The ELROProDoor/window sensor AP55MA11 is designed for use with the ELRO 10-ZONE PRO
ALARM SYSTEM AP5500. The Magnetic sensorconsists of two parts; a Detector and a Magnet. They
are designed to be fitted to doors or windows with the Magnet mounted on the moving/opening part.
Mounting the PRO door/windowsensor:
Decide which doors/windows are to be protected by fitting
Magnetic Contact Sensors, (usually the front and back doors.
Additional sensorsmay also be fitted where required to other
vulnerable doors or windows, (e.g. garage, patio/conservatory
doors etc).Ensure that the position selected for the Magnetic
Contact detector is within effective range of the Control Panel,
(refer to ‘Testing the Control Panel & Remote Control’).
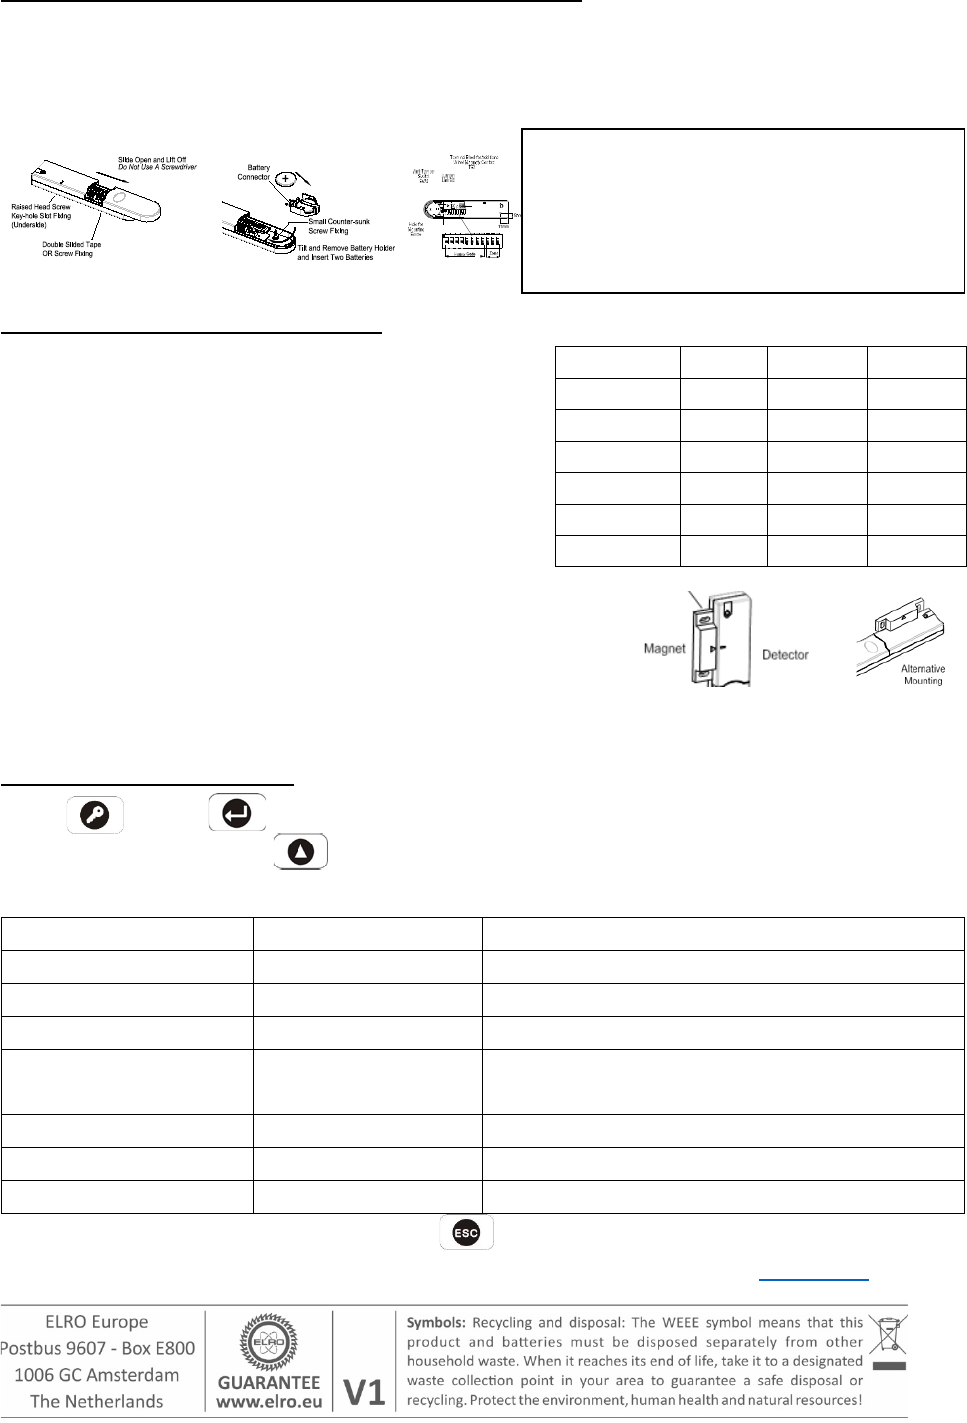
Remove the battery holder, and mount the detector using
either the adhesivetape or screws. Fit the Magnet to the
moving part of the door/window opposite the Detector. Ensure
that theparallel gapbetween the Magnet and Sensoris less
than 10mm and thatthe arrow on the Magnet is pointing to-
wardsand aligned with the mark on.
Programming the Alarm Panel:
Press , ? ? ? ? (???? standard Master Password), display show 1.USER SETUP.
1.USER SETUP. Press ,until in display: 3. ZONE SETTING. No we can choose:
Zone Setup (Z1-10) ; fill in the Zone Number you defined in door/window sensor!
After setting we leave the program modus:pressuntil you see in the display:DISARM READY
For more information about the ELRO 10-ZONE PRO ALARM SYSTEM AP5500 visit www.elro.eu
DIP 9 DIP 10DIP 11
Zone 1OFFOFFOFF
Zone 2OFFOFFON
Zone 3OFFONOFF
Zone 4OFFONON
Zone 5ONOFFOFF
Zone 6ONOFFON
Name
No Name
You can select a room name, or leave ‘no name’
Type
Intruder
Normal sensor will be ‘intruder’.
Final Exit
OFF
‘OFF’
Chime
OFF
‘OFF’
Entry Delay Zone 1
Zone 2-10
ON, 30s
OFF
Depends if you have to pass the
when you leave, or come back!
Part-Arm 1
OFF
Do you want switch this sensor on in PARM1
Part-Arm 2
OFF
Do you want switch this sensor on in PARM2
Walk Through
OFF
‘OFF’
O
E
1 2 3 4
Open the sensor, take out the battery
connector, and place the battery! Check the
house code; same as PIR and Remote Dip 1-
8 from 1-12. Select the Zone you want: setting
Dip 9-11 according the overview below.
Mark
the Zone number on the magnet.
Brauchen Sie Hilfe? Stellen Sie Ihre Frage.
Missbrauch melden von Frage und/oder Antwort
Libble nimmt den Missbrauch seiner Dienste sehr ernst. Wir setzen uns dafür ein, derartige Missbrauchsfälle gemäß den Gesetzen Ihres Heimatlandes zu behandeln. Wenn Sie eine Meldung übermitteln, überprüfen wir Ihre Informationen und ergreifen entsprechende Maßnahmen. Wir melden uns nur dann wieder bei Ihnen, wenn wir weitere Einzelheiten wissen müssen oder weitere Informationen für Sie haben.
Art des Missbrauchs:
Forenregeln
Um zu sinnvolle Fragen zu kommen halten Sie sich bitte an folgende Spielregeln:
Lesen Sie zuerst die Anleitung;
Schauen Sie nach, ob die Frage bereits gestellt wurde;
Stellen Sie die Frage so deutlich wie nur einigermaßen möglich;
Erwähnen Sie was Sie bereits versucht haben um das Problem zu lösen;
Ist Ihr Problem von einem Besucher gelöst dann lassen Sie ihn / sie wissen in diesem Forum;
Falls Sie reagieren möchten, so verwenden Sie bitte das Antworten- Formular;
Da ihre Frage für alle Besucher sichtbar ist, sollten Sie lieber keine persönliche Daten erwähnen.
Neu registrieren
Registrieren auf E - Mails für Elro AP55MA wenn:
neue Frage gestellt werden
neue Handbücher vorhanden sind
Sie erhalten eine E-Mail, um sich für eine oder beide Optionen anzumelden.
Das Handbuch wird per E-Mail gesendet. Überprüfen Sie ihre E-Mail.
Wenn Sie innerhalb von 15 Minuten keine E-Mail mit dem Handbuch erhalten haben, kann es sein, dass Sie eine falsche E-Mail-Adresse eingegeben haben oder dass Ihr ISP eine maximale Größe eingestellt hat, um E-Mails zu erhalten, die kleiner als die Größe des Handbuchs sind.
Ihre Frage wurde zu diesem Forum hinzugefügt
Möchten Sie eine E-Mail erhalten, wenn neue Antworten und Fragen veröffentlicht werden? Geben Sie bitte Ihre Email-Adresse ein.