Inhoud van de Party Bot
De Party Bot Mic
Bot Micro te verbinden met (A) een USB stroo
stopcontact of (B) uw com
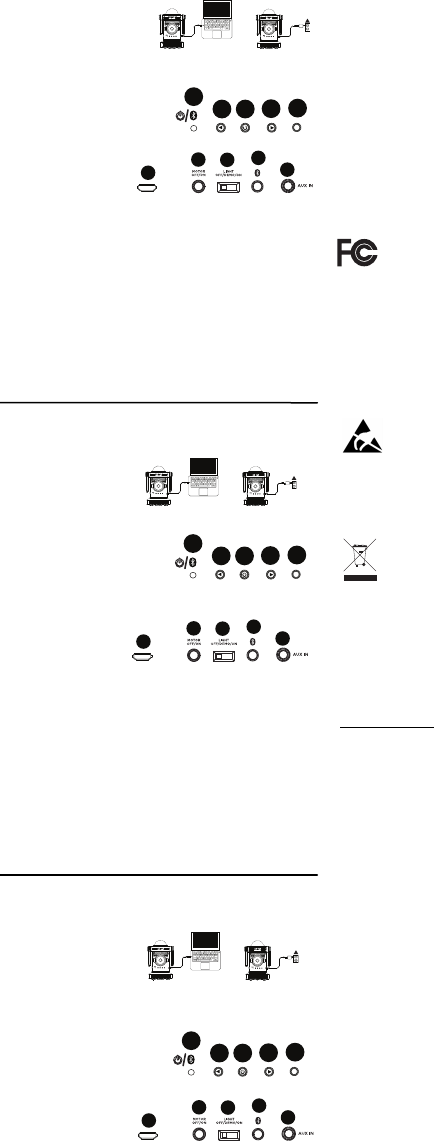
Voorpaneel Besturing:
(1) Bluetooth Koppel Licht (Rood wanneer deze aan staat, blauw wanneer deze is
gekoppeld,
Knippert rood wanneeg
gekoppeld is met een lage batte
(2) Volume -
(3) Stro
(4) Volume +
(5) Oplaad Licht(ro
dez
een
Achter paneel
(6) Micro-USB Laadpoort
(7) Motor Aan/Uit
(8) Licht Uit / Demo / Aan
(9) Bluetooth Ontkoppel (houd deze 2 se
(10) 1/8” (3.5 m
Om te beginnen: (1) Houd de Str
te zetten. (2) Open Bluetooth ins
etc.). (3) Verbind de Part. (4) Speel muziek en pas het volume van de
Party Bot Micro aanVolu en Volume + knoppen. (5) Pas de
Party Light en Motor schakelaar
de beste Party Ligheen donkere ruimte te gebruiken. Wanneer u
de motor eigenschap
supervisie. Party Bot Micro
Party Light Instellingen: Pas deze schakelaar aan om de lichten aan en uit te zetten,
of zet Party Bot Micro in Demo stand. Wanneer dez
indrukken van
• Het apparaat aan zetten (zowe
• Het apparaat uit zetten na 2 minut
Voor de complete h
ionaudio.com/ te bezoe
Innehåll i förpacknin Party Bo
Hur man laddar Party Bot Mic Använd den medföljande mikro-USB-kabeln för att
ansluta(A) en USB-strö
eller (B) din dator (påslagen3 timmar .
Frontpanelen
(1) Parkopplingslampa
den är på, st
blinkar röd när batteriet är
lila när Bluetooth är
men batteriet är svagt)
(2) Volym
(3) Strömbrytare
(4) Volym
(5) Laddningslampa (röd under laddning, stängs av när laddningen är avslutad).
Bakpanelens kontroller
(6) Mikro-USB-laddningsport
(7) Motor På/Av
(8) Lampa
(9) Hur man kopplar ifrån Bluetooth (tryck in i 2 sekunder för att koppla ifrån en
Bluetooth-enhet)
(10) Ingång 1/8” (3,5 mm)
Kom igång: (1Tryck och håll ner knappen Strömbrytare i 2 sekunder för att sätta p
Party Bot Micro. (2) Öppna Bluetooth-inställningarna på din
surfplatta, etc.). (3) AnsParty B. (4Spela musik och justera volymen på
Party Bot Micro med hjälp av Volume - och Volume + . (5) Justera
reglagen för Partybelysni och Motor för att stänga av och på lamp
motorn. Använd den i ett mörkt rum för bäst
golv eller en yta under övervakning
känner inte av bordskanten.
Inställningar för partybelysningJustera detta reglage för att sätta på och stänga
av lamporna, eller ställ in
Strömbrytare då den är i Demo-l
• Sätts enheten p
• Stängs enhe
anslutning
För att läsa hela io.
Laatikon sisältö: Party Bot M
Party Bot Micron lat Kytke P
kaapelilla (A) USB-virtasovittimeen, joka on kytk (B)
tietokoneeseesi (virta pääll ä) 3 tunniksi .
Etupaneelin säät
(1) Bluetooth parituksen valo (punainen valo, kun
virta on päällä, sininen v
vilkkuva punainen va
violetti valo k
mutta paristo
(2) Äänenv
(3) Virta
(4) Äänenv
(5) Latausvalo (punainen kun lataa,
valo
Taustapaneelin
(6) Mikro -USB latau
(7) Moottori päälle/
(8) Valot po
(9) Bluetoothin irtikytkentä (paina 2 sekuntia irroittaaksesi Bluetooth -laitte
(10) 1/8" (3.5 mm) äänen sisäänmeno
Käytön aloittamin2 sekuntia käynnistääksesi Party Bot
Micron. (2) Avaa Bluetooth-asetukset musiikkilaitteessasi (älypuhelin, tabletti, jne.). (3)
Yhdistä Pa. (4) Soita musiikkia ja säädä
äänenvoimakkuutta käyttämällä Äänenvoimak ja Äänenvoimakkuus- -
painikkeita.. (5) Valitse Party L ja Moottori -k
moottor
huoneessa! Kun käytät
valvotuissa olosuhteissa. Party Bot Micro ei tunnista pöydän reunaa.
Party LightValitse tästä kytkimestä laittaaksesi valot päälle/pois päältä,
tai valitaksesi Party Bot Micron
painamisesta aiheutuu seuraavaa:
• Laite kä
• Sammuttaa laitteen 2 minuutin kuluttua, jos Bluetooth-yhteyttä ei ol
Turvallisuus- ja takuio
.
WARNING: To reduce the risk of fire or electrical shock, do
appliance to rain or moisture
in damp environments.
NOTICE CON You are cautioned that change
modifications not expressly ap
void the user's authority to o
This equipment has been tested
digital device, pursuant to part 15 of the FCC rules. These limits are designed to
provide reasonable protection against harmful interference
installation. This equipment generates uses and can radiate radio f
and, if not installed and used in accordance with the instructions, may cau
interference to radio communications. However, there is no
interference will not occur in a particular installation. If this equipment does cause
harmful interference to radio or televi
turning the equipment off and on
interference by one or more o
a. Reorient or relocate the recei
b. Move this unit.
c. Increase the separation between
d. Connect the equipment into an outlet on a circuit different from that to
which the receiver is connected.
e. Be sure that all cables are properly sh
appropriate.
f. Consult the dealer or an experien
ESD / EFT Warning This unit may contain a microcomputer for signal
processin
interference, noise from an exter source, or static electricit
cause it to lock up. In the unlikel
off the unit, wait at
THIS DEVICE COMPLIES WIT
OPERATION IS SUBJECT TO THE FOLLO
(1) THIS DEVICE MAY NOT CAUSE HARMFUL INTERFER
(2) THIS DEVICE MUST ACCEP
INCLUDING INTERFERENCE
OPERATION.
FCC RF Radiation This equipment complies with FCC
radiation exposure lim
follow the specific o
compliance. This transmitter must not be co-locat
any other antenna or transmitter.
RSS Statement fo T
licence-exempt RSS stan
conditions: (1) this device may not cause interference, and (2) this device must
accept any interference, including interference thatcause undesired operation
of the device
In an environment with radio frequency interference, the unit may malfunctio
resume normal operation after re
For best audiovice in a high RF-radiat
Technical Specification
Dimensions(width x depth x height) : 3.7" x 9.4 cm x 8.8 cm x 15.5 cm
Weight: 0.32 kg; 0.71 lbs.
Battery: R
Battery Li (when fully charged): Up to 2 hours with motor, lights, and music.
Up to 11 hours with music only.
Charging TimeApproximately 3 hours
Bluetooth Specification Bluetooth 4.1
Woofer size: 2’’; 50 mm
Output power: 3W Peak
IMPORTANT!
Thanks for buyiIf
your product, we're here to help. Contact us at 401.658.3743 (U.S.) or visit
ionaudio.com/.
Correct DisposalThis marking indicates that this
product should not be disposed w
throughout the EU. To prevent possible harm to the environment or
human health from uncontrolled waste disposal, re
to promote the sustainable reu
used device, please use the return and collection systems or contact
the retailer where the product was purcha
product for environmentally safe recycling.
1
5
2
3
4
CHARGE
6
7
8
9
10
1
5
2
3
4
CHARGE
6
7
8
9
10
1
5
2
3
4
CHARGE
6
7
8
9
10