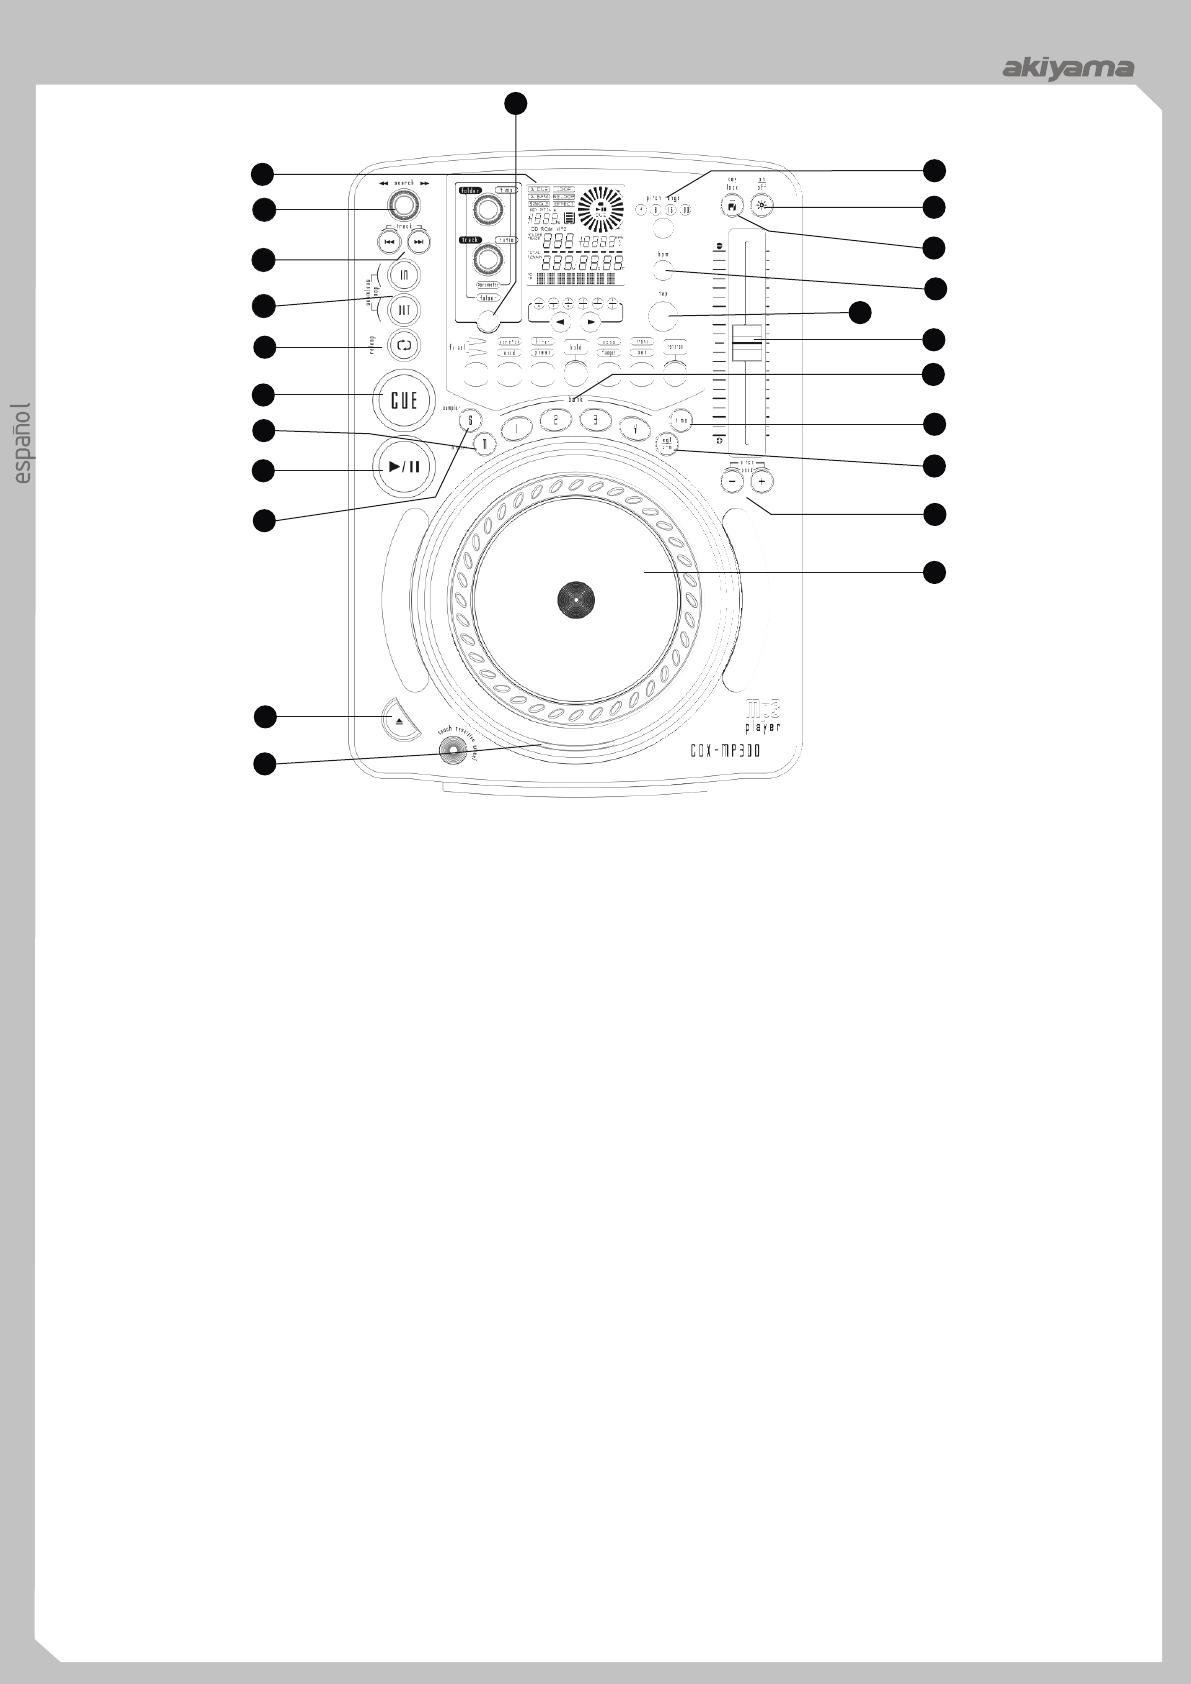
161509
4
Zoom out
Zoom in
Vorherige Seite
1/16
Nächste Seite
123
cdx-mp300
cdx-mp300
cdx-mp300
DESCRIPCION DE MANDOS Y FUNCIONES
1. DISPLAY. Nos permite visualizar los distintos modos de lectura Sampler. Podemos ajustarlo actuando sobre el botón TIME
en el display. PARAMETER o podemos mantener el botón TIME PARAMETER
2. BOTÓN DE BÚSQUEDA. Según el sentido en que giremos el presionado y ajustarlo mediante la rueda JOG. Existen dos formas de
botón nos desplazaremos hacia delante o detrás en la melodía. ajustar el volumen del Sampler, mediante el botón RATIO
Dispone de cuatro velocidades de desplazamiento en cada uno de los PARAMETER o manteniendo dicho botón presionado y ajustando el
sentidos. volumen mediante la rueda.
3. BOTÓN DE PISTA O MELODÍA. Estos botones sirven para Si presionamos el botón SAMPLER una sola vez el Sampler
seleccionar los temas que queramos oír. Forward Skip (siguiente reproducirá contínuamente y se iluminará el LED. Al presionar
canción) & Back Skip (canción anterior). Presionando SAMPLER otra vez reproducirá una sola vez y el LED parpadeará.
continuadamente el lector saltará rápidamente hacia adelante o atrás Presionando SAMPLER una tercera vez cancelamos la función
según el botón sobre el que actuemos. Sampler.
4. BOTÓN “IN”. Nos permite establecer un punto Cue sin 9. BOTÓN MEMMORY. Presione el botón MEMMORY para
interrumpir la reproducción de la música. También seleccionar un seleccionar modo memoria. A continuación presione uno de los
punto de inicio de un Loop. botones 1, 2, 3, 4 de los bancos de memoria para memorizar la
BOTÓN “OUT”. Se utiliza para seleccionar el punto de fin de música desde el punto Cue (desde el momento en que presiona el
Loop. El Loop se establece presionando IN y el punto de fin de Loop botón BANK). El tiempo de música memorizado dependerá de la
presionando OUT. El Loop se reproducirá continuamente hasta que capacidad del banco de memoria (BANK). En modo MEMMORY el
presionemos OUT otra vez. LED se encenderá. También podremos memorizar los parámetros de
5. BOTÓN RELOOP. En el caso de haber editado un Loop y no efectos y la última configuracn de reproducción (Time,
estar reproduciéndolo, al presionar el botón Reloop reactivamos la Single/Continous, selección de Pitch) presionando el botón
reproducción del Loop instantáneamente. Para salir del Loop MEMMORY durante un segundo. Para “llamar/recordar” el banco
presionamos OUT. Cuando la función Reloop esté disponible (BANK) y los parámetros de efectos es necesario activar el modo
aparecerán en el Display las palabras Loop y Reloop. Durante la Memmory antes de insertar el disco en el equipo.
reproducción (PLAY), al presionar RELOOP el lector pasará a 10. BOTÓN EJECT. Eyecta el disco. Para evitar la eyección
reproducir el Loop sin interrupción de la música. accidental durante playback, ésta no se produce a menos que el
6. BOTÓN CUE. Al presionar CUE durante la reproducción
equipo esté en modo Cue o Pause. Otro modo de eyección aún
entramos en Pausa y el lector se posiciona donde establecimos el
estando en modo playback es presionando el botón durante 3
último punto Cue.
segundos, lo que evita errores al eyectar.
ó
11. BOTÓN KEY LOCK. Nos permite seleccionar el modo Key
El LED de Cue se
Lock o el modo Pitch Control. En modo Key Lock nos permite
iluminará cuando el lector está posicionado en el punto Cue.
alterar el valor de PITCH de una pista sin cambiar la percepción de la
7. BOTÓN PLAY/PAUSE. Al presionar el botón cambiamos de
nota original. Cuando el modo Key Lock está activado se iluminará el
modo Play a modo Pause. En modo Skid al presionar el botón se
LED adjunto al botón KEY LOCK.
produce un arranque lento o un frenado. Como si fuera un vinilo.
12. BOTÓN PITCH ON/OFF. Activa/desactiva la función Pitch
8. BOTÓN SAMPLER. Primero presionar SAMPLER y a
ajustable mediante el deslizador PITCH.
continuación seleccionar un banco de memoria BANK. Entramos en
13. +/- 4%, 8%, 16%, 100% BOTÓN DE SELECCIÓN DE
modo Sampler. En modo Sampler la música memorizada se
PITCH. Presione el botón repetidamente para seleccionar los
reproducirá mezclada con la música del CD. El Sampler puede
valores +/- 4%, 8%, 16%, 100%.
funcionar incluso sin disco. Existen dos formas de ajustar el Pitch del
Estando en modo pausa y con el lector situado en el
punto Cue, presionar CUE para obtener una monitorizaci n del Cue
(escucharemos la música desde el punto Cue).
1
2
3
4
5
6
7
8
9
10
11
12
13
14
15
16
17
18
19
20
21
22
23
PANEL FRONTAL
PART NAMES AND FUNCTIONS
DISPLAY
5. ELAPSED, TOTAL REMAIN These indicate that the time
shown on the display is the ELAPSED, TOTAL REMAINING or
single song remaining time.
6. ~ 8.MINUTE, SECOND, FRAME These displays indicate
information on the current track and time
9. TIME BAR shows either time remaining or elapsed depending
on the setting of the TIME button.
10. FOLDER / TRACK Shows the folder / track that unit is playing
with.
11. PITCH Shows the pitch percentage of the song.
12. ANTI SHOCK AND BUFFER INDICATOR The memory
status is represented on the display by a bucket being filled or
emptied. The bucket itself represents the instant start function works
by buffer memory. If the bucket is flashing, the instant start is not
available. Each bar within the bucket represents 2 seconds of anti
shock protection. There is up to 10 seconds of anti shock available.
13. CUE Lit when the unit is at a cue point.
14. PAUSE The PAUSE indicators light during pause or cue mode.
15. PLAY lit while the unit is playing a CD.
16. CD INDICATOR This will indicate that a CD is loaded in the
1. AUTO CUE This will indicate if the Auto Cue is on or off. Press drive.
and hold the SGL/CTN for 1 sec. to turn the Auto Cue function on and 17. MP3 INDICATOR This will indicate that a Mp3 disc is loaded
off. in the drive.
2. SINGLE Shows when the unit is set to play just one track at a 18. CHARACTER DISPLAY This will display the name of the
time. When this is not lit the CD will play continuously through all track and album when a MP3 disc is loaded.
tracks. The function is controlled by the SGL/CTN button. 19. KEY LOCK This will indicate the key Lock function is active.
3. LOOP shows when the CD is repeating a particular area with the 20. AUTO BPM This will indicate that the AUTO BPM counter is
music on the CD. active.
4. RELOOP shows when the CD has had a loop set previously and 21. BPM INDICATOR This meter will display either the BPM’s of
can go back to loop again. the current track.
2
10
3
19
12
1
4
5
6 7 8 9
11
13
14
15
16
17
18
20
21
OPERATIONS
1. Eject Function B. Press the IN button during playback to set the new cue point
Press this button to eject the disc. The disc will not eject unless the (“CUE on the fly”). To return to Cue point press Cue Button. This will
player is in cue or pause, this prevent accidentally ejecting the disc return to point A or B above.
when in play mode. The player has completed the cue or pause operation and is waiting
2. CD Slot In for the play start command. When the PLAY/PAUSE button is
Insert your CD in the CD Slot In. Make sure that you only hold the CD pressed, playback starts.
with 2 fingers on the edge. Avoid touching the inside area of the CD. C. To memory cues.
3. Selecting Tracks 8. Auto Cue
Select desired track by pressing the TRACK SEARCH Buttons once When disk is loaded, the cue point is set to the first source of music.
to move to one higher or lower track or hold the TRACK buttons If track is changed before pressing play, the cue point is changed to
down to change tracks continuously at a higher speed. the new starting point. If you pause during playback this also sets the
When a new track is selected during playback, playback begins as new cue point.
soon as the search operation is completed. 9. Frame Search
4. Starting Playback This is done by first pausing then using the jog wheel to set the
Press the PLAY/PAUSE button during the pause or cue to start starting point. (When you use the jog wheel the monitor function
playback. The PLAY indicator lights when playback starts. allows you to hear what is playing.) Once you reach your desired
5. Stopping Playback starting point, you can set a cue (starting) point by pressing
There are two ways to stop playback. PLAY/PAUSE button.
1) Press the PLAY/PAUSE button during playback to pause at that 10. Scanning (fast forward/fast reverse)
point To turn the search wheel forward or reverse will give you a fast search
2) Press the CUE button during playback to return to the position at through a disc or track. You will scan forward or reverse at 4 different
which playback started (Back Cue). speeds depending on how much you turn the wheel.
6. Pausing 11. Loop Play
Press the PLAY/PAUSE button to switch between play and pause. You can create a seamless loop between two points continuously.
The PAUSE indicator lights when the pause mode is set. a- Press PLAY/PAUSE button so a CD is playing. The PLAY/PAUSE
7. Cueing button’s LED lights (figure 1).
"Cueing" is the action of preparing for playback; when the Cue button
is pressed, playback return to the cue point and enters pause mode.
When the PLAY/PAUSE button is pressed during the cue mode,
playback starts.
Cue point setting:
A. Playback starts from pause (using the jog wheel to set the start
point) or skips to a new track during play or pause. The beginning
play point will be set to the cue point. Or
Fig.1
CUE
english
4

Brauchen Sie Hilfe? Stellen Sie Ihre Frage.

Forenregeln

Missbrauch melden von Frage und/oder Antwort

Libble nimmt den Missbrauch seiner Dienste sehr ernst. Wir setzen uns dafür ein, derartige Missbrauchsfälle gemäß den Gesetzen Ihres Heimatlandes zu behandeln. Wenn Sie eine Meldung übermitteln, überprüfen wir Ihre Informationen und ergreifen entsprechende Maßnahmen. Wir melden uns nur dann wieder bei Ihnen, wenn wir weitere Einzelheiten wissen müssen oder weitere Informationen für Sie haben.

Art des Missbrauchs:

Zum Beispiel antisemitische Inhalte, rassistische Inhalte oder Material, das zu einer Gewalttat führen könnte.

Beispielsweise eine Kreditkartennummer, persönliche Identifikationsnummer oder unveröffentlichte Privatadresse. Beachten Sie, dass E-Mail-Adressen und der vollständige Name nicht als private Informationen angesehen werden.

Forenregeln

Um zu sinnvolle Fragen zu kommen halten Sie sich bitte an folgende Spielregeln:

Neu registrieren

Registrieren auf E - Mails für Akiyama cdx300 wenn:


Sie erhalten eine E-Mail, um sich für eine oder beide Optionen anzumelden.


Das Handbuch wird per E-Mail gesendet. Überprüfen Sie ihre E-Mail.

Wenn Sie innerhalb von 15 Minuten keine E-Mail mit dem Handbuch erhalten haben, kann es sein, dass Sie eine falsche E-Mail-Adresse eingegeben haben oder dass Ihr ISP eine maximale Größe eingestellt hat, um E-Mails zu erhalten, die kleiner als die Größe des Handbuchs sind.

Ihre Frage wurde zu diesem Forum hinzugefügt

Möchten Sie eine E-Mail erhalten, wenn neue Antworten und Fragen veröffentlicht werden? Geben Sie bitte Ihre Email-Adresse ein.


Info