USER MANUAL
CLOCK WITH OUTDOOR SENSOR
-1- -2-
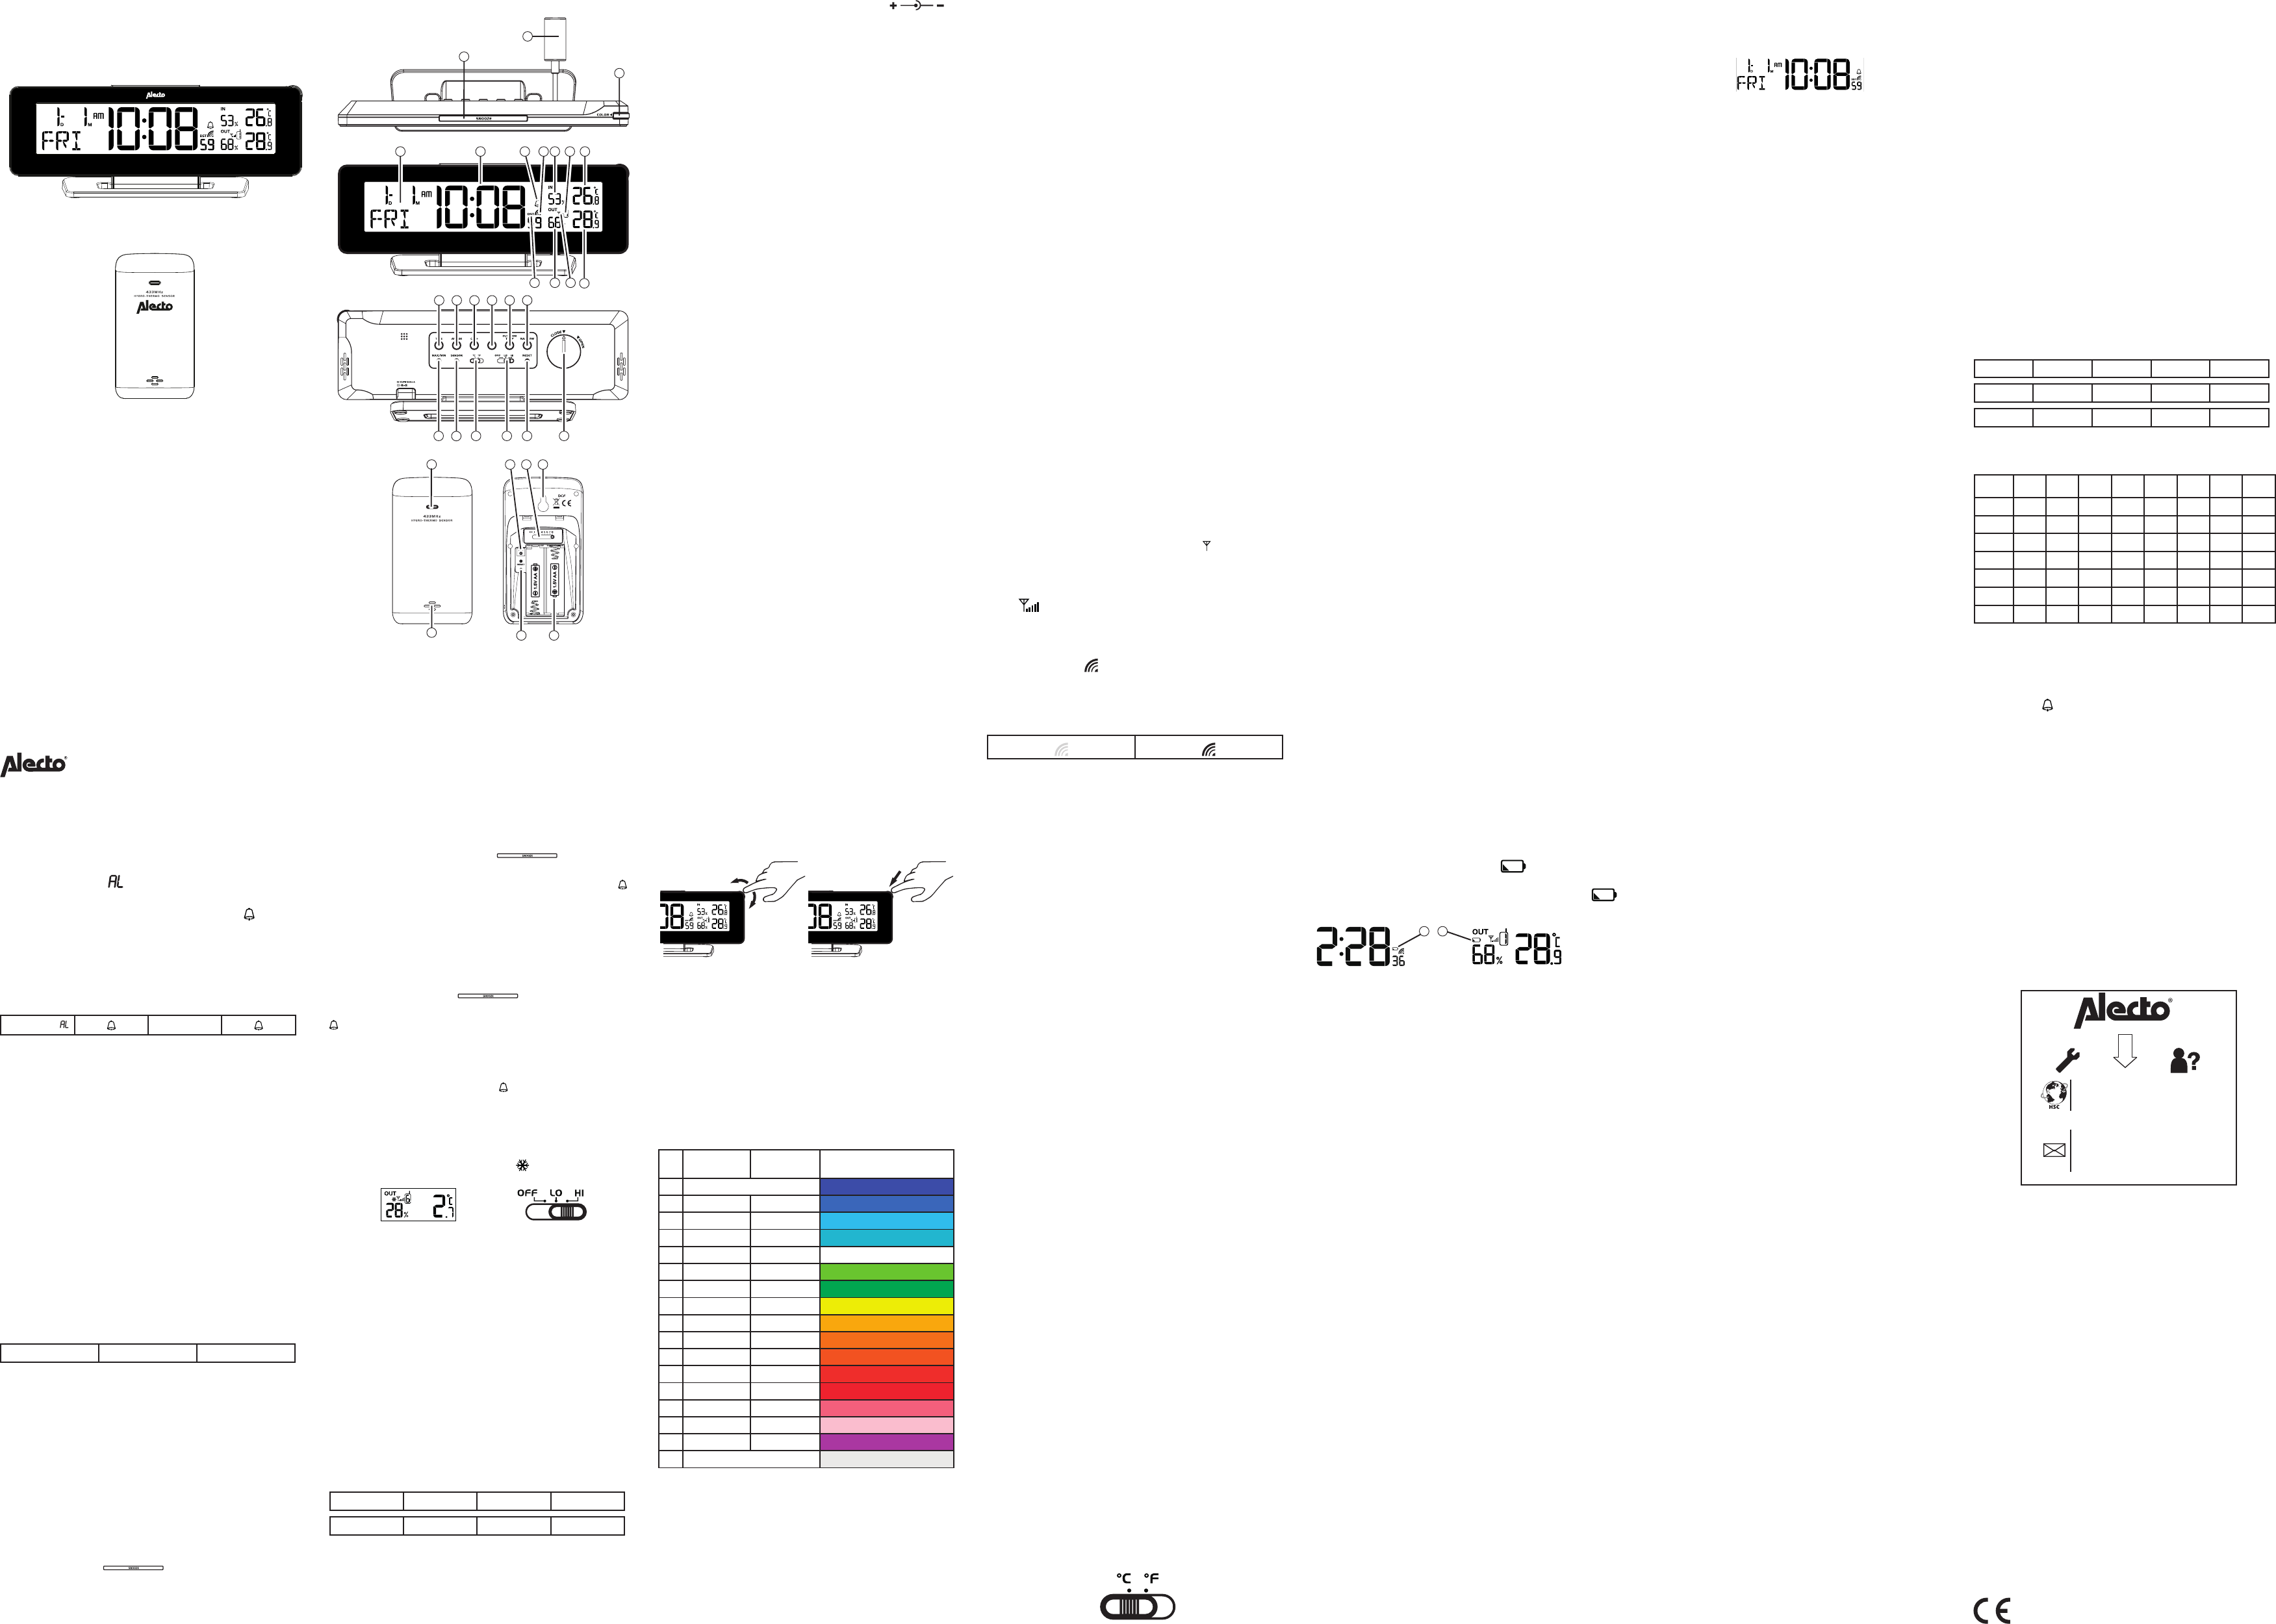
OVERVIEW
1
2
3
4 5 6 7 8
109
11
12
16 17 18 19 20
26
22
21
27 28 29 30
33
31
-3-
1. snooze button
2. power adaptor input 5V 500mA
3. rotary/push-button for colour adjustment
4. date and day display
5. time display
6. icon indicating that the alarm clock is acti-
vated
7. icon indicating DCF-77 reception
8. indoor humidity display
9. outdoor sensor channel number display
10.
11.
12.
13.
14.
indication
15.
16.
operation
17.
18.
19.
20. “RAINBOW” button
21.
mum and minimum temperature and hu-
midity values
22. “SENSOR button
23. “°C/°F” selector
24.
25.
26.
27.
28.
DCF-77 signal
29.
30.
31.
32.
sensor
33.
(2 x 1.5V AA)
-4-
INSTALLATION
Outdoor sensor:
Slide down the battery cover to open it. Use
the slider to set the outdoor sensor to the
desired channel (CH 1-2-3-4-5-6-7-8). Insert
2 alkaline batteries type 2 x 1.5V AA, LR6 into
the battery compartment of the outdoor sensor
in the correct way
battery cover
After installing the batteries, you can no longer
adjust the channel. This can only be done by
changing the channel setup using the slider
and then restarting the outdoor sensor by
brieyremovingthebatteriesandreplacing
them or by pressing the reset button.
Every time the outdoor sensor is switched on
(for example after replacing the batteries) or
after pressing the reset button, the outdoor
sensor must be reconnected to the clock.
Use the “CH/+ ” button (on the back of the
clock) to select the correct channel of the
outdoor sensorSENSOR ” button
to start reception. Select the same channel
on the outdoor sensor
registered or press the “RCC ” key in the
battery compartment of the outdoor sensor
Clock:
Connect the supplied mains adaptor to the
clock and then insert the mains adaptor into
a 230V wall socket. After this connection the
clock will start-up
Press the reset button to synchronize the clock
with the outdoor sensor and the DCF time
signal. The outdoor sensor icon “ ”
nowstartsashingwhiletheclockis
automatically searching for the outdoor sensor
As soon as the outdoor sensor has been found,
the “ ” icon appears in the display
outdoor sensor will now start receiving the
DCF time signal. When the outdoor sensor has
found this signal, the time is transmitted to the
clock and the “ ” icon and DCF-77 time will
appear in the display
The DCF-77 reception icon indicates whether
the DCF-77 signal is synchronised.
-5-
Each day the clock automatically searches for
the DCF-77 signal to attempt to synchronize
the clock. This occurs at 2am, 8am, 2pm and
8pm. The reception is strongest at night at
2am. Don’t place the outdoor sensor near a TV
computer
Notes:
DCF stands for the reception from Frankfurt
(DCF-77)
DST stands for “Daylight Saving Time” or
summertime
DST is indicated together with the DCF-77-
time.
Remark:
The clock may also be used without the
outdoor sensor
the value “--”
The measurement cycle of the outdoor sensor
is 60-64 seconds.
DISPLAYS
General:
The actual time, date and day
and humidity are displayed correctly after both
the clock and the outdoor sensor have been
switched on for sever
been moved.
CLOCK SETUP AND OPERATION
Time and date:
The outdoor sensor contains a built-in DCF-
77 receiver
the DCF time signal from Frankfurt. This
signal ensures that the clock displays a
very accur
reception is successful. The DCF 77 receiver
is located inside the outdoor sensor
take sever
shown in the display of the clock. In case of
a poor reception, you may mo
sensor to improve the reception of the DCF-
77 signal. Press the “RCC” button in the
battery compartment of the outdoor sensor to
manually start the reception.
-6-
Manual setup:
Y
soon as the DCF-77 time signal is received, it’
automatically transmitted to the clock.
In time display mode, press and hold the
“TIME ” button for 2 seconds. The hour
displaystartsashingwiththechoice:
12 hours display or 24 hours display
Use the “+ ” and “- ” buttons to make y
choice.
Press the “TIME”buttontoconrmandto
continue to the hour setup.
Use the “+ ” and “- ” buttons to set the hour
display
Press the “TIME”buttontoconrmandto
continue to the minute setup.
Use the “+ ” and “- ” buttons to set the minute
display
Press the “TIME”buttontoconrmandto
continue to the second setup.
By using the “+ ” and “- ” buttons the seconds
are reset to 00.
Press the “TIME”buttontoconrmandto
continue to the year setup.
Use the “+ ” and “- ” buttons to set the correct
year
Press the “TIME”buttontoconrmandto
continuetodisplayorder;month-dayorda
month.
Use the “+ ” and “- ” buttons to switch between
these options.
Press the “TIME”buttontoconrmandto
continue to the month setup.
Use the “+ ” and “- ” buttons to set the correct
month.
Press the “TIME”buttontoconrmandto
continue to the day setup.
Use the “+ ” and “- ” buttons to set the correct
d
Press the “TIME”buttontoconrmandto
continue to the time zone setup.
Use the “+ ” and “- ” buttons to set the correct
time zone.
Press the “TIME”buttontoconrmandto
continue to the language setup.
Use the “+ ” and “- ” buttons to set the desired
language for the day display: EN (English), FR
(French), DE (German), ES
-7-
(Spanish), IT (Italian), NL (Dutch), RU
(Russian).
Press the “TIME”buttontoconrmandto
continue to the RCC setup.
Use the “+ ” and “- ” buttons to enable or
disable the DCF-77 reception.
Press the “TIME”buttontoconrmandto
continue to the DST (Day Saving Time) or
summertime setup.
Use the “+ ” and “- ” buttons to switch between
“auto”(automatic)oro.
When this option is disabled, you’ll hav
manually set the clock to the correct hour
when the daylight saving time starts or ends.
This may be done to adjust the hours or the
time zone. When the time synchronized with
the DCF signal is displayed incorrectly
means you’ve selected the wrong time z
Press the “TIME”buttontoconrmyour
settings or wait for 60 seconds without
pressing any button.
Clock settings overview
the “TIME ” button:
12/24 Hr hours minutes seconds DM-MD
month day time zone language RCC on/off
DST auto/off
language: T
displaying the days.
Language
Country
Code
Sunday Monday T
Wednes-
day
Thurs-
day
Friday
Satur-
day
English
EN
SUN MON TUE WED THU FRI S
Français
FR
DIM LUN MAR MER JEU VEN SA
Deutsche
DE
SON MON DIE MIT DON FRE SAM
Español
ES
DOM LUN MAR MIE JUE VIE SAB
Italiano
IT
DOM LUN MAR MER GIO VEN SAB
Nederlands
NL
ZON MAA DIN WON DON VRI Z
Pусский
RU
BC ПH BT CP ЧT ПT CБ
Alarm clock and snooze setup:
The clock is provided with a wak
that allows you to set 1 wak
The alarm clock is activated when the alarm
clock icon appears in the display
clockfunctionwillstartashingwhilethe
snooze function is enabled. Every 5 minutes an
alarm signal will sound.
-8-
To set the wake-up time:
• Press the “ALARM ” button to open the
alarm clock settings. Instead of the
seconds, the “ ” icon now appears. Press
the “ALARM ” button again to activate the
alarm clock. The alarm clock icon ( ) now
appears. Press again to disable the alarm
clock.
Overview of activ
up time. RALARM ”
button.
wake-up time
( )
( )
( )
After ± 2 seconds the clock automatically
returns to the clock display
• Press and hold the “ALARM ” button for
2 seconds to open the hour setup for the
wake-up time.
• Use the “+ ” and “- ” buttons to set the hours
for the wake-up time.
• Press the “ALARM”buttontoconrmyour
setting and to continue to the minute setup
for the wake-up time.
• Use the “+ ” and “- ” buttons to set the
minutes for the wake-up time.
• Press the “ALARM”buttontoconrmyour
setting.
Overview of the wak
and hold the “ALARM ” button for 2 seconds
and then repeatedly press the “ALARM ”
button.
wake-up time hours wake-up time minutes actual time
To disable the alarm signal:
As soon as the wake-up time is reached, the
clock will emit an alarm signal.
Fortherst4seconds,therh
alarm signal is slow
In between 4 and 8 seconds, the rhythm of the
alarm signal increases. From 8 to 12 seconds
the rhythm of the alarm signal is even
faster and after 12 seconds it’
The wake-up signal continues for up to 120
seconds.
Within the 120 seconds, press and hold the
snooze button “ ” for 2 seconds to
switchothealarmclockbeforehand.
After 24 hours the alarm signal, connected to
the set wake-up time, will sound again.
-9-
Snooze function:
Press the snooze button “ ” on top
of the clock to stop the alarm signal and to
enable the snooze mode. The wak
nowstartsashing.Afterenablingthesnooze
mode, the alarm signal will sound again after 5
minutes.
To stop the alarm signal:
When the alarm signal sounds, press and hold
the snooze button “ ” for 2 seconds,
the alarm signal stops and the wake-up icon
willnotbeashing.Thealarmclockisnow
stopped and the alarm signal will sound again
after 24 hours. R
time” to completely disable the alarm clock by
making the wake-up icon disappear from the
display
Low temperature alert
When the outdoor temperature decreases to
3°C or lower ) appears.
Display colour:
Y
the rear of the clock. Use the “OFF/LO/HI” se-
lector to set the desired display intensity
To change the display colour:
Y
indierentways.Chooseoneofthex
colours, the automatic colour change or
a colour that depends on the outdoor
temperature.
Fixed colour:
Press the “RAINBOW ” button. The current
colour will change. Press repeatedly for the
following colours:
WHITE RED ORANGE YELLOW
GREEN CY BLUE PURPLE
When the desired colour appears, stop
repeatedly pressing the “RAINBOW ” button
and the display colour will remain visible.
-10-
To adjust the colour using the rotary
wheel:
Ontherightsideoftheclockyou’llnda
rotary wheel. R
256 colours. Press the rotary wheel to have
the colours change automatically
to disable this function.
Outdoor temperature based colour:
Press the “OUTDOOR TEMP ” button. The
display will turn to a colour at a certain
temperature.
The diagram below shows at which
temperature which colour is displa
starting
temperature
end
temperature
COLOUR
1 ≤ -20°C
2 -19 -11,0°C
3 -10 -5,
4 -4,9°C -2,
5 -1,9°C 1
6 1 4,
7 4 8,0
8 8, 1
9 12, 16,
10 1 20,0
11 2 24,
12 2 28,
13 28, 32,0°C
14 32, 36,
15 3 4
16 4 45
17 ≥ 45
Remark:
When the display shows the OUTDOOR TEMP
function, the display turns blue while searching
for the outdoor sensor
sensor has been found, the colour based on
the outdoor temperature is displa
-11-
To check and/or erase the maximum and
minimum values measured:
To check the Maximum and Minimum
values:
• Press the “MAX/MIN ” button once. The
maximum outdoor temperature v
measured is shown in the display together
with the time and date. The word “MAX.
appears at the temperature to indicate this.
• Repeatedly press the “MAX/MIN” button for
the following values:
• max. outdoor temperature
• min. outdoor temperature
• max. outdoor humidity
• min. outdoor humidity
• max. indoor temperature
• min. indoor temperature
• max. indoor humidity
• min. indoor humidity
• actual time
To erase the Maximum and Minimum
values:
• Press the “MAX/MIN ” button once. The
maximum measured outside temperature
is displayed. RMAX/
MIN” key until the data you w
is displayed.
• max. outside temperature
• min. outside temperature
• max. humidity outside
• min humidity outside
• max. indoor temperature
• min. indoor temperature
• max. humidity inside
• min. humidity inside
• Press the “MAX/MIN ” button for at least 2
seconds to delete the selected data. As an
indication, beep tone can be heard and the
display shows stripes.
Temperature notation:
The temperature ma
or °F
• slide the “°C/°F“ button to °C to express the
temperature displa
• slide the “°C/°F” button to °F to express the
temperature displa
-12-
Low battery indication:
When the backup battery of the clock is nearly
exhausted, the battery icon (1) appears in
the display
sensor are nearly empty
(2) appears.
1 2
In this case, please replace the battery or
batteries. In most cases it’ll take sever
before the clock recognises the outdoor sensor
again and starts showing the measurement
data. Please repeat the installation procedure
if the connection between the outdoor sensor
and clock fails.
Multiple outdoor sensors:
By default 1 outdoor sensor is supplied and
inside the battery compartment the set
channel number is selected. Each outdoor
sensor (maximum of 8) must be set to a
unique channel number
fortherstoutdoorsensor
second outdoor sensor
sensors may be ordered via the service
department of Hesdo. When using multiple
outdoor sensors, you may switch the clock
displaybetweenthedierentsensorsby
pressing the “CH/+ ” button.
POSITIONING TIPS
• Don’t place the clock in direct sunlight and
remove an
radiate heat (lamps, heaters, etc.).
• Make sure to place the outdoor sensor on a
spot sheltered from direct rain drops.
• For a proper reception of the r
time signals, never place the outdoor sensor
near large metal surfaces or heavy electrical
equipment such as a refrigerator or w
machine (some experimenting might be
required).
• Depending on local circumstances, the
eectiver
andclockmightvary
the outdoor sensor
connection between the outdoor sensor and
clock remains. If so, mount the outdoor
sensor
• The distance between the clock and the
outdoor sensor should be no more than
30 meters.
-13-
SPECIFICATIONS
Clock:
indoor temperature
measurement range: -5°C ~ 50°C
resolution: 0.1°C
humidity measurement range: 1% ~ 99%
resolution: 1%
alarm duration: 120 seconds
clock synchronisation signal: DCF-77 Fr
power (YL mains adaptor
5VDC,
500mA
backup battery: CR
dimensions: 230 x 87 x 49mm
Outdoor sensor:
outdoor temperature
measurement range: -40°C ~ 60°C
resolution: 0.1°C
humidity measurement range: 1% ~ 99%
transmitting unit
measurement interval: 60-65 seconds
power supply: battery 2 x 1.5V
size AA LR6, alkaline
transmission frequency: 433MHz
range: ± 30 meter
dimensions: 61 x 114 x 39.5mm
RESET/SYSTEM ERROR
In case you’ve lost the o
or the clock is exhibiting a possible error
may be wise to reset the clock and outdoor
sensor
If you still hav
contact the customer service of Hesdo via
www
DECLARATION OF CONFORMITY
This product is in accordance with the essential
conditions and provisions as stipulated in
the European directive 2014/53/EU. This
declaration is a
com/WS-2500-DOC.pdf
Frequency: 433.92 MHz
Maximum power : < 0 dBm
-14-
V1.2
Service Help
WWW
SERVICE@ALECT
Hesdo, Australiëlaan
5232 BB, ‘s-Hertogenbosch
The Netherlands
WWW
SERVICE@ALECT
Hesdo,
‘s-Hertogenbosch,
The Netherlands
v3.0