INTRODUCTION
M50 is Amplicomms’
handsfree base. Its many features include:
1 (Simple and light Android)
2 - T
3 - SOS button
4 - Base: desk top easy-charging base and Bluetooth handsfree device
A- SMARTPHONE DESCRIPTION
1 - T
Power ON/OFF ( Long press )
2 - V
3 - V
4 - Front camera
5 - Receiver
6 - T
7 - T
8 - Home key
9 - Back key
B- BASE DESCRIPTION
P
1. M50 smartphone
2. Base
3. Power adaptor with USB cable
4. Instructions manual
GET ST
Insert the SIM card (required) and the memory card (optional)
- With the SIM card golden contacts facing down, insert the SIM card into one
of the available slots until it stops as illustrated
- T
card (maximum capacity of 64 GB / not included). Insert the memory card into
the slot until it stops as illustrated
Note: Both card slots (SIM1=Micro, SIM2=Micro) support L
used, a SIM card adaptor is required ( provided by operator )
A
•
Small children can swallow them
•
electrical charges
•
Insert the battery
- Insert the battery into battery compartment with golden contacts of the
battery pointing to the top right of the phone
- Press lightly on the bottom end of the battery until it snaps into place
Replace the battery cover
Replace and secure the battery cover until it clicks into place
5. Battery
6. Battery cover
7. Earphones
8. Lanyard
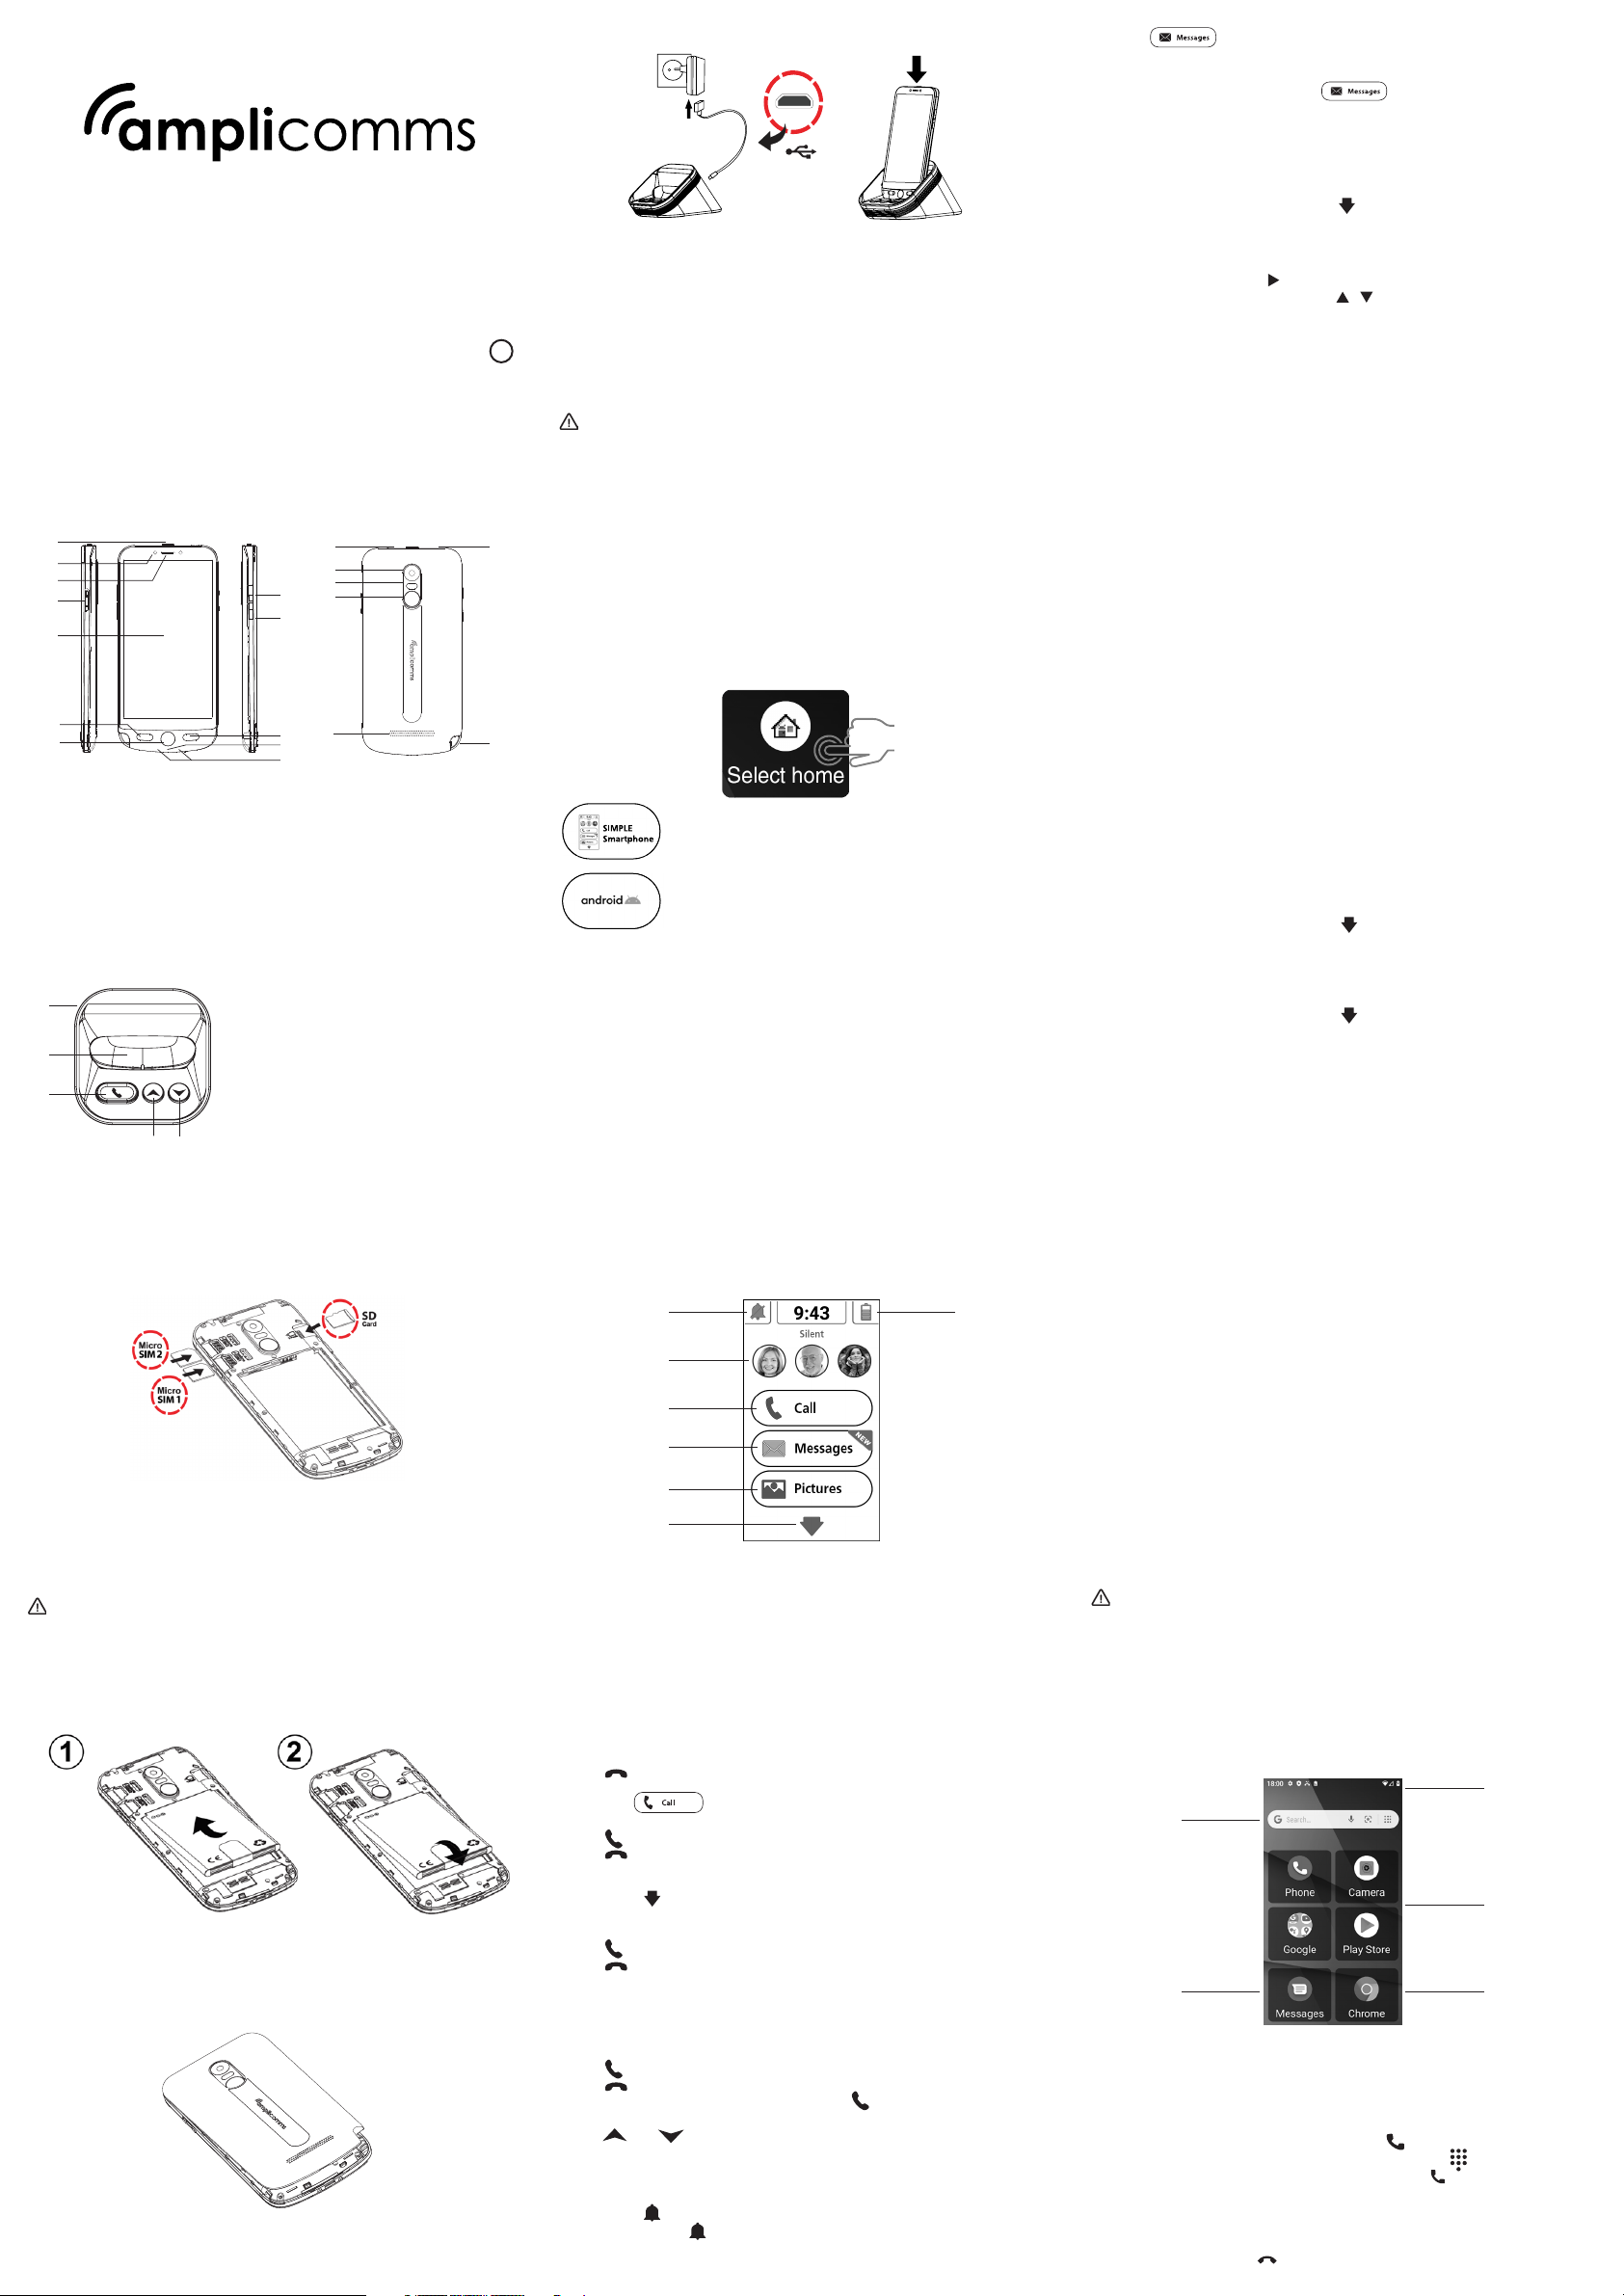
Charging your phone / using the base speaker
- Place the base on a flat surface. Plug provided USB cable to the base and to a
wall mains socket.
- T
also be charged as a regular smartphone by plugging the USB cable directly
on the USB connector (Figure A, 12)
- When placed on the cradle, your phone will connect with the base via
Bluetooth. Y
loudspeaker
(**A valid Bluetooth pairing between M50 and base is required; your system
has been paired at the factory
SMART BASE”)
A
•
with this model. Connecting other accessories may be dangerous and may
invalidate the warranty
Getting started guide
**Please read this “Getting Started guide” CAREFULL
Amplicomms M50.
**Google account is required for your phone to receive software updates. Please sign
in during phone set up or later
1. Long press ON/OFF button ( 1 in the figure A ) to power up the phone
2. The display will be lighted up
3. Enter the SIM PIN code (Optional : Service provider dependent)
4. Select the desired language
5. Follow the setup wizard steps on the screen
6. When completed, swipe with your finger on the touch screen and press Select Home
Simple Smartphone mode offers an extremely easy to use
interface, specifically designed for senior users. Check next
chapter to learn about phone operation in this mode.
Light Android mode presents the user with a simplified
version of a regular smartphone. If you chose this mode,
please read “USING YOUR M50 IN LIGHT ANDROID MODE”.
USING M50 IN SIMPLE SMARTPHONE MODE
When Simple smartphone mode is selected, your M50 will look simpler and easier
to use than a regular smartphone.
Setup Wizard
The first time you select Simple Smartphone mode, you will have the choice to
be guided along the most relevant settings by a Setup Wizard. These are:
a. Click Duration (sets click duration for alphanumeric keyboard and other keys**)
b. Wifi setup (if Wifi internet access is available)
c. Google Account
d. Copy Contacts
e. New Contacts
f. SOS and Support
g. Speed Dial
h. Favorite Contacts
i. WhatsApp
j. Advanced Settings
k. Exit Setup
Once you “Exit Setup”, the wizard is always available under Settings.
** Note all touch-screen clicks are by default long click when using Simple Smartphone
mode. A valid key press should have a confirmation vibration.
Click duration can be changed anytime through the wizard or in Advanced Settings.
Home Screen
1 - Silent / Vibrate only / Normal mode
2 - One T
3 - Calls Center
4 - Message Center - SMS, missed calls, WhatsApp, etc.
5 - Pictures Center - View photos and videos, use the camera
6 - Other functions such as Whatsapp, phonebook, applications, settings, etc
7 - Battery level
T
- Long press ON/OFF button (1 in the figure A)
- The display will be lighted up. (TPower Of > T)
Call from the 3 One-T
- Press one of the 3 One-T
- Press to end the call
Make a call
- Press Call > Dial number > Enter the number 0......9 (Press Del to delete)
- Press to dial
- Press to end the call
Call from phonebook
- Press Call > to search and select the number OR
- Press Call > Search > enter the 1st character of the contact > Search > select
the number
- Press to dial
- Press to end the call
Call Log
- Press Call > Call Log or Phonebook > Call Log to view the call log
- T
Receive a call
- Press to answer
- Press to end the call
- When the phone is on the base, you can use button to answer and end the
call in handsfree mode. Y
with and keys.
Adjust the earpiece loudness
- During a call, press V
Ringer mode
- In idle mode, press > select the ringer mode between Sound / Silent / Vibrate
Message
- All types of messages (SMS, WhatsApp, missed call, etc...) are consolidated in
Message
- When there is a new message, the button will be highlighted with
a new indication
- T
Read old message......
Write new message
- Message > W
- Input the sending number by Dial number > Next OR
- Select from existing phonebook with
- Input from Keyboard > Send OR
- Select the pre-defined simple message by Next
Pictures
- Pictur > View Pictures > move to the next......
(Press All images to see all pictures > / to scroll throught them)
Camera
- Pictur > T > Camera > Capture to take photo or Record to take video
- Remeber to Save or Save and Send the photo......
Phone Book
Options in this menu:
1. View
2. Edit
3. New Contact
4. Call Log
ADD New contact
- Phone Book > New Contact (or Settings > Contacts > New )
- Name > input the name > Next
- Number > input the number > Next ......
- Save
- Y
Press Y
EDIT Contact
- Phone Book > Edit (or Settings > Contact > Update )
- Select a contact for editing
- Name > Edit the name > Next
- Number > Edit the number > Next......
- Save (TSettings > Contacts > Photo )
Settings
- Settings > ......
- Under the Settings menu, the following options can also be accessed:
1. Contacts
2. Speed Dial
3. Language
4. Advanced Settings
5. Setup Wizard
6. Premium Service
Edit the 3 One-T
- Settings > Speed Dial
- Select the empty button
- Choose the number from contact list ( to next page)
- Add contact to list (Add speed dial photo...... Go to Settings > Contacts > Photo )
Add new contact to Favorite contacts in CALL button
- Settings > Contacts > Favorite
- Select the empty button
- Choose the number from contact list ( to next page)
- Add contact to list (Favorite contacts can be selected by pressing Call )
Click duration
Long press duration for menu buttons and text keyboard can be adjusted to be
faster or slower: Settings > Setup Wizard > Click Duration
Advanced Settings
- Settings > Advanced Settings
- Under the Advanced Settings menu, the following options can also be accessed:
1. Initial setting
2. Contacts
3. Personal Info
4. SOS and Support
5. Android settings
- Ringer melody and V
- Wifi
6. Medication Reminder
7. Display & Sound settings
8. .....
T
- While pressing the numeric buttons, M50 will announce the corresponding
number (except when in silent mode)
(TAdvanced Settings menu > Display & Sound
Settings > Sound Settings ......)
SOS Assistance button
- Long press SOS button (Fig. A, 17) for 3 seconds to dial out assistance numbers
- M50 will enter handsfree mode automatically
- In parallel, an SMS with geolocation information will be sent to the recipient of this
assistance call and up to other 5 recipients. (T
Set SOS number
Make sure the desired phone number exists in the phonebook.
- Settings > Advanced Settings > SOS and Support > SOS number > Select the
numbers...... Save
- An SMS will be sent to the selected numbers to inform them
A
•
•
•
T
T
located on the left-hand side of the phone.
USING YOUR M50 IN LIGHT ANDROID MODE
When light Android mode is selected, your M50 will show a simplified smartphone
interface, with large icons and easy-to-navigate pages.
1 - Google search
2 - Messages
3 - Chrome
4 - Apps area, swipe right/left for more pages
5 - Notification area, drag down to see more details or open configuration
Make a call
• Phone icon on the applications menu
•
•
•
(See Contacts section to dial phonebook entries)
•
get the keypad to dial an extension or add another call
•
1 7
2
3
4
5
6
1
23
5
4
10 - T
11 - Charging contacts
12 - USB connector
13 - Flashlight LED
14 - Headset jack
15 - Main camera
16 - Flash
17 - SOS button
18 - Speaker
19 - Lanyard hole
1
10 2
3
9
12
11
4
7
5
6
8
13
15
16
17
18 19
14
1 - Charging cradle and contacts
2 - Phone button (answer incoming call
when smartphone on the base)
3 - V
4 - V
5 - Usb connector (at the back)
5
2
3 4
1
Instructions Manual
M50
1