Delta R Wireless
Cyclocomputer
INTRODUCTION
Thank you for purchasing an Ascent Wireless computer.
Packed with all the features that a professional rider needs to
keep track of a workout, the Delta R is a perfect training tool
for any cyclist. The added convenience of wireless transmis-
sion makes installation simple.
BATTERY INSTALLATION
To simplify installation, the Delta R computer and transmitter
are shipped with batteries installed. Replacement batteries are
available at most camera and electronic shops. Under normal
usage batteries should last approximately one year. Note:
Most problems that occur with cyclocomputers are caused by
dead or weak batteries. If you are having problems with your
computer’s operation, check and replace the batteries first.
COMPUTER/RECEIVER
The Delta R computer uses a common 3V CR2032 button cell
battery. See Figure 1.
STEP 1:
To install or replace the battery, remove the battery
cover from the bottom of the computer using a small coin.
Remove the old battery and dispose of properly.
STEP 2:
Install the new battery with the positive (+) pole fac-
ing the battery cover. Be careful when installing the battery not
to damage the battery contact.
STEP 3:
Reinstall the battery cover and tighten firmly, mak-
ing sure the rubber O-ring does not get pinched or distorted,
as this will compromise the unit’s watertight seal.
Note: During a battery change programmed settings and
odometer mileage will be erased. Make
note of your current wheel size setting
and cumulative odometer mileage
before replacing the battery so you can
reprogram these values after the bat-
tery change (see “Programming Wheel
Size” and “Setting the Odometer”).
STEP 4:
If for some reason the screen is blank or shows an
irregular display after a battery change, remove the battery
and install again. This will reset the computer’s microproces-
sor.
TRANSMITTER
The Delta R transmitter uses a 12V VR22 / L1028 / A23 bat-
tery.
STEP 1:
To install or replace the battery, remove the battery
cover from the top of the transmitter case using a small coin.
Remove the old battery and dispose of properly.
STEP 2:
Install a new battery with the positive (+) pole facing
the cover. Reinstall the battery cover and tighten firmly, mak-
ing sure that the rubber O-ring does not get pinched or dis-
torted, as this will compromise the unit’s watertight seal.
COMPUTER FUNCTIONS
CURRENT SPEED
Displays current speed up to 99.9 M/hr or KM/hr. Accurate to
0.1M/hr or KM/hr. Always displayed on top line.
SPEED BAR
Illuminated LCD segments on the screen align
with speed scale on computer bezel to indicate
current speed.
SPEED COMPARISON (+/-)
Compares current speed to average speed. As you ride, a (+)
or (-) will appear to the right of current speed to indicate
whether your current speed is above (+) or below (-) your
average speed. This function is automatic, requires no pro-
gramming and cannot be disabled.
CLOCK
Displays time of day in 12 hour or 24 hour format.
ODOMETER (ODO)
Displays cumulative ride distance, up to 9,999.9
miles or kilometers.
TRIP DISTANCE (DST)
Displays distance traveled during current ride
up to 999.99 miles or kilometers.
MAXIMUM SPEED (MXS)
Displays fastest speed attained during a ride, up
to 99.9 M/hr or KM/hr. Accurate to 0.1 M/hr or
KM/hr.
AVERAGE SPEED (AVS)
Displays average speed up to 99.9 M/hr or
KM/hr. Accurate to 0.1 M/hr or KM/hr.
Calculated using ride time (TM) and trip dis-
tance (DST).
AUTOMATIC RIDE TIMER
(TM)
Auto start/stop timer records actual ride time
up to 9:59:59. Activated by front wheel move-
ment.
CAL
Calculates calories burned (up to 1000 calories)
during a ride.
FAT
Calculates grams of fat burned (up to 1000
grams) during a ride.
SCAN
Allows hands free viewing of display screens.
When activated, the scan feature scrolls
through all display screens (except ODO and
CLOCK) on a continuous loop, displaying the
screens for four seconds each. To enter scan
mode, press the RIGHT button until “SCAN” appears in the
upper left corner of the display. Press the RIGHT button again
to exit scan mode.
MAINTENANCE INTERVAL REMINDER
A reminder to perform periodic maintenance at programmed
distance intervals. At the appointed distance intervals a
wrench icon will flash in the display screen. When the icon
appears, press the LEFT button to turn it off until the next
maintenance interval is due.
AUTO SLEEP
To prolong battery life, the Delta R will automatically enter
“sleep” mode after 5 minutes of non-use. The computer will
automatically restart when it receives input from the speed
sensor, or when any button is pressed.
PROGRAMMING THE COMPUTER
Before using your Delta R computer, you must program wheel
size, select a speed scale (Miles or Kilometers), input your age
and weight, select a clock mode (12H or 24H) and set the
clock and maintenance reminder. The first step is to determine
wheel size.
DETERMINING WHEEL SIZE
The Delta R uses wheel circumference (measured in millime-
ters) to calculate speed and distance. Note that while your
computer can be programmed to +/-1mm for total accuracy,
discrepancies of as much as 50mm will not have a significant
effect on accuracy in most situations. There are three methods
for determining wheel circumference:
1. Select size from chart below (least accurate)
2. Measure wheel diameter (more accurate)
3. Perform roll-out test (most accurate)
1. Chart: Use the chart to find the circumference for your tire
size, and enter this value in the computer (see “Programming
Wheel Size”). The chart lists circumferences for some of the
most popular tire sizes currently in use. These numbers are
only estimates which may not precisely match the circumfer-
ence of your wheel, due to variations in tire size between
brands and models.
2. Measure: Measure your wheel diameter (including wheel
and tire) in millimeters (1 inch = 25.4mm) and multiply by
3.1416. Enter this value in the computer (see “Programming
Wheel Size”).
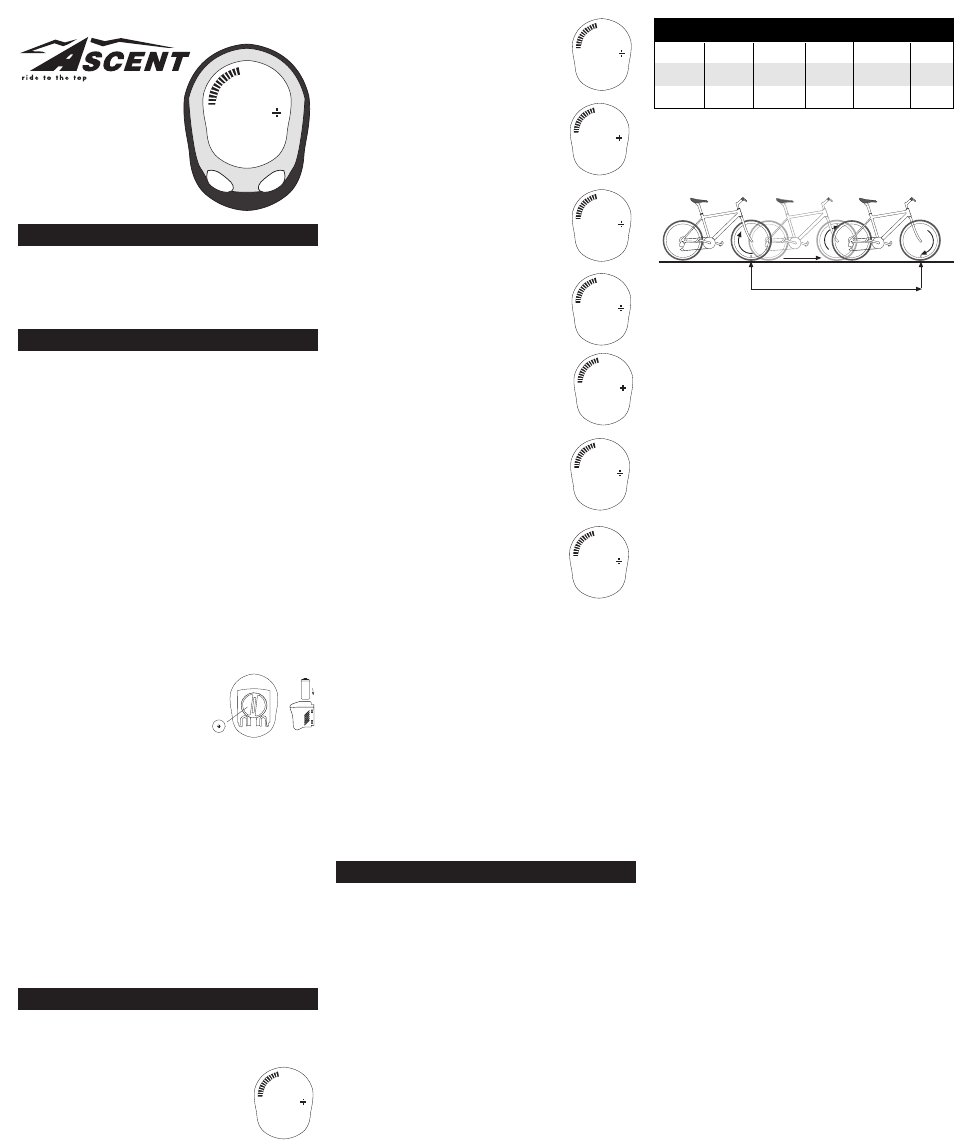
3. Roll-out Test: See Figure 2.
STEP 1:
Stand your bicycle upright. With your tire inflated to
its proper pressure, rotate your front wheel so that the valve is
located at the bottom (6 o’clock position). Make a mark on the
floor to indicate the valve location.
STEP 2:
Roll the bicycle forward in a straight line for one
complete wheel revolution, until the valve is again at the bot-
tom (ideally, you should be on the bike). Make a mark on the
floor to indicate the valve location.
STEP 3:
Measure the distance between the marks in millime-
ters (1 inch = 25.4mm). This value is your wheel circumfer-
ence. Enter this value in the computer (see “Programming
Wheel Size”)
PROGRAMMING WHEEL SIZE
After determining wheel circumference by one of the three
methods above, enter the value in the computer. The default
wheel size setting is 2124mm.
STEP 1:
In any display screen press and hold both buttons
(LEFT and RIGHT) for three seconds to access the wheel size
programming screen.
STEP 2:
The digit at the right of the screen will flash. Press
the RIGHT button to adjust the value. Then press the LEFT
button to advance to the next flashing digit.
STEP 3:
Repeat this process until all digits have been set to
the appropriate value.
STEP 4:
Press the LEFT button to confirm the value and pro-
ceed to the speed scale selection screen.
SELECTING MILES OR KILOMETERS
The Delta R is capable of displaying speed and distance infor-
mation in either miles or kilometers.
STEP 1:
After programming wheel size (above), the
computer will automatically proceed to the speed scale selec-
tion screen, and “KM” will flash at the top of the screen.
STEP 2:
Press the RIGHT button to select miles (M) or kilo-
meters (KM).
STEP 3:
Press the LEFT button to confirm your selection and
proceed to the age input screen.
INPUT AGE
The Delta R uses your age and weight to measure calories and
fat burned.
STEP 1:
After selecting speed scale (above), the computer
will automatically proceed to the age input screen. The left
digit will flash. Press the RIGHT button to adjust the value.
Then press the LEFT button to advance to the next flashing
digit.
STEP 2:
Press the RIGHT button to adjust the value. Then
press the LEFT button to confirm the value and proceed to the
weight input screen.
INPUT WEIGHT
The Delta R uses your weight and age to measure calories and
fat burned.
STEP 1:
After inputting age (above), the computer will auto-
matically proceed to the weight input screen. The left digit will
flash. Press the RIGHT button to adjust the value. Then press
the LEFT button to advance to the next flashing digit.
STEP 2:
Repeat this process until you have entered your cor-
rect weight. Then press the LEFT button to confirm the value
and proceed to the clock mode selection screen.