• Now connect the mains cable and the connection cable to the
load. The numbers of the contact allocation can be found on
the screw terminals.
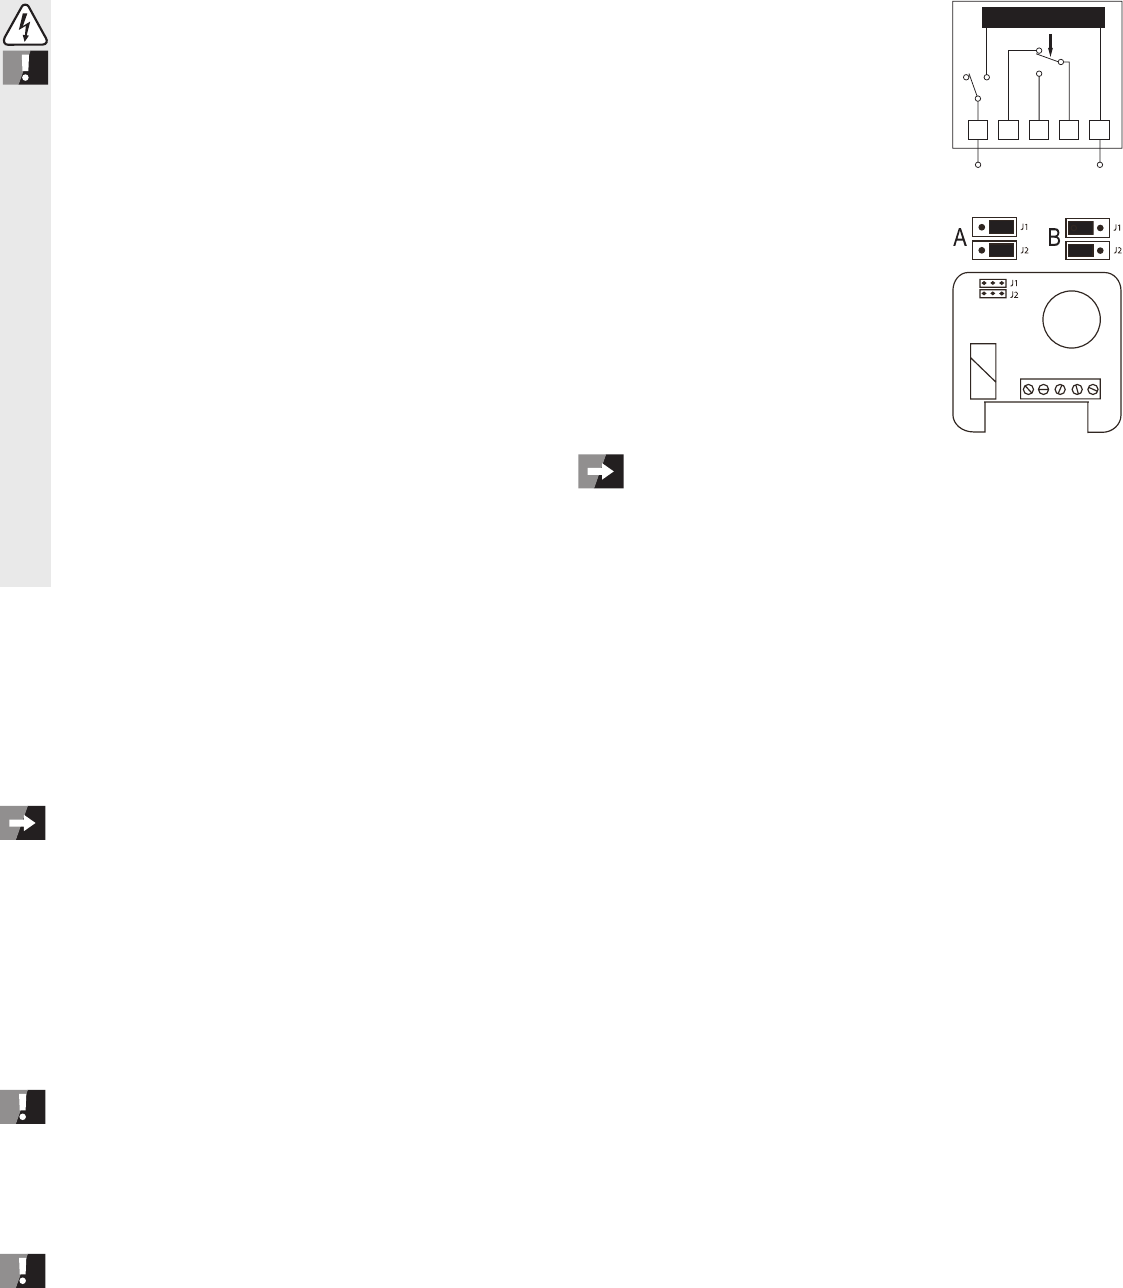
The power supply for the control electronics of the thermostat
is connected to the terminals 1 and 5 (L = phase, N = neutral).
The terminals 2, 3 and 4 are used to connect the electrical
load. Here the change-over contact of the relay is led out (2 =
“NC” = “normally closed” = closed when in the passive state;
3 = “NO” = “normally open” = open when in the passive state,
4 = “COM” = common contact).
• The connection is dependent on the type of load or the posi-
tion of the two jumpers J1 and J2.
A heater can be connected if the jumpers J1/J2 are plugged
in to the right (A). If the temperature exceeds the value that
was set with the knob, the relay switches (the green LED
goes out) and terminal 3 and 4 will connect.
A cooling appliance/air conditioning unit can be con-
nected if the jumpers J1/J2 are plugged in to the left (B). If
the temperature is falling below the value that was set with
the knob, the relay switches (the green LED goes out) and
terminal 3 and 4 will connect.
circuit in order to avoid consecutive switching operations that occur too frequently or
too fast.
• Replace the cover properly and secure with the screw that you removed earlier
• Switch on the mains voltage.
Operation
• The thermostat can be turned on with the sliding switch. The red power LED goes on, when
the thermostat is switched on; the thermostat is then ready for operation and will control the
connected load determined by the temperature setting.
• -
nected load is switched on or off accordingly
switched on.
T
The temperature set on the thermostat deviates from the actual room temperature (e.g.,
as measured with a thermometer)
• The heating power of your room radiator is insufficient (or the cooling power of your air con-
ditioning is too low).
• The thermostat is affected by external heat (e.g., by sunlight, proximity to heaters or electrical
devices).
• The thermostat is installed next to a door or window where draught affects the room tempera-
ture.
•
exterior building wall.
• The room temperature is not the same everywhere in the room.
Depending on the existing heating system (e.g., underfloor -
tion height and the wall temperature, considerable variations between the set position on the
thermostat and the temperature measured with a thermometer may occur
Slow response of the room temperature to the temperature set on the thermostat
•
other hand, it can take a long time for the temperature to rise in poorly insulated buildings and
with cold exterior walls.
• Underfloor heating also reacts very slowly to the temperature setting on the thermostat.
Maintenance and cleaning
The product is maintenance-free. Repair or maintenance work must be carried out by a spe-
cialist.
Y
cleaner
Do not use aggressive chemical or scouring cleaning agents, as this may lead to discolouration
or changes in the material on the surface.
1 2 3 4 5
°C
ON
OFF
NO
NC
COM
d) Handling, operation
•
the chapter “T
•
of a life-threatening electric shock!
•
fire or a fatal electric shock!
supply at all poles (turn off the automatic circuit breaker or remove the fuse, then
switch of the residual current operated circuit breaker of the associated circuits).
Contact a specialist. Do not use the product any longer
•
•
shock!
•
turned off and precautions must be taken to ensure that it is not used unintention-
ally
breaker or remove the fuse and then switch off the connected RCD).
•
- the product shows visible signs of damage
-
burning, audible cracking noises, discolouration to the product or the adjacent
surfaces)
-
- it was exposed to heavy loads during transport
Preparations for connection and installation
• The device must be voltage-free during installation and connection.
Switch off all the poles of the mains cable by removing the corresponding fuse or switching
off at the circuit breaker
(breaker). Secure it against unauthorised reconnection, e.g. with a danger sign.
• Check that the mains leads are without current, e.g., by means of an appropriate tester
• Select an appropriate installation location.
heaters, windows, doors, air discharge openings, etc.
of drafts.
generally tend to be colder than the walls in the interior of the building (depending
on the building insulation).
slowly and sinks back down on the other side of the room. Therefore, an ideal loca-
tion for installing the thermostat is on the wall opposite a heater
Installation and connection
connection and installation”.
• First, switch off the mains voltage to all poles.
•
thermostat.
• The base plate with the electronics can be mounted via the two mounting holes using suitable
screws (and possibly plugs).
damaged!