EN
1
Daily Reference Guide
THANK
In order to receiv
register y ww
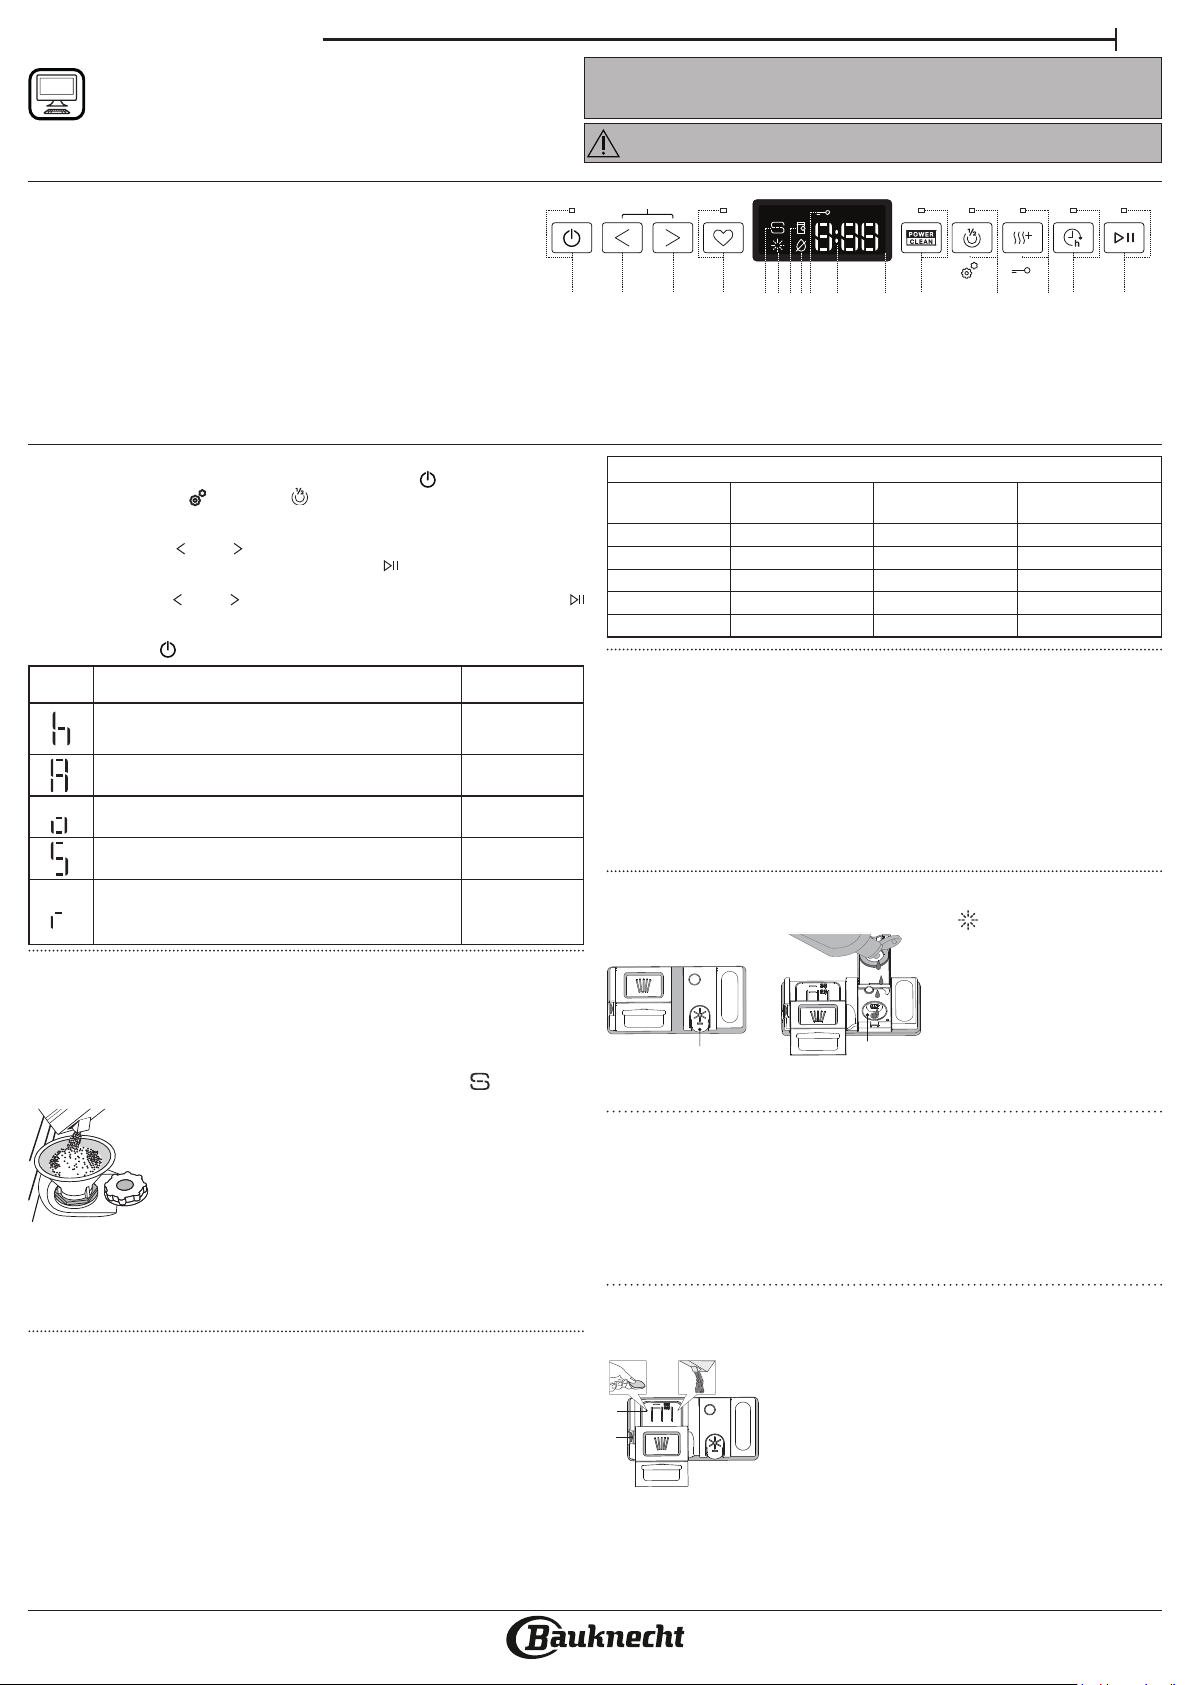
1. ON-OFF/Reset button
with indicator light
2. PREVIOUS program button
3. NEXT program button
4. F butt
5. Salt reservoir empty indicator light
6. Rinse Aid reservoir empty indicator light
7. DESCALE indicator light
8. Closed W indicator light
9. Key lock indicat
10. Program number and remaining time indica
11. Display
12. Po option button with indicator ligh
FIRST TIME
13. Half Load option button with indicator light/ Settings - 3 sec
14. Extra Dry Obutton with indicator ligh/ Keylock - 3 sec. pr
15. Delay option button with indicator ligh
16. ST button with indicator light
Before using the appliance carefully r
Safety and Installation Instructions. More information about y
product available on websit
After installation, please remember to r
parts from the dishwasher
SET
1. Switch on the appliance by prON-OFF button.
2. Hold the Settings (Half Load ) button for 3 seconds
a beep and the display shows SEt ”.
3. After one second the rst available setting (letter h”) will be displayed.
4. Press PRE /NEXT to scroll thr
(see table below), then press ST to view and change the
value of the currently selected setting.
5. PPREVIOUS /NEXT to change the value, then press ST
to save the new v
6. T
7. Press ON-OFF or wait 30 seconds to exit the menu.
FILLING
The use of salt preven
the machine’
The salt reser
lower rack on the left side).
• It is mandatorthe salt reservoir nev
• It is impor
• Salt must be lled when the SAL on the con-
trol panel is lit.1. Remove the lower rack and unscrew the r
(anticlockwise).
2. Position the funnel (see gure) and ll the salt r
right up to its edge (appro
usual for a little water t
3. Only the rst time you do this: ll the salt reservoir
with water
4. Remove the funnel and wipe any salt residue a
Make sure the cap is screwed on tigh
the container during the wash progr
softener beyond repair).
Run a program ev
rese
Setting the water hardness
T
hardness setting is based on the actual water hardness in y-
mation can be obtained from your local w3 ”.
See „ T.
T
Only use salt that has been specically designed for dishw
After the salt has been poured into the machine
light switches o
If the salt container is not lled, the w
element may be damaged as a result of limescale ac
Use of salt is rec
W
W
venting scale buildup on the heater
eciency. T
quired to rell the salt cThe frequency of regen-
eration depends on the water har
place once per 4-6 Eco cycles with the wat3 . The
regeneration pr
fresh water
• Single regeneration consumes: ~3L of w
• T
• Consumes below 0.005kWh of ener
FILLING
Rinse aid makes dish DRYING easierA should be
lled when the RINSE AID REFILL indicator light in the control panel is lit.
1. Open the dispenser B by
pressing and pulling up the
tab on the lid.
2. Pour in the rinse aid (max.110
ml), making sure it does not
overow from the dispenser
If this happens, clean the spill
immediately with a dry cloth.
3. Press the lid down until y
NEVER pour the rinse aid directly into the appliance tub
Adjusting the dosage of rinse aid
If you are not completely satised with the drying results, y
the quantity of rinse aid used.
T
If the rinse aid level is set to ZERO. The LOW
RINSE AID indicator light will not be lit if you run out of rinse aid
A maximum of 6 levels can be set acc
• If you see bluish streaks on the dishes, set a lo
• If there are drops of wa
a mid-range number (4-5).
FILLING
T
the detergent int-
gent for pre-washing directly inside the tub.
1. When measuring out the detergent r
mentioned earlier information to add the pr
quantityD, there are indica-
tions to help the detergent dosing
2. Remove detergent r
dispenser and close the cover until it clicks
3. Close the lid of the detergent dispenser by pulling
it up until the closing device is secured in place
The detergent dispenser aut
ing to the program.
Usage of detergen
malfunction or damage to the appliance.
A
LETTER SE V
(Default - in bold )
W
(see “SET
and “ 1 | 2 | 3 | 4 | 5
Rinse Aid Level
(see “ 0 | 1 | 2 | 3 | 4 | 5
ActiveDry (see “OPTIONS AND FUNCTIONS”)
“1” 1 | 0
Sound
“1” 1 | 0
F
Press ST to restore t
default all the values of the settings included in
the settings menu.
-
W
Leve °dH
German degrees
°fH
Fr
°Clark
English degrees
1 (soft) 0 - 6 0 - 10 0 - 7
2 (medium) 7 - 11 11 - 20 8 - 14
3 (average) 12 - 16 21 - 29 15 - 20
4 (hard) 17 - 34 30 - 60 21 - 42
5 (very hard) 35 - 50 61 - 90 43 - 62
C
W11617756 panel t op
W11616949 panel
W11616929 butt on R
W11616835 butt on L
W11609979 displa y
1 2 3 4 1 12 13 14 15
5 6 7 8 9 10
3 sec. 3 sec.
P