Connect the yellow/green earth wire to the terminal with the symbol .
This wire must be longer than the other wires.
1.Remove the terminal block cover (A), undoing the screw and inserting the cover in the terminal block hinge (B).
2.Insert the power cable in the cable clamp and connect the wires to the terminal block as indicated in the connection diagram located near it.
3.Secure the power cable with the cable clamp.
4.Close the cover (C) and screw it on the terminal block with the previously removed screw.
Each time the power is connected, the hob performs an automatic check for a few seconds.
If the hob already has a power cable, follow the instructions attached to the cable. Connect the appliance to the power supply by means of a multipole switch with
minimum contact gap of 3mm.
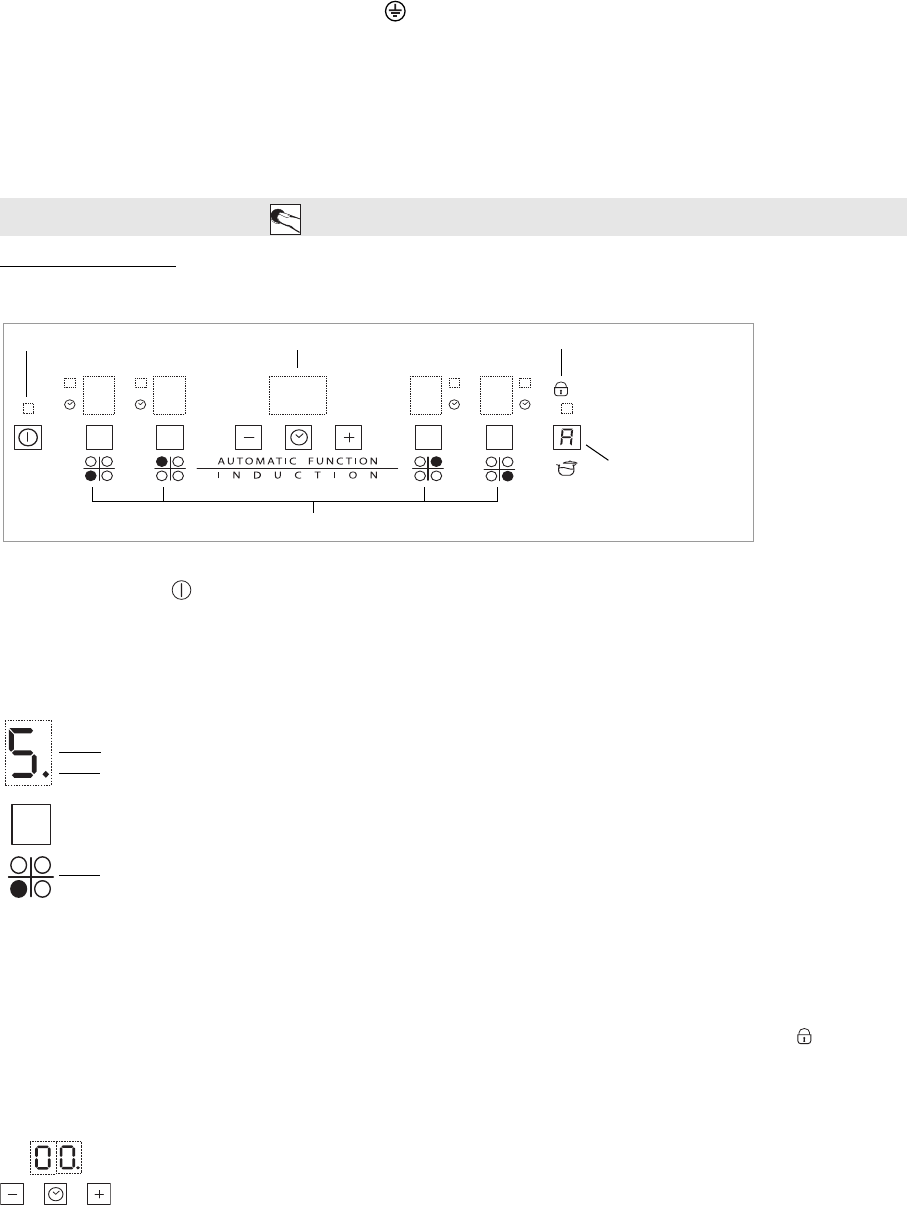
Control Panel Description
Control panel
Switching the hob ON/OFF
To switch the hob on, press the button for approx. 2 seconds until the cooking zone displays light up. To switch off, press the same button until the displays switch
off. All the cooking zones are deactivated
If the hob has been in use, the residual heat indicator “H” remains lit until the cooking zones have cooled down.
If within 10 seconds of switching on, no function is selected, the hob switches off automatically.
Switching on and adjusting cooking zones
Once the hob is switched on and the pan is positioned on the chosen cooking zone, select the
zone using the corresponding button: the display shows level 5.
Each cooking zone has various power levels, adjustable with the +/- buttons, going from “1”:
min. power, to “9”: max. power. Some cooking zones have a fast boil function (Booster),
shown on the display with the letter “P”.
Deactivation of cooking zones
Select the cooking zone you wish to switch off. Press the corresponding button (a dot lights up at the bottom right of the power level indicator).
Press the key “-” to set the level to “0”.
To switch off instantly, hold the zone selection button for 3 seconds. The cooking zone switches off and the residual heat indicator “H” lights up.
Control panel lock
This function locks the controls to prevent accidental switching on of the hob. To activate the control panel lock function, switch on the hob and hold button (or the Automatic
function/Eco Booster button, where present) for three seconds; an acoustic signal and a luminous indicator next to the padlock signal activation. The control panel is locked except
for the deactivation function. To deactivate the control panel lock, repeat the activation procedure. The luminous dot goes off and the hob is active again.
The presence of water, liquid spilled from pots or any objects resting on the button below the symbol can accidentally activate or deactivate the control panel lock function.
Timer
The timer can be used to set cooking time for a maximum of 99 minutes (1 hour and 39 minutes) for all cooking zones.
Select the cooking zone to be used with the timer (an illuminated dot appears to the bottom right hand side of the heat setting indicator on the
display), press the button with the clock symbol then set the desired cooking time using the buttons “+” and “-” of the timer function (see
figure). After a few seconds, the timer begins the countdown (an illuminated dot is visible next to the zone for which the timer has been
activated). Once the set time has elapsed, an acoustic signal sounds and the cooking zone switches off automatically.
To deactivate the timer, press the “-” button until the display shows “0:0” or hold the button with the clock symbol for at least 3 seconds.
To set the timer for another zone, repeat the points above. The timer display always shows the timer for the selected zone or the shortest timer.
To change or switch off the timer, press the zone selection button for the timer in question.
Libble nimmt den Missbrauch seiner Dienste sehr ernst. Wir setzen uns dafür ein, derartige Missbrauchsfälle gemäß den Gesetzen Ihres Heimatlandes zu behandeln. Wenn Sie eine Meldung übermitteln, überprüfen wir Ihre Informationen und ergreifen entsprechende Maßnahmen. Wir melden uns nur dann wieder bei Ihnen, wenn wir weitere Einzelheiten wissen müssen oder weitere Informationen für Sie haben.
Art des Missbrauchs:
Forenregeln
Um zu sinnvolle Fragen zu kommen halten Sie sich bitte an folgende Spielregeln:
Lesen Sie zuerst die Anleitung;
Schauen Sie nach, ob die Frage bereits gestellt wurde;
Stellen Sie die Frage so deutlich wie nur einigermaßen möglich;
Erwähnen Sie was Sie bereits versucht haben um das Problem zu lösen;
Ist Ihr Problem von einem Besucher gelöst dann lassen Sie ihn / sie wissen in diesem Forum;
Falls Sie reagieren möchten, so verwenden Sie bitte das Antworten- Formular;
Da ihre Frage für alle Besucher sichtbar ist, sollten Sie lieber keine persönliche Daten erwähnen.
Neu registrieren
Registrieren auf E - Mails für Bauknecht ETI 1740 wenn:
neue Frage gestellt werden
neue Handbücher vorhanden sind
Sie erhalten eine E-Mail, um sich für eine oder beide Optionen anzumelden.
Das Handbuch wird per E-Mail gesendet. Überprüfen Sie ihre E-Mail.
Wenn Sie innerhalb von 15 Minuten keine E-Mail mit dem Handbuch erhalten haben, kann es sein, dass Sie eine falsche E-Mail-Adresse eingegeben haben oder dass Ihr ISP eine maximale Größe eingestellt hat, um E-Mails zu erhalten, die kleiner als die Größe des Handbuchs sind.
Ihre Frage wurde zu diesem Forum hinzugefügt
Möchten Sie eine E-Mail erhalten, wenn neue Antworten und Fragen veröffentlicht werden? Geben Sie bitte Ihre Email-Adresse ein.