782282
2
Zoom out
Zoom in
Vorherige Seite
1/2
Nächste Seite
Assembly of the magnet / Fig. (h)
Screw the magnet apart with the magnet holder
F and attach it as shown to a spoke of the front
wheel at the height of the sensor D. Make sure
that the distance between the sensor D and the
magnet holder F is not more than 2 mm. For this,
turn the sensor D accordingly on the fork tube
(see Fig. h-1).
Make sure that the magnet F passes the sensor
D at the arrow mark on the sensor (see Fig. h-2).
NOTE!
8.4. Adjustment / Fig. (i)
Make sure that the bicycle computer A and the
sensor D are at a 90° angle to one another. The
distance between the bicycle computer A and
the sensor D should be a maximum of 60 cm.
Prior to assembling the sensor, mark the
maximum distance on the fork tube!
Make sure that the computer is installed in the
marked transmission range of the sensor, Fig. ( j)
9. Start-up
Prior to starting up the bicycle computer and the
sensor for the first time, the button cells must be
inserted.
Insertion of the button cell into the sensor
(Fig. k)
and bicycle computer / Fig. (l)
Open the cover of the button cell compartment on
the sensor D with a coin by turning it clockwise.
The cover must be pressed lightly downwards
with the coin.
Avoid direct skin contact with the surfaces of the
button cells. This can cause them to discharge.
Insert the button cell Gsurfaces so that the +
polarity is visible. Close the cover using the coin,
after you have inserted the button cells.
The same procedure is used for the bicycle com-
puter A. You may need to remove the bicycle
computer off of the bracket for this, Fig. (e).
Please do not insert the button cells loosely, as
otherwise the functions cannot be displayed.
9.1 Menu languages
Before setting the computer, remove the protec-
tive film from the display.
After inserting the button cells, the
setting will light up for selecting the
menu languages. German, English
and French are available to choose
from. Press the MODE key to switch
between the languages. Confirm your selection
with the SET key.
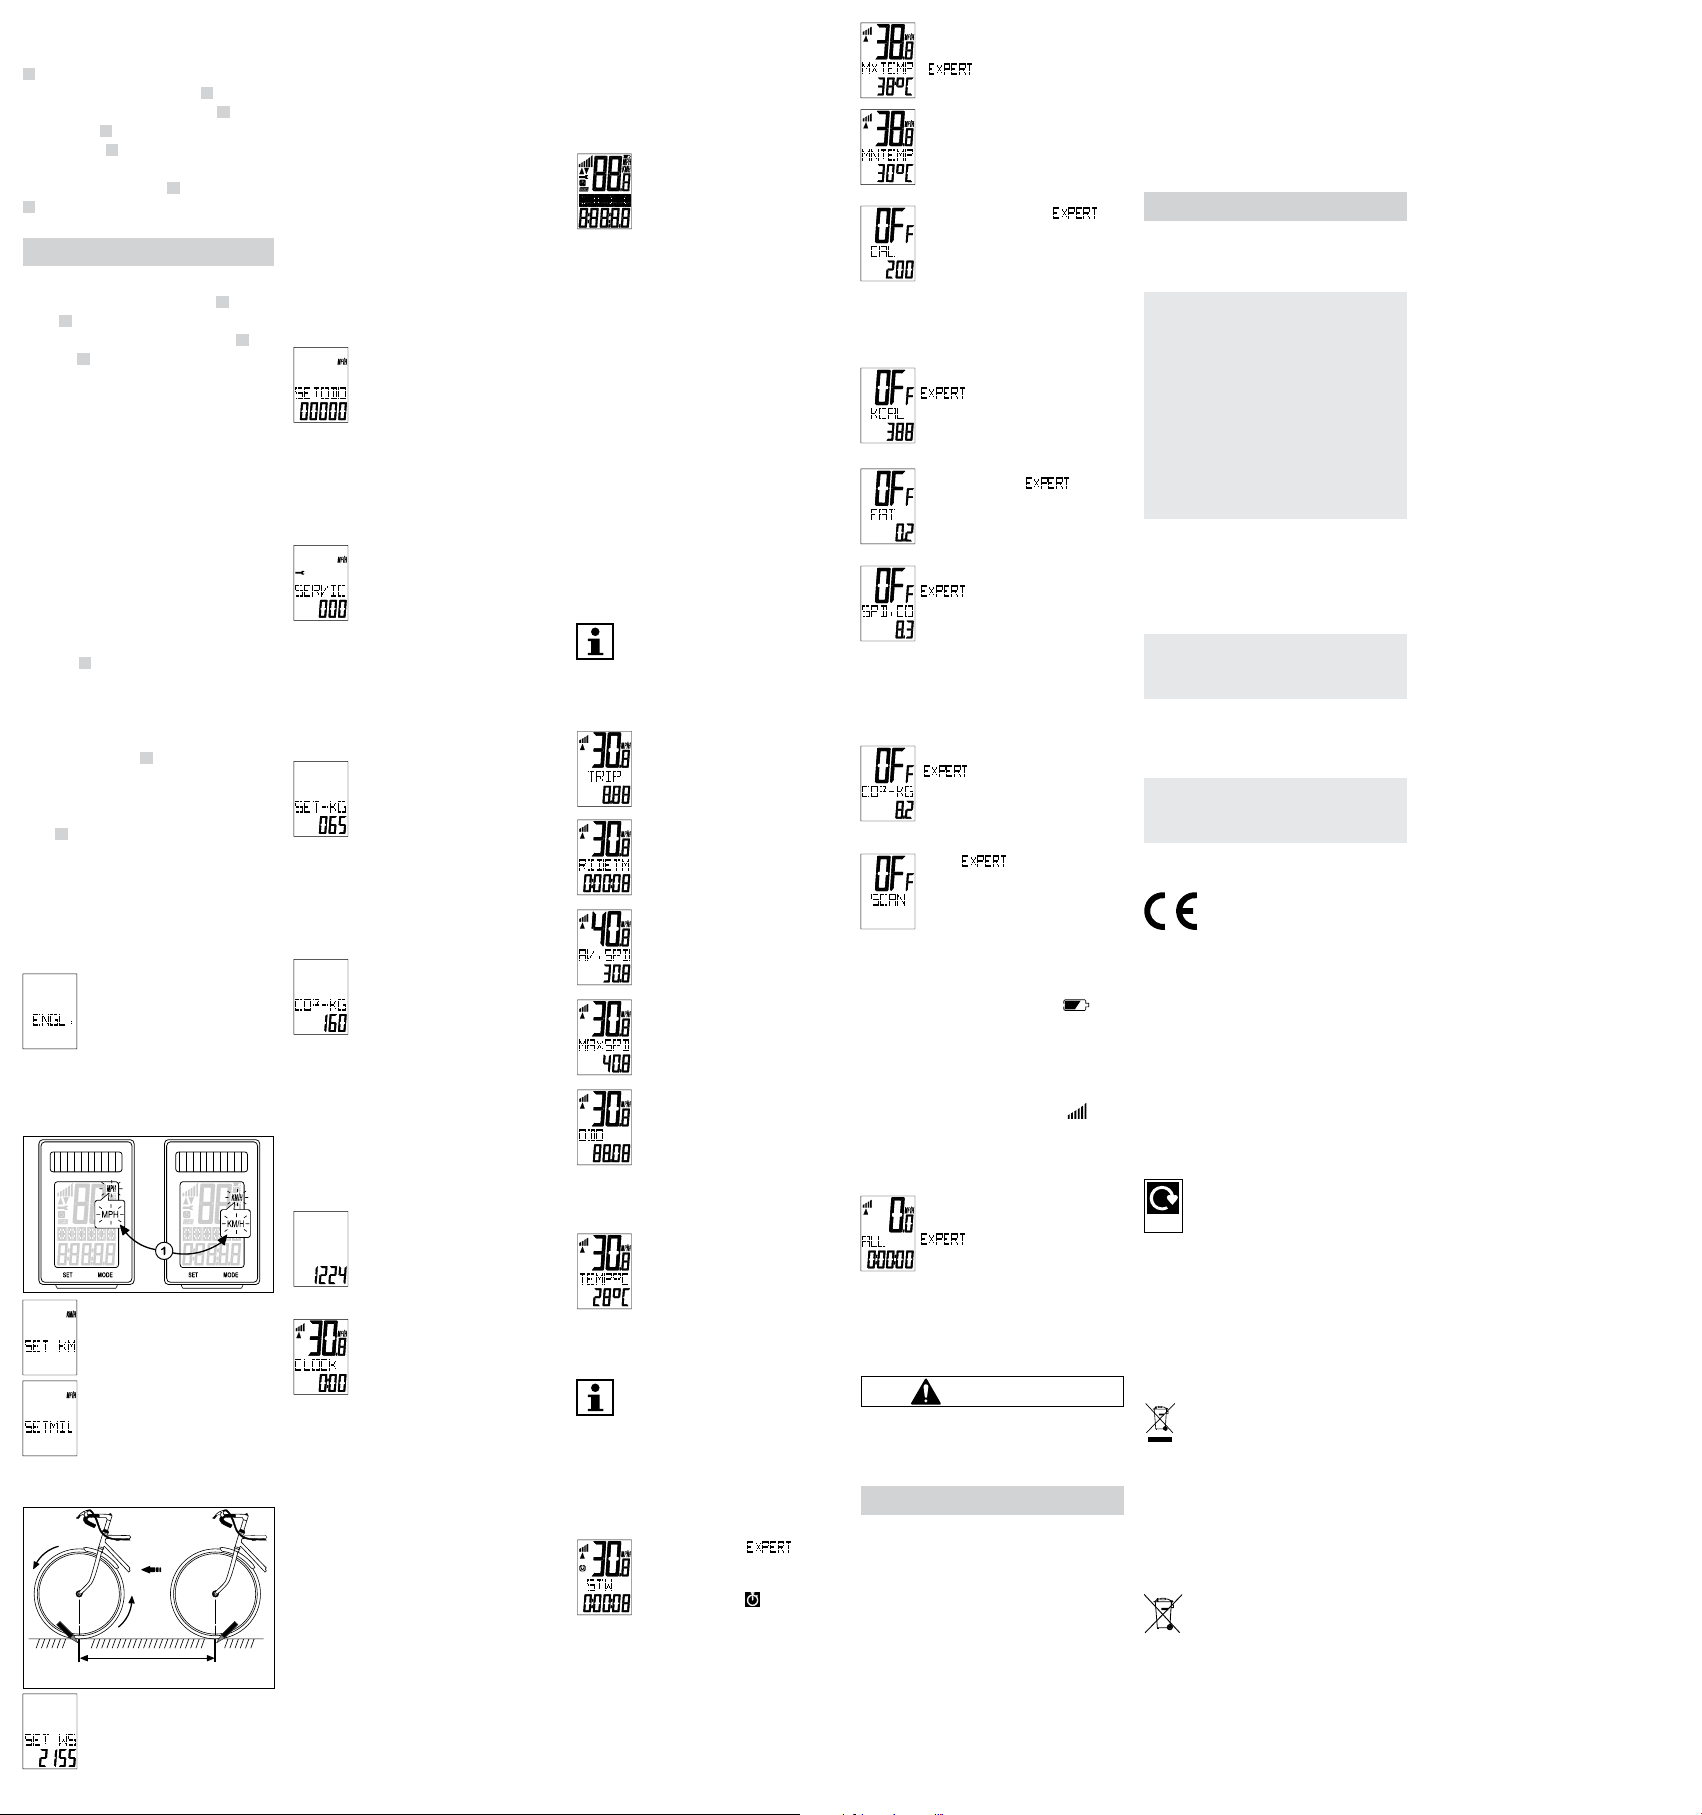
9.2 km/h or mp/h setting
You can select here between km/h
(kilometres) and mp/h (miles). “SET
KM” flashes in the display. Use the
MODE key to switch between the
units of measurement. Confirm your
selection with the SET key.
9.3 Tyre size setting
ab
You can determine your tyre size as
follows:
1. Make sure that the tyres are inflated
correctly.
2. Turn the front tyre valve to the low-
est position and mark the position of the valve on
the ground (a).
3. Move the bicycle forward by one tyre rotation,
until the valve has reached the lowest position
again (b).
4. Measure the distance travelled. You have deter-
mined the tyre size.
In the display, the base setting is shown for the tyre
size “2155” (in mm). The thousand figure can only be
set from 1 to 2. By pressing the MODE key, the thou-
sand figure flashes. By pressing the MODE key, this
figure is increased step-by-step by a value of one.
The selection is confirmed by pressing the SET key.
The subsequent numbers are set accordingly. The
one, ten and hundred figures can be set to a number
between 0 and 9.
9.4 Setting the total distance
The base setting “00000” appears in the
display. The base setting is confirmed by
pressing the SET key. The ten thousand
figure flashes by pressing the MODE key.
By continuing to press the MODE key, the
figure can be increased step-by-step by a value of
one. The selection is confirmed by pressing the SET
key. The one, ten, hundred, thousand and ten thou-
sand figure can take on a value of between 0 - 9.
9.5 Setting the inspection interval
The base setting “000” appears in the
display. This corresponds to the distance
in km until the next bicycle inspection.
The hundred figure flashes by pressing
the MODE key. Press the MODE key, to
increase the one, ten or hundred figure step-by-step
by the value of one. The selection is confirmed by
pressing the SET key.
In order to display a due inspection, a spanner is dis-
played when the set kilometres have been reached.
9.6 Setting the weight
“KG (kilogram) flashes in the display.
Switch to “LB” (pounds) by pressing the
MODE key. Confirm with the SET key.
After this, the base setting “065” appears
in the display. The hundred figure flashes
first. You increase this value with the MODE key and
confirm with the SET key. Proceed in the same way
for the one and ten figure.
9.7 Display of CO²-KG emission
reduction
This function is for the calculation of the
CO₂ emission reduction. This calculates
how much CO₂ would had been pro-
duced, if the distance has been travelled
with a car, instead of with a bicycle. Find
the emission value in g/km in the technical docu-
mentation for your car. Or use the base setting “160”
(g/km). The hundred figure flashes by pressing the
MODE key. Press the MODE key, to increase the one,
ten or hundred figure step-by-step by the value of
one. The selection is confirmed by pressing the SET
key.
9.8 Setting the 12 / 24 hour display
“24” flashes in the dipslay (24 hour time
format). Switch to “12” by pressing the
MODE key. Confirm with the SET key.
9.9 Setting the clock
The hours flash in the display. Continue
pressing the MODE key until the correct
number is displayed. Confirm with the
SET key and thereby automatically reach
the minutes display. Proceed in the same
way for this. You can reach Point 9.8 again by press-
ing and holding the SET key for 3 seconds. Proceed as
already described. Afterwards, you can set the time
and the background lighting again.
9.10 Setting the background
lighting
“ON” flashes in the display. Press the MODE key to
switch between “ON” and “OFF”. If you switch off the
background lighting, you will reach the main func-
tion display.
After confirming the background lighting, specify
the time period (start and end time) during which
this function should be switched on. The hours flash
in the display. Continue pressing the MODE key until
the correct number is displayed. Confirm with the
SET key (thereby automatically switching to the
minutes display). Proceed in the same way for this.
The background lighting will switch on for approx. 3
seconds at a time, as soon as the MODE or SET key is
pressed within the set time period.
10. Checking the bicycle computer
Use the SET or MODE key to activate the bicycle com-
puter. If you now rotate the front wheel of the bicy-
cle, the speed will be measured. If no speed is dis-
played, check and repeat the assembly, if necessary.
11. Restart
If you would like to reset the settings,
press the SET and MODE key at the same
time for approx. 4 seconds. Afterwards,
wait for approx. 3 seconds until the lan-
guage setting “DEUT. flashes. After re-
starting/resetting, the bicycle computer will be in
the base setting and all settings must be entered
again.
12. Automatic display switch-off
After approx. one minute of standstill, the bicycle
computer automatically switches to standby mode,
in order to save energy (time will continue to be
displayed). By pressing any key or with vigorous
vibration, you can reactivate the bicycle computer.
13. Automatic start-stop function
After the first-time activation from standby mode, all
functions will show an automatic start-stop function
(exception: stopwatch and time). This will start, the
first time the magnet passes the sensor. If the bicycle
stands still, approx. 3 seconds will remain for a new
signal. If there is no further signal, the measurement
will stop automatically.
14. Functions
After the bicycle computer starts up the
speed and time will be displayed. The
speed is constantly updated and will
appear in the middle of the display. The measure-
ment range is 0.1-99.9.
TRIP (daily kilometres)
Automatic start at the beginning of the
ride. Maximum measurement range:
999.99.
RIDE TM (riding time)
The total riding time is displayed since
the last restart. Maximum measurement
range: 9:59:59.
AV SPEED (average speed)
Maximum measurement range: 99.9
km/h
or mp/h
MAXSPD (maximum speed)
The maximum reached speed is stored.
Maximum measurement range: 99.9
km/h or mp/h
ODO (total distance)
The total kilometres
(miles) ridden are stored. Maximum
measurement range: 99999. You can
reach the base settings again by press-
ing and holding the SET key for 3 seconds. Proceed
as explained in Point 9.1 to 9.6.
TMP°C (Temperature)
The temperature is measured approx.
every 5 minutes and updated. Press and
hold the SET key for approx. 3 seconds to
switch to °F (Fahrenheit). After approx. 2
seconds, the relevant value is converted.
15. EXPERT MODE
You can activate additional functions in
EXPERT MODE. To do this, press and hold
the MODE key for approx. 5 seconds.
Confirm again with MODE. You are now in EXPERT
mode.
You can switch between OFF and ON by pressing the
MODE key. The selection is confirmed by pressing the
SET key.
STW (stopwatch) -
Maximum measurement range: 9:59:59.
Press the SET key to start the stopwatch.
A stopwatch symbol appears on the
left in the display. By pressing the SET
key again, the counter is stopped. Press and hold
the SET key for approx. 3 seconds, to set the stop-
watch to 0.
MNTEMP & MXTEMP (minimum &
maximal measured temperature)
-
You can only set to F (Fahrenheit) in the
current temperature display.
CAL (calorie counter) -
The current calorie consumption (kcal)
is displayed. Maximum measurement
range: 999.9. You can reach Point 9.6
by pressing and holding the SET key
pressed for 3 seconds. You can set the weight again
here, if needed. The calorie display is purely for mo-
tivation.
KCAL (total calorie counter)
The total calorie consumption (kcal) is
displayed since the last restart. Maxi-
mum measurement range: 99999.
FAT (fat burned) -
The accumulated burned fat is displayed
in grams. Maximum measurement
range: 999.9.
SPD.CO total speed comparison-
Calculates the difference between the
current speed and average speed in
one-second intervals. If you are riding
slower than the average, a “-” symbol appears AND
the arrow under the bar of the speed tendency points
downwards. If you are riding faster than the average,
the arrow points upwards. The “-” arrow disappears.
CO²-KG emission reduction
By pressing and holding the SET key for 3
seconds, you will reach the base setting
at Point 9.7 to change the initial value.
SCAN -
In this mode, the TRIP, RIDE TM and AV
SPEED functions are automatically dis-
played consecutively at 2-second inter-
vals. You can reach the next function by
pressing the MODE key.
Low battery indicator: Low Battery symbol
appears at the top right of the display , if the
voltage of the button cell falls below 2.7 V (initial
value 3 V).
Speed tendency
Constant display of the speed development. A bar
symbol appears on the left in the display
When accelerating, the number of bars increases
(maximum of 5) and when reducing speed, the
number of bars decline (minimum of 1).
Reset data (TRIP, RIDE TM, AV
SPEED, MAX-KMH, KCAL, FETTV) -
Continue pressing the MODE key until
the appropriate function is displayed.
Press and hold the SET key for approx. 3 seconds to
reset all of the values (except for temperature and
time).
16. Cleaning and care
CAUTION!
DANGER OF SHORTCIRCUITING! A
short-circuit can be caused by moisture penetrating
the housing.
NOTE!
- Never immerse the bicycle computer in liquid.
- Make sure that no liquid enters into the housing.
RISK OF DAMAGE! Improper clean-
ing can cause the bicycle computer
to become damaged.
- Do not use aggressive cleaning agents, brushes
with metal or nylon bristles, or sharp or metallic
cleaning items, such as knives, hard spatulas, etc.
These can damage the surfaces.
- Never put the bicycle computer in the dishwasher.
This would destroy it.
Wipe the bicycle computer off with a lint-free, dry
cloth.
17. Storage
All parts must be completely dry before storage.
- Always store the bicycle computer in a dry place.
- Protect the bicycle computer from direct sunlight.
- Store the bicycle computer in a place that is inacces-
sible for children, securely locked and at a storage
temperature of between -10° C and +50° C.
18. Fault description
NOTE!
Prior to each ride, check the attachment of the bicy-
cle computer, sensor and magnet.
- No speed display:
Check the alignment of the sensor and the mag-
net.
Check the distance between the magnet and
the sensor (max. 2 mm) and the distance and
angle between the bicycle computer and sensor
(90°/ max. 60 cm).
Is the computer within the transmissionrange of
the sensor, Fig. (j).
Check the button cell of the bicycle computer
and the sensor.
Replace the button cell.
- Incorrect speed measurement:
Check the setting of the tyre size.
Check kilometre/mile setting.
Check the alignment of the sensor and the mag-
net.
- Black display:
Check whether the display has become too hot.
Let it cool down.
- Display shows irregular numbers:
Remove and reinsert the button cell. Pay at-
tention to the correct polarity.
- Weak or no display:
Check positioning of the button cell.
Replace the button cell.
19. Conformity declaration
We, Monz Handelsgesellschaft Interna-
tional mbH & Co. KG, Schöndorfer Straße
60-62 | 54292 Trier | Germany, declare
under sole responsibility, that the prod-
uct: Bicycle computer, Model No.: 22970, to which
this declaration refers, complies with the require-
ments of Directives 2011/65/EG and 2014/53/EU.
The CE symbol confirms conformity with EU di-
rectives. You can find the complete declaration of
conformity at:
https://www.monz-international.de/index.
php/en/customer-support/downloads/catego-
ry/37-2020
20. Disposal
Dispose of the packaging unmixed
Widely
Recycled
The packaging and operating instructions
are made of 100 % environmentally
friendly materials, which you may dispose
of at local recycling centres.
Disposal of the old device
(Applicable in the European Union and other Euro-
pean countries with systems for separate collection
of recyclable materials)
Old devices should not be disposed of with
household waste!
If the bicycle computer can no longer be
used, every consumer is legally obligated
to dispose of old devices separately from
household waste, e.g. with a collection
centre of his municipality/district. This will ensure
that old devices are recycled properly and negative
implications are avoided for the environment. That is
why electrical devices are marked with the adjacent
symbol.
Disposal of button cells
Button cells and rechargeable batteries are
not permitted to be disposed of with
household waste. They contain harmful
heavy metals. Marking: Pb (= lead), Hg
(= mercury), Cd (= cadmium). You are legally obli-
gated to return used button cells and rechargeable
batteries. After use, you can either return the button
cells to our point of sale or in the direct vicinity (e.g.
with a retailer or in municipal collection centres) free
of charge. Button cells and rechargeable batteries are
marked with a crossed-out waste bin.
2

Brauchen Sie Hilfe? Stellen Sie Ihre Frage.

Forenregeln

Missbrauch melden von Frage und/oder Antwort

Libble nimmt den Missbrauch seiner Dienste sehr ernst. Wir setzen uns dafür ein, derartige Missbrauchsfälle gemäß den Gesetzen Ihres Heimatlandes zu behandeln. Wenn Sie eine Meldung übermitteln, überprüfen wir Ihre Informationen und ergreifen entsprechende Maßnahmen. Wir melden uns nur dann wieder bei Ihnen, wenn wir weitere Einzelheiten wissen müssen oder weitere Informationen für Sie haben.

Art des Missbrauchs:

Zum Beispiel antisemitische Inhalte, rassistische Inhalte oder Material, das zu einer Gewalttat führen könnte.

Beispielsweise eine Kreditkartennummer, persönliche Identifikationsnummer oder unveröffentlichte Privatadresse. Beachten Sie, dass E-Mail-Adressen und der vollständige Name nicht als private Informationen angesehen werden.

Forenregeln

Um zu sinnvolle Fragen zu kommen halten Sie sich bitte an folgende Spielregeln:

Neu registrieren

Registrieren auf E - Mails für Bikemate 22970 wenn:


Sie erhalten eine E-Mail, um sich für eine oder beide Optionen anzumelden.


Das Handbuch wird per E-Mail gesendet. Überprüfen Sie ihre E-Mail.

Wenn Sie innerhalb von 15 Minuten keine E-Mail mit dem Handbuch erhalten haben, kann es sein, dass Sie eine falsche E-Mail-Adresse eingegeben haben oder dass Ihr ISP eine maximale Größe eingestellt hat, um E-Mails zu erhalten, die kleiner als die Größe des Handbuchs sind.

Ihre Frage wurde zu diesem Forum hinzugefügt

Möchten Sie eine E-Mail erhalten, wenn neue Antworten und Fragen veröffentlicht werden? Geben Sie bitte Ihre Email-Adresse ein.


Info