For U.K. and Ireland only:
If the plug is not suitable for the socket outlets in
your home, it can be removed and replaced by a
plug of the correct type. Please refer to
"Installation of a plug" below.
Installation of a plug Applicable to U.K.
and Ireland.
NOTE: If the terminals in the plug are not marked
or if you are unsure or in doubt about the
installation of the plug please contact a qualified
electrician.
If a 13A 3-pin plug is fitted, it must be an ASTA
approved plug, conforming to BS1363 standard.
Replacement 3A fuses must be BSI or ASTA
BS1362 approved.
This product is fitted with a 13A plug complying
to BS1363. If this plug is unsuitable or needs to
be replaced, please note the following:
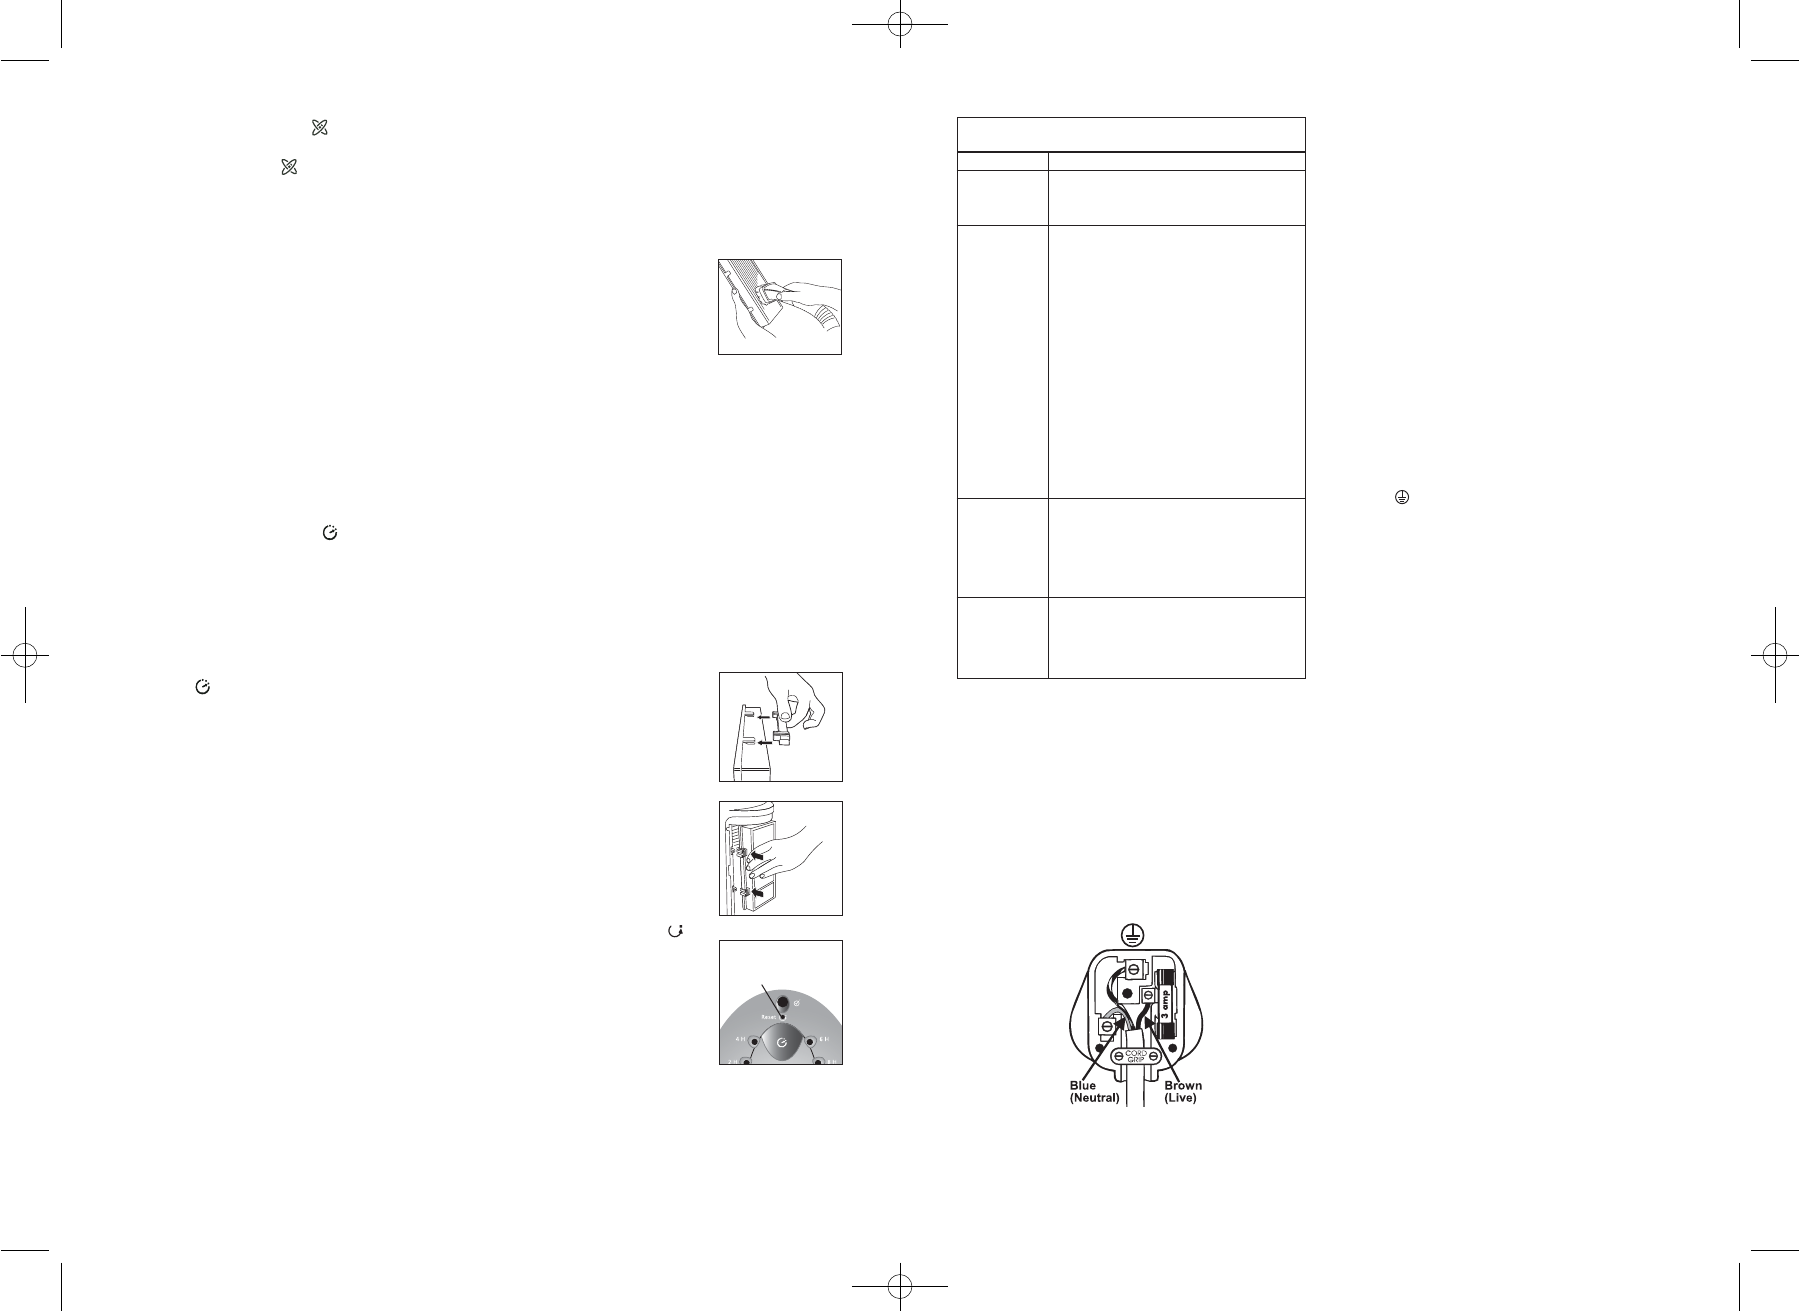
The wires in the mains lead are coloured as such:
BROWN - LIVE
BLUE - NEUTRAL
Please note that the colour of these mains wires
may not correspond with the colour markings
that identify the terminals in your plug. Please
proceed as follows:
The BROWN coloured wire must be connected
to the terminal, which is marked with the letter
"L" or is coloured RED.
The BLUE coloured wire must be connected to
the terminal, which is marked with the letter "N"
or is coloured BLACK.
DO NOT CONNECT either of these wires to the
earth terminal in the plug. The earth terminal plug
is marked with the letter "E", or with the earth
symbol , or coloured GREEN, or GREEN
and YELLOW.
GUARANTEE
Please keep your receipt as this will be required
for any claims under this guarantee.
This appliance is guaranteed for 2 years after
your purchase as described in this document.
During this guaranteed period, if in the unlikely
event the appliance no longer functions due to a
design or manufacturing fault, please take it
back to the place of purchase, with your till
receipt and a copy of this guarantee.
The rights and benefits under this guarantee are
additional to your statutory rights, which are not
affected by this guarantee. Only Holmes
Products (Europe) Ltd. (“Holmes”) has the right
to change these terms.
Holmes undertakes within the guarantee period
to repair or replace the appliance, or any part of
appliance found to be not working properly free
of charge provided that:
• you promptly notify the place of purchase
or Holmes of the problem; and
• the appliance has not been altered in any
way or subjected to damage, misuse,
abuse, repair or alteration by a person
other than a person authorised by Holmes.
Faults that occur through, improper use,
damage, abuse, use with incorrect voltage, acts
of nature, events beyond the control of Holmes,
repair or alteration by a person other than a
person authorised by Holmes or failure to follow
instructions for use are not covered by this
guarantee. Additionally, normal wear and tear,
including, but not limited to, minor discoloration
Issue
Unit will not
operate
Decreased
air flow
Filter
appears
dirty, even
after
vacuuming
clean
Excessive
noise
Solution
• Make sure unit is properly plugged
in and outlet is switched on.
• Make sure unit turned ON.
• Make sure nothing is blocking
air inlet and filtered air outlets.
• Remove all plastic bags from filters.
• Check condition of filters and
clean if necessary.
• Make sure that the air intake grill
is at least 30 to 90 cm from the
wall.
• When unit operates in the AUTO
mode, it will automatically adjust
the fan speed to provide optimum
filtration based on air particulate
concentration. Therefore,
depending on the air quality in
the room, some variation in air
flow is normal and expected.
• This is normal and does not
affect performance in any way. A
new filter is not necessary.
• Remove plastic bag(s) from
filter(s).
• Make sure parts are firmly
positioned in place.
TROUBLESHOOTING
3.Press IONISER button ( ) to turn ioniser
ON or OFF.
• IONISER button ( ) works in any mode
except when air purifier is turned off.
Air Quality Particle Sensor
The AUTO feature uses the particle sensor to
cycle between low, medium and high speeds,
based on surrounding indoor air quality. To use
this feature:
1.When air purifier is off, press the AUTO
button.
• The button will illuminate and the air purifier
will turn on to auto mode.
2.When air purifier is on and set at any manual
mode speed, press the “auto” button.
• The button will illuminate and the air purifier
will run in auto mode.
Setting The Timer Mode
You may set the timer so it automatically turns
off when the desired time has elapsed:
1.Press the TIMER button ( ) until you reach
the desired number of hours you want the unit
to operate (2, 4, 6 or 8).
• The number of hours selected will light up
and remain illuminated on the control panel.
• When time is up, the air purifier will beep 3
times and turn off.
2.To CANCEL the timer, press the TIMER
button ( ) one more time. You may also
cancel the timer operation by turning the
power button off.
CLEANING AND MAINTENANCE
Cleaning The Permanent HEPA-type
Filters
The filter is designed to never need
replacement. However, we recommend regular
cleaning for optimal performance.
• Every few weeks, check the condition of the
filter.
• After approximately 3 months of operation, a
Filter Indicator Light will alert you to clean the
filter before further use.
To clean the filter:
1.Turn off and unplug the air purifier.
2.Remove the air inlet grill by pulling on the tab.
3.Remove and examine the foam pre-filter.
• If it has collected dust or lint, remove and
wash it in warm soapy water. Rinse and
drip dry thoroughly before placing it back
into the grill inlet.
4.Check the condition of the filters and remove
if dirty.
5.Clean the filter.
• Using your vacuum cleaner, run the brush
attachment along both sides of the filter and
clean between the pleated layers (Figure 2).
IMPORTANT: Do not use water,
household purifiers or
detergents to clean the
filter.
The filter may appear
discolored, even after
vacuuming. This is
normal and does not affect
performance in any way—a new filter
is not necessary.
If the filter becomes damaged during
cleaning, call 0870 759 9000 to order
replacements.
RESETTING THE FILTER INDICATOR
LIGHT AND REINSTALLING THE
FILTER.
Complete after reinstalling the filter
and/or resetting the filter indicator
light.
NOTE:A hang tab and filter clips ensure the
filter attaches properly.
1.Unplug unit from wall.
2.Make sure the hang tab is
securely in place (see
Figure 3). Align the clip on
the top of the filter with the
rails on the inside of the
unit. Gently slide the filter
onto the rail (see Figure 4).
3.Place air inlet grill (with
pre-washable foam) back
onto unit securely.
4.After replacing the filters,
completely close the unit
and plug it into the wall.
5.With the unit on, RESET the
Filter Indicator Light ( ) by
inserting a small object
(such as a pin or paper clip)
into the hole below the Filter
Indicator Light (see Figure
5).
6.Hold the button down for
five seconds.
7.The light will now turn off.
Figure 2
Figure 3
Figure 4
Figure 5
Reset
Button
4 5