42
água/substâncias líquidas com a caixa do
motor da ventoinha.
• Para limpar, utilize um pano macio e
humedecido com uma solução de detergente
suave.
• Não utilize as seguintes substâncias como
método de limpeza: petróleo, diluentes ou
benzina.
Como Limpar as Palhetas do Ventilador
(Veja as instruções para o conjunto da cabeça
do ventilador)
1. Remova cuidadosamente a grelha dianteira
do nó de protecção.
2. Limpe as palhetas do ventilador, as grades de
frente e de trás com um pano macio e úmido.
3. Reinstale a lâmina da ventoinha, aperte a
porca de bloqueio da lâmina e fixe
firmemente a grelha dianteira com a porca de
bloqueio da grelha.
Limpeza da Cabeça do Ventilador, do
Pé e da Coluna
Utilize um pano úmido e macio, com ou sem
uma solução suave de água e sabão e
cuidadosamente limpe o pé, a coluna e a
cabeça do ventilador. Por favor tenha cuidado
em volta da área da caixa do motor. Não
permita que o motor ou outro componente
elétrico entre em contato com água.
ARMAZENAMENTO DA VENTOINHA
A sua ventoinha pode ser armazenada
parcialmente desmontada ou montada.
É importante guardá-la num local seco e seguro.
• Se armazenar desmontada, recomendamos
a utilização da caixa original (ou outra de
tamanho adequado).
• Se armazenar montada ou parcialmente
desmontada, lembre-se de proteger a cabeça
da ventoinha da exposição ao pó.
GARANTIA
Guarde o seu recibo, já que ele será necessário
para quaisquer reclamações ao abrigo desta
garantia.
Este produto tem uma garantia de 3 anos após
a compra, conforme o descrito neste
documento.
Durante este período de garantia, no caso
improvável de o aparelho deixar de funcionar
devido a um defeito de concepção ou fabrico,
devolva-o ao local da compra, acompanhado do
recibo e de uma cópia desta garantia.
Os direitos e benefícios adquiridos ao abrigo
desta garantia complementam e não afectam os
seus direitos legais. Apenas a Holmes Products
(Europe) Ltd. ("Holmes") tem o direito de alterar
estes termos.
A Holmes compromete-se, durante o período da
garantia, a reparar ou substituir o aparelho ou
qualquer peça do mesmo que não funcione
devidamente, sem encargos, desde que:
• Comunique prontamente ao local de
compra ou à Holmes o problema; e
• o aparelho não tenha sofrido qualquer
alteração, nem tenha sido sujeito a danos,
uso indevido, abuso, reparação ou
alteração por alguém não autorizado pela
Holmes.
Esta garantia não cobre as avarias resultantes
de uso indevido, danos, abuso, uso de voltagem
incorrecta, actos da natureza, eventos fora do
controlo da Holmes, reparações ou alterações
por alguém não autorizado pela Holmes ou
incumprimento das instruções de utilização. A
garantia não cobre igualmente o desgaste
normal, incluindo, entre outros, ligeira
descoloração e riscos.
Os direitos adquiridos ao abrigo desta garantia
aplicam-se apenas ao comprador original e não
são extensíveis a uma utilização comercial ou
colectiva.
Se o seu aparelho incluir uma
garantia ou um certificado
específico para o país, por favor
consulte os termos e as
condições dessa garantia ou
certificado em vez desta, ou
contacte o seu revendedor local
autorizado para mais
informações.
Os resíduos de equipamentos eléctricos não
devem ser eliminados juntamente com o lixo
doméstico. Recorra a instalações de reciclagem,
caso existam. Contacte-nos por correio
electrónico para enquiriesEurope@jardencs.com
para obter mais informações sobre reciclagem e
REEE.
Holmes Products (Europe) Limited
1 Francis Grove
London
SW19 4DT
UK
1
INTRODUCTION
The Energy Saving Fan uses 45% less energy*
and still has strong air flow. Its energy saving
DC motor will keep you cool and save you
money!
PLEASE READ AND SAVE THESE
INSTRUCTIONS
IMPORTANT INSTRUCTIONS
When using electrical appliances, basic safety
precautions should always be taken including
the following:
• Use the fan only for purposes described in
the instruction manual.
• To protect against electrical shock, do not
immerse the fan, plug or cord in water or
spray with liquids.
• Close supervision is necessary when any
appliance is used by or near children.
• Unplug from the electrical outlet when not in
use, when moving the fan from one location
to another, before putting on or taking off
parts and before cleaning.
• Avoid contact with any moving parts.
• Do not operate in the presence of explosive
and/or flammable fumes.
• Do not operate fan until fully assembled with
all parts properly in place.
• To avoid fire hazard, NEVER place the cord
under rugs or any parts near an open flame,
cooking or other heating appliance.
• Ensure that the fan is switched off from the
supply mains before removing the guard.
• Do not operate any appliance with a
damaged cord, plug, after the appliance
malfunctions, or has been dropped/damaged
in any manner.
• The use of attachments not recommended or
sold by the appliance manufacturer may
cause hazards.
• Do not use outdoors.
• Do not let the cord hang over the edge of a
table or counter, or come into contact with
hot surfaces.
• To disconnect from the electrical supply, grip
the plug and pull from the wall outlet. DO
NOT pull on the cord.
• Always use on a dry, level surface.
• Do not operate without the fan grills properly
in place.
• This product is intended for household use
ONLY and not for commercial or industrial
applications.
• Should the fan stop working, first check the fuse
in the plug (UK only) or fuse/circuit breaker at
the distribution board is operating, before
contacting the manufacturer or service agent.
• If the supply cord or plug is damaged, it must
be replaced by the manufacturer or its
service agent or a similarly qualified person
in order to avoid hazard.
• This appliance is not intended for use by
persons (including children) with reduced
physical, sensory or mental capabilities, or
lack of experience and knowledge, unless
they have been given supervision or
instruction concerning use of the appliance
by a person responsible for their safety.
Children should be supervised to ensure that
they do not play with the appliance.
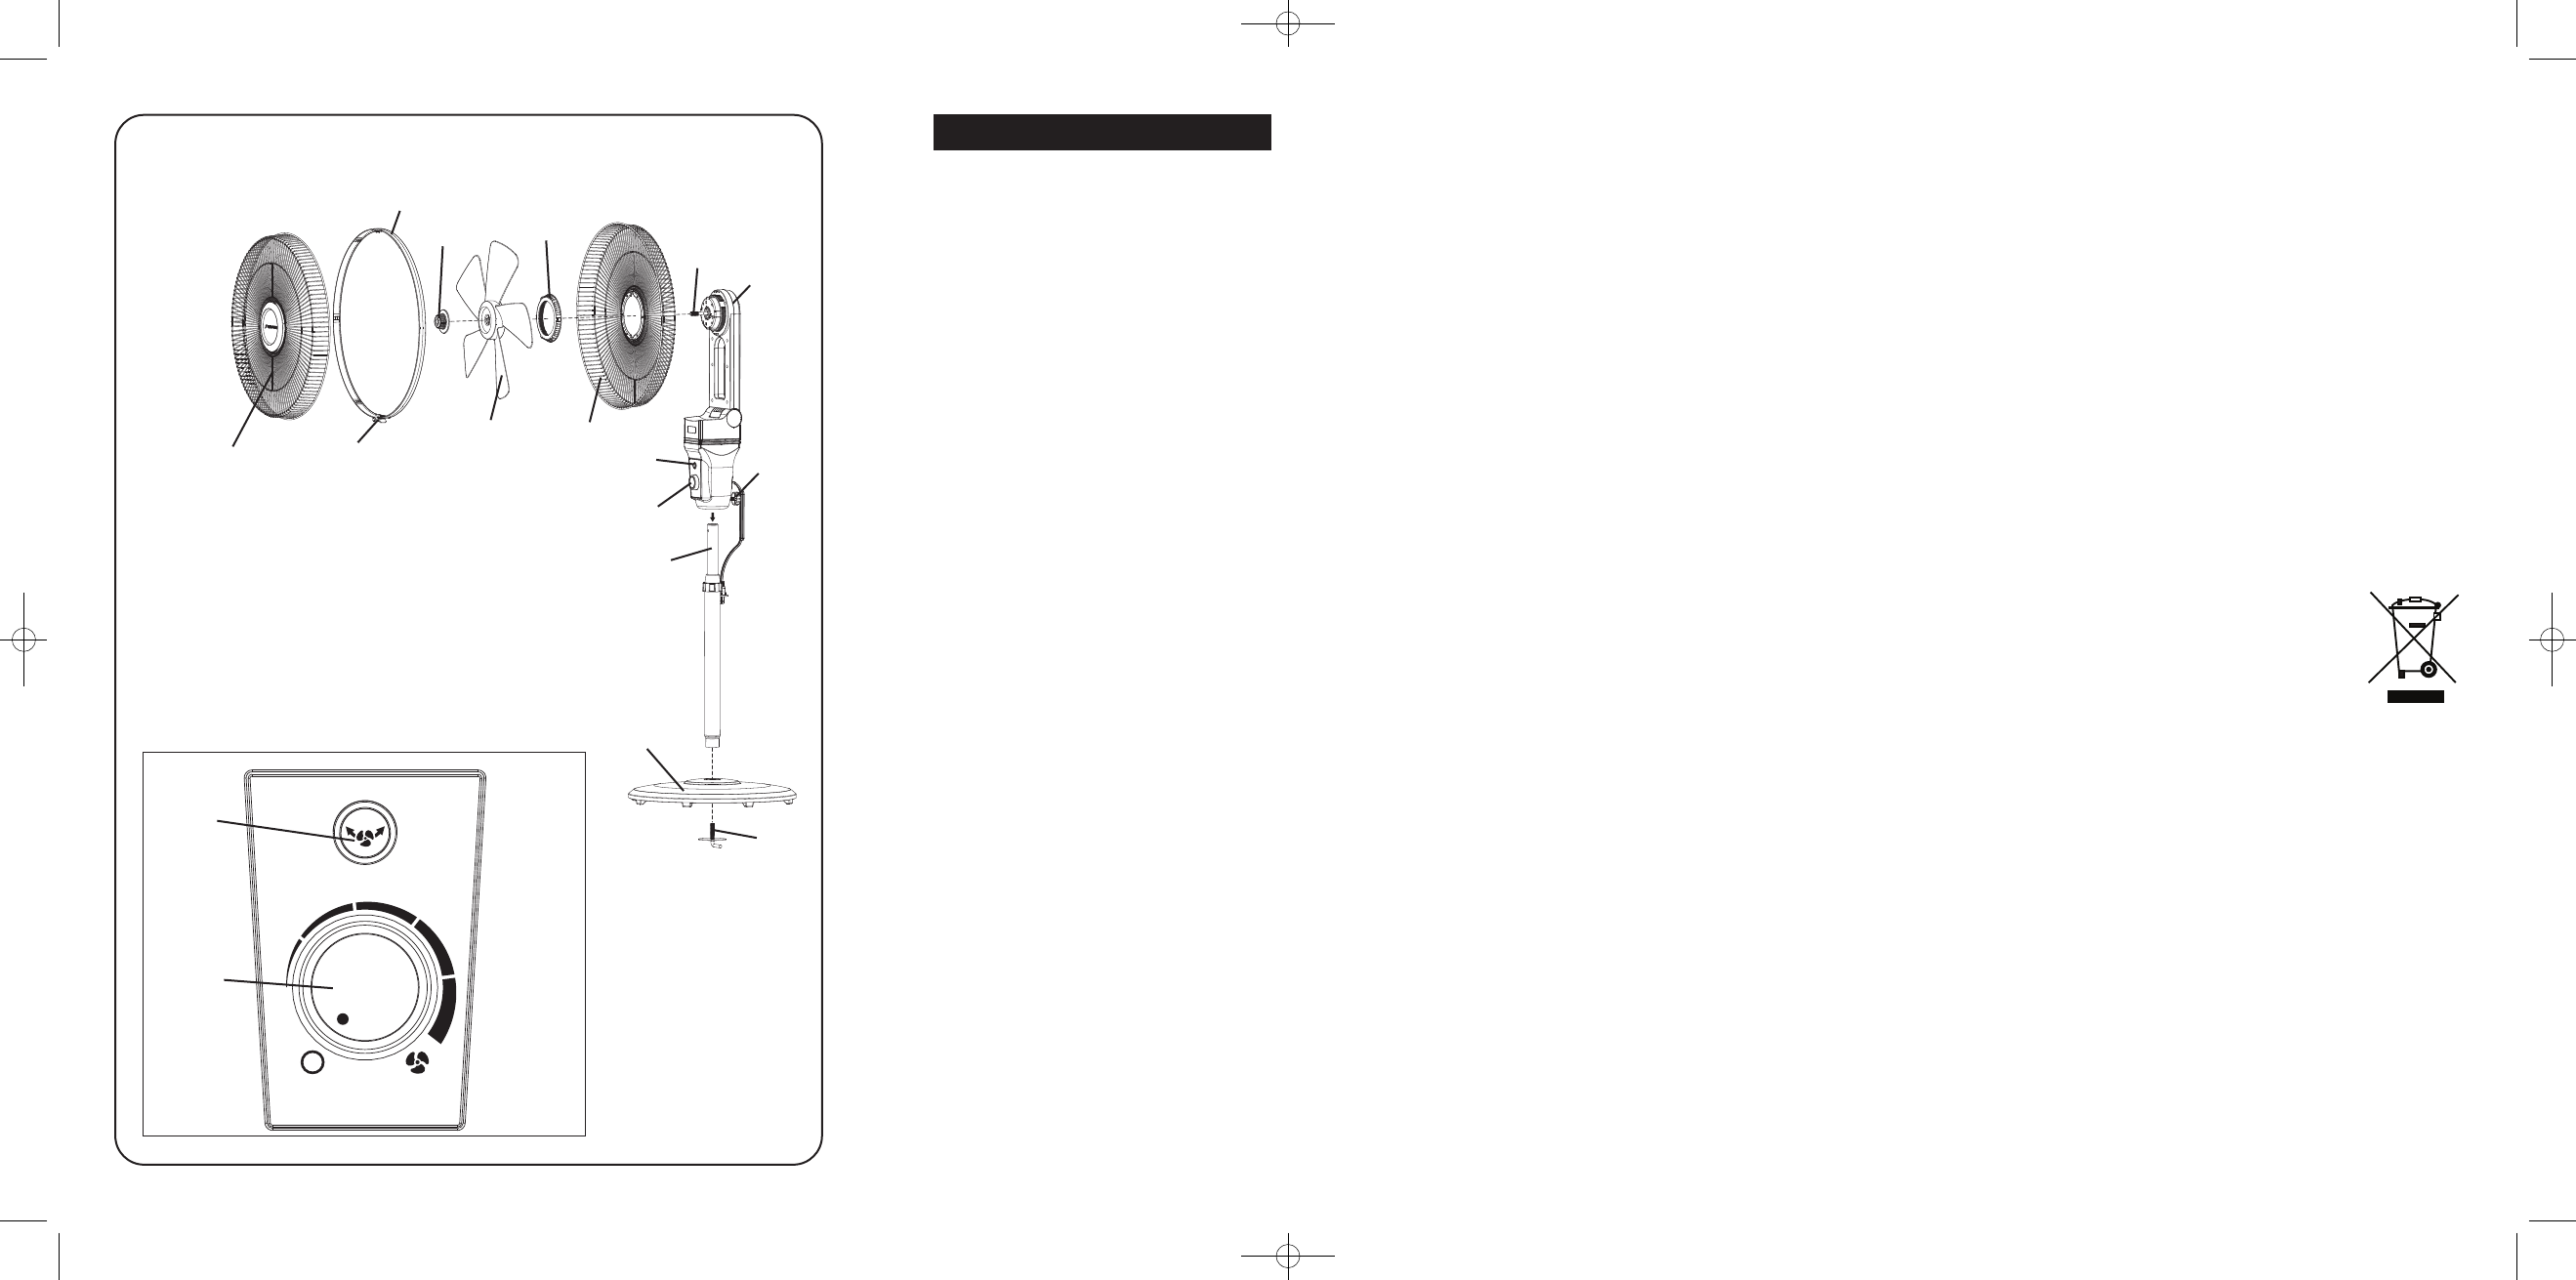
DESCRIPTIONS (See Figure1)
A. Front Grill
B. Grill Locking Nut
C. Guard Loop
D. Fan Blade Lock Nut
E. Fan Blade
F. Rear Grill Nut
G. Rear Grill
H. Motor Shaft
I. Motor Housing
J. Pole Locking Nut
K. Expandable Pole
L. Base
M. L-Shaped locking Lever
N. Oscillation Button
O. Variable Speed Dial
MISSING A PART FOR YOUR FAN?
Please call 0800 052 3615 for assistance.
BASE POLE ASSEMBLY (See Figure 1)
1. Extend the upper pole through the top of the
lower pole and secure it firmly by turning the
height adjust knob clockwise.
2. Insert the bottom of the lower pole into the
hole on the top of the base.
3. Insert the L-shaped locking lever into the
bottom of the base and the lower pole. Turn
the L-shaped locking lever clockwise and
tighten to securely attach the pole to the
base.
FAN HEAD ASSEMBLY (See Figure 1)
You are now ready to assemble the fan head.
1. Position the rear grill over the motor shaft,
ensuring that the notches at the top and
bottom of the rear grill fit over the protruding
notches on the motor housing. Make sure the
rear grill fits securely against the motor
housing.
2. Fasten the rear grill in place using the rear
grill nut. Turn the nut clockwise and tighten
firmly.
ENGLISH
BSF1612M
Figure 2
Figure 1
O
N
L
M
K
O
J
N
I
H
G
E
B
F
D
C
A
*Based on a survey of published wattage for
competitive traditional stand fans in the UK, France
and Spain as of July 15, 2011.