persons (including children) with reduced
physical, sensory or mental capabilities,
or lack of experience and knowledge,
unless they have been given supervision or
instruction concerning use of the appliance
by a person responsible for their safety.
Children should be supervised to ensure that
they do not play with the appliance.
22. CAUTION: In order to avoid a hazard
due to inadvertent resetting of the thermal
cutout, this appliance must not be supplied
through an external switching device, such
as a timer, or connected to a circuit that is
regularly switched on and off by the utility.
PLEASE SAVE THESE INSTRUCTIONS
Please note that this is an electrical
appliance, and requires attention when
in use.
How Your Warm Mist Humidifier Works
Your Bionaire
TM
Warm Mist Humidifier is
designed to allow the proper amount of water to
flow out of the tank and into the heating
chamber where the Electronic Thermal Control
heating element warms the water. Air is drawn in
through the grill openings located in the back of
the unit and mixed with steam in the misting
chamber. The warm mist is then dispersed out
of the top of the misting chamber through the
outlet grill and into the room.
NOTE: A humidity level below 30% can be
unhealthy and uncomfortable. The
recommended humidity level is between 40%-
60%.
PRE-OPERATING INSTRUCTIONS
1. Be sure the humidifi er is disconnected from
the electrical outlet and the Control Knob is
in the Off (
) position.
2. Select a location for your humidifi er, on a
fl at surface, about 10cm away from the wall.
Do not place your humidifi er on furniture.
A fl oor location that will not be damaged by
moisture is best.
3. Remove the water tank (see Fig. 1).
4. Make sure the humidifi er base (E) is free
of foreign objects by removing the main
housing (B). To remove this stack you
must move the Safety Lock located in the
humidifi er base, counter clockwise until the
main housing can freely move away from
the base. To replace the main housing and
chamber back to the base line up and then
rotate the safety lock clockwise.
Filling the Water Tank
NOTE: This humidifier holds about 3.4 litres of
water in the tank and humidifier base. The
humidifier will produce up to 11.7 litres of
moisture over a 24-hour period.
1. Be sure the humidifi er is disconnected from
the electrical outlet and the Control Knob is
in the Off ( ) position. Remove the water
tank.
2. Twist off the tank cap located on the bottom
of the tank by turning counter clockwise and
fi ll the water tank with cool, fresh water. Do
not fi ll with warm water as this may cause
leaking.
3. After fi lling the tank, replace the tank cap
by fi rmly turning clockwise and then replace
the water tank on the base. The tank will
immediately begin to empty into the base.
4. Plug the power cord into a convenient and
suitable power supply.
OPERATING INSTRUCTIONS
1. To turn the unit on, switch the control knob
to the High (2) position. High will produce
the maximum moisture and Low (1) will
produce the longest run time and quieter
performance. The Power light (
) will be
on. It is normal for the humidifi er to take 10
minutes to boil the water and produce a mist.
2. To turn the unit to low, switch the knob to
the Low (1) position. To turn the unit off turn
switch the knob to Off (
).
3. The Medication cup (F) is located on the
top of the mist chamber. To use pour a few
drops of aromatherapy oils or medicinal
drops that have been prescribed by your
doctor into the Medication cup. DO NOT add
medication to the water tank. DO NOT add
medication to the Medication cup when the
unit is already operating.
RESET PROCEDURE
NOTE: When the water in the tank is empty
and the water in the heating chamber is almost
empty, the automatic shut off will activate. The
Reset Light ( ) will illuminate and the unit will
not operate again until you refill the water tank
and reset the humidifier as outlined below:
1. Turn the control knob to Off (
).
2. Unplug the unit.
3. Remove, empty and refi ll the water tank, being
sure to follow the maintenance instructions.
then replace the water tank onto the base.
4. Allow 30 minutes for the automatic shut off
to reset.
5. After the 30 minutes, plug the unit into the
socket and turn the control knob to High
(2). The Reset Light (
) should now be off.
In about 10 minutes the unit will begin to
produce moisture.
Congratulations
By choosing a Bionaire
TM
humidifier, you have
chosen one of the finest humidifiers on the
market today!
PLEASE READ AND SAVE THESE
IMPORTANT INSTRUCTIONS
NOTE: Before reading these
instructions, please review the
corresponding illustrations.
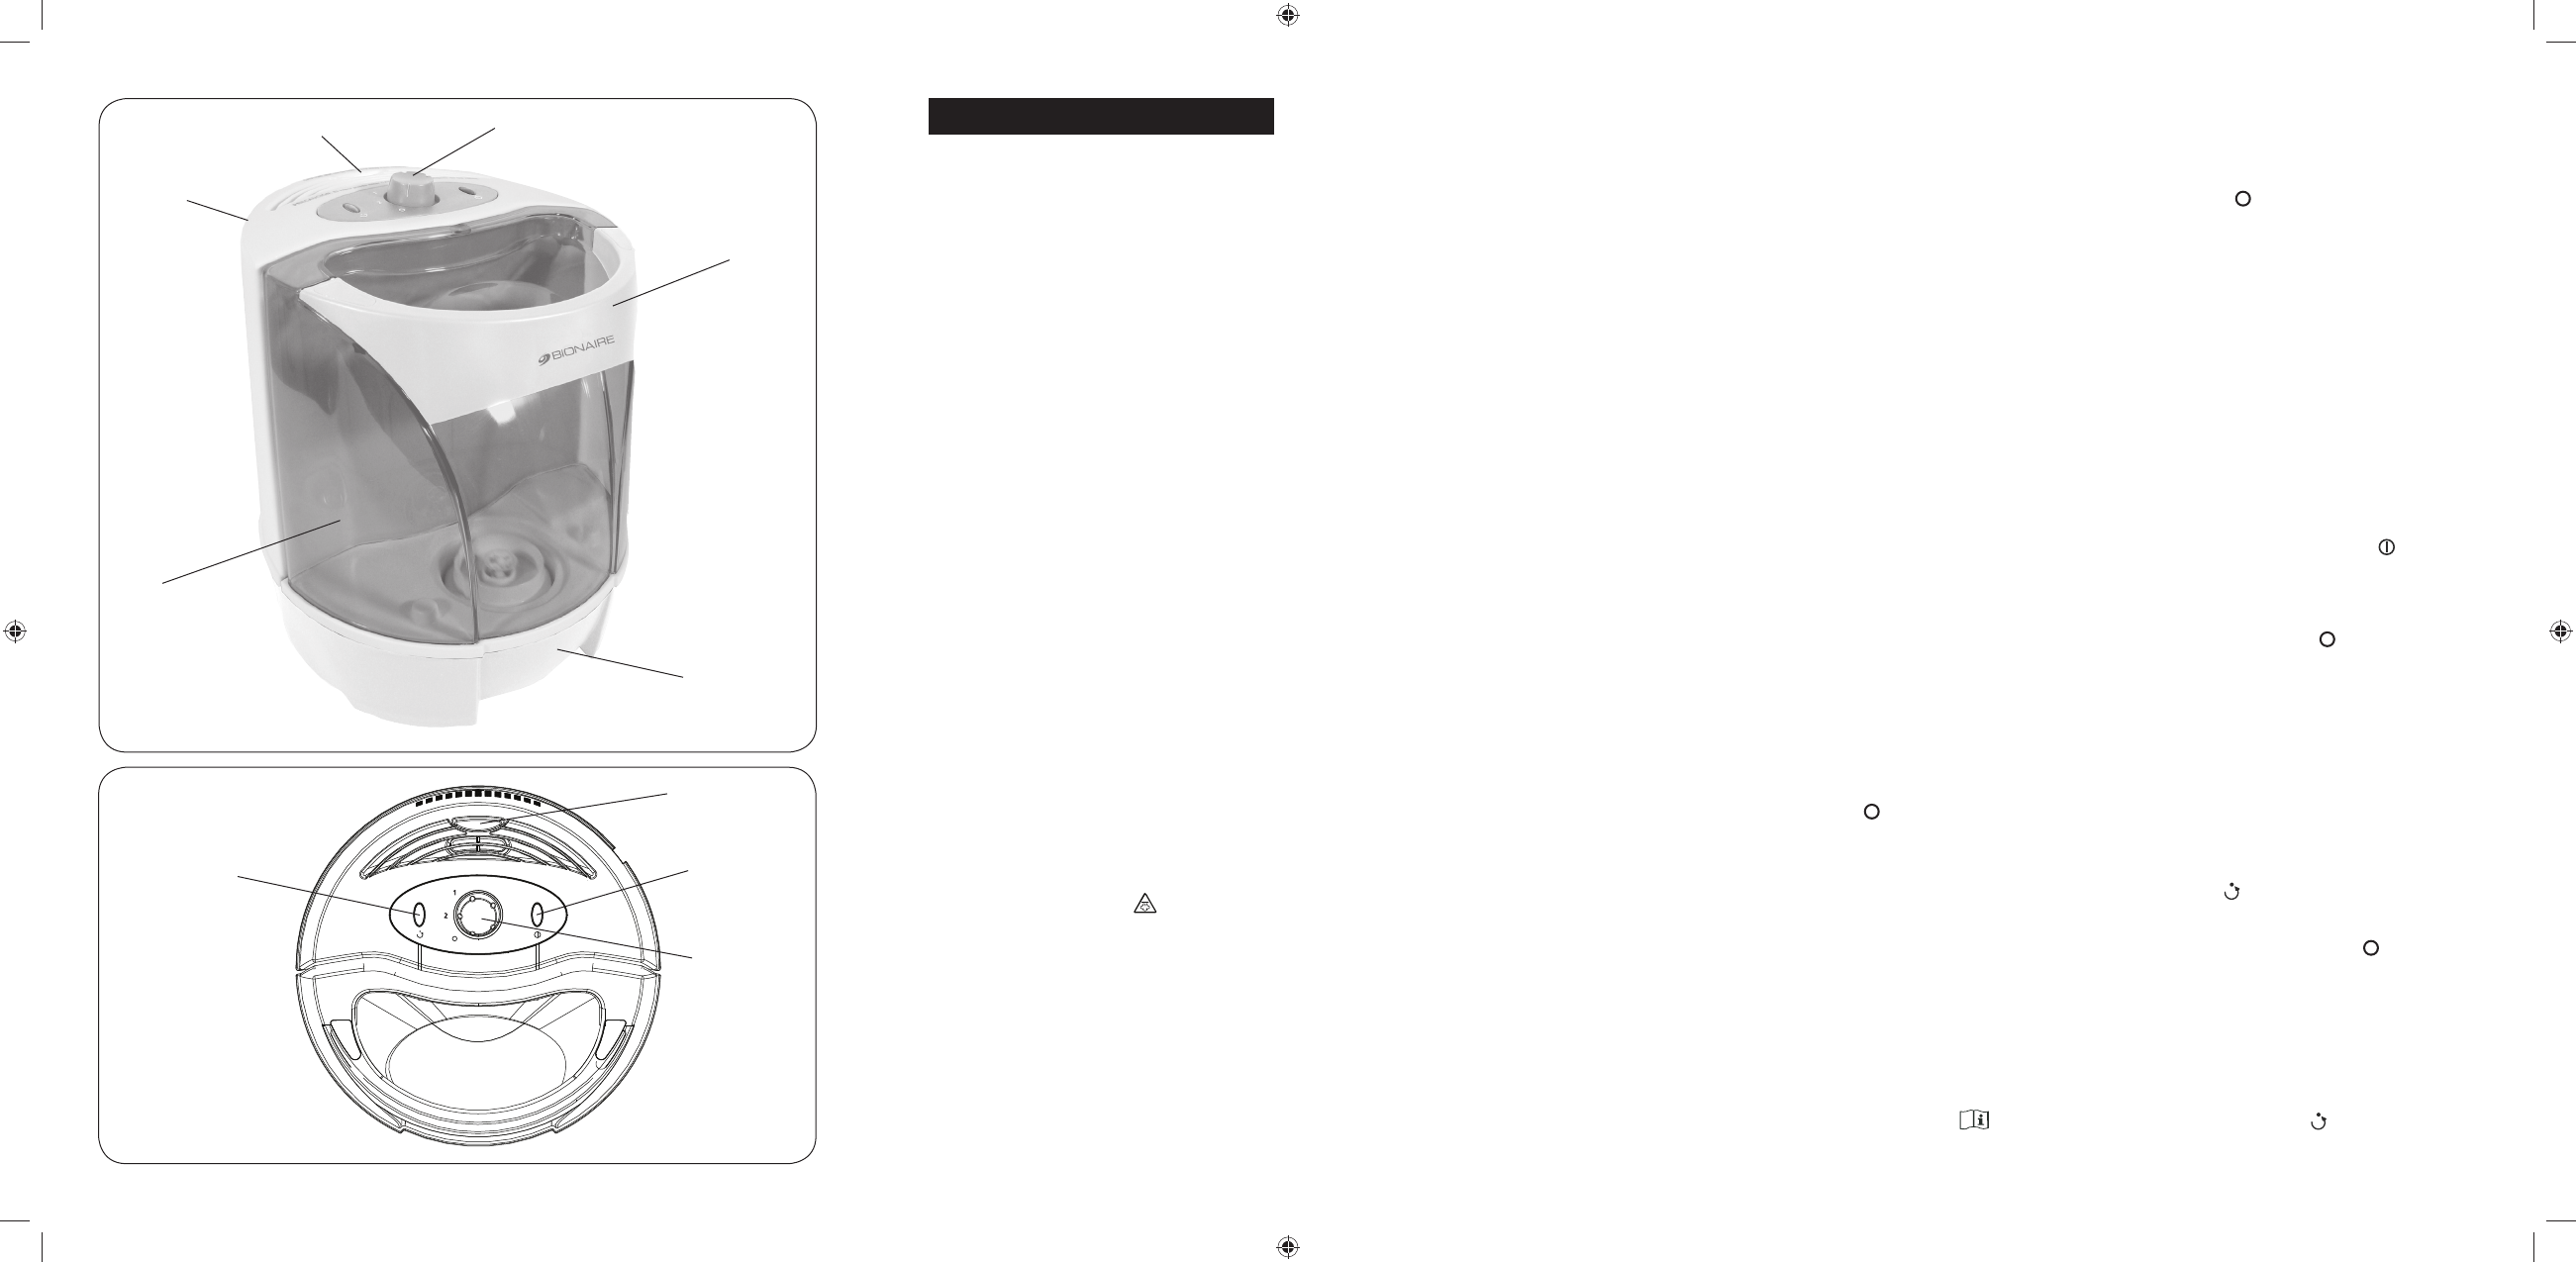
DESCRIPTIONS (See Fig.1 & 2)
A. Humidifi er tank
B. Main Housing
C. Tank Handle
D. Control Knob
E. Humidifi er base
F. Medication Cup
G. Power light
H. Reset Light
SAFETY PRECAUTIONS
When using electrical appliances, basic safety
precautions should always be followed to reduce
the risk of fire, electric shock, and injury to
persons, including the following:
1. Read all instructions before using the
appliance.
2. To avoid fi re or shock hazard, plug the
appliance directly into an electrical outlet and
fully insert the plug.
3. Keep the cord out of heavy traffi c areas. To
avoid fi re hazard, NEVER put the cord under
rugs, or near radiators, stoves, or heaters.
4. DO NOT place humidifi er near heat sources
such as stoves, radiators, and heaters. Do
locate your humidifi er on an inside wall near
an electrical outlet. The humidifi er should be
at least 10cm/4” away from the wall for best
results.
5. CAUTION: Hot steam (
). This
humidifi er produces hot steam and therefore
should not be placed in an area where
it is accessible to children. Never use a
humidifi er in a closed room. (i.e: doors
and windows closed) as it may result in
excessive humidity.
6. WARNING: Do not attempt to refi ll
humidifi er without fi rst unplugging the unit
from it’s electrical outlet. Be sure to pull by
the plug and not the cord.
7. NEVER drop or insert any object into any
openings. DO NOT place hands, face, or
body directly over or near Moisture Outlet
while unit is in operation. DO NOT cover
Moisture Outlet or place anything over it
while the unit is operating.
8. DO NOT operate any appliance with a
damaged cord or plug, after the appliance
malfunctions, or if it has been dropped or
damaged in any manner. Return appliance
to manufacturer for examination, electrical or
mechanical adjustment, or repair.
9. Use appliance only for intended household
use as described in this manual. Any other
use not recommended by the manufacturer
may cause fi re, electric shock, or injury
to persons. The use of attachments not
recommended or sold by the manufacturer
may cause hazards.
10. DO NOT use outdoors.
11. Always place humidifi er on a fi rm, fl at,
level surface. A waterproof mat or pad is
recommended for under the humidifi er.
NEVER place it on a surface that may
become damaged by exposure to water and
moisture (i.e. fi nished fl oor).
12. DO NOT allow the Moisture Outlet to directly
face the wall. Moisture could cause damage,
particularly to wallpaper.
13. Humidifi er should be unplugged when not in
use.
14. NEVER tilt, move, or attempt to empty unit
while it is operating. Shut off and unplug
before removing the water tank and moving
the unit. DO NOT attempt to remove the
water tank within 15 minutes after the
humidifi er is turned off and unplugged.
Serious injury may result.
15. This humidifi er requires regular maintenance
to operate appropriately. Refer to cleaning
and maintenance procedures.
16. NEVER use detergents, petrol, glass
cleaner, furniture polish, paint thinner, or
other household solvents to clean any part of
the humidifi er.
17. Excessive humidity in a room can cause
water condensation on windows and some
furniture. If this happens, turn the humidifi er
OFF.
18. Do not use humidifi er in an area where
humidity level is in excess of 55%.
19. DO NOT attempt to repair or adjust any
electrical or mechanical functions on this
unit. The inside of the unit contains no user
serviceable parts. All servicing should be
performed by qualifi ed personnel only.
20. If the supply cord is damaged, it must be
replaced by the manufacturer or its service
agent or a similarly qualifi ed person.
21. This appliance is not intended for use by
ENGLISH
2 3
Fig.1
Fig.2
G
D
F
H
C
B
F
D
E
A