16
13
04
02
05
18
08
19
08
20
21
20
22
20
09
30
27
11
25 28
27
25
28
17
11
11
11
29
11 26 25
04
02
05
29
07
11
13
14
24
23
13
12
15
A properly adjusted headrest 07 ensures optimal protection
for your child on the child seat. Regularly check that the height
of the headrest 07 is suitable for the body height of your child:
The headrest 07 must be adjusted so that the shoulder straps
08 are at the same level as your child’s shoulders, or slightly
higher.
A correctly adjusted headrest 07 ensures that the diagonal
belt 11 is optimally positioned and gives your child optimum
protection. Regularly check that the height of the headrest 07
is suitable for the body height of your child:
The headrest 07 must be positioned so that two fingers
can be inserted between the headrest 07 and your child's
shoulders.
To adjust the height of the headrest to fit your child:
1. Press and hold the adjustment handle 10 on the back
ofthe headrest 07 .
2. The headrest
07 is now unlocked and can be moved
to the desired height. When you release the adjustment
handle 10 , the headrest 07 locks into place.
3. Place the child seat on the car seat.
4. Sit your child on the child seat and check the height.
Repeat this procedure until the headrest 07 is at thecor-
rect height.
5.3 Adjusting the headrest for Group II +III (15-36 kg)
1. If your vehicle is not fitted with ISOFIX insertion aids
as standard, clamp the two insertion aids 02 (which
are supplied along with the seat*), with recess facing
upwards, into the two ISOFIX fixing points 01 in your
vehicle.
TIP: The ISOFIX fixing points are located between
theseat surface and the backrest of the car seat.
2. Move the headrest of the car seat to its topmost position.
3. Pull the grey fabric loop at the back of the child seat 03
until the ISOFIX locking arms 04 are fully extended.
4. On both sides of the ISOFIX locking arms, squeeze the
04 green locking button 05 and the red release button
06 together. This ensures that both hooks on the ISOFIX
locking arms 04 are open and ready to use.
* The insertion aids make it easier to install the child seat using the ISOFIX fixing points and they
prevent damage to the car seat covers. If they are not being used, remove them and keep them
in a safe place. For vehicles with a folding backrest, the insertion aids need to be removed before
folding the backrest.
Any problems that occur are usually caused by dirt or external objects on the insertion aids and
onthe hook. Remove the dirt or external objects to resolve such problems.
5.1 Preparing ISOFIX
5.2 Adjusting the headrest for Group I (9-18 kg)
First please read the section describing the desired installation method in Section 6.
GROUP 2 (15-25 kg) &
GROUP 3 (22-36 kg)
With ISOFIT + car seat belt
B1
GROUP 1 (9-18 kg)
With ISOFIX + Top Tether
A
1. PREPARATORY STEPS
1.1 Follow the steps described in Section 5.1
“PREPARING ISOFIX”.
1.2 Follow the steps in Section 5.2 “ADJUSTING
THEHEADREST FOR GROUP I”.
2. PREPARING THE TOP TETHER
2.1 Unhook the snap-on hook 12 of the top tether 13
from the fastening on the back of the child seat.
2.2 Take the top tether 13 out of the pouch 14 and lay
itover the child seat.
TIP: Remove the outer rubber band only if the length
of the top tether 13 is not sucient for your vehicle
model.
2.3 Place the child seat in the direction of travel on an
approved car seat. Adjust the backrest angle of the
car seat so that the gap between the car seat and the
child seat is as small as possible.
2.4 Take the top tether 13 and press the metal tongue 15
away from the belt to extend it, and pull the top tether
13 at the snap-on hook 12 until it forms a V shape.
2.5 Guide the top tether 13 past the headrest on the left
and right.
3. FIXING THE TOP TETHER
Attach the snap-on hook 12 to the anchorage point
recommended in your vehicle's instruction manual.
CAUTION! Check that you are not using lug-
gagehooks instead of the top-tether anchorage
points.
Look for the following symbol in your vehicle:
4. FASTENING THE ISOFIX
4.1 Position the two ISOFIX locking arms 04 directly
infront of the two insertion aids 02 .
4.2 Push the two ISOFIX locking arms 04 into the insertion
aids 02 until the ISOFIX locking arms 04 engage
onboth sides with an audible click.
DANGER! The green locking button 05 must
bevisible on both sides indicating that the child seat
iscorrectly fastened.
5. PRESS THE CHILD SEAT BACKWARDS
Push the child safety seat firmly backwards as far as it will go.
6. CHECK FOR CORRECT FASTENING
Shake the child seat to check that it is securely fastened
and check the locking buttons 05 to make sure that the
two indicators are fully green.
7. TIGHTEN THE TOP TETHER
Tighten the top tether 13 , until the belt tension indicator
16 turns green and the top tether 13 is tight.
1. PREPARATORY STEPS
1.1 Follow the steps described in Section 5.1
„PREPARINGISOFIX”.
1.2 Follow the steps in Section 5.3 “ADJUSTING
THEHEADREST FOR GROUP II+III”.
2. Place the child seat facing forward on an approved car
seat. Make sure that the backrest 30 is flush with the back-
rest of the vehicle seat.
Tip: If the headrest of the car seat prevents the child seat
from being fastened properly, it should be removed (see
vehicle’s instruction manual). Secure the removed headrest
in a suitable place in the vehicle so that it will not be tossed
around.
3. FASTENING THE ISOFIX
3.1 Position the two ISOFIX locking arms 04 directly
infrontof the two insertion aids 02 .
3.2 Push the two ISOFIX locking arms 04 into the inser-
tion aids 02 until the ISOFIX locking arms 04 engage
onboth sides with an audible click.
DANGER! The green locking button 05 must bevisi-
ble on both sides indicating that the child seat iscorrect-
ly fastened.
4. PRESS THE CHILD SEAT BACKWARDS
Push the child safety seat firmly backwards as far as it will go.
1. Follow the steps in Section 8 „ADJUSTING THE HEAD-
REST FOR GROUP II+III“ .
2. Place the child seat on the car seat. Ensure that the back-
rest 30 is flat against the backrest of the car seat.
Tip: If the headrest of the car seat prevents the child
seat from being fastened properly, it should be removed
(see vehicle’s instruction manual). Secure the removed
headrest in a suitable place in the vehicle so that it will not
be tossed around.
3. Follow the steps in Section 8 “SECURING YOUR CHILD”.
5. CHECK FOR CORRECT FASTENING
Shake the child safety seat to ensure that it is securely fas-
tened, and check the locking buttons 05 again to ensure
that they are fully green.
6. Follow the steps in Section 8 “SECURING YOUR CHILD”.
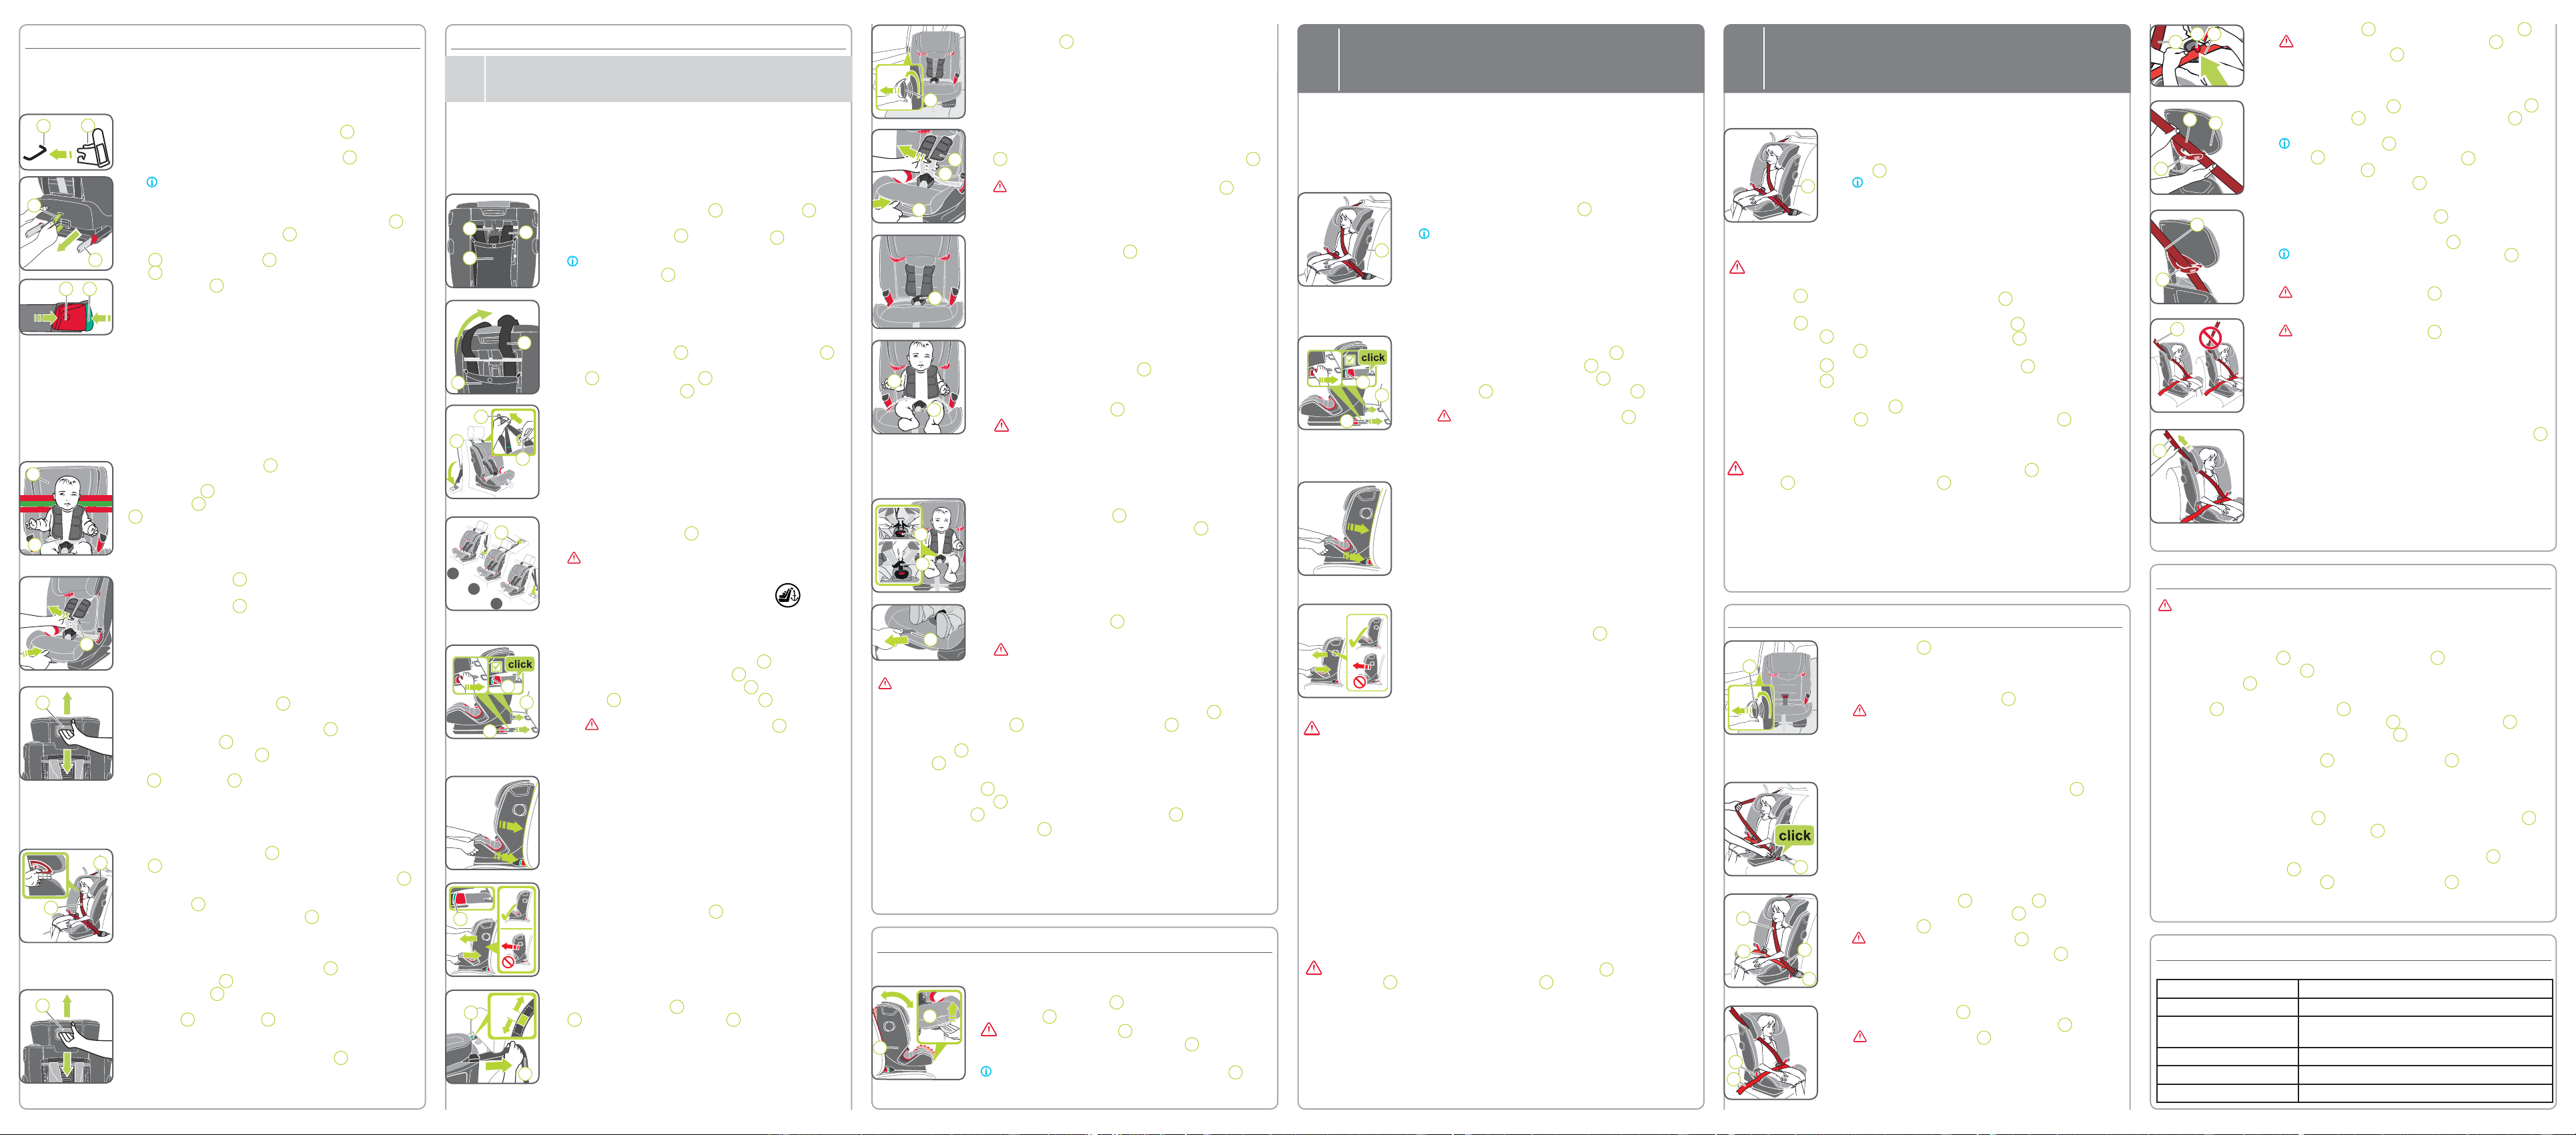
Before every journey, for your child’s safety, check that ...
Źthe child seat is engaged on both sides with the ISOFIT locking arms in the ISOFIT
fixing points and both locking buttons are fully green;
Źthe child seat is securely fastened;
Źthe lap belt passes through the bright red belt guides on both sides of the seat
cushion;
Źthe
lap belt passes through the bright red
SecureGuard;
Źthe diagonal belt on the car seat belt buckle side also passes through the bright
red belt guide on the seat cushion;
Źthe diagonal belt passes through the dark red belt holder at the headrest;
Źthe SICT side impact protection is correctly installed and functional;
Źthe diagonal belt runs diagonally backwards;
Źthe straps are tight and not twisted;
Źthe car seat belt buckle is not placed in the bright red belt guide on the seat
cushion.
Before every journey, for your child’s safety, check that ...
Źthe child seat is securely fastened;
Źthe lap belt
25
passes through the bright red belt guides
28
on both sides of the
seat cushion;
Źthe
lap belt
25
passes through the bright red
SecureGuard 26 ;
Źthe diagonal belt 11 on the side of the car seat belt buckle 27 also passes through
the bright red belt guide 28 on the seat cushion;
Źthe diagonal belt 11 passes through the dark red belt holder 29 at the headrest;
Źthe diagonal belt 11 runs diagonally backwards;
Źthe straps are tight and not twisted;
Źthe SICT side impact protection 17 is correctly installed and functional;
Źthe car seat belt buckle 27 is not placed in the bright red belt guide 28 on the seat
cushion.
1. Turn the SICT 17 anti-clockwise (on the side nearer
thevehicle door) until there is a gap of 5 mm between
it and the vehicle door or until it is fully unscrewed.
Pullout the car seat belt, pass it in front of your child
and into the car seat belt buckle 27 .
DANGER! Check that the car seat belt is not twist-
ed, otherwise the full protective action of the restraint
system will be impaired.
2. Insert the buckle clip in the car seat belt buckle 27 until
there is an audible click.
3. Place the diagonal belt 11 and lap belt 25 on
the side of the car seat belt buckle 27 in the bright
redbelt guide 28 on the seat cushion.
DANGER! The seat belt buckle 27 must
notbeplaced near the bright red belt guide 28 .
4. Also place the lap belt 25 on the other side
oftheseatcushion in the light red belt guide 28 .
DANGER! The lap belt 25 must be placed as
lowaspossible over your child's hips on both sides.
5. Insert the lap belt 25 in the bright red SecureGuard 26 .
DANGER! Do not insert the diagonal belt 11 in the
bright red SecureGuard 26 .
6. Place the diagonal belt 11 in the dark red belt holder 29
atthe headrest 07 until it is fully in the belt holder 29
without twisting.
Tip: If the backrest 30 is covering the dark red belt
holder 29 , you can adjust the headrest 07 upwards.
Thediagonal belt 11 can now be easily inserted. You
cannow adjust the headrest 07 back to the correct height.
7. Make sure that the diagonal belt 11 passes over
thecollarbone of your child, not the neck, and that the
button on the dark red belt holder is 29 fully closed.
Tip: You can adjust the height of the headrest 07
again in the vehicle.
DANGER! The diagonal belt 11 must run diagonally
backwards. You can adjust the position of the belt with
the adjustable belt deflector of the vehicle.
DANGER! The diagonal belt 11 must never run
forwards towards the belt deflector on the vehicle.
Inthiscase, use the child seat on the back seat only.
8. Tighten the car seat belt by pulling on the diagonal belt 11 .
9. Follow the safety instructions for the installation method
concerned.
UNFASTENING YOUR CHILD AND REMOVAL:
To unfasten your child or to remove the child seat, follow the steps in Section 9
"REMOVING THE CHILD SEAT".
The
ADVANSAFIX IV R
is not permanently installed in the vehicle. It is simply secured
along with your child by the vehicle's 3-point seat belt.
UNFASTENING YOUR CHILD AND REMOVAL:
To unfasten your child or to remove the child seat, follow the steps in Section 9
“REMOVING THE CHILD SEAT”.
ŹThe shoulder straps 08 must be adjusted so that they
arehorizontal or just above your child’s shoulders.
ŹThe shoulder straps 08 must not be passed behind the
child’s back, or placed level with or above the child’s ears.
The shoulder straps are adjusted as follows:
1. Loosen the 5-point harness 09 on the child seat as far
aspossible.
2. Press and hold the adjustment handle 10 on the back
ofthe headres t 07 .
3. The unlocked headrest 07 can now be moved to the
desired height. When you release the adjustment handle
10 , the headrest 07 locks into place.
9. LOOSEN THE SHOULDER STRAPS
To loosen the shoulder straps, press the adjustment button
18 while at the same time pulling both shoulder straps 08
forward.
CAUTION! Do not pull the shoulder cushions 19 .
10. OPEN THE HARNESS BUCKLE
To open the harness buckle 20 press the red button
onthe buckle.
11. SET THE CHILD IN THE CHILD SEAT
Place your child in the child seat.
Check that the harness buckle 20 is facing forwards.
12. PLACE THE SHOULDER STRAPS
Pass the shoulder straps 08 over your child’s shoulders.
WARNING! Do not twist or swap the shoulder
straps, as this will remove their protective function.
13. FASTENING THE HARNESS BUCKLE
Take the two buckle clips 21 and hold them together
before inserting them in the harness buckle 20 – they must
make an audible click when inserted.
14. TIGHTENING THE ADJUSTMENT STRAP
Pull the adjustment strap 22 until the strap lies flat
andsnug around your child’s body.
WARNING! The hip belts must be positioned
aslowas possible across your child's hips.
Before each journey, in order to ensure your child’s safety, make
sure that ...
Źthe child seat is engaged on both sides with the ISOFIT locking arms 04
intheISOFIX fixing points 01 and that both locking buttons 05 are fully green;
Źthe child seat is securely fastened;
Źthe top tether 13 is tight over the backrest of the car seat and the belt tension
indicator 16 is green;
Źthe child seat belts fit snugly around the child’s body without causing constriction;
Źthe shoulder straps 08 are correctly adjusted and are not twisted;
Źthe shoulder cushions 19 are in the correct position for your child’s body;
Źboth buckle clips 21 are fully engaged in the harness buckle 20 ;
Źthe SICT side impact protection 17 is correctly installed and functional.
UNFASTENING YOUR CHILD AND REMOVAL:
To unfasten your child or to remove the child seat, follow the steps in Section 9
"REMOVING THE CHILD SEAT".
The seat pan of the
ADVANSAFIX IV R
has three different angles of tilt:
To adjust the seat angle:
Pull the adjustment handle 23 forwards and push/slide
the seat pan 24 into the desired position.
DANGER! The seat pan 24 PXVWEH¿UPO\HQJDJHG
whatever the position. Pull on the seat pan 24 to check
that it has engaged.
TIP: You can adjust the tilt angle of the child seat 24
even while your child is sitting on it.
Please observe the waste disposal regulations in your country.
Disposal of packaging Container for cardboard boxes
Seat cover Residual waste, waste incineration
Plastic parts To be placed in the corresponding container
according to the labels
Metal parts Container for metals
Belt straps Container for polyester
Buckle and clip Residual waste
DANGER!
If your child tries to open the car seat belt buckle 27 or insert the
diagonal belt 11 in the bright red SecureGuard 26 , stop your vehicle immedi-
ately, or as soon as possible. Check that the child seat is correctly fastened and
that your child is correctly secured. Explain to your child the dangers caused by
such actions.
DANGER! If your child tries to open the car seat belt buckle 27 or insert the di-
agonal belt 11 in the bright red SecureGuard 26 , stop the vehicle immediately, oras
soon as possible. Check that the child safety seat is correctly fastened and that your
child is correctly secured. Explain to your child the dangers caused by such actions.
DANGER! Remove the child seat from the vehicle. Never carry the child seat
inthe car if it is not fastened properly.
A) GROUP 1 (ISOFIX & TOP TETHER)
1. Loosen the top tether 13 by pushing the metal tongue 15
away from the belt.
2. Release the snap-on hook 12 from the anchorage point in the vehicle and lay
the top tether 13 to the front over the child seat.
3. Loosen the ISOFIX fastening on both sides by squeezing the green locking
button 05 and red release button 06 together.
4. Pull the seat forward and store the top tether 13 in the storage pouch 14
and attach the snap-on hook of the top tether 13 to the fastening on the back
of the child seat.
5. Move the ISOFIX locking arms 04 back into the seat pan 24 .
B) GROUP 2/3 (ISOFIT & CAR SEAT BELT / CAR SEAT BELT)
1. Press the release button on your car seat buckle
2. Open the dark red belt holder 29 by pressing the button on the belt holder 29
backwards and pull out the diagonal belt 11 .
Only for installation method with ISOFIT:
3. To release the ISOFIT fastening, squeeze the green locking button 05
and red release button 06 WRJHWKHU¿UVWRQRQHVLGHWKHQRQWKHRWKHU
4. Move the ISOFIX locking arms 04 back into the seat pan 24 .
GROUP 2 (15-25 kg) &
GROUP 3 (22-36 kg)
With car seat belt
B2
8. ADJUSTING THE SICT
Turn the SICT 17 anti-clockwise (on the side nearer
thevehicle door) until there is a gap of 5 mm between
itand the vehicle door, or until it is fully unscrewed.
5. PREPARATORY STEPS 6. INSTALLATION & USE
7. ADJUSTING THE SEAT ANGLE
8. SECURING YOUR CHILD
9. REMOVING THE CHILD SEAT
10. DISPOSAL