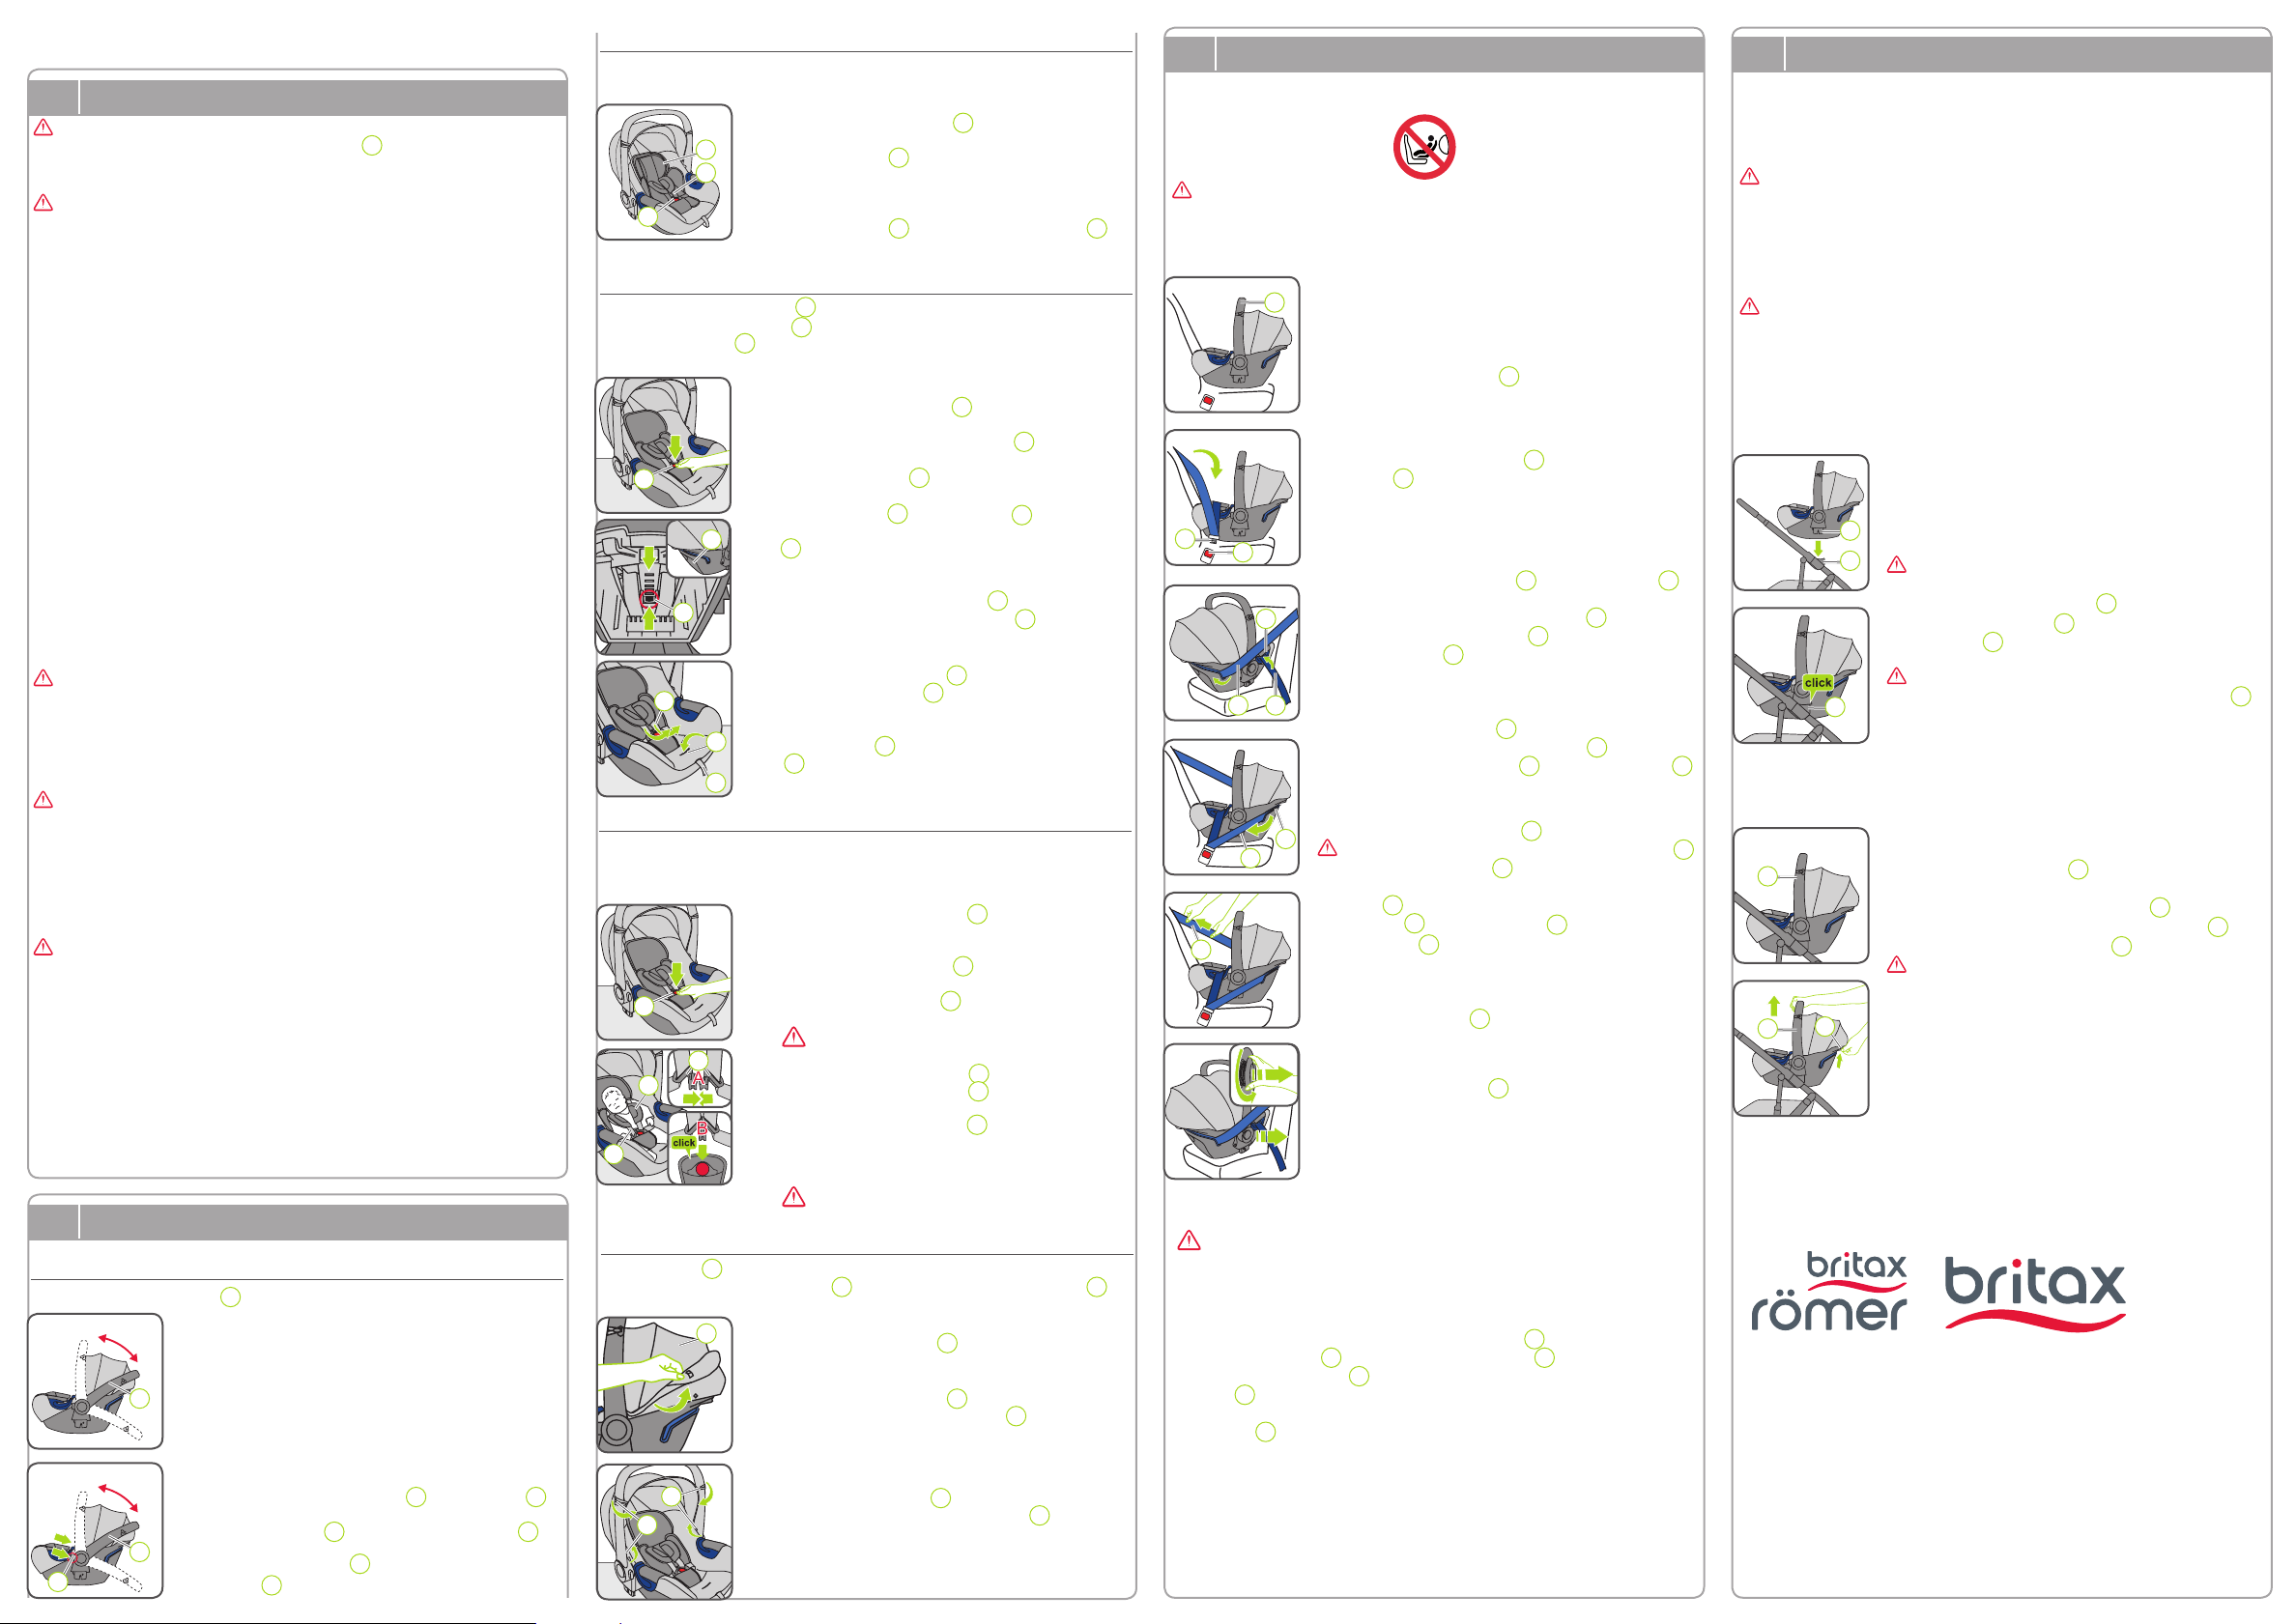
1. Choose a suitable position in the vehicle according
to the overview table in chapter 4. USE IN THE
VEHICLE.
2. Place the infant carrier rearward-facing on the vehicle
seat (baby is facing backwards).
3. Ensure that the handle 04 is in the upper position A.
4. P
theinfant carrier
5. Engage the buckle tongue 29 in the vehicle seat
buckle 18 .
6. Place the lap belt section 17 in the belt guides 03
on both sides of the infant carrier
you do not twist the lap belt section 17 .
7. T17 by pulling on the
diagonal strap 16 .
8. P16 behind the head end
ofthe infant carrier over the adapter 13 .
9. Thread the diagonal str16 into the belt holder 12 .
Make sure that you do not twist the vehicle seat belt.
10. Tight16 .
DANGER! Make sur 18
is not in the belt guide 03 under any circumstances
and is not so far forward that it is in front of the belt
guide 03 (in direction of tr
buckle is 18 in the belt guides 03 or in front of the
belt guides 03 , place the infant carrier on a dierent
seat. If you have any doubts about installing the seat
correctly, please contact your dealer
1 Unscrew the SICT 26 anti-clockwise (on the side
closer to the vehicle door) until it has a distance of
5 mm to the vehicle door or has been unscrewed
tothe maximum.
The unscrewed SIC 26 provides additional protec-
tion in the event of a side impact.
Before securing the infant carrier in the vehicle, secure your baby in the infant
carrier as described in chapter 8.4 S
DANGER! An airbag hitting the infant carrier can cause serious injuries
toyour baby, possibly resulting in death.
Do not use the infant carrier on passenger seats with activated front airbags!
For seats with side airbags, please observe the instructions in your owner's
manual.
USE
8.
Use the seat insert when your baby is still very small. The foam blocks can be
removed for use with larger babies.
T
1. Open the harness buckle 08 (press the red release
button).
2. Place the insert 19 into the infant carrier
filled with the foam blocks must be facing down-
wards.
3. Thread the lower part of the insert underneath the
shoulder straps 07 . Make sure that the insert 19
isin contact with the backrest of the infant carrier
8.2 USING THE SEA
8.3 ADJUSTING THE HEIGHT OF THE SHOULDER S
A properly installed headrest 01 ensures optimal protection for your child in
the child seat. The headrest 01 must be adjusted so that the outlet slots for
the shoulder straps 07 are about two finger widths (25 mm) below the height
of your child's shoulders.
Adjusting the shoulder straps:
1. Open the harness buckle 08 (press the red release
button).
2. Open the instruction compartment 10 on the rear
side of the infant carrier
3. Place the headrest 01 in the right position by
pressing and moving the adjustment button for the
shoulder straps 20 . (The headr 01 must be ad-
justed so that the outlet slots for the shoulder str
07 are about two finger widths (25 mm) below the
height of your child's shoulders.)
4. Make sur
der straps is pr 20 .
5. Close the instruction compartment 10 again.
T
Pr 21 and at the same time
pull both shoulder straps 07 forward.
T
Pull the str 09 . Make sure that you pull the str
end 09 straight out and not upwar
8.4 STRAPPING Y
The BRIT
safety when the shoulder straps fit as snugly as possible over the body without
constricting the babyT
1. L07 (as described in
chapter 8.3 ADJUS
SHOULDER STRAPS).
2. Open the harness buckle 08 (press the red release
button).
3. P07 over the shoulders of
your baby
WARNING!
Do not twist or swap the shoulder
straps, as this will invalidat
4. P 05 together
5. Engage the buckle tongues 05 so that they make
an audible clicking sound.
6. T07 until they fit snugly
over your baby's body (as described in chapter 8.3
ADJUSTING THE HEIGHT OF THE SHOULDER
STRAPS).
WARNING!
The hip belt must lie as low as
possible over your baby's groin.
INS
9.
F
►the infant carrier is fastened against the direction of tr
►the infant carrier is only installed on the front passenger seat if no front
airbag can strike the infant carrier
►the infant carrier is secured using a 3-point belt,
►the lap belt section runs through both belt guides 03 on the infant carrier
►The diagonal strap 16 runs through the belt holder 12 ,
►the vehicle seat buckle 18 is not in the belt guide or in front of the belt
guide 03 ,
►the vehicle seat belt is tightened up and not twisted,
►the SICT 26 is installed and used correctly
8.5 USING THE SUNSHADE
The sunshade 28 protects your baby's head fr
folded up and down on the handle 04 . T28 ,
proceed as follows:
REMOVING THE SUNSHADE
1. Remove the sunshade 28 at the head end of the
infant carrier
side and remove the elastic seam.
2. Unhook the cover loops 15 on both sides of the
handle from the sunshade hooks 14 .
FITTING THE SUNSHADE
1. Hook the cover loops 15 , on the right and left of
the handle, into the sunshade hooks 14 .
2. P
carrier
fasteners.
USE WITH PUSHCHAIRS
10.
SAFETY NO
7.
Fitting the infant carrier to a pushchair
1. Always apply the br
provided with the pushchair
2. P
scribed in the instructions for the pushchair (e.g.ad-
just the pushchair seat, unhook the seat cover).
3. With the infant carrier in a rearward-facing position,
lift it above the pushchair
WARNING! Never try to attach the infant carrier
tothe pushchair in a forward-facing position.
4. Engage the fixation prongs 22 of the infant carrier
into the fixation slots 23 on both sides. The control
indicators 25 on both sides of the infant carrier must
be green.
WARNING! Ensure that the infant carrier is secur
attached to the pushchair by pulling the handle 04
upwards.
Please refer to the user instructions supplied with your pushchair
The infant carrier can be used as a T
which are approved for use with BRIT
WARNING! This T
... for transporting mor
... for commercial use.
... in conjunction with other frames.
...
buggies must only be used to tr
WARNING! Always str
the infant carrier is securely fastened t
pushchair by the infant carrier
carrier onto the pushchair or removing it.
Removing the infant carrier from a pushchair
1. Always apply the br
provided with the pushchair
2. Ensure that the handle 04 is in the upper position A
(see chapter 8.1 ADJUS
3. P24 .
4. Lift the infant carrier until the fixation prongs 22
release from the fixation slots 23 .
WARNING! Keep a firm grip on the infant carrier
while doing this.
5. Remove the infant carrier from the pushchair
If you have any further questions regarding the use of the carrier
please feel free to contact us:
BRIT
Kindersicherheit GmbH
Theodor-Heuss-S
D-89340 Leipheim
Germany
T
F
E.: service.de@britax.com
ww
BRIT
1 Churchill W
Andover
Hampshire SP10 3UW
United Kingdom
T
F
E.:
service.uk@britax.com
ww
04
04
02
08
10
20
21
07
09
08
07
15
28
08
19
07
06
04
23
22
25
04
24
04
16 17
03
12
13
16
18
29
05
14
Please take the time to r
them to hand in the designated compartment 10 in the infant carrier at all
times! The instructions must be kept with the child safety seat if the latter
is passed on to a third party
DANGER! F
•
carrier may be damaged without the damage becoming immediately visible. In this
case the infant carrier must be replaced. Please dispose of it properly
•
ground).
•
inparticular
• Never lubricate or oil parts of the infant carrier
•
•
•
changing unit, table, sofa).
•
cloth) when it is not in use. The infant carrier can get very hot in direct sunlight.
Children's skin is sensitive and could be harmed.
• -
ed. Therefore, avoid putting thick clothes on your child under the belt.
•
semi-recumbent position in the infant carrier will always put a str
spine. T
interrupting long car rides. Do not keep your baby in the infant carrier once it has
been removed from the car
• -
ble rear seat bench).
•
them.
DANGER! F
In the case of an emergency stop or an accident, unsecur
cause injury to other vehicle occupants. Please always check that...
•
• all persons in the vehicle have their seatbelts fastened.
•
transport
WARNING! F
•
objects (car door
•
doors, escalators, etc.) as this could cause the infant carrier to fall.
•
objects on the seat and do not store it dir
sunlight.
CAUTION! T
•
etc.) may sustain signs of wear and tear when using child safety seats. F
protection of your car seat covers, we r
BRIT
seat protect
P
Y04 in three positions: A, B and C:
Handle positions:
A - For carrying and for tr
B - For placing your baby int
C - For setting the infant carrier down safely outside the
car
T
1. P02 on the handle 04
at the same time.
2. Pivot the handle 04 with the buttons pressed 02
until it is in the desired position.
3. Release the buttons 02 and make sure that the
handle 04 is engaged properly
8.1 ADJUSTING THE HANDLE