For the safety of your child, before every journey in the car check that...
• the child seat is engaged on both sides with the ISOFIX locking arms 12 in the ISOFIX attachment points
01 and that both ISOFIX indicators 14 are completely green;
• the child seat is securely fastened;
• the support leg is rmly on the vehicle oor and the support leg indicator 19 is green;
• the straps of the child seat are close to the body without constricting the child;
• the shoulder straps 06 are correctly adjusted and the straps are not twisted;
• the shoulder pads 05 are in the right position on your child‘s body;
• the buckle latches 21 are engaged in the harness buckle 07.
CAUTION! If your child attempts to open the ISOFIX release buttons 13 or the harness buckle 07 ,
make sure to stop at the earliest opportunity. Check that the child safety seat is correctly attached and
make sure that your child is properly secured. Teach your child about the dangers involved.
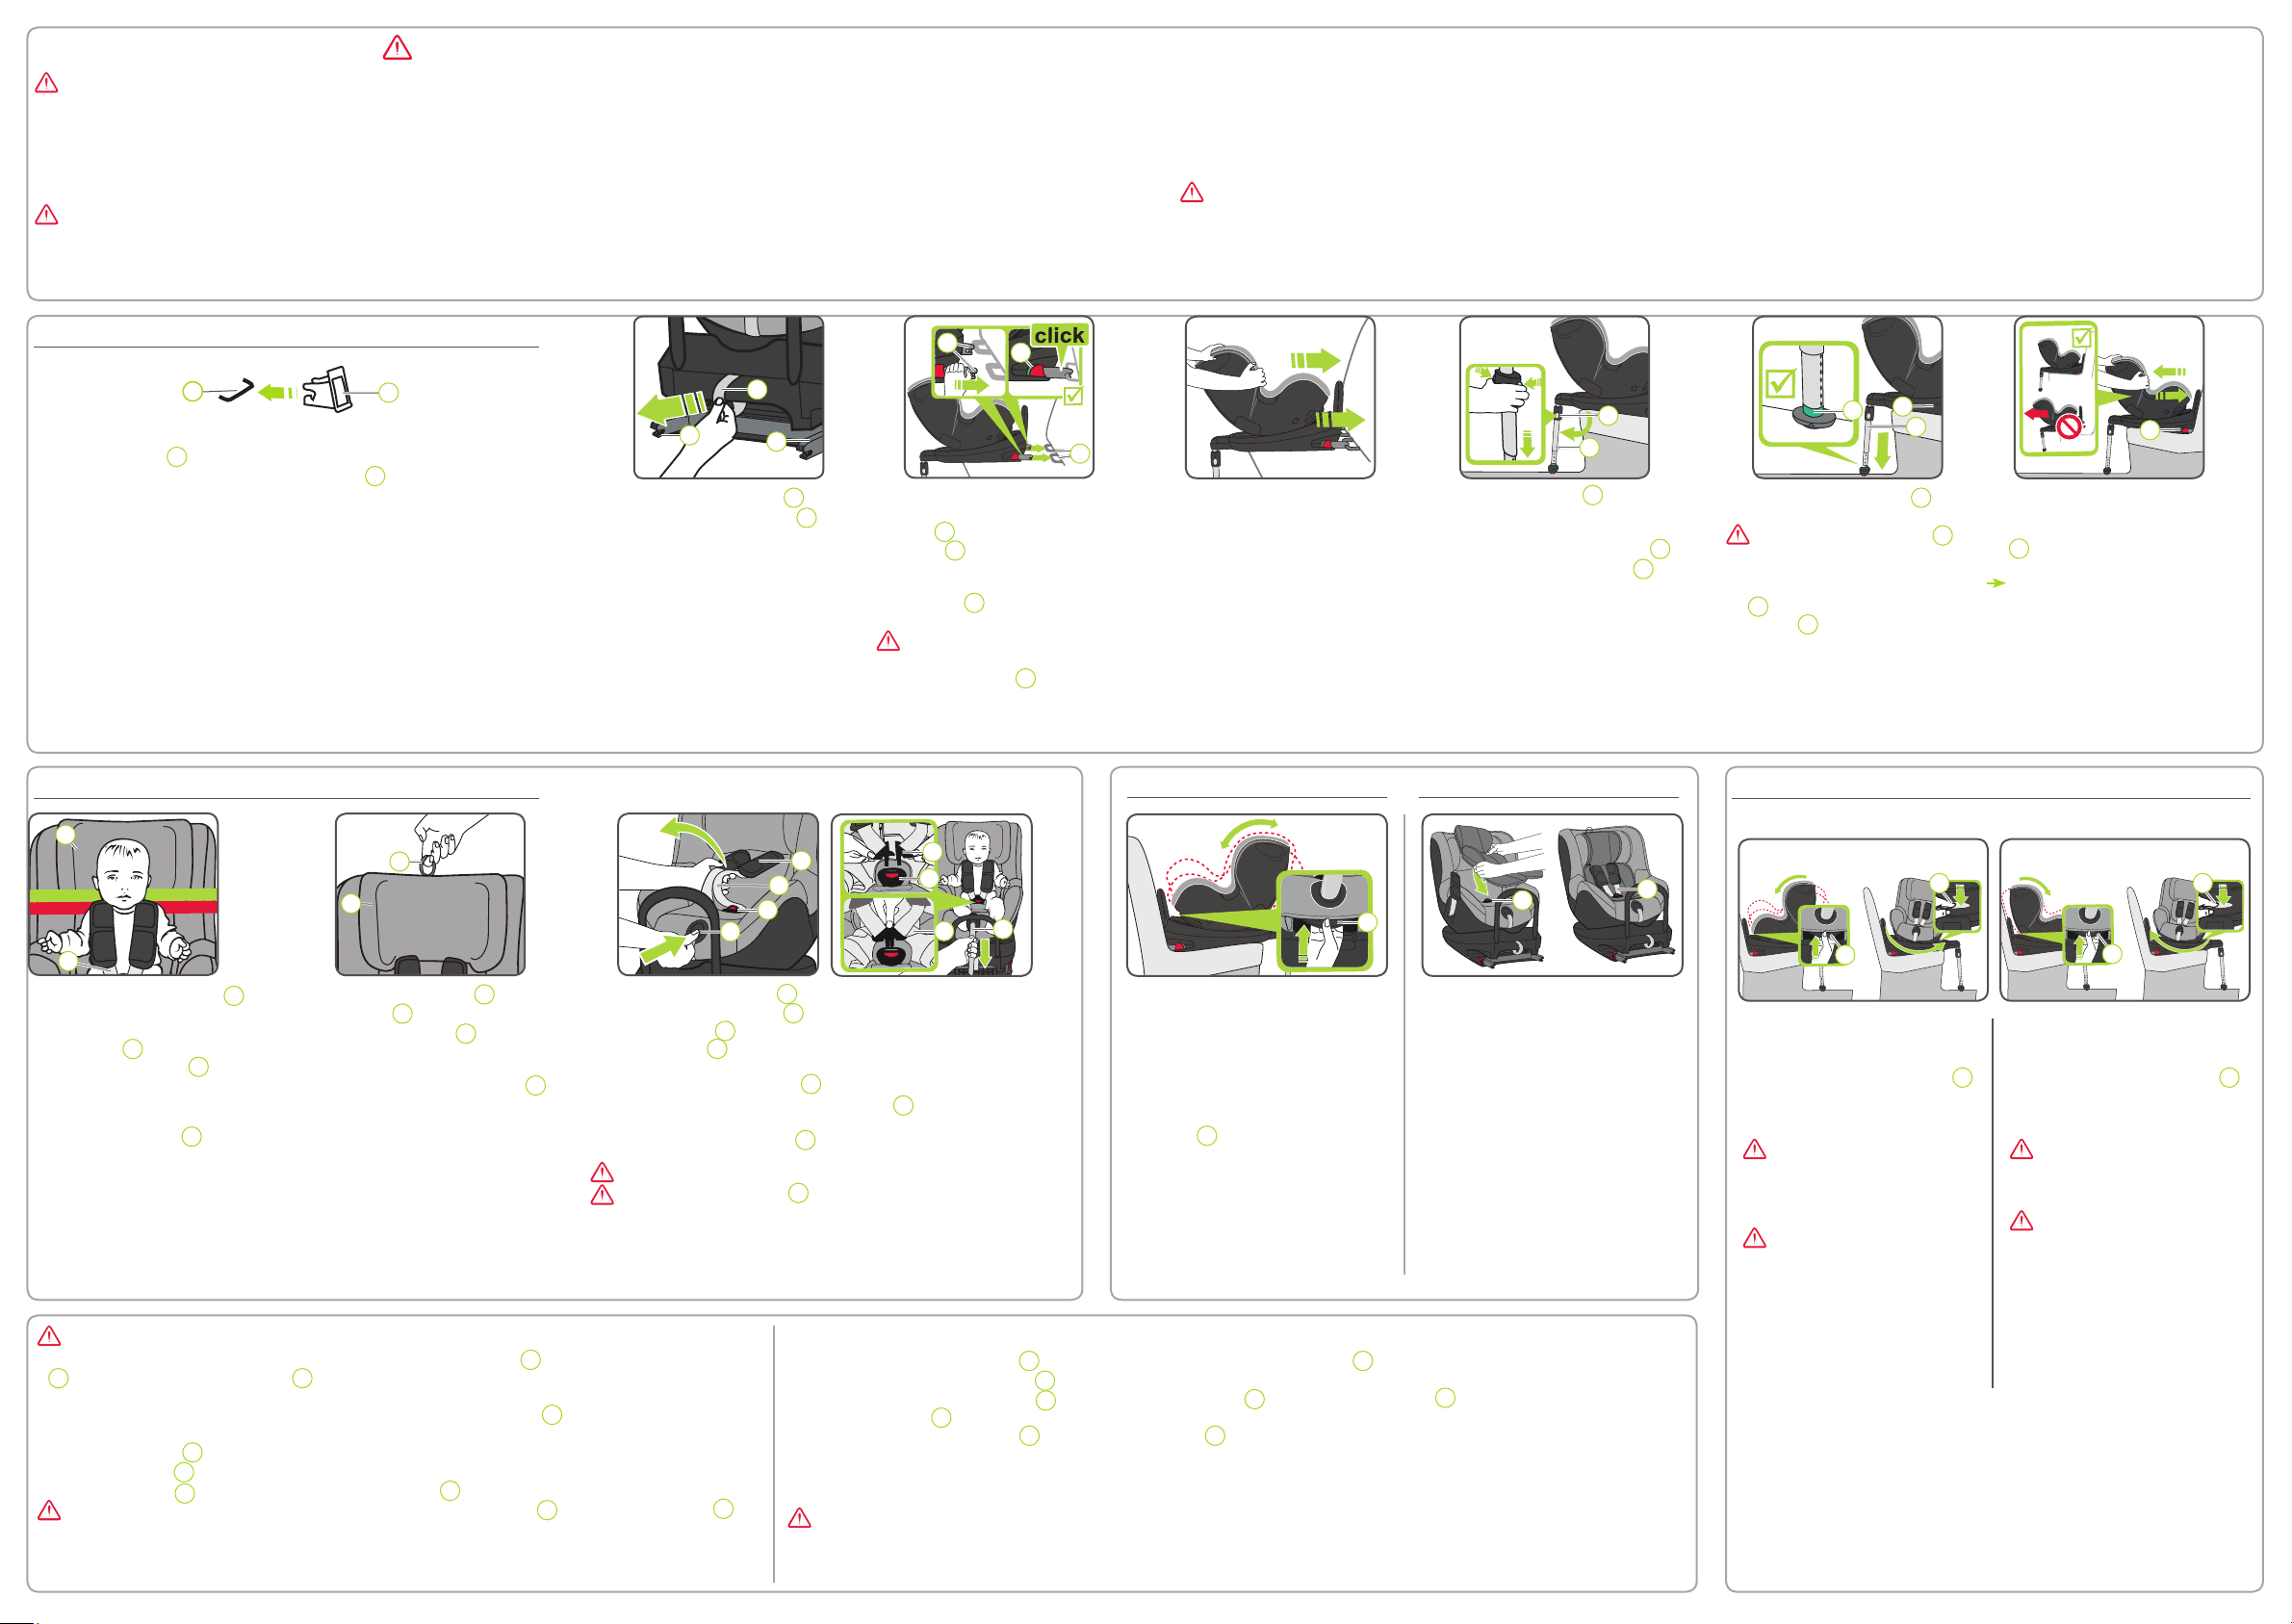
Removing the child seat with ISOFIX
1. Push both adjustment buttons 18 and slide the lower section of the support leg 17 into the upper section until it is fully stored.
Release the adjustment buttons 18 to x it in its storred position
2. Push the green ISOFIX indicator 14 and the red release button 13 on the two locking arms 12 towards each other.
The locking arms 12 release.
3. Slide the ISOFIX locking arms 12 back into the seat shell 26
→ A rattling noise is produced when the locking arms are pushed back in.
TIP: The locking arms are protected against damage when they are pushed back into the seat base.
CAUTION! Remove the child safety seat from the vehicle.The child safety seat must never be transported in the car if it is not
properly secured.
Preparatory work
1. If your vehicle is not equipped with the ISOFIX insert guides as standard, clip the
two insert guides 02 which are included with the seat* with the cut-out facing
upwards onto the two ISOFIX attachment points 01 of your vehicle.
TIP: The ISOFIX attachment points are located between the surface and the back-
rest of the vehicle seat.
2. Move the head restraint on the vehicle seat to the upper position.
* The insert guides make it easier to install the child safety seat with the aid of the
ISOFIX attachment points and prevent damage to the seat covering. When not in
use, they should be removed and stored in a safe place. On vehicles with a folding
backrest the insert guides must be removed before the backrest is folded.
Any problems which occur are usually caused by dirt or foreign objects on the insert
guides and on the hooks. Clean off any dirt or foreign objects to remedy this type of
problem.
For the protection of all vehicle occupants:
In the case of an emergency stop or an accident, persons or objects which are not properly secured in the car can cause injury to other vehicle occupants.
For this reason, please always check that...
• the backrests of the vehicle seats are locked (e.g. that the latch on a folding rear seat bench is engaged).
• all heavy or sharp-edged objects in the vehicle (e.g. on the parcel shelf) are secured.
• all persons in the vehicle have their seatbelts fastened.
• the child safety seat is always secured in the car via the ISOFIX anchoring, even when there is no child in the seat.
For the protection of your child :
• The more snugly the harness ts over your child‘s body, the safer your child will be.
• Please do not ever leave your child unattended in the child safety seat in the vehicle.
• Use on the rear seat:
Move the front seat forward far enough that your child‘s feet cannot hit the backrest of the front seat (to prevent risk of injury).
• The child safety seat can get hot in direct sunshine. Caution: Children‘s skin is delicate and could be injured as a result. Protect the child seat against inten-
sive direct sunlight when it is not currently in use.
• Only allow your child to enter and exit the vehicle on the pavement side.
• Make stops during longer journeys to give your child an opportunity to run about and play.
To protect your vehicle:
Some vehicle seat coverings made of more delicate materials (e.g. velour, leather, etc.) may develop wear marks when child seats
are used. For optimum protection of your seat covers, we recommend using the BRITAX RÖMER Car Seat Protector, which is
available from our range of accessories.
Take the time to carefully read through these instructions, and always keep them ready to hand in the designated pocket on the child seat.
8. Shake the child safety seat to
make sure it is safely attached and
re-check to the ISOFIX indicators
14 to make sure that both of them
are completely green.
Your car seat is now fully installed
9. Follow the steps in the section
„SECURING YOUR CHILD“.
Not included in scope of delivery,
available as accessory and espe-
cially recommended for small babies.
Our newborn insert was specially
developed for the special requirements
of newborns. Shock-absorbing foam
cushions offer special protection and
high comfort for your baby. The reduced
seat surface allows your baby to lie
atter - in a comfortable, ergonomic
position.
4. Push the child seat with a
substantial amount of force
as far back as it will go.
The DUALFIX² R can be put into
multiple different positions. You can
change the recline position while the
child is installed in the car seat.
The most recline position gives your
child the most comfort for sleeping.
To change the positions grasp the rec-
line button 10 and push the seat into
the desired position.
A) To change from rearward
facing to forward facing:
1. Press the grey rotation button 20
and turn the seat into the direction
of travel.
CAUTION! Before every jour-
ney: make sure that the rotating part
of the child seat is fully engaged by
trying to turn the seat around in both
directions.
CAUTION! Do not use the child
seat forward facing when your child
is below 9 kg.
B) To change from forward facing
to rearward facing:
1. Press the grey rotation button 20
and turn the seat against the
direction of travel.
CAUTION! Before every journey:
make sure that the child seat is in the
right group and conguration for your
child.
CAUTION! Before every journey:
make sure that the rotating part of the
child seat is fully engaged by trying to
turn the seat around in both directions.
INSTALLATION
SECURING YOUR CHILDROTATION FUNCTION + CHANGE GROUPS RECLINE POSITIONSINFANT INSERT
10
06
07
B)A)
20
1010
20
1. Pull the adjusting ring 24 of the
headrest
04 upwards.
2. Move the headrest 04 to the
correct shoulder strap height and
check that it is properly engaged
by lightly sliding the head rest 04
downwards.
3. Open the harness buckle 07 (press red button)
4. Press the adjusting button 08 and at the same time pull both
shoulder straps 06 forwards. Do not pull on the
shoulder pads 05 .
5. Have your child sit down in the child seat.
6. Guide the two buckle latches 21 together and engage them
before putting them into the harness buckle 07 - this should
make a clicking noise.
7. Pull on the adjustment strap 09
until the harness lies at and is
close against your child‘s body.
CAUTION! Pull out the adjusting strap to the front.
CAUTION! The hip straps 22 must be positioned as low as possible
Libble nimmt den Missbrauch seiner Dienste sehr ernst. Wir setzen uns dafür ein, derartige Missbrauchsfälle gemäß den Gesetzen Ihres Heimatlandes zu behandeln. Wenn Sie eine Meldung übermitteln, überprüfen wir Ihre Informationen und ergreifen entsprechende Maßnahmen. Wir melden uns nur dann wieder bei Ihnen, wenn wir weitere Einzelheiten wissen müssen oder weitere Informationen für Sie haben.
Art des Missbrauchs:
Forenregeln
Um zu sinnvolle Fragen zu kommen halten Sie sich bitte an folgende Spielregeln:
Lesen Sie zuerst die Anleitung;
Schauen Sie nach, ob die Frage bereits gestellt wurde;
Stellen Sie die Frage so deutlich wie nur einigermaßen möglich;
Erwähnen Sie was Sie bereits versucht haben um das Problem zu lösen;
Ist Ihr Problem von einem Besucher gelöst dann lassen Sie ihn / sie wissen in diesem Forum;
Falls Sie reagieren möchten, so verwenden Sie bitte das Antworten- Formular;
Da ihre Frage für alle Besucher sichtbar ist, sollten Sie lieber keine persönliche Daten erwähnen.
Neu registrieren
Registrieren auf E - Mails für Britax-Romer DUALFIX 2 R wenn:
neue Frage gestellt werden
neue Handbücher vorhanden sind
Sie erhalten eine E-Mail, um sich für eine oder beide Optionen anzumelden.
Das Handbuch wird per E-Mail gesendet. Überprüfen Sie ihre E-Mail.
Wenn Sie innerhalb von 15 Minuten keine E-Mail mit dem Handbuch erhalten haben, kann es sein, dass Sie eine falsche E-Mail-Adresse eingegeben haben oder dass Ihr ISP eine maximale Größe eingestellt hat, um E-Mails zu erhalten, die kleiner als die Größe des Handbuchs sind.
Ihre Frage wurde zu diesem Forum hinzugefügt
Möchten Sie eine E-Mail erhalten, wenn neue Antworten und Fragen veröffentlicht werden? Geben Sie bitte Ihre Email-Adresse ein.