5. C
• The buckle tongues 29 no longer engage (i.e. when you try to push them in,
they pop out again).
• The buckle tongues 29 engage without an audible click.
• The buckle tongues 29 are dicult to push in (you feel a certain amount of
resistance).
• The harness buckle 04 only opens if extreme for
Remedy: Clean the harness buckle 04 so that it functions properly again with no
trouble:
Cleaning the harness buckle
04
29
24
25
24
25
1. Remove the cover from the surface of the seat as described below under
"Removing the cover".
2. Rotate the crotch harness with the metal plat 24 which holds the harness
buckle 04 in the seat shell 18 by 90° in the longitudinal slot.
3. Slide the metal plate 24 through the harness slot 25 with the narrow edge
facing forwards.
4. Soak the harness buckle 04 in warm water containing washing-up liquid for at
least an hour
5. Slide the metal plate 24 fully into the longitudinal slot from the fr
6. Rotate the crotch harness with the metal plat 24 by 90° until it is hooked
into the harness slot 25 on the seat shell 18 perpendicular to the direction of
motion.
DANGER! T 04 to make sure that it is secur
the seat shell 17 .
7. Thread the harness buckle 04 through the crotch pad 23 on the cover and
then re-fasten the V
Removing the cover
17
03
32
33
09
32
04
03
23
1. Put the seat shell 17 into its flatt
2. Loosen the shoulder str 09 and open the harness buckle 04 .
3. Slide the headrest 03 into the highest position.
4. First unhook the rubber loop 33 at the bottom edge of the headrest 03 , fol-
lowed by the hook 32 at the top edge, and remove the cover
5. Slide the headrest 03 into the lowest position.
6. Open the press studs at the left and right on the back of the cover and thread
the shoulder straps 09 through the opening.
7. Open the V 23 .
8. Unhook the rubber loops 33 and the plastic cards from the leg area.
9. Unhook the elastic seam of the cover from the bottom.
10. 13 by the adjust-
ment strap, over the harness buckle 04 and then over the headrest 03 by the
opening.
DANGER! The child safety seat must not be used without the seat cover
Reattaching the cover:
Proceed in r
Caution: The harnesses must not be twisted and must be corr
in the harness slots.
Removing the shoulder pads
08
18
09
17
08
30
1. Rotate the seat shell 18 so it is facing backwards.
2. Loosen the shoulder str 09 as far as possible.
3. Open the shoulder pads 08 at the Velcr
4. Open the operating instructions compartment 17 .
5. Pull the shoulder str 09 out a little and unhook the underlying harness loops
on the shoulder pads 08 from the plastic fins 30 of the height adjuster
6. Pull the shoulder pads 08 forwards out of the harness slots.
Reattaching the shoulder pads:
Follow the st
Caution: The shoulder pads 08 and the harnesses must not be twisted or
have their places changed over 09 must be located under
the black cover band in the shoulder pads 08 .
1. Press the r 20 on the side of the
bottom section 19 , rotating the seat shell 18 90°
towards the vehicle door at the same time.
2. Now you can put your child in or take him or her
out easily
3. Secure your child in the seat (see Section 8. US-
ING THE CHILD SAFETY SEA
4. Rotate the seat shell 18 90° again so it is facing
either forwards or backwards, depending on the age
of your child, until it engages with a clicking sound.
5. Make sure that both indicators 27 are black. If
one of the indicators is red, the seat shell 18 is not
engaged properly
Caution: Before every journey, make sure that the
rotating seat shell 18 is fully engaged and both
indicators are black.
4. PUTTING THE CHILD IN/T
THE CHILD OUT
Cleaning
Only use authentic BRIT
of the child safety seat and is key to ensuring the trouble-fr
system. Replacement seat covers are available fr
• The cover can be removed and washed with a mild deter
machine's delicates cycle (30 °C). Please observe the instructions on the wash-
ing label of the cover
• The baby insert can be washed in the same way as the cover
parts from the top and bott
washed.
• The shoulder pads can be removed and washed in lukewarm soapy water
• The plastic parts and the harnesses can be cleaned with soapy water
use any caustic cleaning agents (such as solvents).
Caring for the harness buckle
T
04 continues to function correctly 04 malfunctions are usually
caused by a build-up of soiling or by external objects:
• When you press the red r
tongues 29 to be ejected.
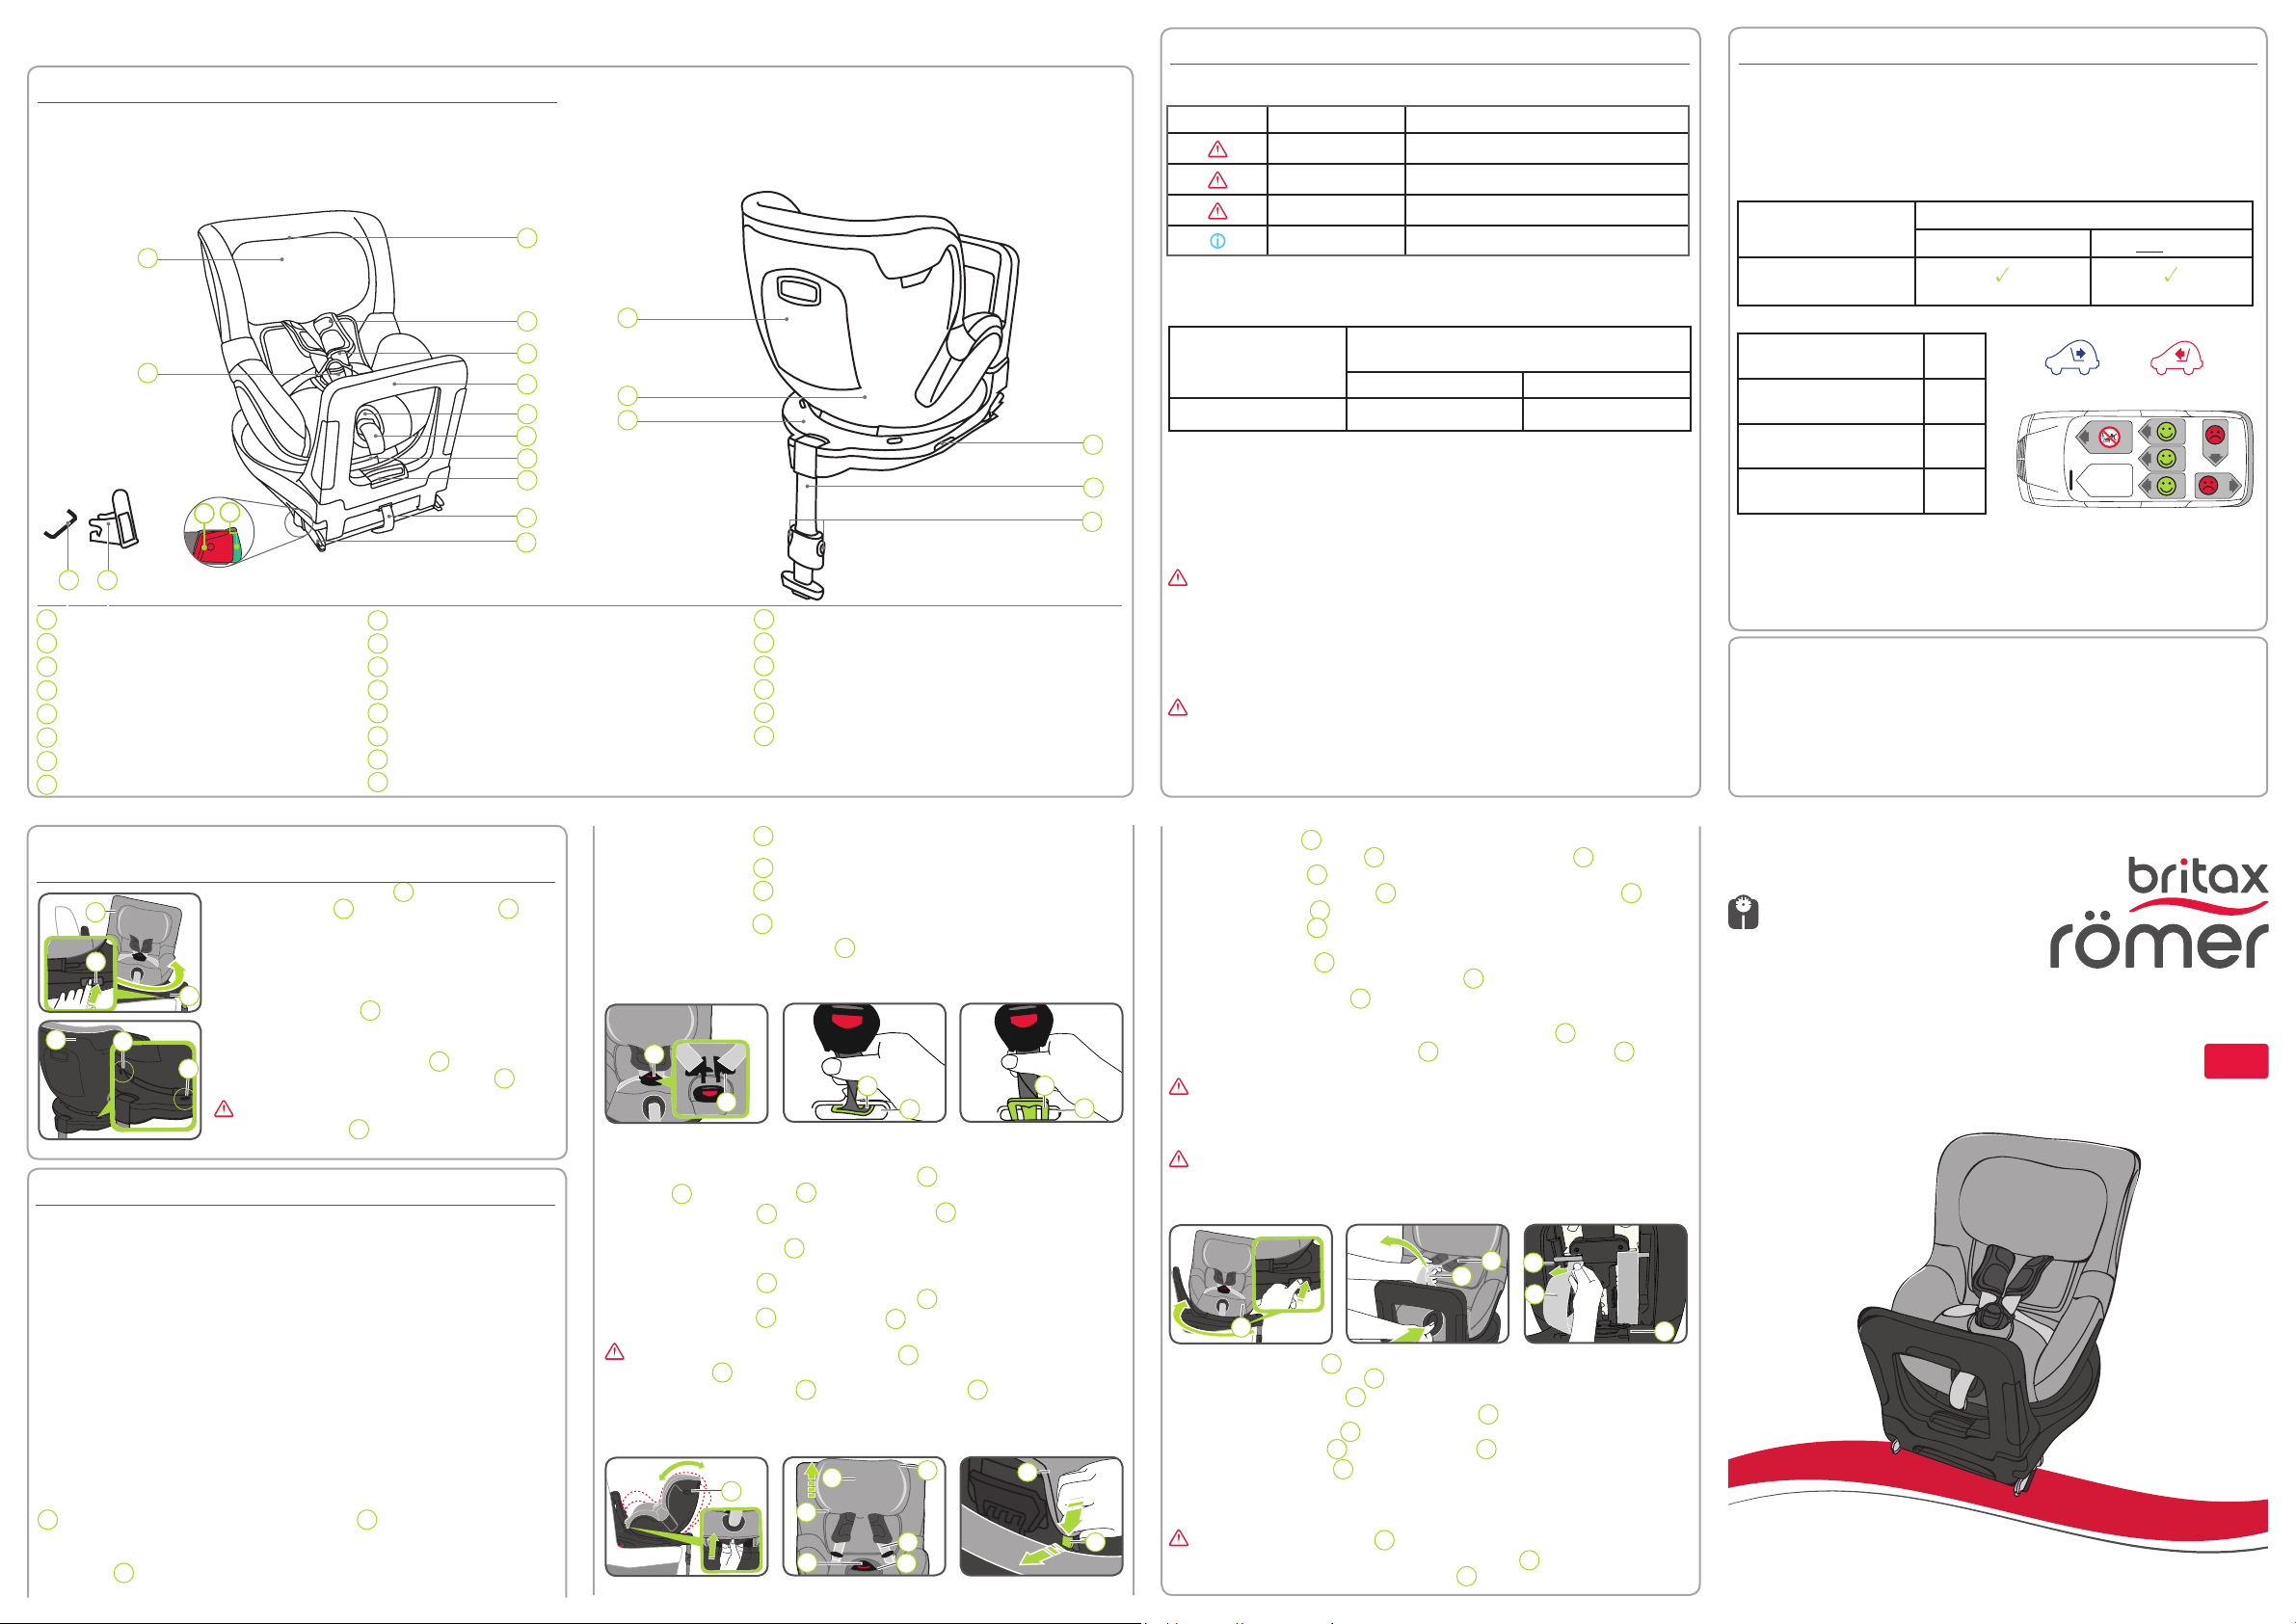
20
18
19
Rotation button
Bottom section of shell
Seat shell
Operating instructions compartment
Shock bar adjustment handle
Tilt adjustment handle
Adjustment strap
Adjustment button
Shock bar
Shoulder straps
Safety button
Release button
Harness buckle
Headrest
ISOFIX insertion aids
Headrest release butt
07
06
05
04
03
02
14
13
12
11
10
09
20
19
18
17
Shoulder pads
08
F
15
Support leg adjustment buttons
Support leg
22
21
ISOFIX fastening points (vehicle)
01
ISOFIX locking arms
16
06
05
04
03
17
18
19
01 02
07
08
11
13
14
20
09
12
10
15
16
21
22
18
27
27
1. PRODUC
2. APPROV
These instructions use the following symbols:
Symbol Keyword Explanation
DANGER! Risk of severe personal injury
W! Risk of minor personal injury
CAUTION! Risk of material damage
TIP! Useful notes
3. USE IN THE VEHICLE
Please observe the instructions for using children's restr
operating instructions of your vehicle. During use, be sur
tions relating to airbags.
Please refer to the oper
vehicle seats which are certified for the use of children's r
to ECE R16.
DUALFIX Z-LINE usage options:
BRIT
Child safety seat
V
i-Size Not i-Size
DUALFIX Z-LINE
See type list
Y
Facing forwar
direction of tr
Y1)
Facing backwar
the direction of tr
Y1)
With 2-point or 3-point
safety harness
No
On seats featuring:
ISOFIX fastenings
Y2)
(Please observe the applicable regulations in force in your country)
1)
Facing forwards (in the direction of travel) 76–105 cm/facing backwards (against the direction of
travel) 61–105 cm
2)
Facing forwards (in the direction of travel) 76–105 cm: If there is a passenger airbag: Slide the pas-
senger seat well backwards and follow any relevant directions in your vehicle's operating instructions.
Facing backwards (against the direction of travel) 61–105 cm: Do not use on passenger seats with an
active front airbag!
We ar
DUALFIX Z-LINE
to accompany your child safely through a new stage of his or her life.
In order to pr
DUALFIX Z-LINE
must always be used and installed as described in these instructions.
The
DUALFIX Z-LINE
is exclusively int
BRIT
Child safety seat
T
to ECE* R 129/02
Body size Body weight
DUALFIX Z-LINE
61–105 cm ≤ 18 kg
*ECE = European Standard for Child Safety Equipment
The child safety seat has been designed, tested and appr
the requirements of the Eur
R 129/02). The seal of approval "E" (in a circle) and the appr
located on the or
DANGER!
tions to the child safety seat. Only the manufacturer is permitt
to make modifications t
technical changes can cause the prot
seat to be reduced or complet
technical changes to the child safety seat.
DANGER!
DUALFIX Z-LINE
exclusively for securing your child in
your vehicle. It is in no way suitable for use as a seat or toy in
the home.
P
61–105 cm
≤ 18 kg
76–105 cm
≤ 18 kg
BRIT
Kindersicherheit GmbH
Kindersicherheit GmbH
Theodor-Heuss-Str
89340 Leipheim
Germany
+49 (0) 8221 3670 199
BRIT
1 Churchill Way W
Andover
Hampshire SP10 3UW
United Kingdom
+44 (0) 1264 386034
BRIT
Jörgen Kocksgatan 4
SE-211 20 Malmö
Sweden
www.britax-roemer
hello@britax-roemer
BRIT
Operating instructions
GB
DU Z-LINE
61 - 105 cm
≤ 18 kg
ww
2000033704 19/07