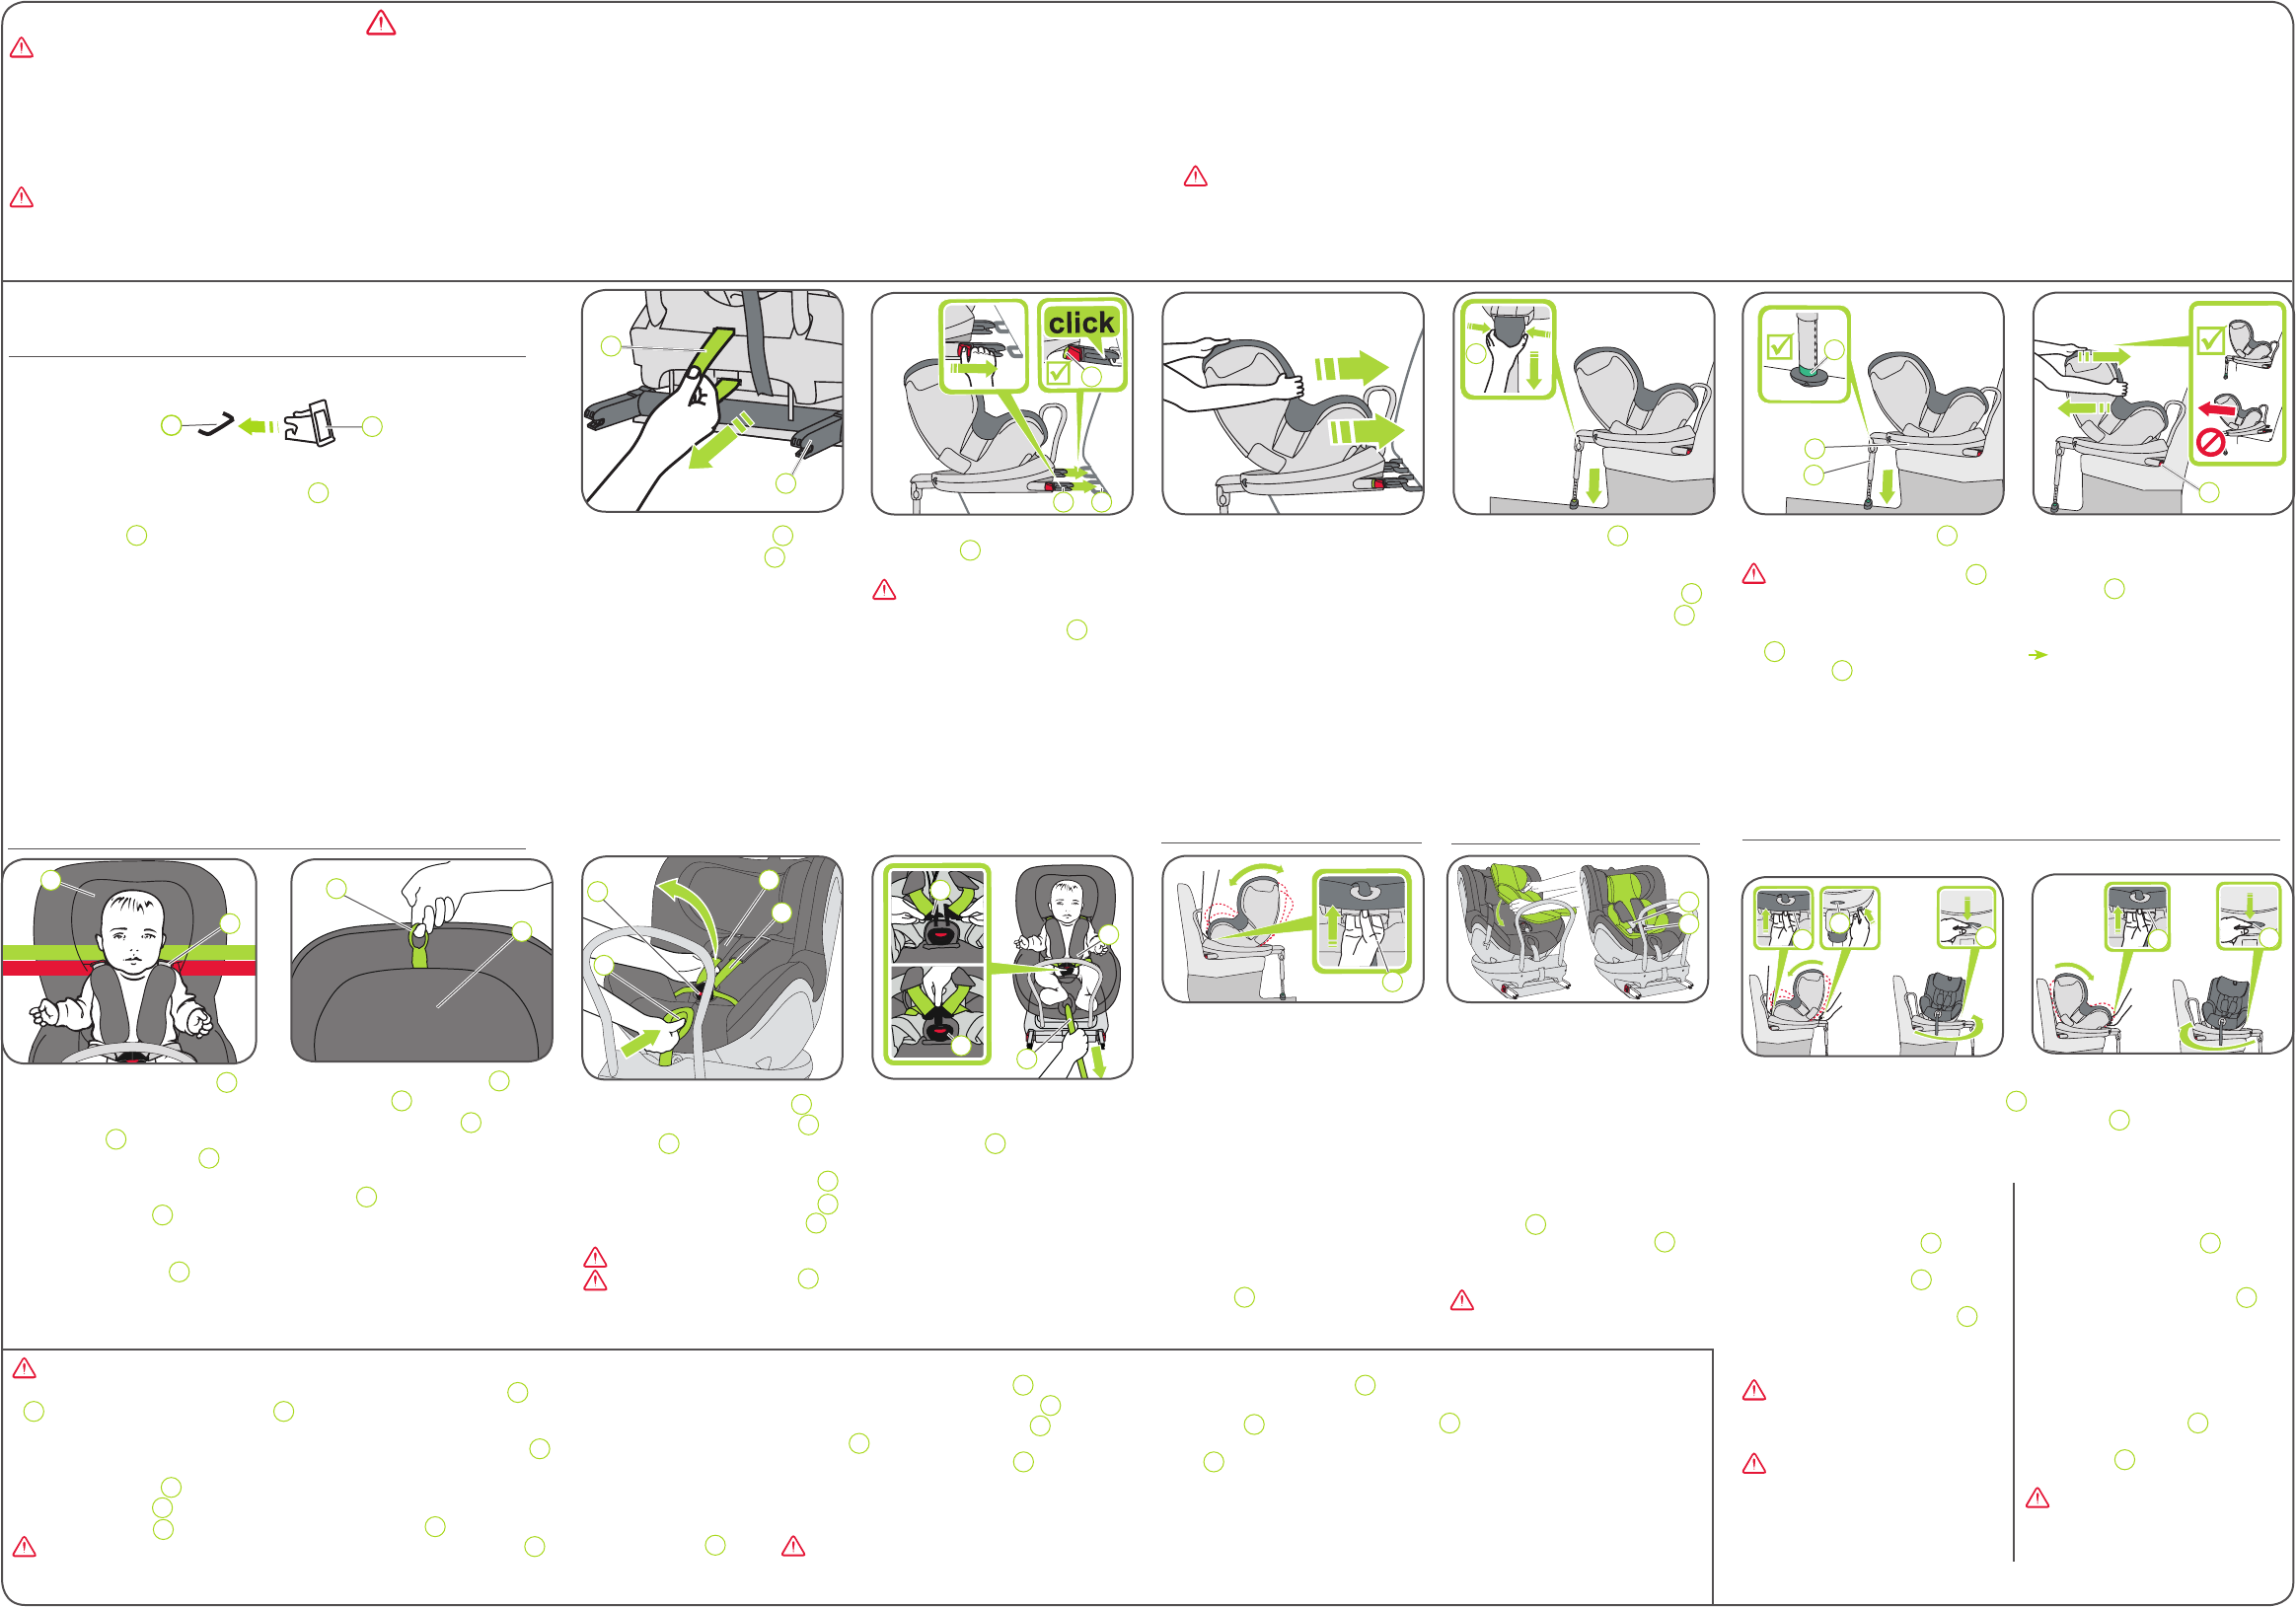
1. Pull the grey fabric loop
11
to pull
out both locking arms
12
.
2. Place the child seat in the direc-
tion of travel rearward-facing on
the vehicle seat.
INST
3. both sides.
dicators
14
must now be visible
on both sides.
CAUTION! The locking arms
are only correctly engaged if both
of the ISOFIX indicators
14
are
completely green.
5. Pull the support leg
17
as far away
from the back of the child seat as
possible.
6. Push both adjustment buttons
18
and pull out the support leg
17
until it rests rmly on the oor of
the vehicle.
A correctly adjusted headrest
04
ensures optimal protection for your
child in the safety seat:
The headrest
04
must be adjusted
so that the shoulder straps
06
are
at the same level as your child’s
shoulders or slightly above.
The shoulder straps
06
must run at
shoulder height or a little above the
height of the child’s shoulders.
►The shoulder straps
06
must not
run behind the back of the child or
at ear height or above the ears.
10. Pull the adjusting ring
24
of the
headrest
04
upwards.
1 Move the headrest
04
to the
correct shoulder strap height
and check that it is properly en-
gaged by lightly sliding the head
rest
04
downwards.
7. The support leg indicator
19
must
be completly green
CAUTION! The support leg
17
must never be suspended in mid-
air or supported by other objects.
Also ensure that the support leg
17
does not raise the DUAL-
FIX base
16
from the car seat
surface.
For the safety of your child, before every journey in the car check that...
• the child seat is engaged on both sides with the ISOFIX locking arms
12
in the ISOFIX attachment points
01
and that both ISOFIX indicators
14
are completely green;
• the child seat is securely fastened;
• the support leg is rmly on the vehicle oor and the support leg indicator
19
is green;
• the straps of the child seat are close to the body without constricting the child;
• the shoulder straps
06
are correctly adjusted and the straps are not twisted;
• the shoulder pads
05
are in the right position on your child‘s body;
• the buckle latches
21
are engaged in the harness buckle
07
.
CAUTION! If your child attempts to open the ISOFIX release buttons
13
or the harness buckle
07
,
make sure to stop at the earliest opportunity
make sure that your child is properly secured. T
Removing the child seat with ISOFIX
1. Push both adjustment buttons
18
and slide the lower section of the support leg
17
into the upper section until it is fully stored.
Release the adjustment buttons
18
to x it in its storred position
2. Push the green ISOFIX indicator
14
and the red release button
13
on the two locking arms
12
towards each other
arms
12
release.
3. Slide the ISOFIX locking arms
12
back into the seat shell
26
→
TIP: The locking arms are protected against damage when they are pushed back into the seat base.
CAUTION! Remove the child safety seat from the vehicle.The child safety seat must never be transported in the car if it is not
properly secured.
Preparatory work
1. If your vehicle is not equipped with the ISOFIX insert guides as
standard, clip the two insert guides
02
which are included with the
seat* with the cut-out facing upwards onto the two ISOFIX attach-
ment points
01
of your vehicle.
TIP: The ISOFIX attachment points are located between the surface
and the backrest of the vehicle seat.
2. Move the head restraint on the vehicle seat to the upper position.
* The insert guides make it easier to install the child safety seat with the aid of the ISOFIX
attachment points and prevent damage to the seat covering. When not in use, they should
be removed and stored in a safe place. On vehicles with a folding backrest the insert
guides must be removed before the backrest is folded.
Any problems which occur are usually caused by dirt or foreign objects on the insert gui-
des and on the hooks. Clean off any dirt or foreign objects to remedy this type of problem.
For the protection of all vehicle occupants:
In the case of an emergency stop or an accident, persons or objects which are not properly secured in the car can cause injury to other vehicle
occupants. For this reason, please always check that...
• the backrests of the vehicle seats are locked (e.g. that the latch on a folding rear seat bench is engaged).
• all heavy or sharp-edged objects in the vehicle (e.g. on the parcel shelf) are secured.
• all persons in the vehicle have their seatbelts fastened.
• the child safety seat is always secured in the car via the ISOFIX anchoring, even when there is no child in the seat.
For the protection of your child :
• The more snugly the harness ts over your child‘s body
• Please do not ever leave your child unattended in the child safety seat in the vehicle.
• Use on the rear seat:
Move the front seat forward far enough that your child‘s feet ca
• The child safety seat can get hot in direct sunshine. Caution: Children‘s skin is delicate and could be injured as a result. Protect the child
seat against intensive direct sunlight when it is not currently in use.
• Only allow your child to enter and exit the vehicle on the pavement side.
• Make stops during longer journeys to give your child an opportunity to run about and play
T
Some vehicle
are used. For optimum protection of your seat covers, we recommend using the BRIT
availa
T
SECURING YOUR CHILD
RO
8. Shake the child safety seat to
make sure it is safely attached
and re-check to the ISOFIX indi-
cators
14
to make sure that both
of them are completely green.
Y
9. Follow the steps in the section
„SECURING YOUR CHILD“.
12. Open the harness buckle
07
(press red button)
13. Press the adjusting button
08
and at the same time pull both shoulder
straps
06
forwards. Do not pull on the shoulder pads
05
.
14. Have your child sit down in the child seat.
15. Guide the two buckle latches
21
together and engage them before putting
them into the harness buckle
07
- this should make a clicking noise.
16.
09
until the harness lies at and is close
against your child‘s body
CAUTION! Pull out the adjusting strap to the front.
CAUTION! The hip straps
22
must be positioned as low as possible over
your child‘s hips.
INF
The infant insert can be used for child-
ren between 0 - 6 months.
The infant insert ensures your baby´s
spine is supported during travel.
Installation of the infant insert:
1. Place the infant insert into the
child seat and lay both shoulder
straps
06
over the infant insert
2. Slide the harness
07
and the crotch pad through the
opening of the infant insert.
CAUTION! Make sure that your
child is always securely fastened.
4. Push the child seat with a sub-
stantial amount of force as far
back as it will go.
RECLINE POSITIONS
The DUALFIX can be put into multip-
le different positions. Y
the recline position while the child is
installed in the car seat.
The most recline position gives your
child the most comfort for sleeping.
For younger children from 0-6 months
use the seat in its most recline position
with the infant insert to ensure your
child spine is supported whilst sleeping.
T
line button
10
and push the seat into
the desired position.
A) T
forward facing:
1. Grasp the recline button
10
and
press the child seat whilst pressing
the grey safety button
20
into the
most upright position.
2. Press the grey rotation button
23
and turn the seat into the direction
of travel.
CAUTION! Before every journey:
make sure that the rotating part of the
child seat is fully engaged by trying to
turn the seat around in both directions.
CAUTION! Do not use the child
seat forward facing when your child is
below 9 kg.
B) T
rearward facing:
1.Grasp the recline button
10
and
press the child seat into the most
upright position
2.Press the grey rotation button
23
and
turn the seat against the direction of
travel --> now the child seat is in the
mode for group 1 (9-18 kg) rearward
facing
If you want to use the child seat in
group 0+ (0-13 kg) rearward facing:
Grasp the recline button
10
and press
the child seat whilst pressing the grey
safety button
20
into the most reclined
position
CAUTION! Before every journey:
make sure that the child seat is in the
right group and conguration for your
child
The DUALFIX has a grey safety button
20
which must be pressed when changing
between group 0+ and group 1. The grey safety button
20
prevents that the child
seat is used by mistake in the wrong group for your child.
B)
A)
01
02
12
17
04
06
04
07
05
08
21
07
22
09
06
07
11
24
10
18
19
16
14
20
10
23
10
23
06
14
12 02