6. SAFETY NO
Please take the time to r
to hand in the intended oper17 on the
child safety seat at all times. The instructions must be kept with the child
safety seat if the latter is passed on to a third party
In order for the SWINGFIX M i-SIZE to prot
always be installed and used exactly as described in these instructions.
It is possible that some of the child safety seat settings will lead to
restrictions when used in "i-Size" vehicle seat positions.
DANGER! F
•
child safety seat may be damaged without the damage becoming immediately
visible. In this case the child safety seat must be replaced. Please dispose of
it properly
• As a rule, have your child safety seat checked if it has been damaged
(e.g. if it falls on the ground).
• Regularly check all important parts for damage. Ensure that all mechanical
parts, in particular
• Never lubricate or oil parts of the child safety seat.
• Never leave your child unattended in the child safety seat in the vehicle.
• Only allow your child to enter and e
•
The child safety seat can get very hot in direct sunshine. Children's skin is
sensitive and could be harmed as a result.
• The more snugly the belt fi
protect
• T
opportunity to run about and play
• Use on the rear seat: Move the front seat far enough forwards t
your child's feet cannot hit the backrest of the front seat (t
ofinjury).
DANGER! F
In the case of an emergency stop or an accident, unsecur
may cause injury to other vehicle occupants. Please always check that ...
• no other load-bearing contact points are used other than those specifi
these instructions and marked out on the child safety seat.
• the backrests of the vehicle seats are locked (e.g. that a folding r
bench latch is engaged).
• all heavy or sharp-edged objects in the vehicle (e.g. on the parcel shelf
secured.
• all persons in the vehicle have their seatbelts fastened.
• the child safety seat is always secured when it is in the vehicle, even if no
childis being transport
WARNING! F
• Never use the child safety seat free-standing, not even for test sitting.
• T
hard objects (vehicle door
• Keep the child safety seat in a safe place when it is not in use. Do not place
any heavy objects on the seat and do not store it dir
heat or in direct sunlight.
CAUTION! F
• Certain vehicle seat covers made from more sensitive mat
leather) may sustain signs of wear and tear when using child safety seats.
Foroptimum pr
BRIT
P
1. If your vehicle is not fi
the two insertion aids 02 , which are included in the scope of delivery of
the seat*, with the opening pointing upwards, to the two ISOFIX fast
points 01 of your vehicle.
TIP! The ISOFIX fastening points are locat
backrest of the vehicle seat.
2. Move the headrest of the vehicle seat into the top position.
* The insertion aids facilitate the installation of the child safety seat with the use
of the ISOFIX fastening points and prevent damage t
As long as they are not used, remove them and keep them in a safe place.
For vehicles with a folding backr
before folding the backrest. Any pr
or external objects on the insertion aids and on the hook. Remove soiling or
external objects t
7. PREP
8. INS
SAFETY SEA
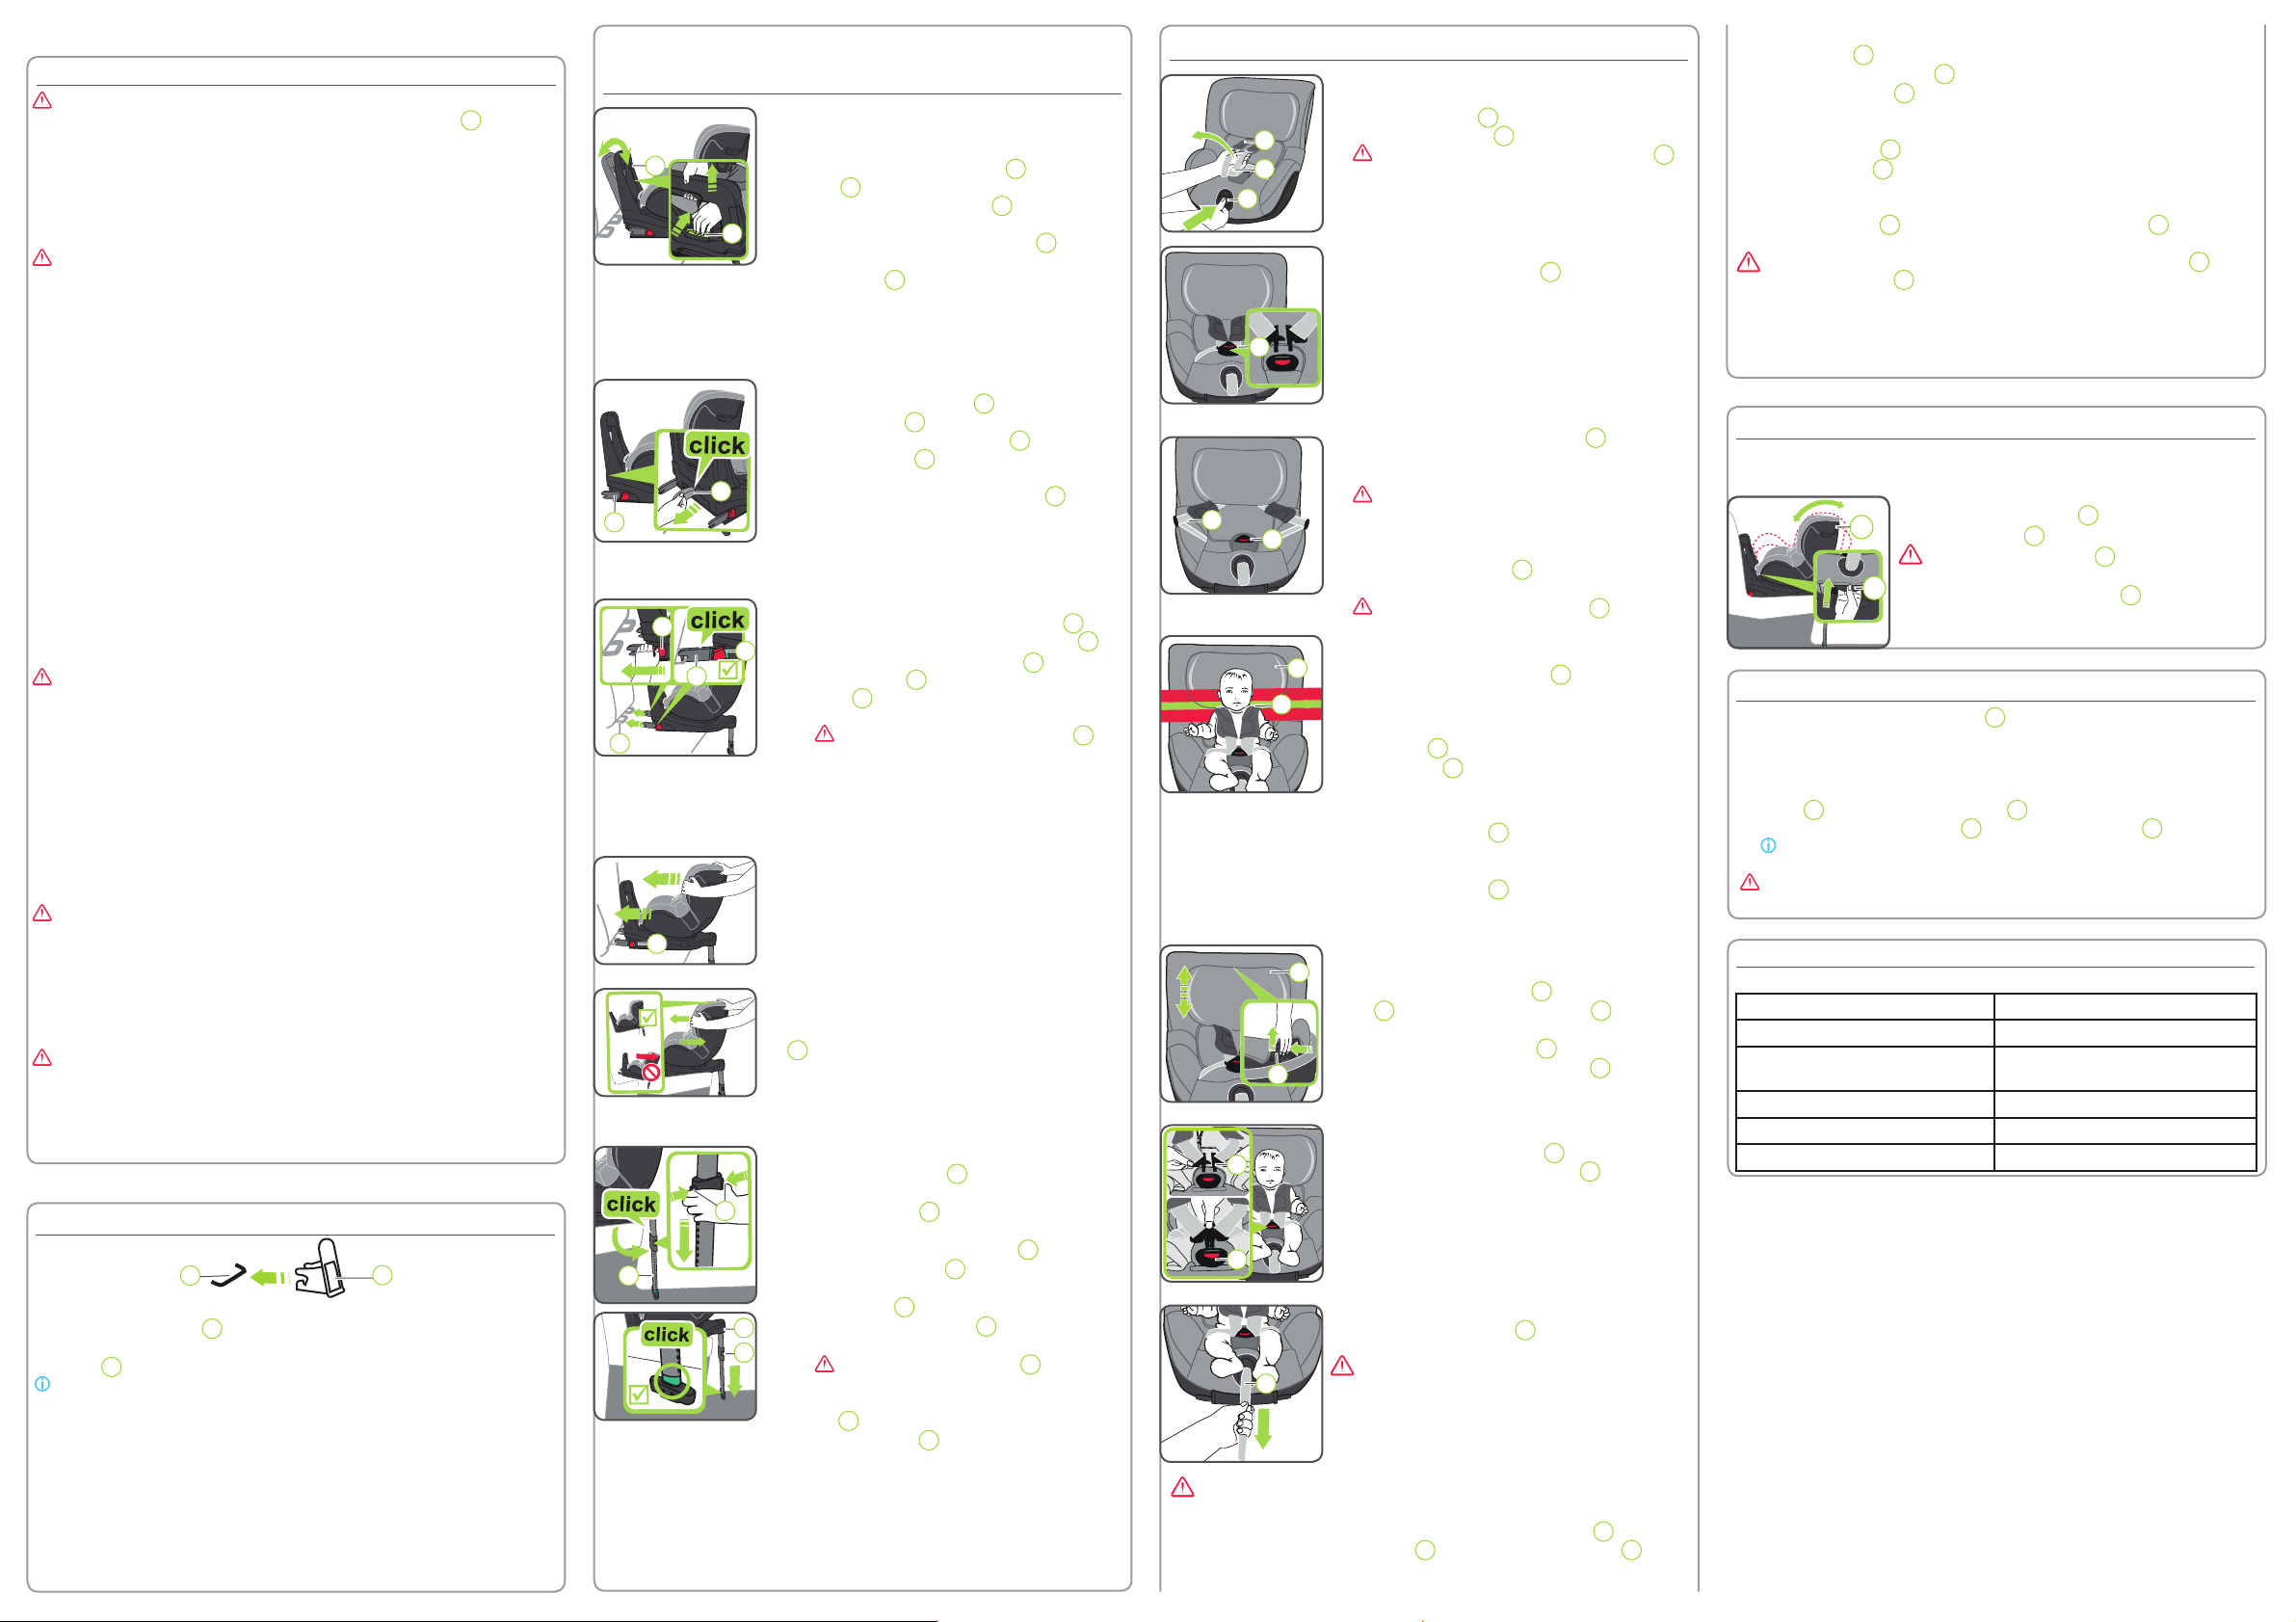
1. ADJUSTING THE SHOCK BAR
1.1 Place the child seat facing forwards (in the
direction of tr
1.2 Pr 14 on the shock
bar 10 down with one hand and use the other
hand to pull the shock bar 10 up at the same
time, until it unlocks.
1.3 Adjust the angle of the shock bar 10 to the
angle of your vehicle seat backrest so the
shock bar 10 engages with a clicking sound.
9. USING THE CHILD SAFETY SEA
2. PREP
2.1 Pull the gr 15 until the ISOFIX
locking arms 16 are fully extended.
2.2 Push the gr06 and the red
release button 05 on both sides of the seat
towards each other
hooks on the ISOFIX locking arms 16 are
open and ready to use.
3. F
3.1 16
directly in front of the two insertion aids 02 .
3.2 Push both ISOFIX locking arms 16 into the
insertion aids 02 until the ISOFIX locking
arms 16 engage on both sides with a clicking
sound.
DANGER! The gr 06
must be visible on both sides so that the child
safety seat is correctly fastened.
4. PUSHING THE CHILD SAFETY SEA
SECUREL
Push the child safety seat as far as possible
towards the vehicle seat backr
5. CHECKING THE F
Shake the child safety seat to ensur
securely fastened and check the safety butt
06 to make sur
green.
6. INST
6.1 21 away from the back of
the child safety seat until you hear a click and
the support leg 21 is fully extended. The red
marking must not be visible any more.
6.2 Push both adjustment butt 22 and pull
out the support leg 21 until it rests fi
the fl
support leg 21 must be fully green and the
two adjustment buttons 22 must engage with
a clicking sound.
DANGER! The support leg 21 must
never be suspended in mid-air or supported
by other objects. Make sure that the support
leg 21 does not lift the SWINGFIX M i-SIZE
bottom section 19 up from the surface of the
vehicle seat.
1. L
T
adjustment button 11 and, at the same time, pull
both shoulder straps 09 forwards.
CAUTION! Do not pull the shoulder pads 08 .
2. OPENING THE HARNESS BUCKLE
T 04 , press the red
button on the harness buckle.
5. ADJUSTING THE HEADRES
A correctly adjusted headr 03 ensures
optimum protection for your child in the child
safety seat:
The headrest 03 must be adjusted so that the
shoulder straps 09 are at the same level as your
child’
T
5.1 Loosen the harness (8.1).
5.2 Hold the release button 07 on the headrest
03 down and slide the headrest 03 until it is
at the correct shoulder str
5.3 Check that the headrest 03 is properly
engaged by sliding the headrest 03 down
alittle.
3. POSITIONING A CHILD IN THE SEA
Place your child in the child safety seat.
Make sure that the harness buckle 04 is folded
forwards and place your child in the child safety
seat.
DANGER! Only use the child safety seat
facing backwards on the passenger seat if the
front airbag has been deactivated.
4. FITTING THE SHOULDER STRAPS
Lay the shoulder straps 09 over your child's
shoulders.
CAUTION! The shoulder str 09 must not
be twisted or have their places changed over
6. CL
Push the two buckle t 29 together and
push them into the harness buckle 04 until they
engage with a clicking sound.
7. TENSIONING THE ADJUSTMENT S
Pull the adjustment str 12 until the strap lies fl
and snug on your child’
WARNING! The hip belt must lie as low as
possible over your child's hips.
1. Pr22 on the support leg and push the
bottom part of the support leg into the t
Release the adjustment buttons to fi
position.
2. Loosen the ISOFIX fast
button 06 and the red release butt 05 towards each other
3. Move the ISOFIX locking arms 16 back into the seat shell 18 .
TIP! The ISOFIX locking arms are prot
are pushed back into the seat bott
DANGER! The child safety seat must always be secur
vehicle, even if no child is being transport
Please observe the waste disposal regulations in your country
Disposal of packaging Container for cardboard bo
Seat cover Residual waste, waste inciner
Plastic parts T
container according to labelling
Metal parts Container for metals
Belt straps Container for polyester
Buckle and tongue Residual waste
10. ADJUS
T
Pull the adjustment handle 13 forwards and push/
slide the seat shell 18 into the desired position.
DANGER! The seat shell 18 must engage
securely with a clicking sound regar
position. Pull up on the seat shell 18 to ensur
itis engaged.
►The shoulder straps 09 must be adjusted so that
they run horizontally or just above your child’
shoulders.
►The shoulder straps 09 are not allowed t
behind your child’
ears.
Before each car journey, in order t
safety, make sur
• the child safety seat is fastened in the ISOFIX fastening points
01
on both
sides with the ISOFIX locking arms
16
and both ISOFIX indicators
06
are
fully green;
12. DISPOSAL
11. REMOVING THE CHILD SAFETY SEA
02
01
• the child safety seat is securely fastened;
• the support leg
21
is resting fi
indicator on the support leg
21
is green;
• the rotating seat shell
18
is fully engaged and both indicators are black;
• the harness of the child safety seat is fi
without being constricting;
• the shoulder straps
09
are correctly adjust
• the shoulder pads
08
are in the correct position on your child’
• the front airbag is deactivated if you ar
passenger seat;
• the buckle tongues
29
are fastened int
04
.
CAUTION! If your child tries t
05
or
the harness buckle
04
, stop immediately as soon as possible. Check
whether the child safety seat is correctly fastened and ensur
child is correctly secured. Explain t
with their actions.
13
18
The seat shell of the SWINGFIX M i-SIZE can be used in six di
positions facing backwards:
12
03
07
03
09
09
04
04
14
10
15
16
05
06
16
02
06
21
22
22
19
11
09
08
04
29
04