KNOWING YOUR SEWING MACHINE ————————————————————————————————————————————————————————————————————————————————————————————————————————————————————————————————
—
————————————————————————————————————————————————
—————
5
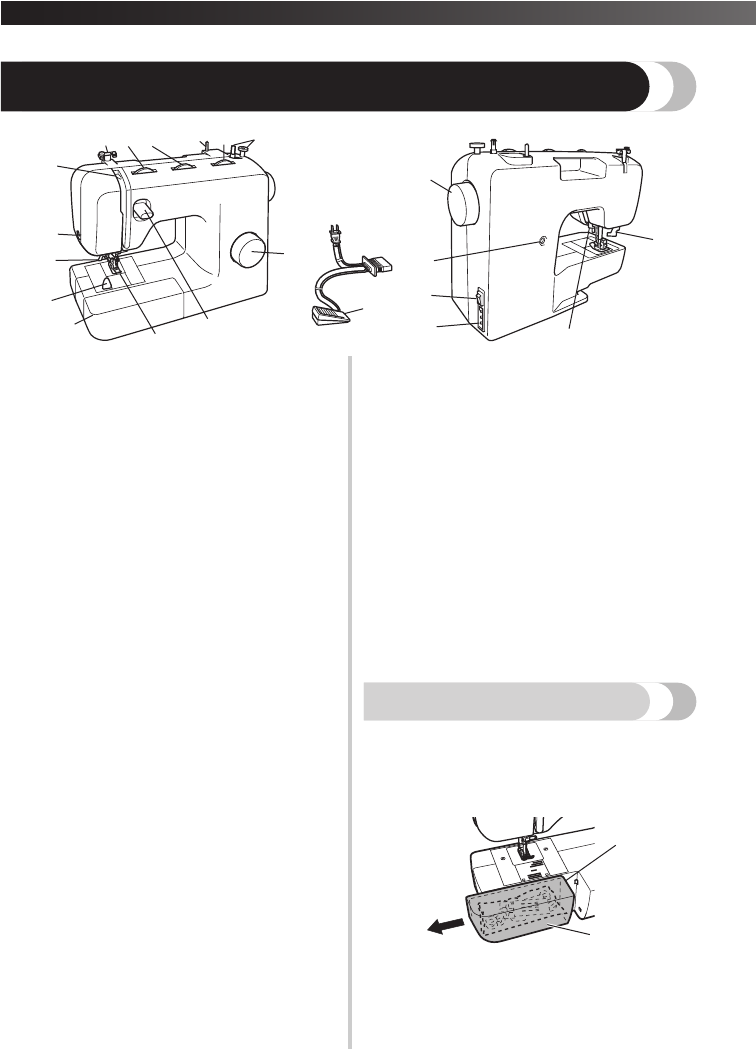
THE MAIN PARTS
1Bobbin winder (Page15)
This winds the thread onto the bobbin for use as the
lower thread.
2Stitch length dial (Page14)
Rotate the dial to control the stitch length.
3Spool pin (Page 15, 19)
This holds the spool of thread.
4Stitch width dial (Page14)
Rotate the dial to control the stitch width.
5Upper tension-control dial (Page29)
This controls the tension of the upper thread.
6Thread guide (Page 15, 19)
This is used when winding the thread onto the
bobbin and then threading the machine.
7Thread take-up lever (Page20)
8Thread cutter (Page 26)
Pass the threads through the thread cutter to cut
them.
9Needle threader (Page 21)
(This is only available on certain models.)
0Quick-set bobbin (Page 18)
(This is only available on certain models.)
AFlat bed attachment with accessory compartment
(Page 5)
BPresser foot (Page 8)
CReverse sewing lever (Page 14)
Push this lever to stitch in the reverse direction.
DPattern selection dial (Page 9)
Rotate the dial in either direction to choose the
stitch you want.
EHandwheel
Used to manually raise and lower the needle.
FButtonhole fine-adjustment screw (Page 38)
GMain power and sewing light switch (Page 7)
You can turn the main power and sewing light
switch on and off.
HFoot controller jack / socket (Page 6)
Plug in the foot controller plug and connect the
machine to the power supply.
IPresser foot lever (Page 19)
Used to raise and lower the presser foot.
J
Buttonhole lever (1-Step automatic buttonhole)
(
Page 36
)
Lower the buttonhole lever when sewing
buttonholes.
KFoot controller (Page 7)
You can use this to control the sewing speed, and to
start and stop sewing.
Foot Controller:
Model KD-1902 for 110-120V area
KD-1902 for 110-127V area (Brazil only)
Model KD-2902 for 220-240V area
The foot controller part code differs depending on the
country or region. Contact your dealer or the nearest
authorized service center.
Flat bed attachment
The accessories can be stored in a compartment inside
Libble nimmt den Missbrauch seiner Dienste sehr ernst. Wir setzen uns dafür ein, derartige Missbrauchsfälle gemäß den Gesetzen Ihres Heimatlandes zu behandeln. Wenn Sie eine Meldung übermitteln, überprüfen wir Ihre Informationen und ergreifen entsprechende Maßnahmen. Wir melden uns nur dann wieder bei Ihnen, wenn wir weitere Einzelheiten wissen müssen oder weitere Informationen für Sie haben.
Art des Missbrauchs:
Forenregeln
Um zu sinnvolle Fragen zu kommen halten Sie sich bitte an folgende Spielregeln:
Lesen Sie zuerst die Anleitung;
Schauen Sie nach, ob die Frage bereits gestellt wurde;
Stellen Sie die Frage so deutlich wie nur einigermaßen möglich;
Erwähnen Sie was Sie bereits versucht haben um das Problem zu lösen;
Ist Ihr Problem von einem Besucher gelöst dann lassen Sie ihn / sie wissen in diesem Forum;
Falls Sie reagieren möchten, so verwenden Sie bitte das Antworten- Formular;
Da ihre Frage für alle Besucher sichtbar ist, sollten Sie lieber keine persönliche Daten erwähnen.
Neu registrieren
Registrieren auf E - Mails für Brother 888 wenn:
neue Frage gestellt werden
neue Handbücher vorhanden sind
Sie erhalten eine E-Mail, um sich für eine oder beide Optionen anzumelden.
Das Handbuch wird per E-Mail gesendet. Überprüfen Sie ihre E-Mail.
Wenn Sie innerhalb von 15 Minuten keine E-Mail mit dem Handbuch erhalten haben, kann es sein, dass Sie eine falsche E-Mail-Adresse eingegeben haben oder dass Ihr ISP eine maximale Größe eingestellt hat, um E-Mails zu erhalten, die kleiner als die Größe des Handbuchs sind.
Ihre Frage wurde zu diesem Forum hinzugefügt
Möchten Sie eine E-Mail erhalten, wenn neue Antworten und Fragen veröffentlicht werden? Geben Sie bitte Ihre Email-Adresse ein.