If using AAA alkaline batteries: Replace them with new
ones.
If using Ni-MH batteries: Charge them fully.
Battery Dead
The installed batteries are running low.
Invalid!
An invalid number was entered as the label length.
(This is not displayed in Auto Designs function.)
No Text!
•You tried to print a text file when there is no data
stored in the memory.
• is pressed when no text is entered.
•You tried to select Text Preview or Cable Label when
no text is entered.
• was pressed when no text was entered while
using the DECO MODE or Auto Designs function.
Line Limit!
•You tried to enter a 3rd line by pressing .
•You tried to print or preview two lines of text while
0.13" (3.5mm) or 0.23" (6 mm) tape is installed. Install
tape of a larger size.
No Cassette!
You tried to print a label when there is no cassette
installed.
Cutter Error
The tape cutter lever was used during the printing
process.
Text Full!
The maximum number of characters (80 characters*)
have already been entered.
*50 characters - for Auto Designs function and DECO
MODE
Text Limit!
With the DECO MODE function:
Since the number of entered characters exceeds the
label length, reduce the text.
All other functions:
Since the number of entered characters exceeds the
label length, reduce the text, or select [Auto] as the
label length.
No Frame OK?
Printing on 0.13" (3.5mm) tape with invalid Frame
setting ON. (Select to print with no Frame,
to cancel.)
OK to Feed?
Feeding tape after printing when [Chain Print] is
selected. Refer to “Setting Margin”.
Insert 0.47"
Only 0.47"(12mm) tapes are available for use with
DECO MODE function.
Wrong Tape!
Use a tape cassette with the mark.
MessageCause/Remedy
ProblemSolution
The display stays blank
after you have turned on
the machine.
•Check that the batteries are correctly
inserted.
•If the batteries are weak, replace them.
When the label is printed
out, the margin(space) is
too large on both sides of
the text.
•See “Setting Margin” in this users guide
and select [Half] or [Narrow] to have
smaller margins for your label.
The machine does not
print, or the printed
characters are not formed
properly.
•Check that the tape cassette has been
inserted correctly.
•If the tape cassette is empty, replace it.
•Check the cassette cover is properly
closed.
The setting has cleared
on its own.
•The batteries may be weak. Replace
them.
•When power is disconnected for more
than three minutes, all text & formats in
the display will be lost. Language and Unit
settings will also be cleared.
A blank horizontal line
appears through the
printed label.
•There maybe some dust on the print
head. Remove the tape cassette and use
a dry cotton swab to gently wipe the print
head with an up-and-down motion.
The machine has “locked
up” (i.e., nothing happens
when a key is pressed,
even though the machine
is on.)
•Refer to “Resetting the P-touch”.
The power turns off when
you try to print.
•The batteries may be weak. Replace
them.
•Check that the batteries are correctly
inserted.
The tape does not feed
properly or the tape gets
stuck inside the machine.
•Check that the end of the tape feeds
under the tape guides.
•The cutter lever is used while printing. Do
not touch the cutter lever during printing.
All text and format
settings need to be
cleared to create a new
label.
•Press and select [Text&Format].
The LCD is set to an
incorrect language.
•Refer to “Initial Settings”.
ProblemSolution
BASIC USAGE
XSwitching Upper Case/Lower Case
Upper case ( ON)Lower case ( OFF)
XMaking Two Lines of Text
To make two lines of text, do one of following:
a)
Enter the text for the first line and then press for the
second line.
b)
Move the cursor to where the second line starts and press
.
Use either 0.35" (9mm) or 0.47" (12mm) wide tape for two line text.
NOTE
Do not press after the second line; otherwise the “Line Limit!”
error message will appear.
XTo Clear
By pressing , the letters will be deleted one by one.
To delete all text and settings :
To delete text only :
XEntering Accented Characters
•To cancel the current operation, press .
•The order of accented characters differs depending on the
selected LCD language.
XChanging Label Length
NOTE
•After the label is printed, cut along the printed dots (:) with
scissors so that the label length matches the machine setting.
•If a specific label length has been selected, also appears in
the LCD.
XPreview
You can preview the text before printing.
Only the text can be previewed, not the size, font or any
additional features.
XFeeding (Tape Feed)
XPrinting
•If you need only 1 copy of the label, press without
selecting the number of copies.
•The number of copies can also be specified by pressing a
number key.
•To prevent damage to the tape, do not touch the cutter lever
while the message "Printing..." or "Feeding..." is displayed.
•To cut off the label, push in the tape cutter lever on the upper-
right corner of the machine.
•Peel the printed label from the backing and apply the label.
•You can print up to 9 copies of each label.
XSetting Margin
[Full]/[Half]/[Narrow]
For leaving equal margins on both sides of the text.
[Chain Print]
For creating a label containing text in various styles.
1. Enter text.
2. Press , then [Copies: ] appears.
3. Press / or enter number with number keys to
select the number of copies.
4. Press . Printing will start, and then the message "OK
to Feed?" appears.
5. Press to enter more text.
6. Clear the text, enter the text for the next label, and then
press .
7. When the message "OK to Feed?" appears after the last
label is printed, press .
8. After the tape is fed, press the cutter lever to cut off the
chain of labels.
NOTE
•When [Half] or [Narrow] is set, the displayed label length is the
length from the printed dots () to the end of the label.
•To print more than 1 copy of a label with minimum margin, set
the margin to [Narrow].
•When [Chain Print] is set, feed the tape before using the cutter
otherwise a part of the text may be cut off. Also, cut along the
printed dots () with scissors so the text is centered in the label.
*Feed the tape before using the cutter.
•Do not pull the tape since this may damage the tape cassette.
You can save up to 9 labels and recall them for printing at a later
date. A maximum of 80 characters can be saved per file, a
maximum total of 720 characters for the total memory. You can
also edit and overwrite the stored label.
XPrint
XSave
XOpen
NOTE
If you try to store a label when there is already a label stored to that
number, a message “Overwrite?” will appear. Press to save
your new label. Press to cancel.
If the cutter blade becomes dull after repetitive use and the tape cannot
be cut cleanly, replace with a new cutter (stock no. TC-4). You may
obtain this item from an authorized Brother reseller.
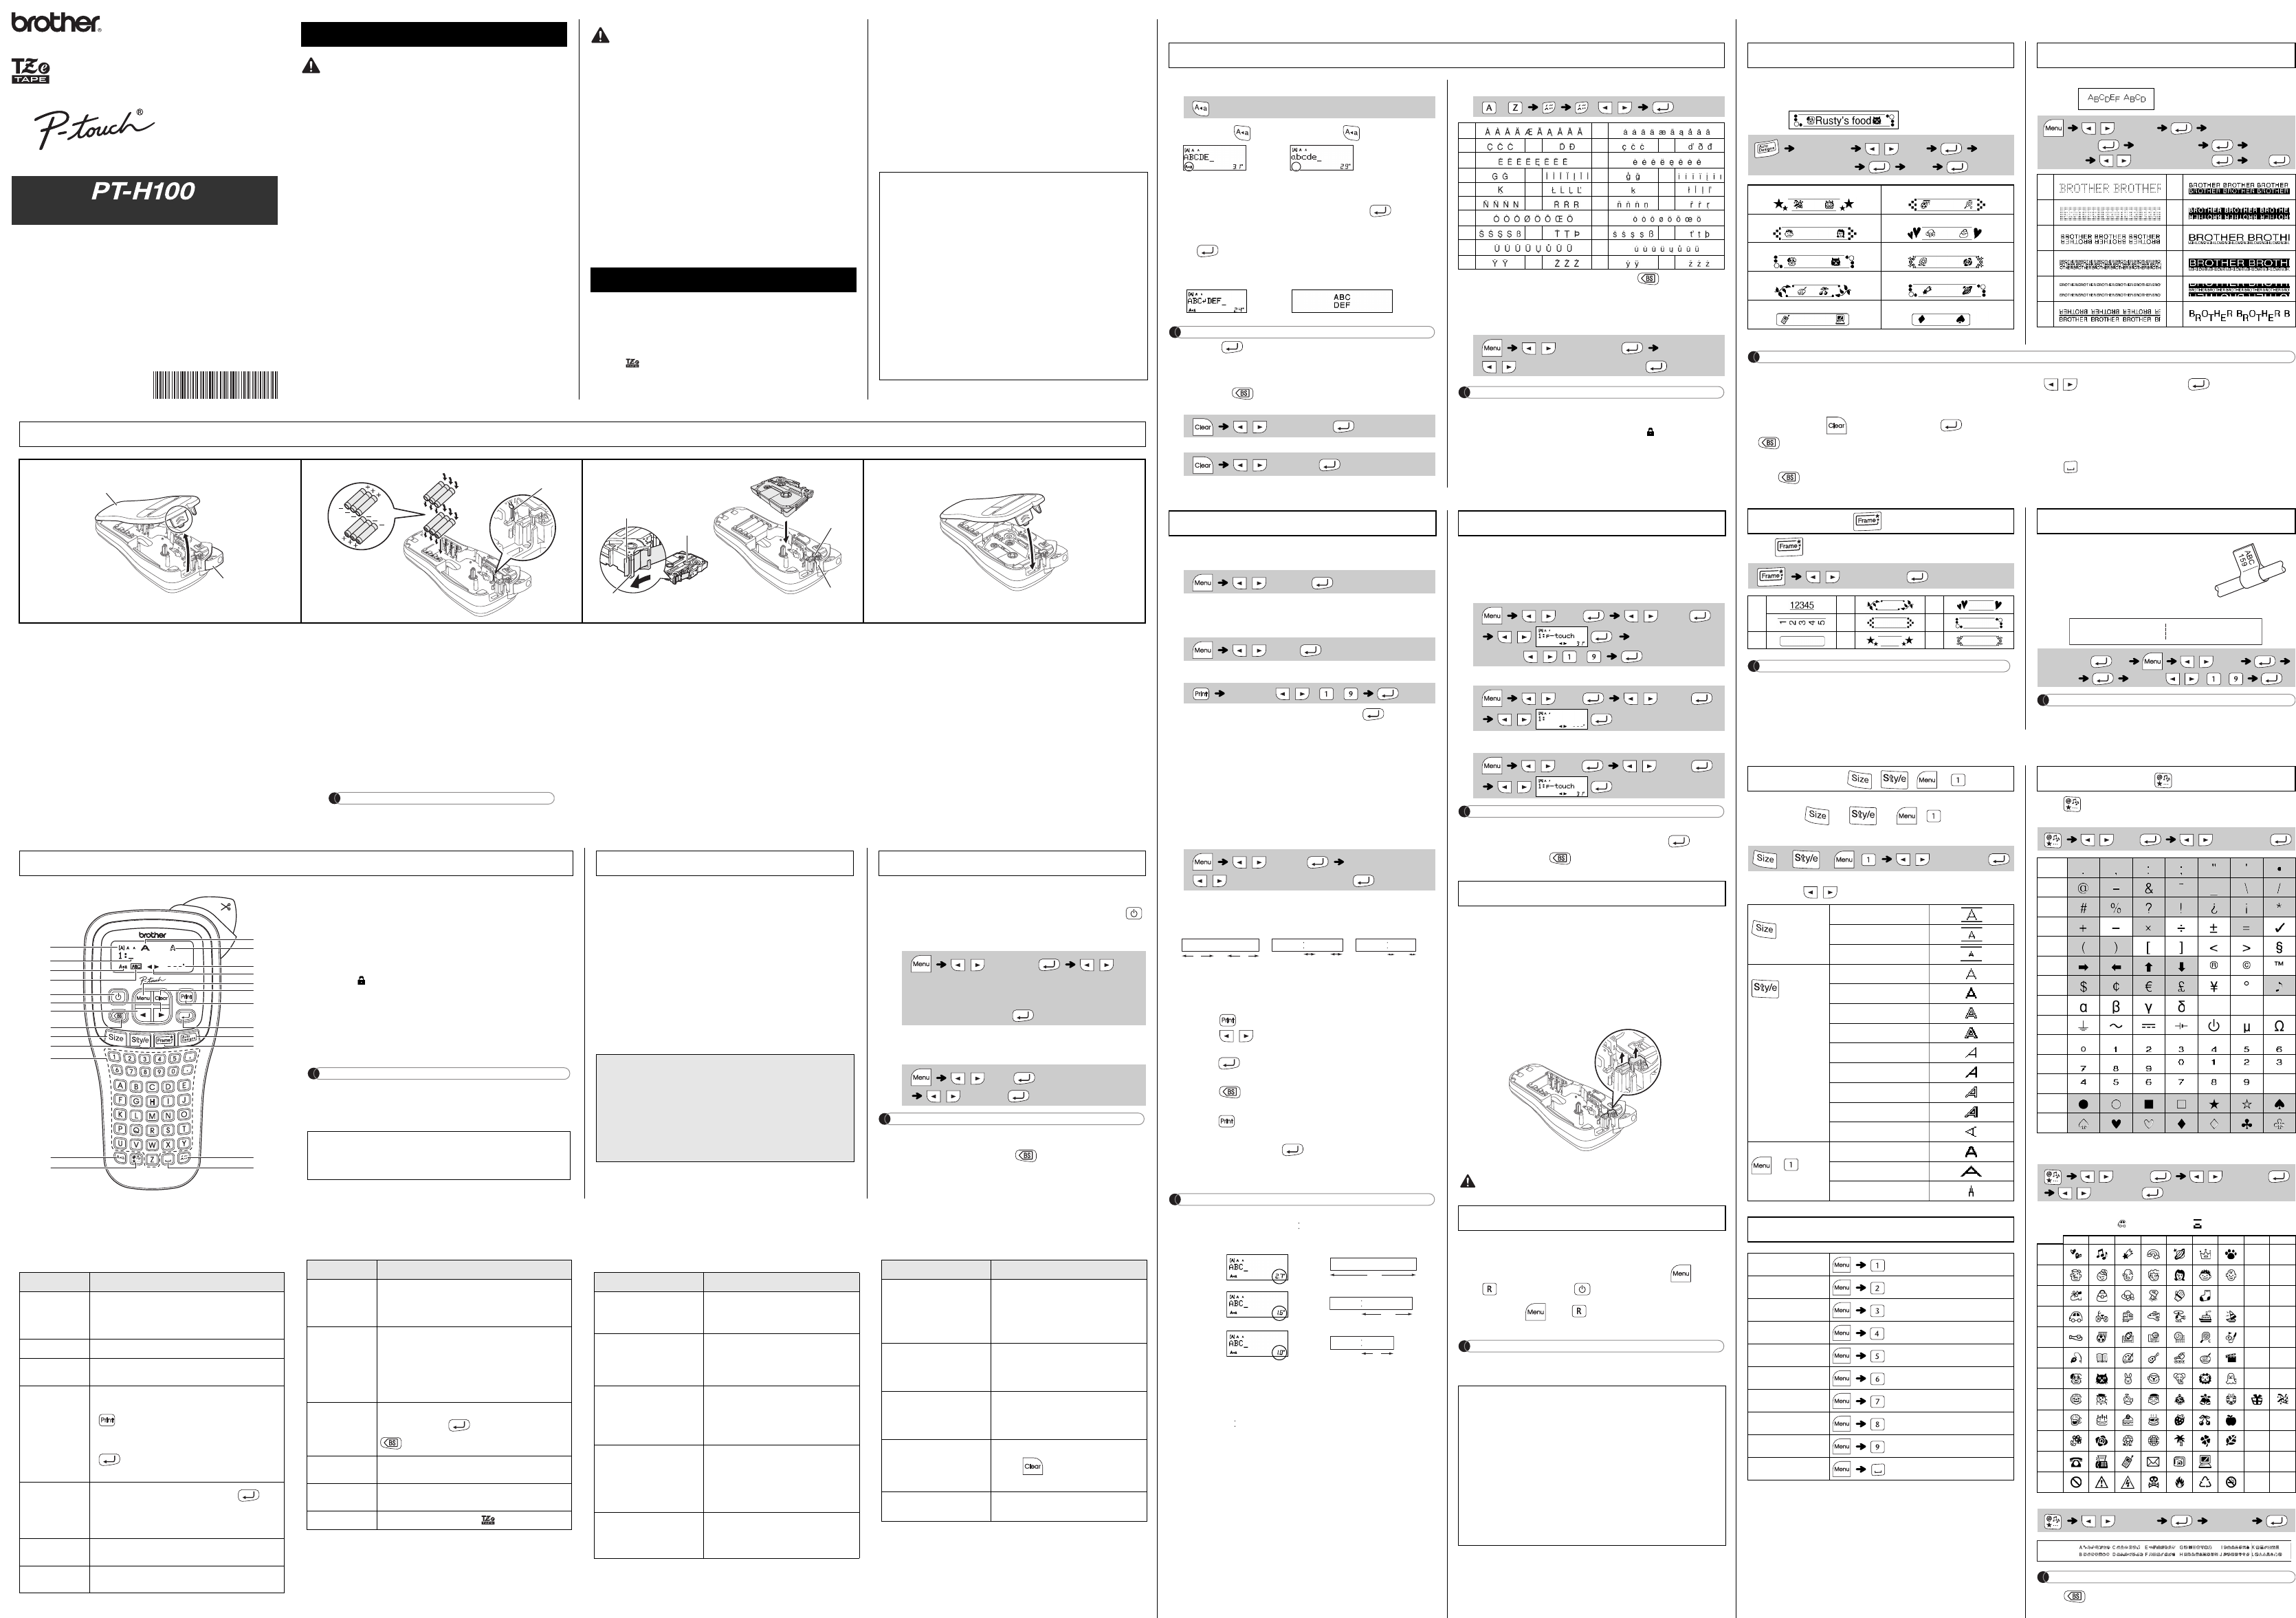
XReplacing the Cutter Unit
1. Pull out the two sections of the cutter unit (green) in the
direction of the arrows shown in the illustration.
2. Install a new cutter unit. Push it in until it snaps into place.
You can reset the P-touch labeler when you want to initialize the
settings, or in the event the P-touch labeler is not working properly.
1
Turn off the P-touch labeler, hold down and
and then press to turn the P-touch back on.
2Release and .
The P-touch labeler turns on with the internal memory reset.
NOTE
All text, settings and stored files are cleared.
Entering Text
LCD displayLabel image
/ [Text&Format]
/ [Text Only]
- / /
Aa
CDcd
Ee
GIgi
KLkl
NRnr
Oo
STst
Uu
YZyz
/ [Label Length]
/ [Auto/1.2"-12.0" (30-300 mm)]
Printing Labels
/ [Preview]
/ [Feed]
[Copies: 1] / / -
/ [Margin]
/ [Full/Half/Narrow/Chain Print]
LCD displayLabel image
Full
Half
Narrow
1"
0.16"0.16"
1"
ABCABC
0.47"0.47"
(4 mm)
(25 mm)
(12 mm)
ABC
Full
Half
Narrow
2.7"
(67 mm)
ABC
1.6"
(41 mm)
ABC
1"
(25 mm)
ABC
Saving Label Files
/ [File] / [Print]
/
[Copies: ] / -
/ [File] / [Save]
/
/ [File] / [Open]
/
Accessories
Tape Cassettes:See the included “Supplies and
Accessories Guide”.
Cutter Unit:TC-4 (replacement)
Do not touch the cutter blade directly with your fingers.
Resetting the P-touch
Declaration of Conformity
(Europe/Turkey only)
We, BROTHER INDUSTRIES, LTD
15-1, Naeshiro-cho, Mizuho-ku,
Nagoya, 467-8561, Japan
declare that this product is in compliance with the essential
requirements and other relevant provisions of Directives
2004/108/EC.
The Declaration of Conformity (DoC) is on our Web site.
Please go to http://solutions.brother.com -> choose region
(eg. Europe) -> choose country -> choose your model ->
choose “Manuals”-> choose Declaration of Conformity
(*Select Language when required).
USING TEMPLATES
The designed labels shown below are preset in the machine.
Using these templates, you can create decorative labels easily by
inputting text.
Example:
If [Surprise!] is selected, a frame, style and pictographs are selected randomly.
This function allows you to create unique labels by using built-in templates.
Example:
NOTE
•Depending on the format you have selected, the entire contents of your text may
not be printed. For example, if you selected a fixed Label Length and the text is too
long, the "Text Limit!" error message will appear. (Only for DECO MODE function)
•The template designs cannot be edited.
•Only the highlighted symbols in “Symbol Key” can be used in DECO MODE.
•To clear all text, press , and “Clear?” appears. Press to clear. Press
to cancel.
•When you access DECO MODE or Auto Designs, your most recently printed
DECO MODE or Auto Designs text and label length will be recalled.
•Press to return to the previous step.
•To exit DECO MODE or Auto Designs and return to the text input screen, press
/ to select [Cancel], and then press when [Print] is displayed.
•The DECO MODE features are only available when using 0.47" (12mm) tape
cassettes.
•The maximum label length is 7.8" (200mm) for the DECO MODE.
•When [Surprise!] is selected in the Auto Designs function, label length will not be
displayed in the text input screen.
•When [Auto] is selected for “Label Length”, the label will automatically adjust to the
correct length for the text.
•Press to return to the [Auto] setting for “Label Length” mode.
Press to select the frame design.
NOTE
Frames cannot be printed on 0.13" (3.5mm) tape.
NOTE
With the Cable Label function, [Auto] is automatically selected for
the label length and [Full] for the margins.
USEFUL FUNCTION KEYS
1Press or or + to select the
settings to enter the text.
2Press / to select the settings.
Press to select various symbols.
To enter Basic symbols :
Only the highlighted symbols can be used in DECO MODE.
To enter Pictograph symbols :
The selected symbol is displayed as "A1" in the text input screen.
For example, a car is displayed as in the screen.
To print all pictographs :
NOTE
Press to return to the previous step.
Auto Designs
[★Category★] / [Pets]
[★Input text★] Rusty's Food [Print]
CongratsSports
PeopleFashion
PetsFlower
KitchenSpace
BusinessSurprise!
DECO MODE
/ [Deco mode]
[Design X] (X:1-12)
[Input Text] ABCDEF
[Label Length] / [Auto/1.2"-7.8"(30-200mm)]
[Print]
17
28
39
410
511
612
Frame Key
/ Select a frame
2
47
58
369
Cable Label
This function allows you to create cable labels
as below with 2 lines of text wrapping around
cable. We recommend using Brother Flexible
ID tape when wrapping.
Refer to the insertion sheet included with
Flexible ID tape about the recommended
conditions for use.
[Input text] ABC 159 / [Cable]
[Print OK?] [Copies: 1] / / -
ABC
159
ABC
159
Text Keys //+
or or +/ Select an item
Size
Large
Medium
Small
Style
Normal
Bold
Outline
Shadow
Italic
I+Bold
I+Outline
I+Shadow
Vertical
Width
+
Normal
× 2
× 1/2
Short Cut Keys
Width
Label Length
Margin
File
Cable
Deco mode
Preview
Feed
Unit
Language
Symbol Key
/ [Basic] / Choose a symbol
1
2
3
4
5
6
7
8
9
10
11
12
13
14
/ [Pictograph] / Select category
/ Choose a symbol
123456789
A
B
C
D
E
F
G
H
I
J
K
L
/ [Print List] [Print OK?]
With your PT-H100, you can create labels for multiple
applications. Select from the many frames, character sizes and
styles to design beautiful custom labels. In addition, the variety
of tape cassette available allows you to print labels with different
widths and exciting colors.
Read this manual carefully before you begin and keep the
manual in a handy place for future reference.
Printed in China
LAA204001
English
Español
User’s Guide
*
1
Visit us at http://solutions.brother.com/ for the latest
information about the recommended batteries.
Specifications
Dimensions:
(W x D x H)
Approx. 4.4" × 8.2" × 2.4"
(Approx.110(W) × 208(D) × 59(H)mm)
Weight:Approx. 0.9 lb. (Approx. 390 g)
(without batteries and tape cassette)
Power supply:Six AAA alkaline batteries (LR03)
Six AAA Ni-MH batteries (HR03)*
1
Tape cassette:Brother TZe tape (width)
0.13" (3.5mm), 0.23" (6mm),
0.35" (9mm), 0.47" (12mm)
Should you encounter any problems with your product,
please do not return your product to the store!
After referring to the User's guide, if you still need
assistance, call Brother Customer Service at:
Voice: 1-877-BROTHER
Web: www.brother-usa.com
Fax: 1-901-379-1210
If you need to locate a service center, please call
1-877-BROTHER or visit us at www.brother-usa.com
Brauchen Sie Hilfe? Stellen Sie Ihre Frage.
1
Forum
brother-p-touch-h100
Suche zurücksetzen
Hallo, ich möchte eine lesbare Bedienungsanleitung vom Etikttendrucker p-touch H100LB. Das pdf Dokument ist winzig klein. Ich möchte die Schrift auf dem Etikett vergrößern, aber ohne lesbare Bedienungsanleitung ist das schwer. Können Sie mir helfen? Mit freundlichen Grüßen Susanne Wolff
Eingereicht am 11-10-202317:59
vielen jahren den geist aufgegeben hat .bels sei dem kauf vor jahren gab es wenigstens noch eine vernünftige bedienungsanleitung dazu was ich jetzt bei dem neuen gerät sehr vermisse. als senior (ü 80) was muß man unternehmen um an so eine bedienungsanleitung vom P-touchH100LB zu kommen ?
Eingereicht am 7-3-202214:44
ich will drucken, aber nix passiert; auf dem Display erscheint "Blatt leer". Ich habe eine neue Kassette gekauft, aber das hat nicht geholfen
Eingereicht am 25-4-202011:47
Haben P-Touch H100LB. Dieses Gerät zeigt immer wieder einen Schneidefehler nach Druck an und hängt sich auf. Wir schalten es dann aus und wieder an. Wie kann ich es beheben
Eingereicht am 18-7-201710:12
Haben Problem mit P-Touch H100LB, es zeigt immer wieder einen Schneidefehler an. und hängt sich auf Wir schalten das Gerät dann aus und wieder ein
Eingereicht am 18-7-201710:11
Libble nimmt den Missbrauch seiner Dienste sehr ernst. Wir setzen uns dafür ein, derartige Missbrauchsfälle gemäß den Gesetzen Ihres Heimatlandes zu behandeln. Wenn Sie eine Meldung übermitteln, überprüfen wir Ihre Informationen und ergreifen entsprechende Maßnahmen. Wir melden uns nur dann wieder bei Ihnen, wenn wir weitere Einzelheiten wissen müssen oder weitere Informationen für Sie haben.
Art des Missbrauchs:
Forenregeln
Um zu sinnvolle Fragen zu kommen halten Sie sich bitte an folgende Spielregeln:
Lesen Sie zuerst die Anleitung;
Schauen Sie nach, ob die Frage bereits gestellt wurde;
Stellen Sie die Frage so deutlich wie nur einigermaßen möglich;
Erwähnen Sie was Sie bereits versucht haben um das Problem zu lösen;
Ist Ihr Problem von einem Besucher gelöst dann lassen Sie ihn / sie wissen in diesem Forum;
Falls Sie reagieren möchten, so verwenden Sie bitte das Antworten- Formular;
Da ihre Frage für alle Besucher sichtbar ist, sollten Sie lieber keine persönliche Daten erwähnen.
Neu registrieren
Registrieren auf E - Mails für Brother P-Touch H100 wenn:
neue Frage gestellt werden
neue Handbücher vorhanden sind
Sie erhalten eine E-Mail, um sich für eine oder beide Optionen anzumelden.
Das Handbuch wird per E-Mail gesendet. Überprüfen Sie ihre E-Mail.
Wenn Sie innerhalb von 15 Minuten keine E-Mail mit dem Handbuch erhalten haben, kann es sein, dass Sie eine falsche E-Mail-Adresse eingegeben haben oder dass Ihr ISP eine maximale Größe eingestellt hat, um E-Mails zu erhalten, die kleiner als die Größe des Handbuchs sind.
Ihre Frage wurde zu diesem Forum hinzugefügt
Möchten Sie eine E-Mail erhalten, wenn neue Antworten und Fragen veröffentlicht werden? Geben Sie bitte Ihre Email-Adresse ein.