Operation Guide 3139
4
Alarm Operation
The alarm sounds at the preset time for about 10 seconds (in all modes), or until you
stop it by pressing any button.
To test the alarm
In the Alarm Mode, hold down
D
to sound the alarm.
To turn the daily alarm and the Hourly Time Signal on and off
In the Alarm Mode, press
D
to cycle through the settings shown below.
Alarm Off
Signal On
Alarm On
Signal Off
Alarm Off
Signal Off
Alarm On
Signal On
Alarm On Indicator / Hourly Time Signal On Indicator
•
The alarm on indicator and the Hourly Time Signal on indicator are shown on the
display in all modes while these functions are turned on.
Daylight Saving Time (DST)
Daylight Saving Time (summer time) advances the time setting by one hour from
Standard Time. Remember that not all countries or even local areas use Daylight
Saving Time.
The time calibration signals transmitted from Mainfl ingen (Germany),
(England), or Fort Collins (the United States) includes both Standard Time and DST
data. When the Auto DST setting is turned on, the watch switches between Standard
Time and DST (summer time) automatically in accordance with the received time
signal.
The time calibration signals transmitted from Fukushima and Fukuoka/Saga (Japan)
do not include summer time data.
•
The default DST setting is Auto DST (
) whenever you select ANC , YVR ,
LAX, YEA , DEN, MEX , YWG, CHI, MIA, YTO, NYC, YHZ, YYT , LIS, LON, MAD ,
PAR, ROM , BER, STO, ATH, MOW, HKG , BJS , TPE , SEL , or TYO as your Home
City code.
•
If you experience problems receiving the time calibration signal in your area, it
probably is best to switch between Standard Time and Daylight Saving Time (summer
time) manually.
To change the Daylight Saving Time (summer time) setting
1. In the Timekeeping Mode, hold down
A
until the city code starts to fl ash, which
indicates the setting screen.
2. Press
C
and the DST setting screen appears.
3. Use
D
to cycle through the DST settings in the sequence shown below.
Auto DST
()
DST on
()
DST off
()
4. When the setting you want is selected, press
A
to exit the setting screen.
•
The DST indicator appears to indicate that Daylight Saving Time is turned on.
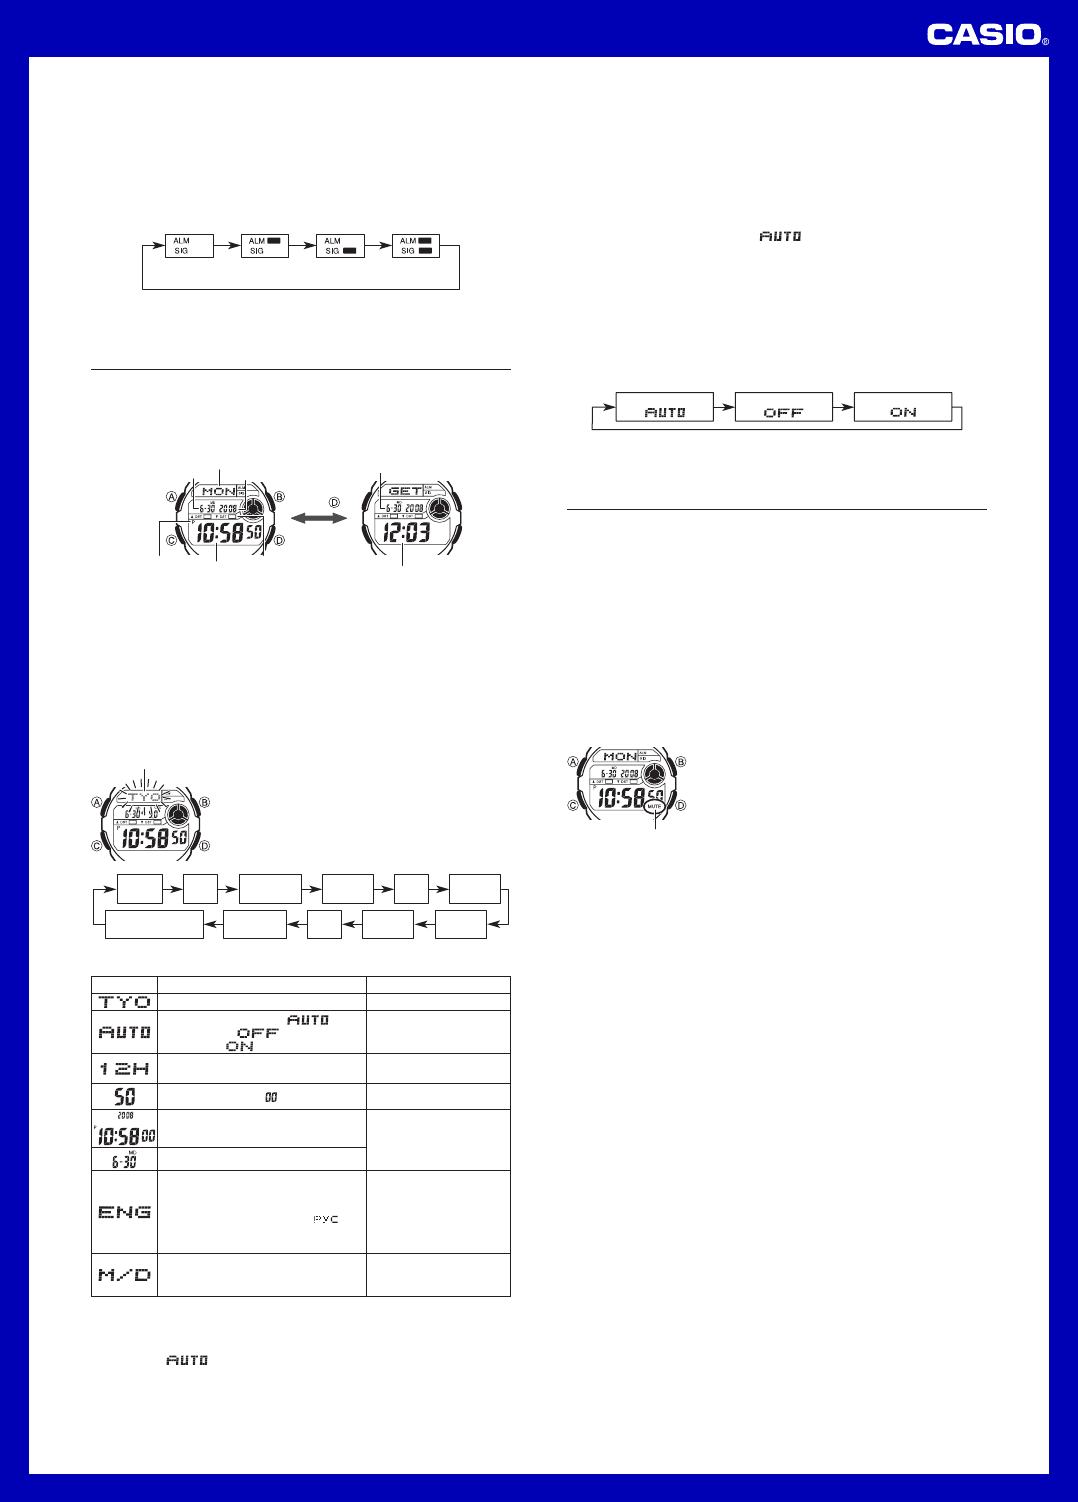
Timekeeping
Use the Timekeeping Mode to set and view the current time and date.
•
When setting the time, you can also confi gure settings for the City Code, the DST
setting, the 12/24-Hour Format, Year, Month, Day, the Language setting, and the
Month/Day display format.
•
Pressing
D
in the Timekeeping Mode will display the Last Signal screen.
Current Time and Date Screen Last Signal Screen
Press .
D
Home Time
(Hour : Minutes Seconds)
Month – Day
Receive time
Receive date
Ye
PM indicator
DST indicator
Note
•
This watch is capable of displaying text for the day of the week in any one of
nine different languages (English, Spanish, French, Portuguese, German, Italian,
Chinese, Russian, and Japanese).
Setting the Time and Date
Make sure you select your Home City code before you change the current time
and date settings. World Time Mode times are all displayed in accordance with the
Timekeeping Mode settings. Because of this, World Time Mode times will not be
correct if you do not select the proper Home City code before setting the time and
date in the Timekeeping Mode.
To set the time and date
City code
1.
A
until the city
code starts to fl ash, which indicates the setting screen.
2. Press
C
to change the fl ashing contents in the
sequence shown below to select other settings.
DST
City
Code
Seconds
12/24-Hour
Format
Minutes
Day
Month/Day
Display Format
Month
Language
Ye r
Hour
3. When the setting you want to change is fl ashing,
B
and/or
D
to change it as
described below.
Screen: T Do this:
Change the city code Use
D
(east) and
B
(west).
Cycle between auto DST ( ),
Standard Time ), and Daylight
Saving Time ( )
Press
D
.
T
12H
) and
24-hour (
24H
) timekeeping
Press
D
.
Reset the seconds to Press
D
.
Change the hour
Use
D
(+) and
B
(– ).
Change the month or day
Change the language
ENG
:
English
ESP
:
Spanish
FRA
:
French
POR
:
DEU
:
ITA
:
CHN
:
:
Russian
JPN
:
Japanese
Use
D
and
B
.
T
between
month/day (M/D ) and daD/M ).
Press
D
.
•
See the “City Code Table ” at the back of this manual for a complete list of
available city codes.
•
See the “Day of the Week List ” at the back of this manual for information on
abbreviations used.
•
Auto DST
) can be selected only while HNL, ANC, YVR, LAX , YEA,
DEN, MEX, YWG , CHI, MIA , YTO, NYC , YHZ , YYT, LIS , LON , MAD , PAR , ROM,
BER, STO, ATH , MOW , HKG, BJS , TPE, SEL, or TYO is selected as the Home
City code. For more information, see “ Daylight Saving Time (DST)” below.
4. Press
A
to exit the setting screen.
Reference
This section contains more detailed and technical information about watch operation.
It also contains important precautions and notes about the various features and
functions of this watch.
Auto Display
Auto Display continually changes the contents of the digital display.
To turn off Auto Display
Press any button to turn off Auto Display. This returns to the Timekeeping Mode.
To turn on Auto Display
In the Timekeeping Mode, while holding down
B
, hold down
D
for about two
seconds until the watch beeps.
Note
•
Calibration signal reception is disabled while Auto Display is being performed.
•
Auto Display cannot be performed while a setting screen is on the display.
Button Operation Tone
MUTE indicator
The button operation tone sounds any time you press one
of the watch’s buttons. You can turn the button operation
tone on or off as desired.
•
Even if you turn off the button operation tone, the alarm,
Hourly Time Signal, and Countdown Timer Mode alarm
all operate normally.
To turn the button operation tone on and off
In any mode (except when a setting screen is on the
display), hold down
C
to toggle the button operation tone
on (MUTE not displayed) and off (MUTE displayed).
•
Since the
C
button is also the mode change button, holding it down to turn the
button operation tone on or off also causes the watch’ s current mode to change.
•
The MUTE indicator is displayed in all modes when the button operation tone is
turned off.
Auto Return Features
•
If you leave the watch with the Last Signal screen in the Timekeeping Mode for one
or two minutes without performing any operation, it returns to the Current Time and
Date screen in the Timekeeping Mode automatically.
•
If you leave the watch in the Alarm Mode for two or three minutes without performing
any operation, it returns to the Timekeeping Mode automatically.
•
If you leave the watch with a fl ashing setting on the display for two or three minutes
without performing any operation, the watch exits the setting screen automatically.
Scrolling
The
B
and
D
buttons are used in various modes and setting screens to scroll
through data. In most cases, holding down these buttons during a scroll operation
scrolls through the data at high speed.
Initial Screens
When you enter the World Time or Alarm Mode, the data you were viewing when you
last exited the mode appears fi rst.