Operation Guide COMBIWVGE1
4
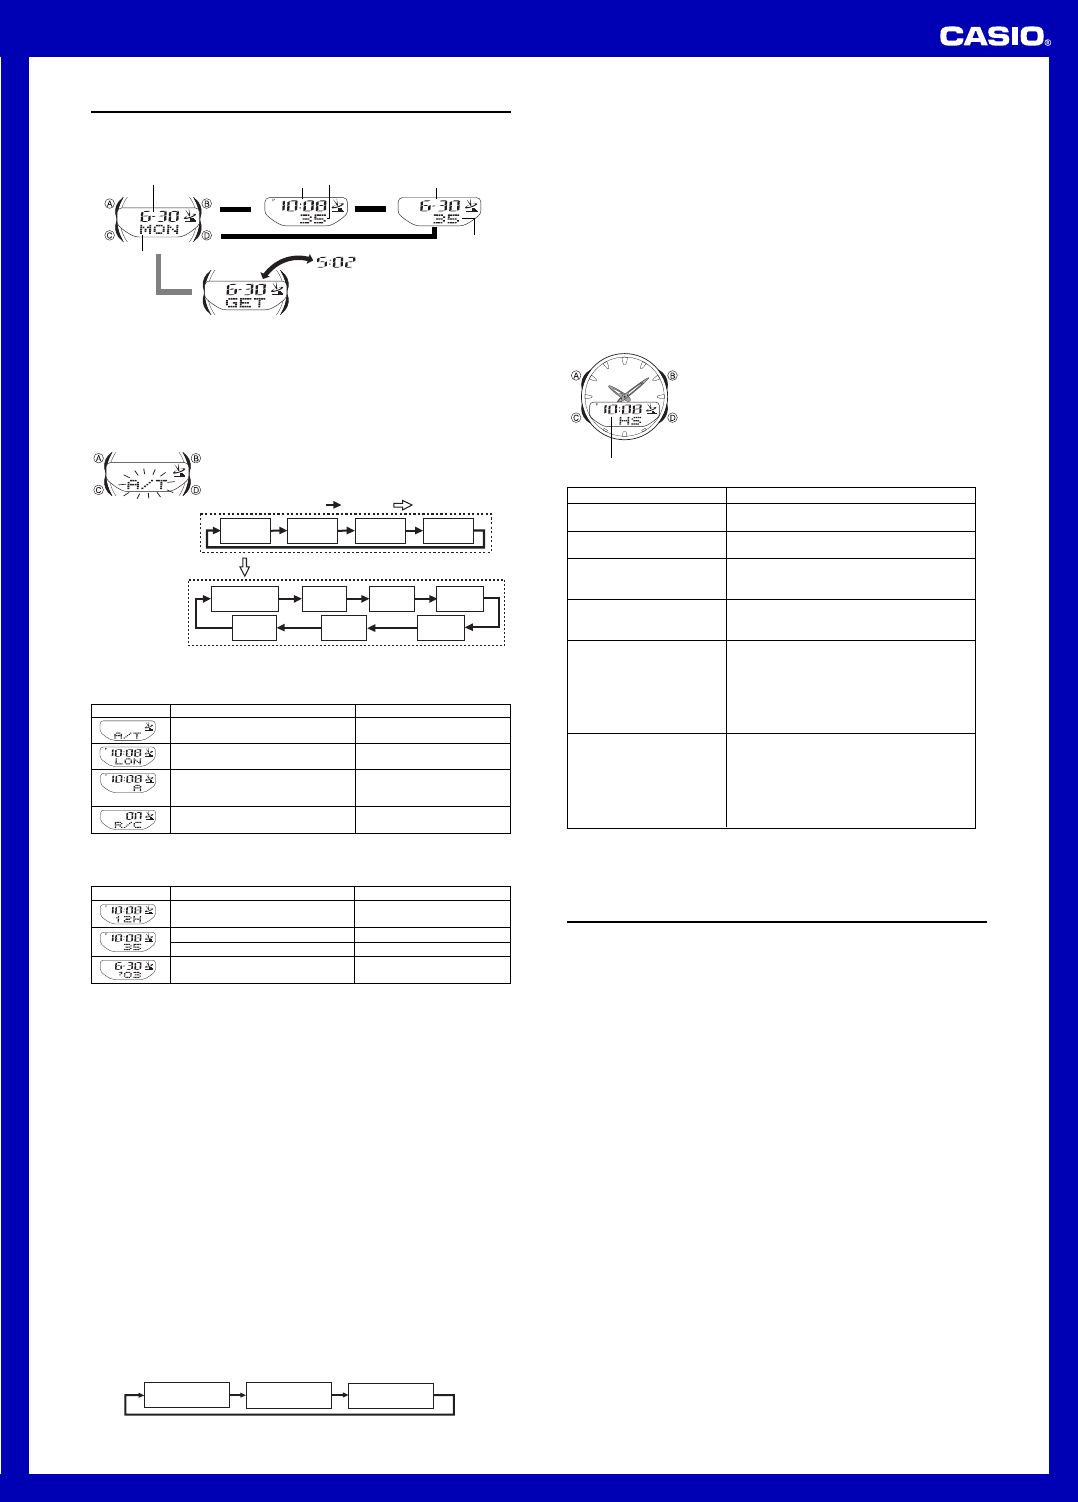
Timekeeping
Use the
also explains ho
• All of the operations in this section are perf
you can enter by pressing C.
Day of week
Hour: Minutes Seconds
Month – Day
A
▲
A
▲
Press A .
▲
Seconds
Month – Day
▲
Press D.
Last Signal Screen
▲
Setting the Digital
Make sure you select y
date settings.
Timekeeping Mode settings.
correct if you do not select the proper Home City code before setting the time and
date in the Timek
T
1. In the A until the
transmitter indicator starts to flash, which indicates the
setting screen.
2. Use A or C to mov
shown below to select other settings
Auto
Receive
DSTCity Code
Seconds
Hour Minutes
12/24-Hour
For
Day
Month Y
/ Press A .
Press C .
T
C
C
A
T
City Settings
Time/Date
Settings
3. When the setting you want to change is flashing, use B and/or D to change it as
described below
Screen:
T
Change the transmitter setting (A/T ,
MSF, or
DCF)
Change the city code
T
Time (
ON) , Standard OFF ),
or Auto DST (A)
T
(
ON) and off ( OF)
Do this:
Use D.
Use D (east) and B (west).
Press D.
Press D.
T
DST
• See “ City Code ” for a complete list of av
4. Use A to exit the setting screen.
• If a A twice
• If a A once
• When you e
match the digital time.“ Analog Timekeeping” f
Note
• See “ T” for more information.
• Auto DST (
A) can be selected only while BER, PAR, LON, or
ATH is selected as the
Home City code.“Daylight Saving ” below
Screen: T
T12H ) and
24-hour (24H ) timekeeping
Reset the seconds to 00
Change the hour or minutes
Change the month, day
Do this:
Press D.
Press D.
Use D (+) and B ( – ).
Use D (+) and B ( – ).
Time/Date Settings
• The auto receive setting is used f“About
Auto Receiv” f
Daylight Saving
Daylight Sa
Standard Time
Saving Time.
The time calibration signals transmitted from Rugby and Mainflingen include both
Standard Time and DST data.
switches between Standard
accordance with the received time signal.
• The default DST setting is A
A) whenevBER , PAR , LON ,
or
ATH as your Home City code.
• If you e
probably best to s
time) manually
T
1.A until transmitter indicator starts to flash,
which indicates the setting screen.
2.C twice and the DST setting screen appears.
3.D to cycle through the DST settings in the sequence shown below
4.A twice to exit the setting screen.
Auto DST (
A
) DST off (
OFF
) DST on (
ON
)
Analog Timekeeping
The analog time of this watch is synchronized with the digital time
setting is adjusted automatically whenev
Note
• The hands for the analog timepiece mo
the follo
When you change the digital time setting manually
When the digital time setting is changed by time calibration signal reception
When you change the Home City code and/or DST setting
• If the analog time does not match the digital time f
described under “ T” to match the analog setting to the digital
setting.
• Whene
make sure you adjust the digital setting first.
• Depending on how much the hands ha
time, it ma
T
1. In the C six times to enter
the Hand Setting Mode.
2. Hold down A until the current digital time starts to
flash, which indicates the setting screen.
3. Use D (+) and B ( – ) to adjust the analog setting as
described below
Current time
Mov
forw
Perf
• Press D.
Mov
20 seconds
Move the hand setting a short
wa
Mov
short way back at high speed
Mov
long way f
speed
• Press B.
• Hold down D.
• Release D when the hands reach the setting
you want.
• Hold down B.
• Release B when the hands reach the setting
you want.
• While holding down D to mov
high-speed, press B to lock the high-speed
hand movement.
• Press any button when the hands are close to
the setting you want.
• Hand mov
hand makes one full (12-hour) re
Mov
wa
• While holding down B to mov
high-speed, press D to lock the high-speed
hand movement.
• Press any button when the hands are close to
the setting you want.
• Hand mov
hand makes one full (12-hour) re
4. Press A to exit the setting screen.
• The minute hand will be adjusted slightly to match the seconds when y
setting screen.
• TC.
Reference
This section contains more detailed and technical information about watch operation.
It also contains important precautions and notes about the various features and
functions of this watch.
Auto return features
• If you leav
“T” ), Date Aler
without performing any oper
Mode.
• If you leav
minutes without perf
hav
Scrolling
The B and D buttons are used in v
through data on the display
operation scrolls through the data at high speed.
Initial Screens
When you enter the
viewing when you last e
Radio-controlled Timekeeping
• Strong electrostatic charge can result in the wrong time being set.
• The time calibration signal is bounced off the ionosphere.
factors as changes in the reflectivity of the ionosphere
ionosphere to higher altitudes due to seasonal atmospheric changes or the time of
day ma
impossible
• Even if the time calibr
the time setting to be off by up to one second.
• The current time setting in accordance with the time calibration signal takes priority
ov
• The watch is designed to automatically update the date and da
period January 1, 2000 to December 31, 2039.
calibration signal cannot be performed starting from January 1, 2040.
• This watch can receiv
years
• Though this watch is designed to receiv
and date data (year
data only