ORIGINAL SET UP FOR THE MITY 3 AND ENDURO 2
L cm
on back
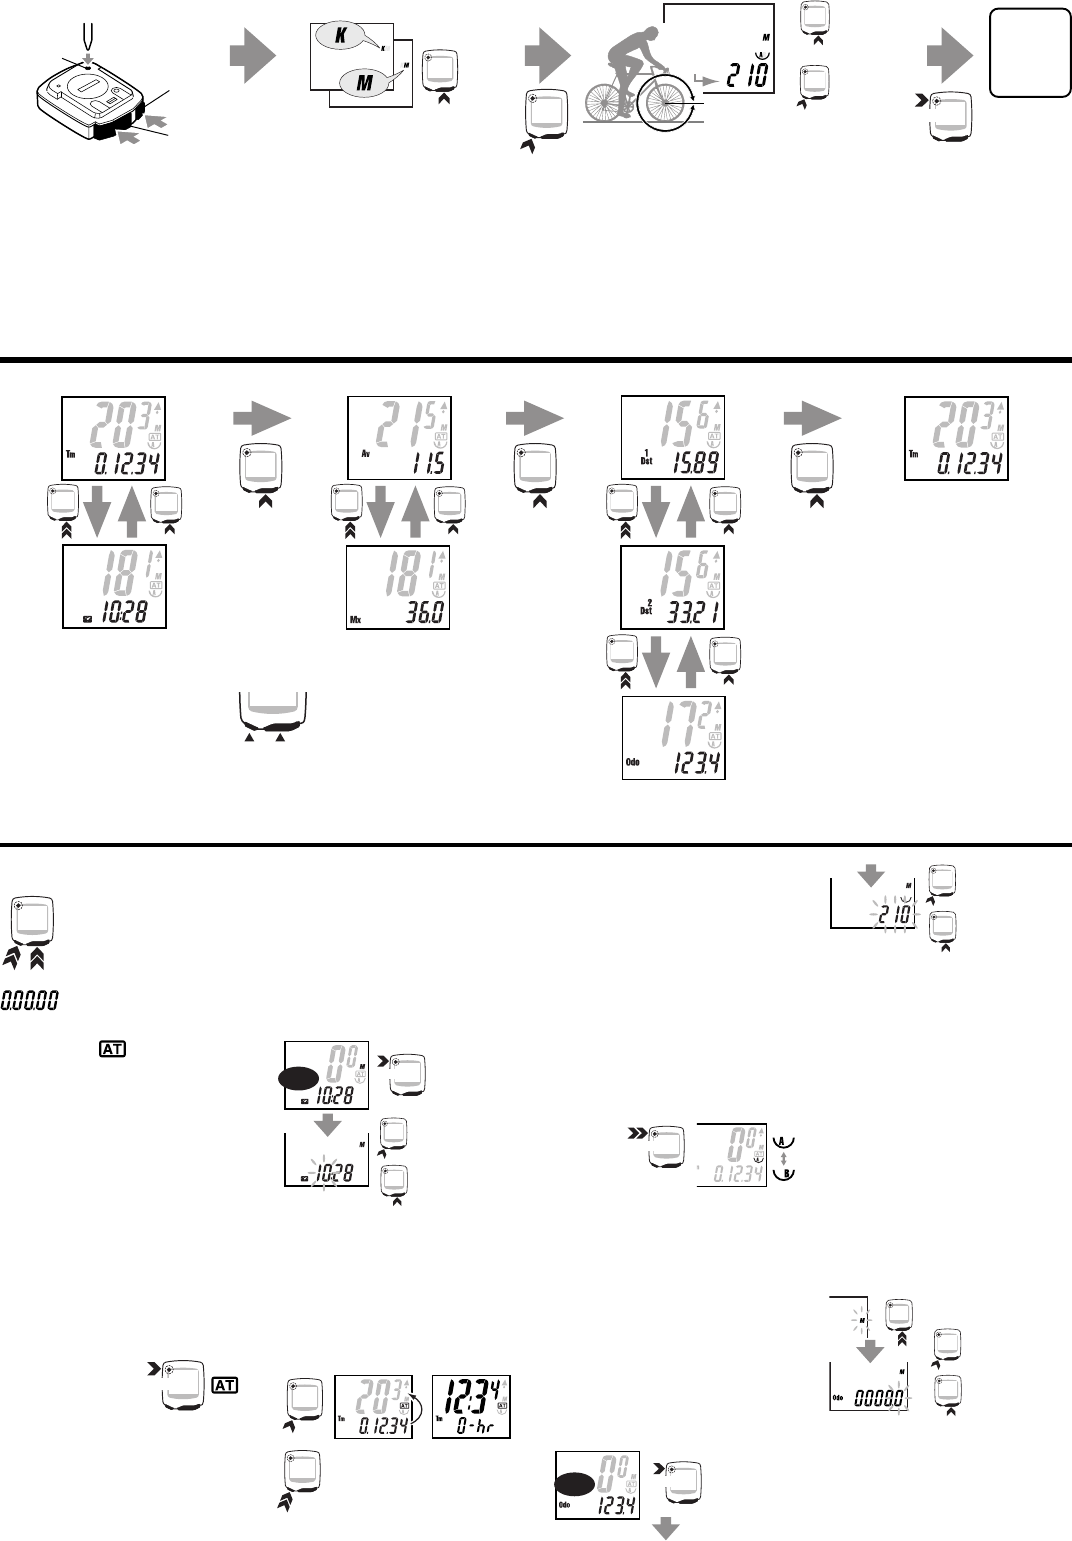
To set up your computer for the first time,
perform an ALL CLEAR OPERATION first
by pressing ALL THREE BUTTONS AT
THE SAME TIME.
Hint: Hold the computer upside down
holding the MODE and START/
STOP (S) Buttons DOWN. Now
PRESS the SET Button with a pencil
or other pointed object.
The complete screen will light up for a mo-
ment and then all fade away. The only
thing on the screen will be a flashing "K".
Select the speed scale you would like by
pressing the MODE Button. "K" for kilome-
ters and "M" for miles per hour. Note that
the speed scale you select DICTATES
CLOCK function in 12 or 24 hours. "K" will
select a 24 hour clock. "M" will select a 12
hour clock.
Set the speed scale by PRESSING the
ST./STOP (S) Button.
The number "210" will flash. This is a pre-
set tire setting for 700X23C tires. Refer to
the tire calibration chart in your manual or
on our web site <www.cateye.com>.
Please note that this number is actually the
DISTANCE in Centimeters your tire rolls
with each revolution while you are on the
bike. If you want to input the most accu-
rate number you will need to do a wheel
roll out.
Increase the digits by PRESSING the
MODE Button. Decrease the number by
PRESSING the ST./STOP (S) Button. Set
the number by PRESSING the SET Button
on the back.
Your computer is now set up for riding.
BUTTON NAVIGATION
The right Button is the MODE Button. The left but-
ton is the START/STOP (S) Button. You use the
MODE Button to navigate through the modes.
From the ELAPSED TIME func-
tion (Tm on the computer
screen), you can PRESS the
MODE Button to access the AV-
ERAGE SPEED function (Av).
PRESS the MODE Button to access the DISTANCE
ONE (Dst1) function. This is the standard ride distance
function. Now PRESS the MODE Button to get back to
the TIME (Tm) function.
T
2 sec.
Clock
TIME has a sub-function of CLOCK. You
access this by PRESSING and HOLD-
ING the MODE Button for 2 Seconds. To
get out of the CLOCK press the MODE
Button. You are now back in TIME.
AVERAGE SPEED (Av) has a sub-func-
tion of MAXIMUM SPEED (Mx). To ac-
cess MAX SPEED PRESS and HOLD
the MODE Button when in AVERAGE
SPEED. To get out of MAX SPEED
PRESS the MODE Button.
Average
Speed
Max
Speed
Odometer
DISTANCE ONE (Dst1) has two sub-functions.
PRESS and HOLD the MODE Button for 2 seconds
to access DISTANCE TWO (Dst2).
DISTANCE TWO is a separate Trip Distance that
can be reset without resetting the other functions.
To reset DISTANCE TWO, PRESS and HOLD the
ST./STOP (S) and MODE Button for ONE SEC-
OND.
From DISTANCE TWO (Dst2) you can access the
ODOMETER function (Odo). PRESS and HOLD
the MODE Button for TWO SECONDS in DIS-
TANCE TWO and you will now be in ODOMETER
(Odo.).
To navigate out of either of these two sub-functions
to DISTANCE ONE, press the mode button.
T
1 sec.
Resetting TIME and DISTANCE
functions
To reset the TIME, DISTANCE
ONE, AVERAGE and MAX
SPEEDS, PRESS AND HOLD
the MODE and ST./STOP (S)
Buttons for ONE SECOND.
DISTANCE TWO (Dst2) can
only be reset while in DIS-
TANCE TWO.
AUTO MODE
You can set the computer to record TIME,
DISTANCE, MAX and AVERAGE SPEED
automatically (AUTO MODE) or manually
(STANDARD MODE).
In STANDARD MODE you must press the
ST./STOP (S) Button to begin recording
TIME and DISTANCE.
In AUTO MODE (AT) the computer starts
and stops when ever it records a signal
from the sensor at the wheel.
To set the computer to AUTO MODE with
the computer in the DISTANCE function or
TIME function, press the SET Button on
the back of the computer. A small symbol
with the letters AT will appear on the
screen indicating AUTO MODE. You take
the computer out of AUTO MODE the
same way.
Setting the CLOCK
To set the CLOCK the computer must be
turned off and the speed scale symbol (ei-
ther M for Miles or K for Kilometers) must
not be flashing. In the Time function
PRESS AND HOLD the MODE Button.
You will see little CLOCK symbol. Now
PRESS the SET Button on the back of the
computer. The hours will start flashing.
The MODE Button advances the digits.
The ST./STOP (S) Button changes from
Hours to Minutes. PRESS the SET Button
on the back to set the CLOCK.
The CLOCK is set to either 24 HOUR or 12
HOUR depending on the SPEED SCALE
selected. In K (Kilometers per hour) a 24
HOUR CLOCK is selected. In M (Mile per
hour) a 12 HOUR CLOCK is selected.
Moving TIME, AVERAGE and
MAX SPEED to upper display
When the computer is set in AUTO MODE
(AT), the functions of TIME, AVERAGE
and MAX SPEED can be switched to the
upper display by PRESSING the ST./
STOP (S) Button. You can move SPEED
back to the upper display by pressing the
ST./STOP (S) Button again.
In STANDARD MODE (AT sym-
bol is off) PRESS and HOLD
ST./STOP (S) Button for 2 sec-
onds.
WHEEL SETTING A or B
The computer has two wheel settings for
quickly and conveniently moving the be-
tween two bikes with different size of tires.
You can tell which WHEEL SETTING you
are in by the semicircle symbol with an "A"
or "B" on the computer screen. Wheel set-
ting "A" has been preset with a tire size for a
700 X 23C road tire. Wheel setting "B" is
preset for a mountain bike tire of 26 x 1.95.
Wheel setting "B" is also specifically pro-
gramed for low speed sensitivity. If you are
using the computer on a mountain bike we
recommend that you use Wheel setting "B".
To select Wheel setting "A" or "B", HOLD
the SET Button except in ODOMETER
function.
CHANGING the WHEEL SETTING
CALIBRATION NUMBER
When you are in the ODOMETER (Odo)
function, you can view the WHEEL CALI-
BRATION NUMBER by PRESSING the
ST./STOP (S) and the MODE Button.
To change the CALIBRATION NUMBER
PRESS the SET Button on the back of the
computer in ODOMETER (Odo) function.
The WHEEL CALIBRATION NUMBER will
flash on the screen. PRESS the MODE
Button to increase the digits. PRESS the
ST./STOP (S) button to decrease the dig-
its. PRESS the SET Button on the back to
set the new number.
REPLACING MILEAGE INTO THE
ODOMETER
This is done after replacing the battery in
the unit or for transferring mileage from
another computer.
First PRESS ALL THREE BUTTONS, the
MODE Button, the ST./STOP (S) Button
and the SET Button on the back. Now the
"K" flashes indicating speed scale.
PRESS the MODE Button to select be-
tween "K" for Kilometers or "M" for Miles
per hour reading.
To add previous mileage or kilometers you
must NOW PRESS AND HOLD the MODE
Button. ".0" will be flashing. Input the
number with the MODE Button. PRESS
the ST./STOP (S) Button to change to the
next digit. You will be able to set distance
up to 00,000.0 digits. Now press the SET
Button on the back.
Now you must input your tire calibration
number. Please note that this number is
actually the DISTANCE in Centimeters
your tire rolls with each revolution while
you are on the bike.
on back
DISTANCE, AVERAGE
or TIME function
K (km/h)
M (mph)
on back
advance the digits
change from Hours
to Minutes
T
on back
Clock
STOP
S
STOP
S
Odometer
decrease the digits
increase the digits
change to the next
digit
Input the number
1
2
decrease the digits
increase the digits
SET UP
FOR
RIDING
ALL CLEAR
OPERATION
SET button
MODE button
ST./STOP
button (S)
ST MODE
2 sec.
2 sec.
2 sec.
2 sec.
on back