OPERATING MANUAL
Congratulations on your purchase!
With the CICLOMASTER CM 4.3A you have acquired a wireless electronic bike computer with state of the art
electronics, the highest level of precision and it is weatherproof. As special features the CM 4.3A has an
optional cadence measurement and an optional heart rate measurement (for this you need separately available
accessories ).
The Two in One-System: this allows you to use this cycle computer for two different bicycles and view the
combined total values.
Please read this operating manual carefully.
Guarantee certificate:
Sender:
Name
irst name
Street, No.
Code/Location
Telephone (during the day)
Fax
E-Mail
Reason for return:
After expiry of the guarantee: Repairs should be carried out up to a value of Euro ____________
GB USA
Tire size Circumference
40-559 26 x 1,5 2026 mm
44-559 26 x 1,6 2051 mm
47-559 26 x 1,75 2070 mm
50-559 26 x 1,9 2026 mm
54-559 26 x 2,00 2089 mm
57-559 26 x 2,125 2114 mm
37-590 26 x 1 3/8 2133 mm
32-620 27 x 1 1/4 2199 mm
40-622 28 x 1,5 2224 mm
47-622 28 x 1,75 2268 mm
40-635 28 x 1 1/2 2265 mm
37-622 28 x 1 3/8 2205 mm
20-622 700 x 20C 2114 mm
23-622 700 x 23C 2133 mm
25-622 700 x 25C 2146 mm
28-622 700 x 28C 2149 mm
32-622 700 x 32C 2174 mm
G
CM 4.3A
Package content:
- CICLOMASTER CM 4.3A
-battery type CR 2032
- battery cap
- handlebar bracket
- transmitter
-cable ties for mounting
- spoke magnet
1. Mounting
The handlebar bracket can be mounted on the handlebar and
also on the stem.
Bild A: Mounting is possible on handlebar (Position A-1) or stem
(Position A-2).
Bild B: For using it on the stem, change bracket mounting
orientation from Position A to Position B.
Remove the protective tape.
Place the handle bar and fasten it with the cable ties.
Bild C: Mount the transmitter with cable ties on the fork (max.
distance to the handlebar bracket max. 60 cm; best mounting on
the right side, handlebar bracket and transmitter should be on
the same side).
Bild D: Fix the magnet on a spoke so that it will face the mark on
the transmitter. Adjust the magnet position and fine tune the
sensor if necessary (distance between transmitter and magnet
max. 3 mm).
Bild E: Rotate the CM 4.3 to 45 degree left and install it into the
bracket. Then rotate it 45 degrees right to lock it. To unlock,
rotate 45 degrees to the left.
1.1 Mounting of optional cadence-set
(separately available)
Mount the handlebar as described above on the handlebar or on
the stem.
Place the sensor on the cable on the left chain-brace in height of
the crank with help of cable-ties so that it is still loose enough to
be lined up. Mount the cadence-magnet (with help of a cable tie)
on the inside of the crank. The distance between magnet and
sensor should be max. 3 mm.
The magnets must point directly to the mark on the sensor. Now
switch on the cadence measuring in the setting mode of the
CM 4.3A (see chap. 2.1). Turn crank a few times to check if the
mounting is correct. Now tighten the cable-ties.
2. Preparation
Inserting the battery
Insert battery type CR2032 with plus-pole facing up. Close
battery cap with a coin, being sure not to over tighten. After
inserting the battery the display will show normal mode.
(If nothing or incomprehensible signs appear in the display, press
the AC-button on the rear of the computer with help of a ballpoint
pen or a similar object. Attention: this will delete all values and
setting).
2.1 Settings
Enter setting mode by pressing centre button for 3
seconds. Display shows ‘SET BIKE1’.
To quit setting mode press again centre button for 3 seconds in
any setting.
(To change the display to german language, press left button
short, display shows ‚LANGUAGE’. Press centre button to choose
this function and then switch between ‘English’ and ‘Deutsch’
with right button. To store press left button and then get back to
setting mode with short pressing of right button).
Though CM 4.3A can show german and english words, this
manual shows both possible displays.
The different setting modes can be shown by pressing
right or left button, by pressing centre button the shown
setting mode is chosen.
Possible setting modes:
SET ALT / SET HOEHE
SET BIKE1 / SET RAD1
SET CLOCK / SET UHR
SET MISC
EXIT / ENDE
LANGUAGE / SPRACHE
Each setting mode can have different setting possibilities.
The following is valid for these settings: the blinking value
can be changed with the right button, the value is stored
by shortly pressing the left button and the next value
blinks or the next value appears on the display.
For a better reading in the following chapters the setting modes
are fat printed and the settings fat and italic.
SET ALT / SET HOEHE
To define altimeter settings.
To select, press the centre button.
ALTITUDE / HOEHE
To change current altitude
Range: -300 to +6000m
Set with right and left buttons, continue with left button
Here you can change the altitude that is displayed, e.g. if you
notice that the current altitude diverges from altitude shown in
the display (e.g. if barometric pressure changes).
HOME OFF / HEIM AUS
To switch the home altitude on/off
Default: OFF
Set with right button, continue with left button
Here you can switch the automatic reset off the home altitude
value on/off
HOME ALT / HEIMHOEHE
Range: -300 to +6000m
Set with left or right button, continue with left button
CM 4.3A has got a barometric altimeter which adapts itself to
temperature variations.
Changes of barometric pressure (e.g. during the night) can cause
variations of the indicated altitude in the display. To compensate
for these variations you can set the altitude of your origin (e.g.
starting point such as home).
With each reset of the daily values (deletion) the current altitude
will be reset to the adjusted altitude.
UNIT m
Set unit of measurement for altitude
Default: m (meters)
Here you can select whether the indication is meter (m) or feet
(ft).
UNIT °C
Set unit of measurement for temperature
Default: °Celsius
Here you can adjust whether the indication is Celsius (C) or
Fahrenheit (F).
SET BIKE1 / SET RAD1
Set of bike-specific values, e.g. total distance, circumference,
unit and more for bike 1.
Choose with centre button.
To do these settings for bike 2, press right and left button short
simultaneously in normal mode. CM 4.3 switches to bike 2, then
enter again setting mode (display then shows SET BIKE2/SET
RAD2).
DAY DST / TAGES-DST
Set of the daily distance
Default: 000.00 km
Range: 000,00 to 999,99 km or m
Set with right and left button, store with left button.
Here the daily distance can be adjusted, e.g. the point of starting
a tour, when using a printed tour-guide.
(This setting doesn’t change the total distance. There only really
ridden kilometres are counted).
TOT DST / GES. DST
Set of the total distance
Default: 0000 km
Range: 0 to 99999 km or m.
Set with right and left button, store with left button.
Here the total distance can be adjusted.
Wheel/Radumf.
Set of circumference
Default: 2080 mm
Range: 0000-3999 mm
Set with right and left button, store with left button.
Here the circumference can be adjusted.
The circumference of the wheel can be taken from the
chart (Pict. G) or be measured by yourself.
Measuring the circumference of the
wheel (for a more precise setting):
Put a marking at the front-tire and on the
ground (e.g. with chalk). Ride straight
ahead exactly one turn of a tire (for a very
exact measurement, check the pressure of the tire before getting
on your bike) and mark this position on the ground. Now measure
the exact circumference of the wheel between the two markings
at the ground (in mm) – see pict. F.
Unit km bzw. Unit mi
Set of the measuring unit (kilometres or miles)
Default: km
Set with right button, store with left button
Here you can choose whether the display should show kilometres
(km/h) or miles (m/h).
CAD OFF/TRITT AUS
Switch cadence on/off (ON/AN – OFF/AUS)
Default: OFF/AUS
Set with right button, store with left button
Here you can switch on/off the cadence measuring. To use this
function you need the optional cadence-set (available at your
local dealer).
SET CLOCK / SET UHR
Set of clock, date and clocktime-format.
Choose with centre button
Time / Uhrzeit
Set of clock
Range: 00:00 to 23:59 or 12:00 to 11:59 A/P
Set with right and left button, store with left button
Here you can set the current clocktime. First you set the hours,
then the minutes.
Year / Jahr
Set of the year
Default: 2007
Range: 2007 to 2099
Set with right button, store with left button
Here you can set the current year.
Month / Monat
Set of the month
Default: 01
Range: 01 to 12
Set with right button, store with left button
Here you can set the current month.
Day / Tag
Set of the day
Default: 01
Range: 01 to 31
Set with right button, store with left button
Here you can set the current day.
Clock / Zeit
Set of the clock format
Default: 24
Set with right button, store with left button
Here you can select between 24- or 12-hour format (AM/PM).
SET MISC
Here you can switch on the powerdown-mode or make a reset
(delete all values).
Choose with centre button
Powerdown / STROMSPAR
Switch on the powerdown-mode (e.g. before changing of the
battery, to save the values).
To switch it on, press right and left button short simultaneously,
display fades out and CM 4.3 is in powerdown-mode. By short
pressing of any button, CM 4.3 starts again and displays normal
mode.
Reset / Löschen
Here you can delete all values (including the total values). For this
press right and left button short simultaneously, display shows
‘reset’ and then normal mode.
If you only want to delete the day values, press right and left
button for three seconds in normal mode.
3. Functions
The CM 4.3A has an automatic start/stop when on the handlebar
bracket.
That means, 4 sec. after the first wheel turn the display shows
normal mode and the current speed.
1 minute after the last wheel turn (and without a button is
pressed) the display changes to an “energy save“ mode. During
this mode, only the time is displayed.
If the wheel turns or a button is pushed, the computer will
resume normal functions.
CM 4.3A has got three modes: Bike 1, Bike 2, and Non-Bike
mode.
To switch from one mode to another, simultaneously press
the right and left buttons briefly (switching is only possible if
speed = 0).
The centre display shows ➀ or ➁ depending on whether the
selected mode is Bike 1 or Bike 2. The Non-Bike mode doesn’t
show any figures in the display. The Non-Bike mode can be used
for tours without a bike (e.g. with a dedicated wristlet). It only
shows values which have nothing to do with the bike movements.
To reset all day values, press right and left button for
three seconds.
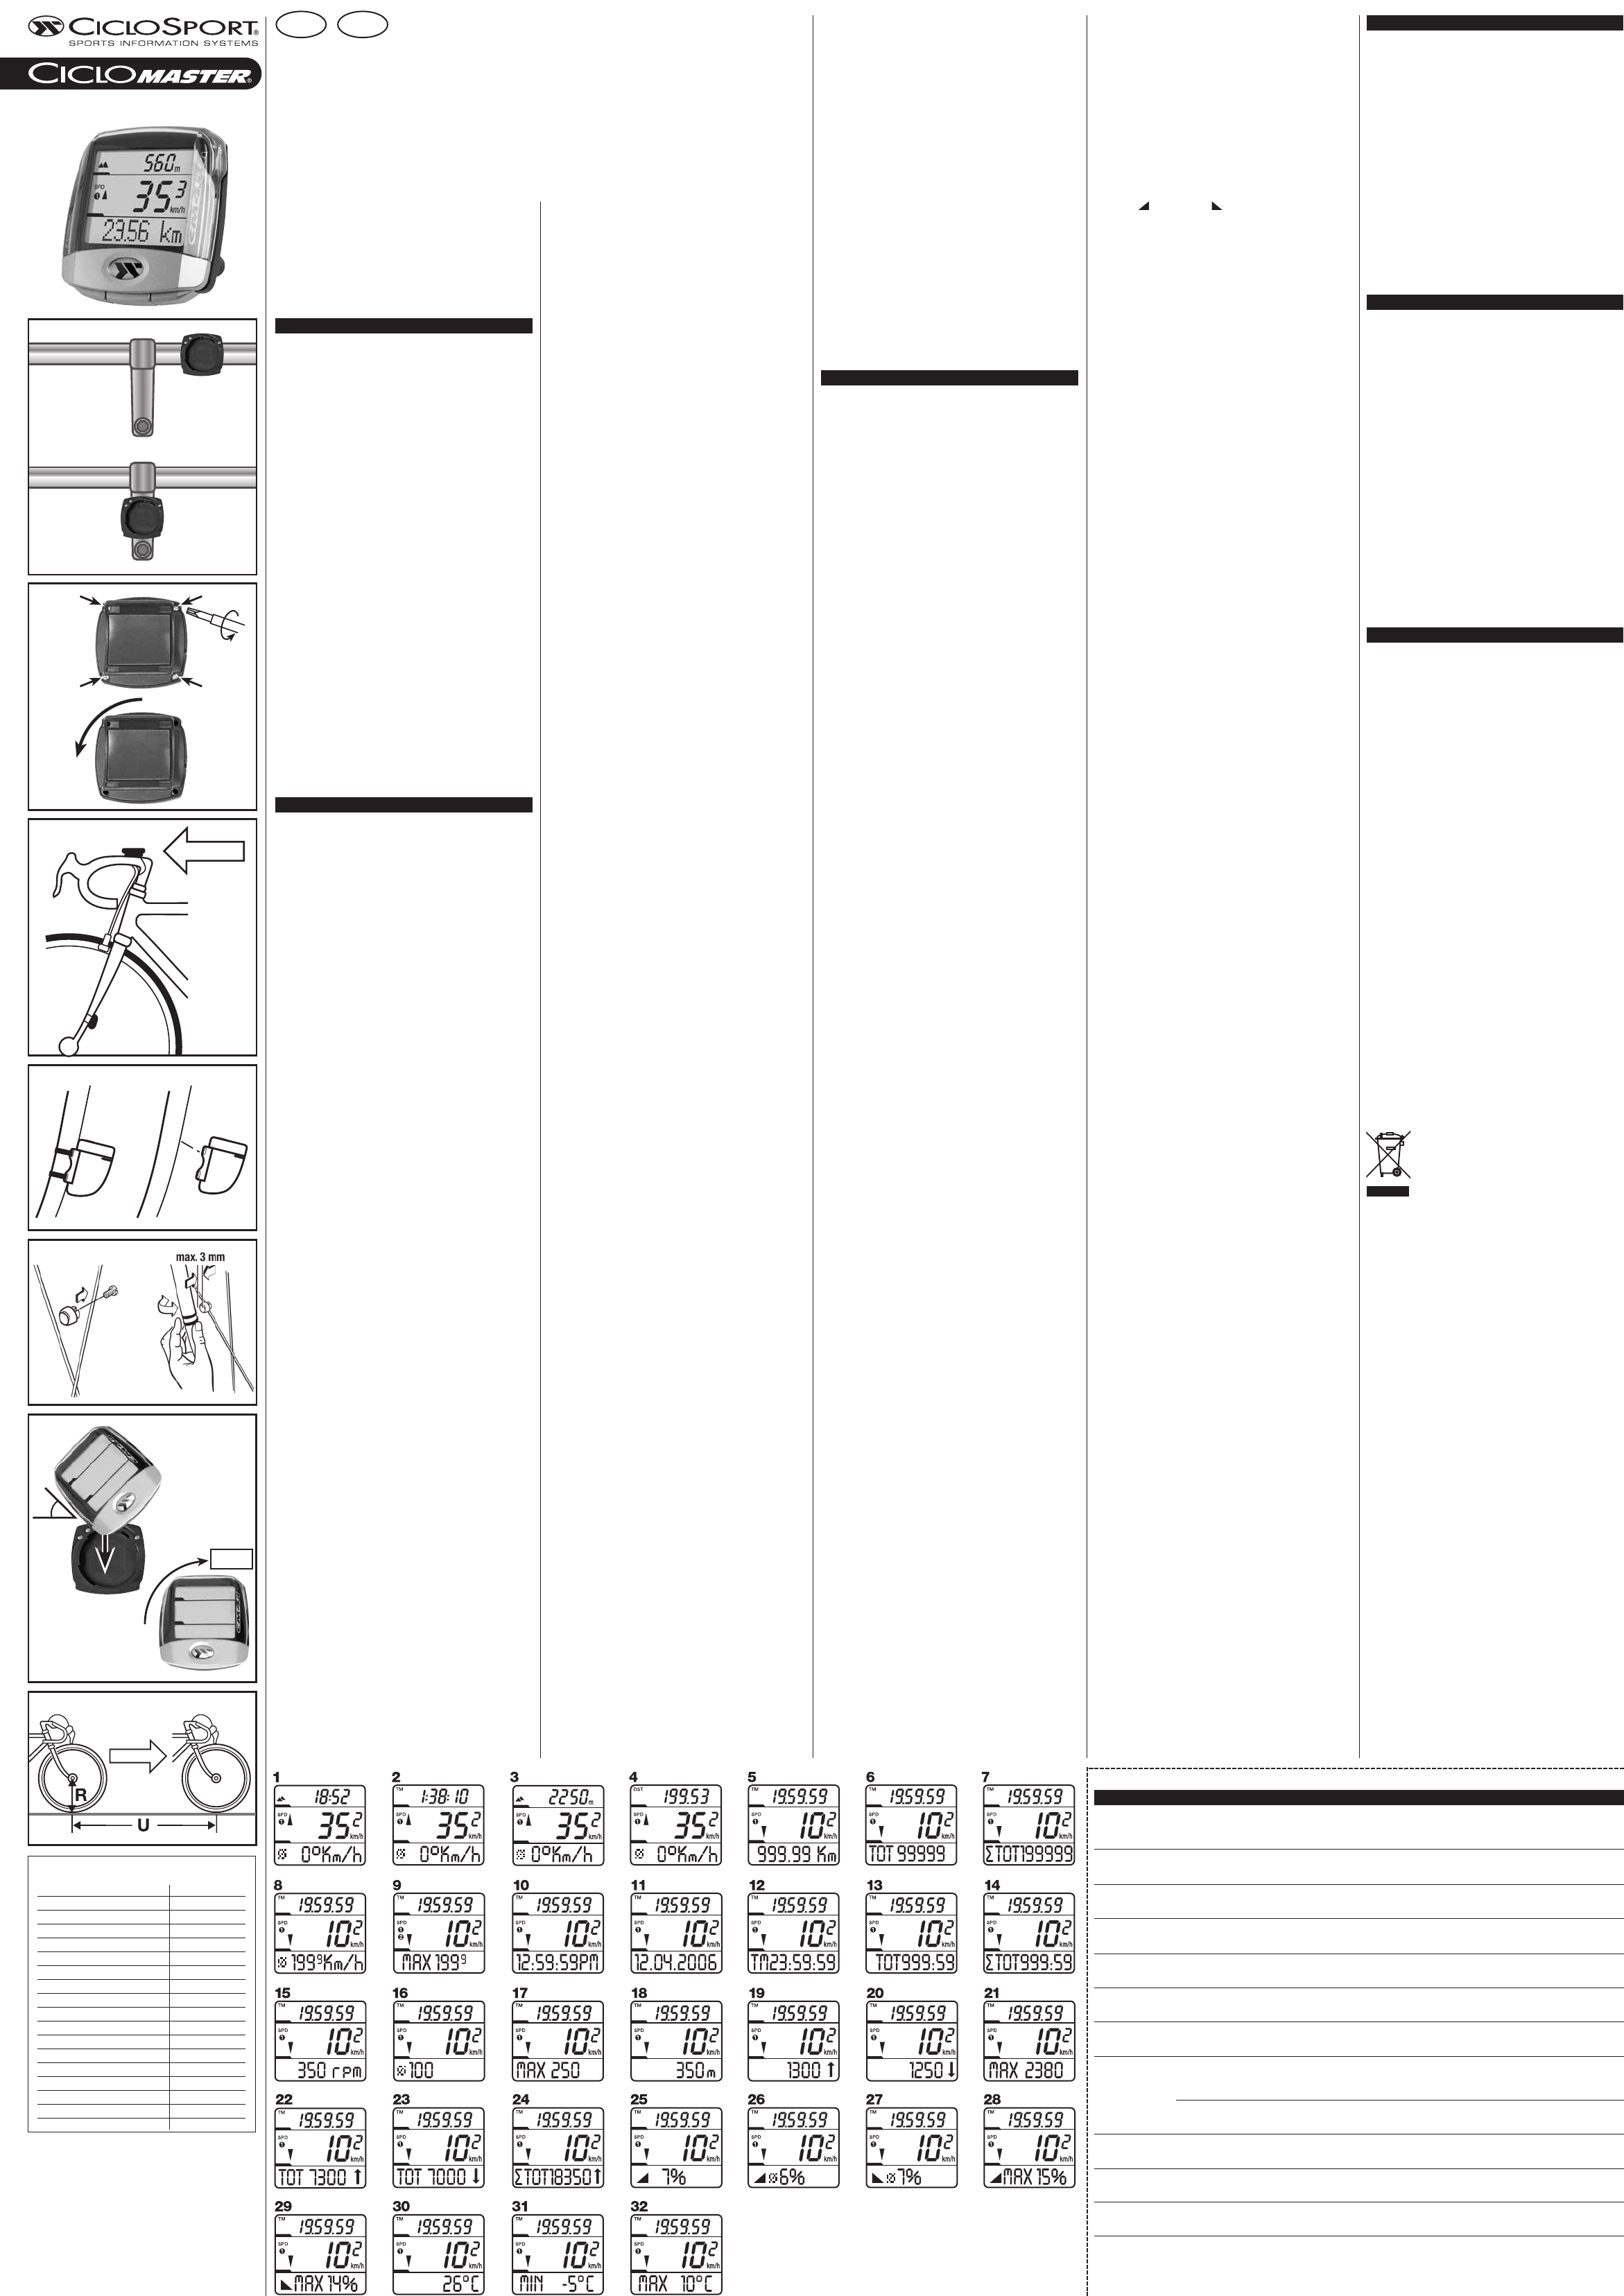
The CM 4.3A has a three-lined display. In the centre part the
current speed is shown, with a small ➀ or ➁ left beside, that
shows whether the current values are valid for bike 1 or bike 2.
To advance the functions of the upper display, press right
button, to advance the functions of the lower display press
left button.
Always short pressing of the centre button shows the sub-
functions of the function in the lower display.
Important for all sufunctions: display shows settings for
10 seconds befor switching back to main function.
Functions of upper display:
TM – Daily Ride Time (pict. 2)
DST – Daily distance (pict. 4)
Altitude (pic. 3)
Time (pict. 1)
Function of centre display:
SPD – Current Speed
Inidcates the current speed in km/h or m/h .
Range: 0 to 199,9 km/h or m/h
An arrow on the left side of the display displays, whether the
current speed is faster (arrow up) or slower (arrow down) than
the current average speed.
Functions of lower display:
DST – Daily Distance (pict. 5)
Displays the distance ridden up to now in kilometres or miles..
Range: 0 to 999,99 km or mi
TOT – total distance (pict. 6)
Sub-function “Daily Distance”
Displays the total distance ridden up to now in kilometres or
miles (since last reset or battery change).
Range: 0 to 99999 km or mi
∑TOT – sum of total distance of bike 1 and bike 2 (pict. 7)
Sub-function of “Daily Distance”
Displays the sum of the total distance ridden up to now in
kilometres or miles (since last reset or battery change) of bike 1
and bike 2.
Range: 0 to 199999 km or mi
Current Altitude (pict. 18)
Displays the current altitude (above sea level). The altitude is
displayed in intervals of 1 meter. It is determined by the baro-
metric pressure. For this reason, the altitude value is dependent
on weather variations.
Range: -300 to +6000 m or ft.
Attention! The altitude values will be added together from the
signals received from the bike. In the Non-Bike mode they will be
added together during the whole time.
Daily distance of altitude upwards (pict. 19)
Sub-function of "Current Altitude"
Displays the altitude travelled upwards.
Range: 0 to 20000 m or ft
Daily distance of altitude downwards (pict. 20)
Sub-function of "Current Altitude"
Displays the altitude travelled downwards.
MAX – maximum altitude (pict. 21)
Sub-function of "Current Altitude"
Displays maximum altitude of the tour.
Range: -300 to +6000 m or ft.
TOT – total of altitude upwards (pict. 22)
Sub-function of "Current Altitude"
Displays total distance of altitude upwards
Range: 0 to 20000 m or ft
TOT – total altitude downwards (pict. 23)
Sub-function of "Current Altitude"
Displays total distance of altitude downwards
Range: 0 to 20000 m or ft
∑TOT sum of altitudes from Bike 1 and Bike 2 (pict. 24)
(This function doesn’t exist in No-Bike mode)
Sub-function of "Current Altitude"
Displays sum of altitude upwards.
Range: 0 to 20000 m or ft
Current inclination / declination (pict. 25)
Displays current inclination or declination as percentage. The
symbol on the left side of the display shows whether it is
inclination ( ) or declination ( ).
Range: 0 to 100%
Attention: For technical reasons, the current percentage will
only be shown after 50 - 100 m. This depends also on your
speed.
Average inclination (pict. 26)
Sub-function of "Current inclination/declination"
Displays the average of the inclination values recorded so far.
Range: 0 to 100%
Average declination (pict. 27)
Sub-function of "Current inclination/declination"
Displays the average of the declination values recorded so far.
Range: 0 to 100%
Maximum Inclination (pict. 28)
Sub-function of "Current inclination/declination"
Displays the maximum of the inclination values recorded so far.
Range: 0 to 100%
Maximum Declination (pict. 29)
Sub-function of "Current inclination/declination"
Displays the maximum of the declination values recorded so far.
Range: 0 to 100%
Ø – Average Speed (pict. 8)
Displays the current average speed in km/h or mi/h.
Range: 0 to 199,9 km/h or m/h (the decimal place is
highranking)
MAX – Maximum Speed (pict. 9)
Sub-function of “Average speed”
Displays the highest speed so far in km/h or mi/h.
Range: 0 to 199,9 km/h or m/h (the decimal place is
highranking)
Temperature (pict. 30)
Displays current temperature
Range: -10 to +50 °C or °F
Attention: If you carry the CM 4.3A on your body, the measured
temperature can vary from outside temperature.
MIN – Minimum Temperature (pict. 31)
Sub-function of "Temperature"
Displays minimum measured temperature.
Range: -10 to +50 °C or °F
MAX – Maximum Temperature (pict. 32)
Sub-function of “Temperature”
Displays maximum measured temperature.
Range: -10 to +50 °C or °F
Time (pict. 10)
Displays the current time.
Range: 00:00:00 to 23:59:59 or 12:00:00 to 11:59:59 AM/PM
Date (pict. 11)
Sub-function of “Time”
Displays the current date (dd.mm.yy).
TM – daily ride time (pict. 12)
Displays the current daily ride time.
Range: 0 to 9:59:59 h
TOT – total ride-time (pict. 13)
Sub-function “Daily Ride Time”
Displays the total ride time (since last reset or battery change).
Range: 0 to 999:59 h
∑TOT – sum of total ride time of bike 1 and bike 2
(pict. 14)
Sub-function of function daily ride time
Displays the sum of the total ride time (since last reset or battery
change) of bike 1 and bike 2.
Range: 0 to 999:59 h
4 . Battery change
CM 4.3A: Open battery cap with a coin (unscrew to the left).
Insert battery type CR2032 (please use battery with smooth
minus-pole) with plus-pole facing up. Close battery cap, being
sure not to over tighten. After inserting the battery the display will
show normal mode.
If nothing or incomprehensible signs appear in the display, press
the AC-button on the rear of the computer with help of a ballpoint
pen or a similar object. Attention: this will delete all values and
setting.
(Battery change in the optional chest belt works in the same
way.)
Transmitter: Open battery cap at the top of the transmitter with a
coin (unscrew to the left), remove old battery and insert new 12
V battery, type 23A (with pluspole facing up). Close battery cap,
being sure not to over tighten.
Please do not throw away battery in your normal garbage.
5. Trouble shooting
Faulty or no display
- check to see if battery is installed properly or replace battery
(Attention: removing battery will clear all settings and values in
the CM 4.3A)
- press AC-button on the rear of the computer
Speed not displayed
- check to see if wheel-sensor is mounted properly
- check the position of the spoke magnet (max. 3 mm distance
to wheel-sensor)
- make sure CM 4.3A is mounted in bracket correctly
- check wheel circumference
Speed to high or to low
- check wheel circumference
- check to see if you are using miles or kilometers
Incorrect display of altitude:
- Check the home altitude (basic settings). Perhaps the settings
were made incorrectly.
- Changing barometric pressure as a result of changing weather
(readjust current altitude)
6. Guarantee
We offer a guarantee for 24 months from the date of purchase
on the CM 4.3A. The guarantee is limited to material and
processing faults. The batteries are excluded from the guarantee.
The guarantee is valid only if the computer, with accessories, has
been handled and maintained carefully and according to
operating instructions.
To return the CM 4.3A under conditions/terms of the guarantee,
please refer to your dealer, your local distributor or send the
computer with the proof of purchase (date) and all accessories
and with sufficient postage, to:
CICLO SPORT SERVICE
K. W. Hochschorner GmbH
Konrad-Zuse-Bogen 8
D-82152 Krailling
Phone: +49 89 / 89 52 70 31
Fax: +49 89 / 8 59 63 01
E-Mail: ciclo-service@ciclosport.de
Please read through the operating manual again carefully before
sending in the device and check the battery.
In case of valid guarantee claims, the repaired device or a
replacement device will be returned free of charge.
Repair:
If your CM 4.3A is sent in for repair (or battery change) or if a
guarantee claim is not valid, repairs up to EUR 20.- will be
carried out automatically.
In case of higher repair costs you will be notified. The repaired
device will be sent back COD.
Disposal of Old Electrical & Electronic Equip-
ment (Applicable in the European Union and
other European countries with separate
collection systems)
This symbol on the product or on its packaging
indicates that this product shall not be treated as household waste.
Instead it shall be handed over to the applicable collection point for
the recycling of electrical and electronic equipment. By ensuring
this product is disposed of correctly, you will help prevent potential
negative consequences for the environment and human health,
which could otherwise be caused by inappropriate waste handling
of this product. The recycling of materials will help to conserve
natural resources. For more detailed information about recycling of
this product, please contact your local city office, your household
waste disposal service or the shop where you purchased the
product.