588899
2
Zoom out
Zoom in
Vorherige Seite
1/8
Nächste Seite
Features
ATTENTION: Computer Functions refer to the packing details.
FUNCTIONS 4 5 7 9 13 16
Speedometer (SPD) 0-99.9 Km/hr or M/hr ● ●
Tripmeter (DST) Max. 999.9 Km or M ● ●
Odometer (ODO) Max. 9999.9 Km or M ● ●
Auto Trip Timer (TM) 9:59‘:59“ ● ●
Maximum Speed (MXS) Max. 99.9 Km/hr or M/hr ● ●
Average Speed 0-99.9 Km/hr or M/hr
Scan for DST, MXS, AVS, TM
Freeze Frame Memory for TM, DST, AVS
Speed Comparator +/- ● ●
Digital Clock ● ●
12 / 24 hour selectable
Speed Tendency
Odometer Save Function
Temperature -10°C bis + 50°C
°C /°F Selection
Maintenance Program
EL Backlight (optional)
COMPUTER
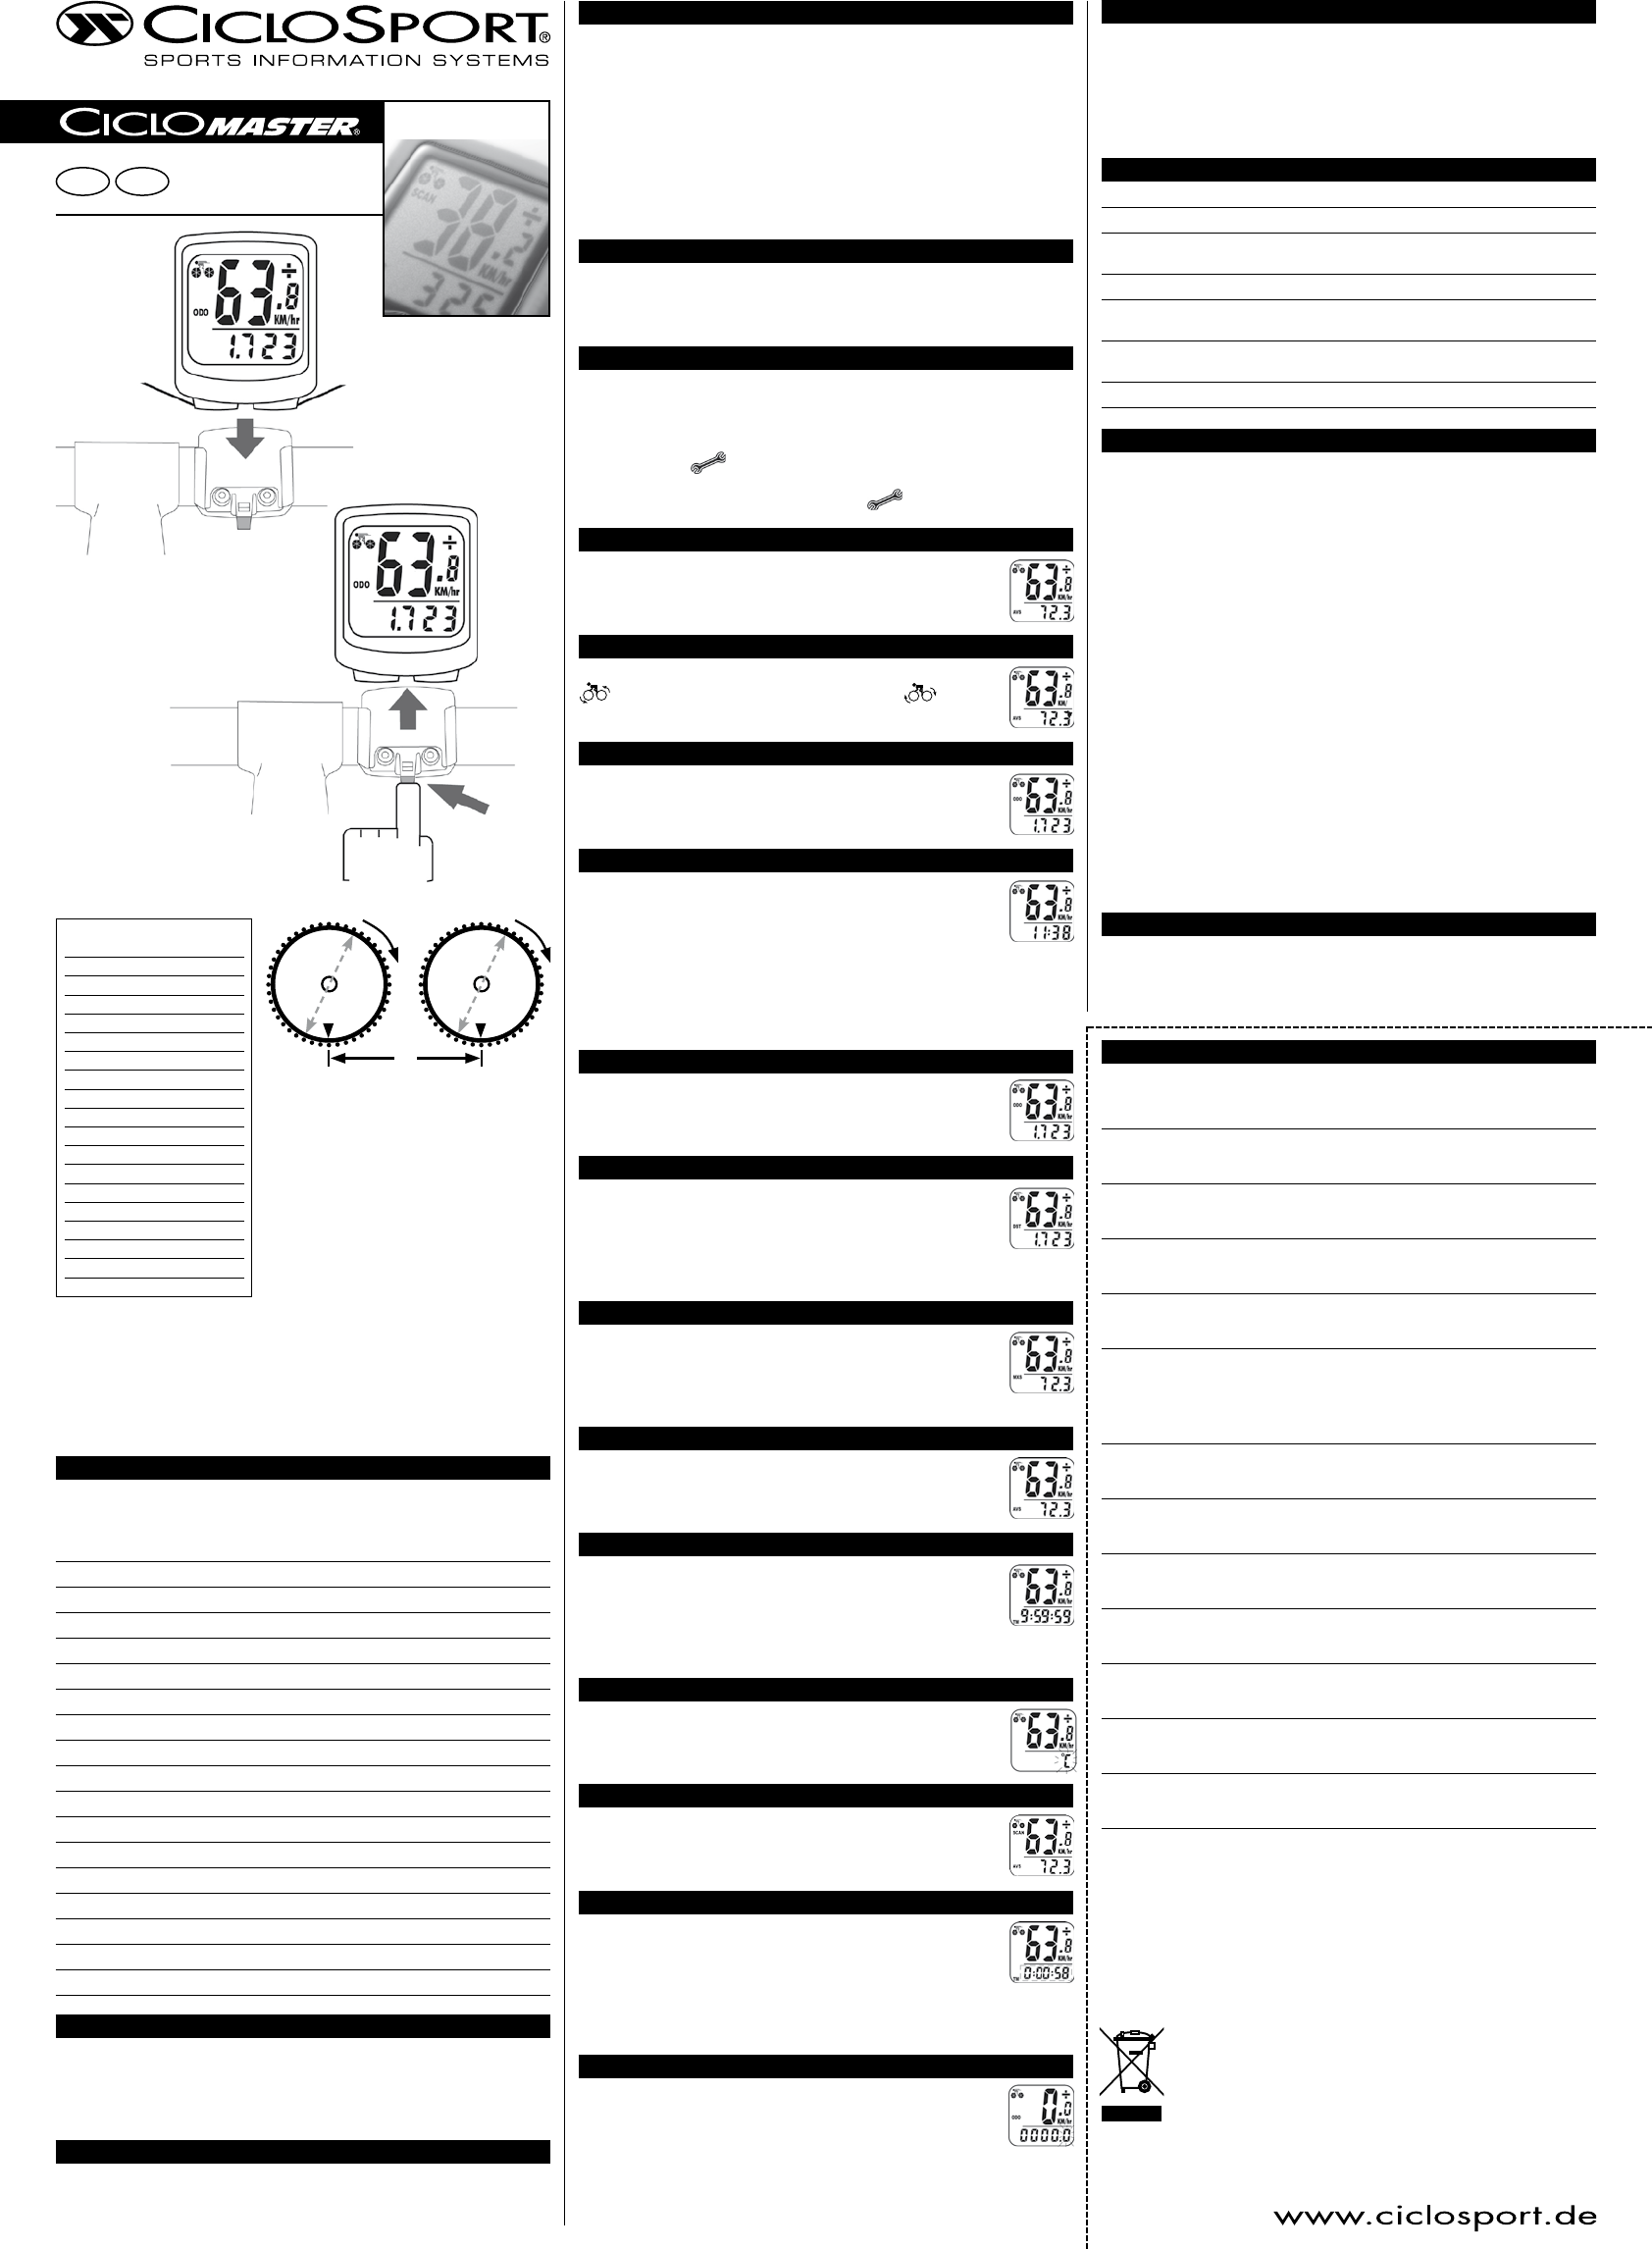
Slide the computer onto the mounting bracket until it snaps firmly into position. Press the
release button to take out the computer as shown in Fig. 1.
ATTENTION! Refer to the appendix for installation reference.
START/STOP
To start the unit, press the RIGHT button to turn on the display and the wireless mounting
system. To stop the unit, left unused for over 5-6 minutes and then the computer will
automatically switch off to preserve batteries.
WHEEL SIZE INPUT
Press and hold LEFT and RIGHT buttons for 2 seconds or after the replacement of
battery, the unit is switched to wheel size input mode. Multiply wheel diameter, d (Fig.
2) in millimeters by 3.1416 to determine wheel factor, c. Press the LEFT button to select
digit to be input and the RIGHT button to adjust the digit to the desired number (hold for
fast advance). Press the LEFT button again to KM/MILE selection.
(Note: removing battery will erase Wheel Size Input)
Fig. 2: For convenience you can refer to the chart of wheel diametersize factor
inputs.
KM / MILE SELECTION
After the wheel size input, the following function is selection of kilometers or miles as the
measurement for distance. Press the RIGHT button to choose between kilometer (KM)
and Mile (M), press the LEFT button to confirm.
MAINTENANCE PROGRAM
It is used to remind you for the parts replacement or to lubricate the chains and wheels
after the peset distance is reached. Right after KM/ MILE selection, the preset total distance
of 600 km (or miles) will flash, press the RIGHT button to select between 200, 400, 600 &
800 km (or miles) and press LEFT button to confirm. For example, if 600 km is selected,
th e spann e r ( ) will flash whenever the total distance (ODO) reach 600, 1200,
1800 km (or miles).
Press the LEFT button to stop flashing of spanner ( )
SPEED COMPARATOR (Cadence)
A “+” or “-” sign appears to the right of the speed. “+” indicates you are
travelling faster than your average speed (AVS). A “-” indicates you are
riding slower than your average speed.
SPEED TENDENCY (Acceleration & Deceleration)
A cyclist symbol appears to the left of the speed. The wheel turns forward
to indicate acceleration. The wheel turns backward to indicate
deceleration.
SPEEDOMETER (SPD)
Instantaneous Speed is indicated on the top line. The range of measurement is from 0 to
99 KM/ hr [0 to 99 M/ hr] and accuracy is ± 0.5 KM/ hr [M/ hr].
CLOCK (12H / 24H)
A 12 or 24-hour digital clock is indicated by the flickering colon on the
bottom line. To switch between the 12 and 24 hour format or to adjust
time, press the LEFT button for 2 seconds. “24H” will start to flicker. Use
the RIGHT button to select “12H” for12-hour format or “24H” for 24-hour
format. Press the LEFT button to confirm. Next the hour digits will start to flicker. Use
the RIGHT button to select the hour. To change minutes, press LEFT button again. The
minutes will start to flicker. Use the RIGHT button to select the minutes. Press the LEFT
button once more to return to CLOCK Mode. Press the RIGHT button to enter ODO mode.
ODOMETER (ODO)
Total distance travelled is indicated by ODO and display on the bottom line.
To reset ODO, press and hold LEFT and RIGHT buttons for 2 seconds or
remove the battery. Press the RIGHT button to enter DST mode.
TRIPMETER (DST) Trip Information Reset Mode
Trip distance measurement is indicated by DST and is displayed
on the bottom line. Tripmeter is activated automatically with
speedometer input. Reset DST to zero by pressing the LEFT button for
2 seconds; DST (Trip distance), TM (Trip Timer) & AVS (Average Speed) will
also be reset at that time. Press the RIGHT button to enter MXS mode.
MAXIMUM SPEED (MXS)
Maximum speed measurement is indicated by MXS and is displayed on the
bottom line. Maximum speed is stored in memory and updated only when
a higher speed is reached. To reset MXS, press and hold the RIGHT button
to enter AVS mode.
AVERAGE SPEED (AVS)
Average Speed measurment is indicated by AVS and is displayed on the
bottom line. AVS is calculated with the Trip Timer (TM), so AVS is the
average speed only while riding. Press the RIGHT button to enter TM mode.
TRIP TIMER (TM)
Trip timer measurement is indicated by TM and is displayed on the bottom
line. Trip Timer is activated automatically with speedometer input (On when
you ride and off when you stop.) It records only the time spent actually
riding. Reset TM to zero by pressing the LEFT button for 2 seconds in DST
mode. Press the RIGHT button to enter Temperature mode.
TEMPERATURE
Press and hold LEFT button for 2 seconds, ”°C” will start to flash. Press
RIGHT button to select “°C” or “°F” and press LEFT button to confirm.
Press RIGHT button to enter the Scan mode.
SCAN
The Scan mode allows DST, MXS, AVS and TM to cycle on the screen
without pressing any keys. Press the RIGHT button to enter the Clock
mode.
FREEZE FRAME MEMORY
Press the LEFT button, Freeze Frame Memory can lock the display at the end
of a ride segment and information TM, DST and AVS which will be flashing,
can be read at a later time by pressing the RIGHT button. To release the
memory, press the LEFT button until the display digit is static again. This
is particularly useful when crossing the finish line of a time trial, since the TM cannot be
stopped manually.
ODOMETER SAVE FUNCTION
The SAVE function allows you to keep the important data of total distance
(ODO) even after replacement of battery. To set ODO, after battery
replacement and wheel size setting, press RIGHT button to ODO mode and
then press and hold LEFT button for 2 seconds until the last digit flickering.
To adjust number, press the RIGHT button. Press the LEFT button to confirm. Repeat above
sequence to reach the desired odometer value. Press the LEFT button again to return to
normal ODO mode.
!
Wheel Diameter Factor
d c
20“ 1596
22“ 1759
24“ 1916
26“ (650A) 2073
26,5“ (Tubular) 2117
26.6“ (700x25C) 2124
26,8“ (700x28C) 2136
27“ (700x32C) 2155
28“ (70013) 2237
w/tire
ATB 24“x1.75 1888
ATB 26“x1.4 1995
ATB 26“x1.5 2030
ATB 26“x1.75 2045
ATB 26“x2 (650B) 2099
27“x1 2136
27“x1 1/4 2155
Fig. 2:
Distanz in millimeter
per one turn
d d
c
LEFT
RIGHT
Fig. 1:
RELEASW
Disposal of Old Electrical & Electronic Equipment (Applicable in the European Union and
other European countries with separate collection systems)
This symbol on the product or on its packaging indicates that this product shall not be treated as
household waste. Instead it shall be handed over to the applicable collection point for the recycling
of electrical and electronic equipment. By ensuring this product is disposed of correctly, you will
help prevent potential negative consequences for the environment and human health, which could
otherwise be caused by inappropriate waste handling of this product. The recycling of materials will
help to conserve natural resources. For more detailed information about recycling of this product, please
contact your local city office, your household waste disposal service or the shop where you purchased the product.
Subject to technical alterations and fault.
EL BACKLIGHT (optional)
The EL backlight can be turned on either as follows:
1) Holding the RIGHT button for 2 seconds, the EL light will be turned on for 8 seconds
and the computer will then go to fast scan mode with trip distance, maximum speed,
average speed and trip timer displayed once.
2) Press once on the LEFT Button, the EL light will be turned on for 4 seconds and the
comuter will go to the freeze frame menory mode as well.
PROBLEMS
MALFUNCTION PROBLEM
Inaccurate maximum speed reading Unknown atmospheric or RF interference
No speedometer reading Improper magnet/transmitter alignment
Check battery and correct installation
Slow display response Temperature outside of operating limits (0-55 °C)
Black display Temperature too hot,
or display exposed to direct sunlight too long
No trip distance reading alignment Check correct transmitter / magnet
Check battery and correct installation
Display shows irregular figures Take out computer battery and install again
Guarantee
We offer a guarantee for 2 years from the date of purchase on the CM 108. The guarantee
is limited to material and processing faults. Broken transmitters, or damages of wasted parts
of CM 8.3A are excluded from the guarantee. The guarantee is valid only if the computer,
with accessories, has been handled and maintained carefully and according to operating
instructions. The guarantee will take place through changes of or repairing the defective
parts. The guarantee doens’t cover direct, indirect or subsequent damages which are related
to the product. This guarantee doesn’t limit any rights of the consumer (considering relative
national law) in respect to the dealer.
To return the CM 108 under conditions/terms of the guarantee, please refer to your
dealer, your local distributor or send the computer with the proof of purchase (date) and all
accessories and with sufficient postage to:
CICLO SPORT SERVICE
K. W. Hochschorner GmbH
Konrad-Zuse-Bogen 8
D-82152 Krailling
E-Mail: ciclo-service@ciclosport.de
Please read through the operating manual again carefully before sending in the device and
check the battery.
In case of valid guarantee claims, the repaired device or a replacement device will be
returned free of charge.
Repair
If your CM 108 is sent in for repair (or battery change) or if a guarantee claim is not valid,
repairs up to EUR 19.- will be carried out automatically.
In case of higher repair costs you will be notified. The repaired device will be sent back
COD.
Guarantee certificate
Absender:
Name First Name
Street, No.
Code/Location
Telephone (during the day) Fax
E-Mail
Reason for return:
After expiry of the guarantee: Repairs should be carried out up to a value of
Euro____________________
GB
USA
INSTrUcTIoN mANUAL
CM 108
2

Brauchen Sie Hilfe? Stellen Sie Ihre Frage.

Forenregeln

Missbrauch melden von Frage und/oder Antwort

Libble nimmt den Missbrauch seiner Dienste sehr ernst. Wir setzen uns dafür ein, derartige Missbrauchsfälle gemäß den Gesetzen Ihres Heimatlandes zu behandeln. Wenn Sie eine Meldung übermitteln, überprüfen wir Ihre Informationen und ergreifen entsprechende Maßnahmen. Wir melden uns nur dann wieder bei Ihnen, wenn wir weitere Einzelheiten wissen müssen oder weitere Informationen für Sie haben.

Art des Missbrauchs:

Zum Beispiel antisemitische Inhalte, rassistische Inhalte oder Material, das zu einer Gewalttat führen könnte.

Beispielsweise eine Kreditkartennummer, persönliche Identifikationsnummer oder unveröffentlichte Privatadresse. Beachten Sie, dass E-Mail-Adressen und der vollständige Name nicht als private Informationen angesehen werden.

Forenregeln

Um zu sinnvolle Fragen zu kommen halten Sie sich bitte an folgende Spielregeln:

Neu registrieren

Registrieren auf E - Mails für Ciclo Master CM108 wenn:


Sie erhalten eine E-Mail, um sich für eine oder beide Optionen anzumelden.


Das Handbuch wird per E-Mail gesendet. Überprüfen Sie ihre E-Mail.

Wenn Sie innerhalb von 15 Minuten keine E-Mail mit dem Handbuch erhalten haben, kann es sein, dass Sie eine falsche E-Mail-Adresse eingegeben haben oder dass Ihr ISP eine maximale Größe eingestellt hat, um E-Mails zu erhalten, die kleiner als die Größe des Handbuchs sind.

Ihre Frage wurde zu diesem Forum hinzugefügt

Möchten Sie eine E-Mail erhalten, wenn neue Antworten und Fragen veröffentlicht werden? Geben Sie bitte Ihre Email-Adresse ein.


Info