A
C
D
PEDOME
SPEED SENSOR
PODÓME
SENSOR DE VELOCIDAD
ID: #05007
m
y
h
a
n
s
e
c
o
n
t
r
o
l
.
c
o
m
M
A
N
U
A
L
D
E
V
E
L
O
P
E
D
I
N
G
E
R
M
A
N
Y
Use
Man
B
1
2
3
6
5
6
7
DI•
DIST
AL
w
YEAR
AÑOS DE
AFTER SALES SUPPORT•
SERVICI
service@produk
+1 80
08/
MODEL/:
AU6-PE-
PRODUCT CODE/CÓDIGO
PRODUCTO: 93
User Manual
Manual
del usuar
USA
Scope of deliv
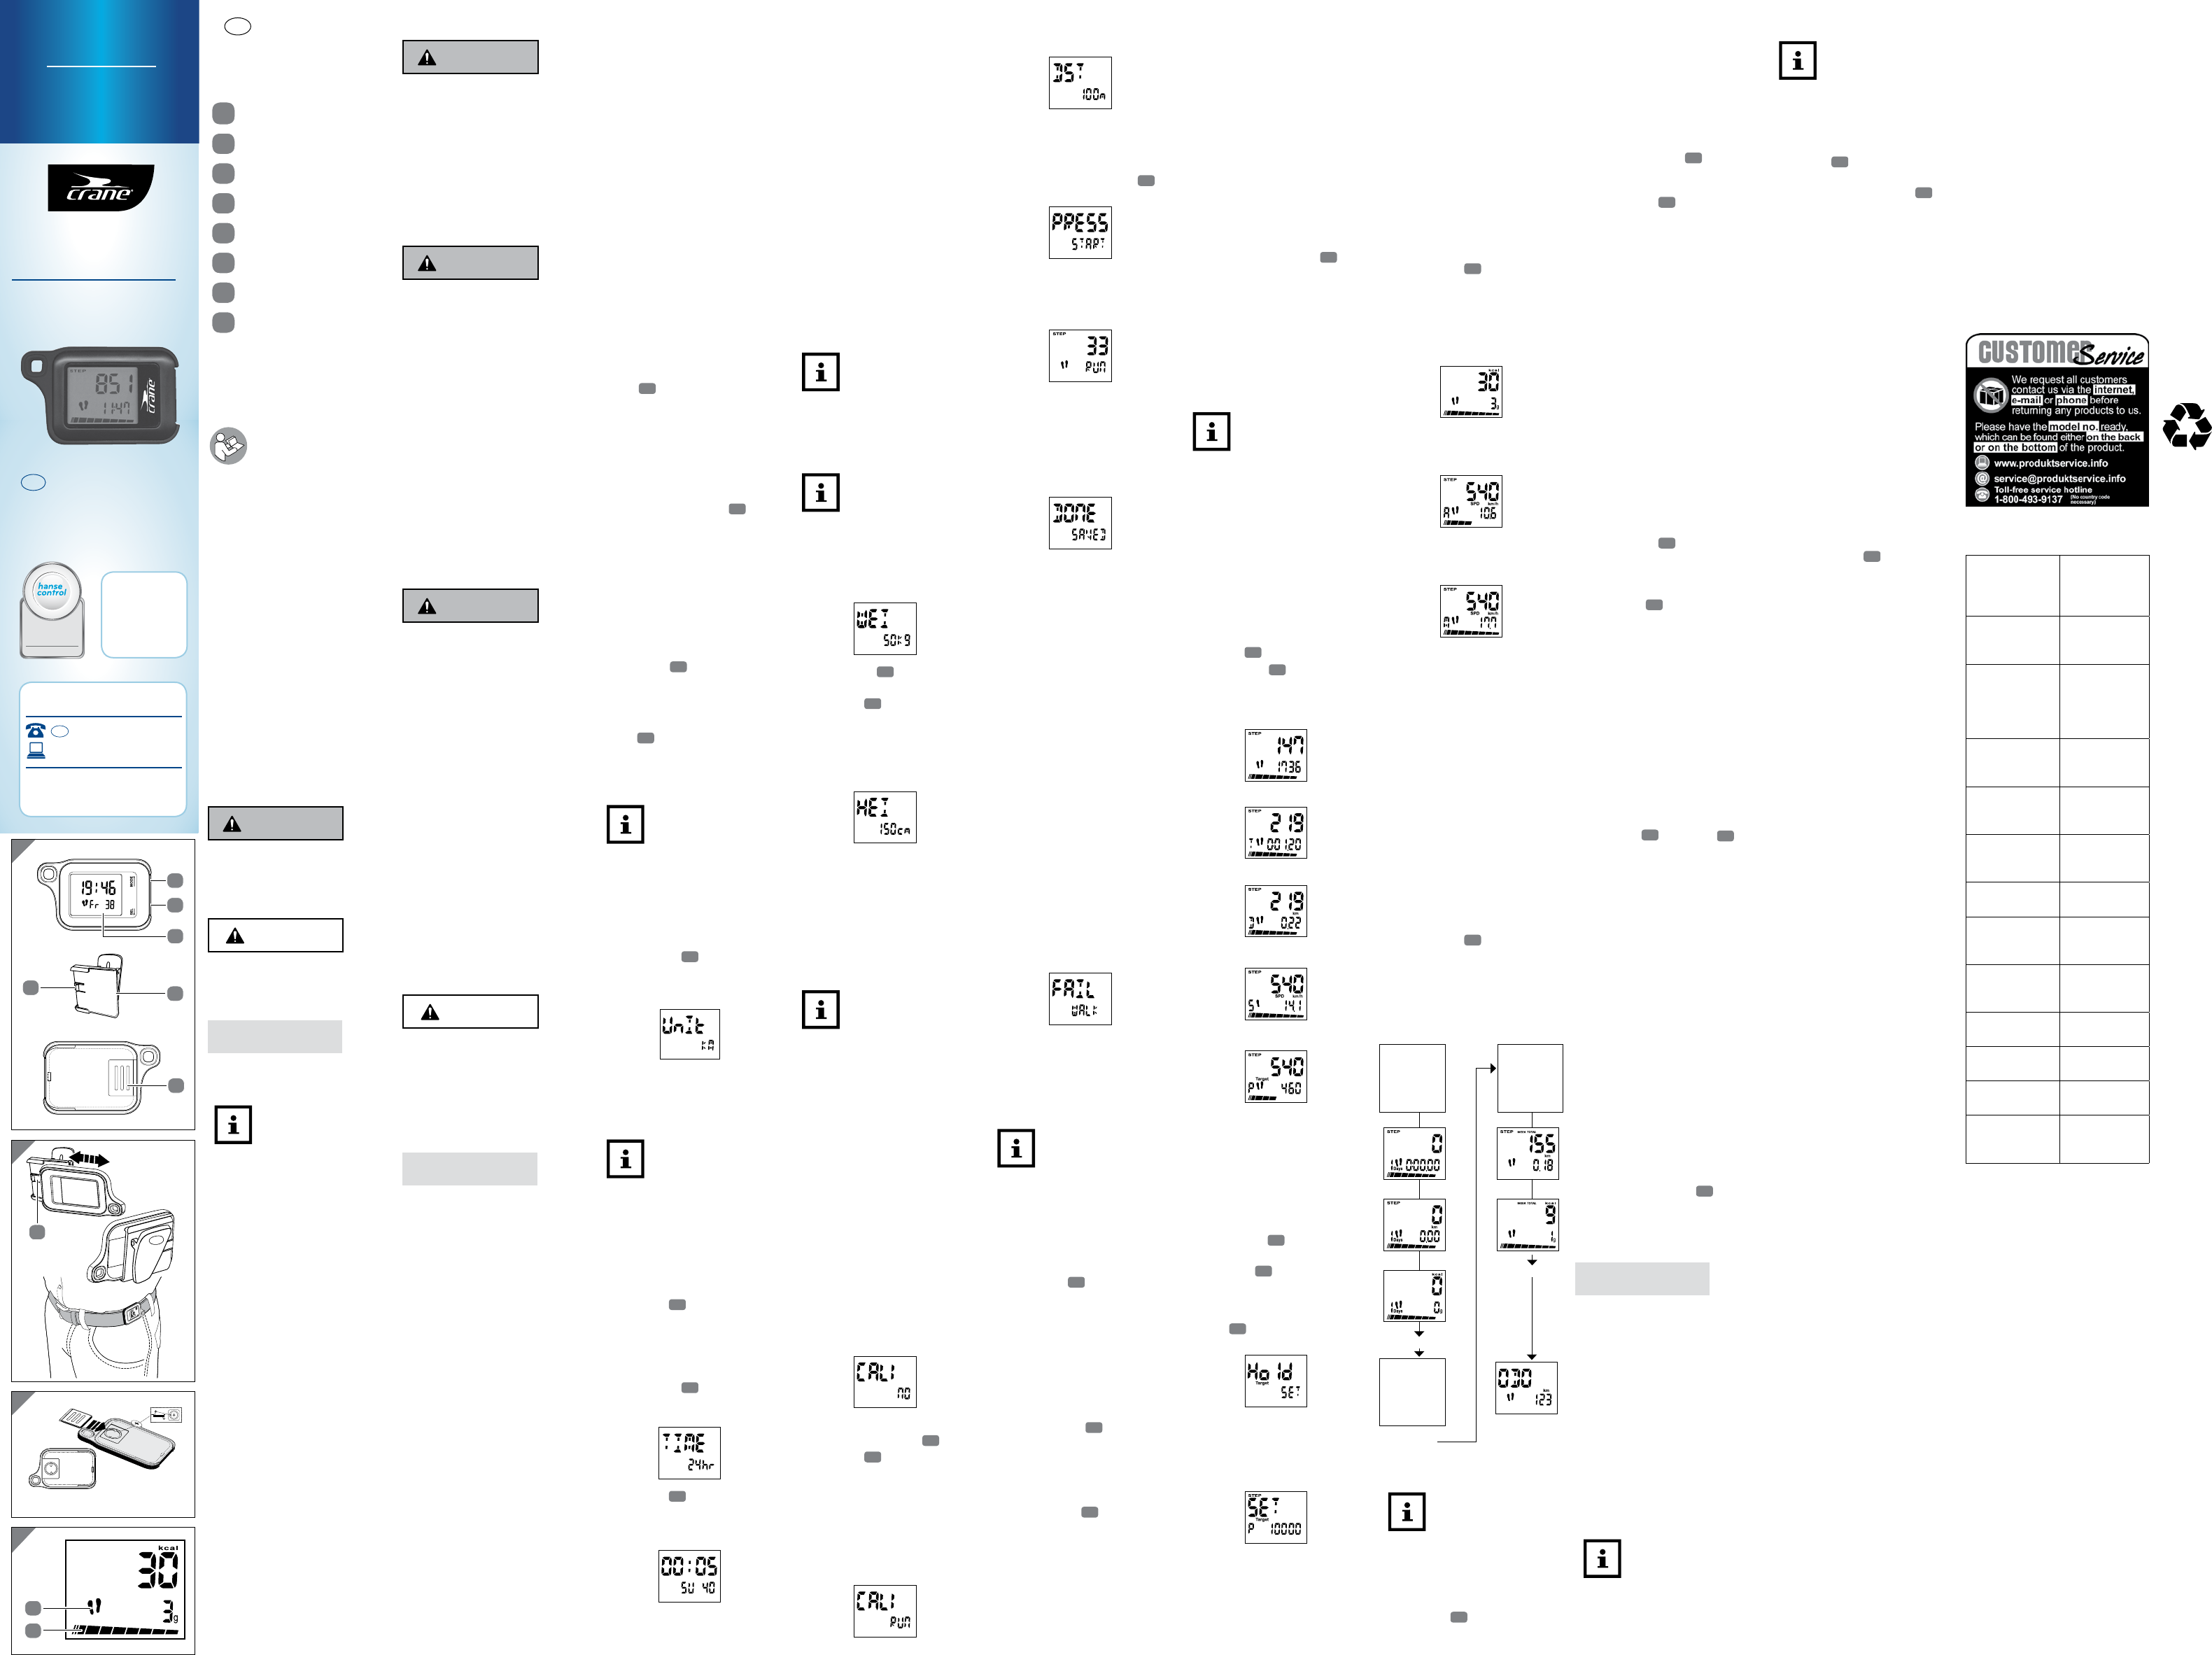
Devic
1
MODE button
2
SELECT (SEL) button
3
Display
4
Clip
5
Bat
6
Locking hook
7
Footprint icon
8
Progres
General information
Reading and storing the
user manual
This user manual
accompanie
pedomete
sensor.
impor
ope
readabilit
spe
to as “ped
Before using the pedometer
the user manual
par
notes
manual may caus
damage.
Store
use.
Make su
manual when passing the-
meter o
Ex
The following s
signa
manu
the packaging.
W
This signal sy
desi
mod
in dea
avoide
CAUTION!
This signal sy
desi
ris
mod
NOTICE!
This signal word war
pos
This symbol provides
you wi
supplemen
information on
handling and use.
S
Proper use
Th
designed as a train
measurement and display of
movement
ru
pers
for any commercial, therapeutic
or medical applic
ped
a medical device.
Read th
abo
your pedometer t
flawless oper
Onl
des
oth
may re
or even
The manufac
ca
incur
incorrec
Safety notes
W
Risk of swallowing, choking
and poisoning!
If small c
sw
bat
or suf
Keep the pedometer and
the battery away from small
children and animals.
W
Danger of explosion!
Bat
are exces
recharged
Do not expose the pedometer
or the battery to heat.
Keep the pedometer and the
battery away from hot surfaces
and objects.
Do not throw the pedometer or
the battery in an open fire.
Protect the pedomet
battery from dir
Never recharge or short
the battery and do not tak
apart.
Only replace the battery with
one of the same or similar type.
W
Risk of chemical burns from
batter
Leak
chemic
T
danger of leakage, never
expose the battery t
heat such as sunlight, fire or
the like.
Remove dead batteries from
the pedometer immediately
Remove the battery when the
pedometer is not in use for a
longer period of time.
Do not allow battery acid to
come into contact with skin,
eyes or mucus membranes.
In the event of contact with
battery acid, immediately
flush the applicable areas
with plenty of clean water and
consult a physician.
CAUTION!
Ris
E
train
Always consult a physician
before starting a r
training progr
NOTICE!
Risk of damage
Improp-
meter may dama
Operate the pedometer only
in ambient temperatures
bet
(0 °C and 4
Wi
ped
32 °F to 1
The pedometer is
wa
pedometer against f
moisture and condensation
(ext
tempe
shor
Do no
the pedometer
Do no
near ve
fields (e.g. electr
welding equipment, current
tr
variations in the time
measurement.
Do not expose the pedomet
disp
ultr
Remove w
the di
permanen
Fir
Checkin
and produc
1. T
packaging.
2. Che
deliver
(se fi).
3. Check whether the ind
par
this is t
the pedometer
manu
add
warr
Using the clip
At
or wa
showf , you c
val
it
in your p
1. Slide the pedomet
cli
4
so that the
slid
clifi).
2. Push t
end of t
loc
T
the c
1. Li
6
at th
clip.
2. Push t
fro
is released from the clip.
Using the function ke
The pedometer is
wi
side
hal
MOD
1
. Th
to as “MO
instru
Pre
the s
bu
2
. Th
“SEL
Set
If you h
dat
to res
param
total r
under “Resetting the
pedometer
Th
slee-
ting m
1. Press MODE
1
. All d
the di
Then “U
“K
2. Follow the i
Set
measurement
If you s-
ter to “K
will b
(k
and m
the pedometer
the un
mile
inches
1. Pre
“K
2. Pre
2
to conf
desired unit
Th
set
Set time
1. Press MODE
1
to tog
bet
format.
2. Pre
2
to conf
desi-
ter will a
the ac
3. Pres
desi
2. Pre
distan
10
3. Pres
enter
ped
calibr
step l
3
sho
4Pres
Th
step
distan
5. Af
dis
calibr
6. If th
cor
display shows “DO
“
Now, you nee
the c
described below:
1. The display shows “C
“WA ” is fla
2. Pre
calibr
3. Pres
distan
10
4Pres
dis
is rea
wal
5. The display shows “P
S
6. Pres
7.Af
dis
calibr
8. If th
cor
show
Unsuccessful calibration
In c
suc
“F
Af
show
agai
calibr
Waking up the pedometer
The pedometer
cannot be switched
on or of
sw
LC
If no a
min
Sleep m
In Sle
show th
Press MODE
1
once to wake
the pedometer up.
Main display elements
T-
play in mf ):
• the footprint icon
• the p
target
Th
7
shows that
the p
your wo
pedometer det
the fe
It lo
Th
8
at th-
tom of th
muc
target you have
(se
Ea
the p
per
Th
during your wor
wi
Ea
soo
per-
get
your target completely
bar w
Operation modes
Th
modes:
• Main/
• E
• Reco
• Memor
Scroll through the
mod
1
.
Main⁄
In thi
dat
dat
Th
“
Exercise mode
Dist
time-
maticall
at 0:
Th
use d-
ning ex
In E-
ly s
• the c
(i
display)
• the fo
middle of the
• the p
tar
display
3
)
By p
2
you can also
browse through
information:
• clock
•
exercise
• distan
• current speed
• wor
Defining a workout target
Y
wor
Y-
get is t-
gres
of s
proceed as
1. Press MODE
1
unt-
meter i
2. Pre
2
unt-
meter d
tar
3. Pres-
play
3
will s-
g
4The di
Se
ca
bet
target.
5. The f
fl
the d
digit.
6. Pres
for th
digi
y
7.Repea
digit.
8. Af
you re
tar
E
Y
ac
Record
In Reco
dat
displayed.
By p
2
you can
browse through
information:
• amo
cons
(i
wo
• Av
numb
tod
• Max
numb
tod
Memor
Th
dat
• total n
made.
• total t
• total distance you cov
• total calorie consumption.
• total a
In mem
• revi
the la
• revi
of the l
• enter the odometer which
tr
ki
By p
2
you can
brow
to day 7
fi
Th
an au
and th
Au
loop for
recorded
daily data
Day 1
Au
loop for
recorded
seven
total data
SEL
SEL
Au
loop for
recorded
daily data
D
SEL
Saving odometer data
The odometer data
(total distan
covered) is deleted
during ba
and af
T
proceed as
1. Go to me
2. Pre
2
repeatedly until
you se
3. Wri
distance you covered.
4Per
cha
5. Go to Mem
6. Pres
se
7.Pres
display
8. Th
3
will show
“0
flashing
9.Press MODE
1
to enter th
fi
noted t
10. Conf
SEL
begin flash
1Repea
have ent
all dig
noted t
12Af
digi
Odometer display screen.
Y
cha
the re
Changing weight, height
and calibration
Y
heigh-
librat
oth
1. Press MODE
1
to wa
pedometer if necessar
2. Pre-
ter is in E
3. Pres
2
unt
Clock screen.
4Pres
display
5. Now you c
weigh-
on dat
the “
and “Pedometer
sec
Resetting the pedome
T
T-
meter yo
Press SEL
2
and MODE
1
simultaneously for 5 seconds.
Remove the battery and insert
it again.
Features
The features reset deletes the
follo
• Step
• Wor
• Dist
• Calor
• Fa
• Average Speed
• Maximum Speed.
Data recorded on the previous
days a-
ter
be de
res
1. Enter t
2. Se
the C
3. Pres
2
to re
all dai
Cleaning and care
NOTICE!
Risk of damage
Improper cleaning of the
pedo
Do not use solvents, abrasive
or gaseous cleaning materials,
rough tools or brushes t
the pedometer
1. Use o
cloth to
2. Remove any remaining
moisture entirely from the
display
Storage
Store
in a coo
Onc
been re
ped
sto
(0 °C
Bat
Please note that
af
replacement, all data
is del
to
For batter
as foll
1. Remove th
the c
4
if ne
(sefig).
2. Ope
5
on
the b
and refi).
3. Car
bat
a sa
fr
under “Disp
4If ne
fre
bat-
fore inserting the bat
5. Inse
positi
into th
unt
6. Make sure the
is correc
7.Plac
bac
compar
8. Star
desc
param
9.If irregular s
in the d
3
, rem
the bat
reins
microprocess
the pedometer
normally.
Troubleshooting and
FA
Before submitting a claim about
the pedometer
and change it if required.
Als
your problem.
Why is th
disp
my distance co
Have you p
For optimal results, the calibration
has to be p
and al
A shu
or uneve
incorrec
When climbing s
distance measurement is reduced
as the p
desi
sur
Ap
wal
ca
Plea-
sure
ir
What s
changes?
Enter t
or
change
How is the c
measured?
Th
dep
and th
correct body weight
Why did t
pedometer stop reacting?
If th
irregular s
T
reinsert it. This will reset the
microprocessor
Af
shou
usual.
The display is
legi
Repla
display star
it is f
the bat
cor
remove
pers
The display remains
what is wrong
The ambient temper
be too h
to oper
bet
(0 °C
Th-
pos
lon
case conta
Finding additional
information on the
Internet
Y
of our online product ser
pag
pedometer
ht
E
Mak
Plea
numb
reason for the claim.
Contac
T
Power supply: 3V lithium
b
CR
0.03
Oper
ambient
temperature:
32 °F
(0 °C
Stor
ambient
temperature
(wi
remo
32 °F
(0 °C
Clock 12
w
minute
Daily s
measurement
range:
0–99
s
Daily dis
measurement
range:
0–99
miles
Daily exercis
timer rang
2
Daily c
measure ment
range:
0–99
Daily fat
measure ment
range:
0
Bod
range:
30
66–479
Bod
range:
40"–99"
10
Odometer: 9
miles
Measurement 2.
0.4
× 1.
All s
guidance and subjec
without notice.
CON
Th
15 of t
is sub
cond
cause har
(
inter
inter-
desired oper
NOT
tes
wi
devi
the FCC R
designed to provide reasonable
protec
inter
installation. T
gene
ra
installed and used in accordance
with the instruc
harmf
communicat
is no gu
will n
installation. If this equipment
does cause har
to radio or t
whi
tur
the us
cor
more of the following measures:
• Reor
receiving antenna.
• Increas
between the
receiver
• Connect the eq
an ou
fro
is connec
• Consult the dealer or an
exper
technician for help.
WARN
modif
exp
responsible for compliance could
void us
the equipment.
Disposal
Disposing of packaging
Sor
befo
Dispos
and c
rec
and w
appropriate collec
ser
Disposing of the
pedometer
Should the pedomet
be c
point in time, dispos
accordance with the regulations
in for
c
This ensur
are rec
mann
negative consequences for the
environm
Please ensure your recycling in-
for
regulations and the EP-
mendations (ww
Bat-
rie
with household trash!
by law to br
stora
whether they
subs
poin-
t
that t
environm
T-
tion p
only
* lab
Hg = me
4
8
4Pres
The pedomet
to setting the minutes.
5. Pres
desired minu
6. Pres
minutes set
pedomete
set
7.Pres
to 0
8. Pres
se
pedomete
set
9.Pres
desi
10. Pre
of wee
Th
the wei
Set wei
Enter your current
weight and height. T
pedometer requires
these se
calc
val
consumption and fat
burning.
If th
af
ca
los
will be recalculated
acco
height value.
Th
50 kg o
1. Press MODE
1
to enter you
current weight.
2. Pre
2
to conf
entered value.
Th
the height
Th
15
1. Pre
ac
2. Pre
entered value.
Th
Calibr
Pedometer calibration
By c
pedometer it automa-
tically c
step l
and walk
We strongly recom-
mend calibr
ped
pers
pattern. Othe
ped
only statis
bas
and he
use
of the p
not wo
c
Y
calibr
10
10
you sho
of at le
for c
leng
1. Y
and “
1
.
2. Pre
2
to e
“
or ch
calibrate the pedomete
If you choose “Y
enter
mode.
1. Pre
adv
3
USA
USA