GB/IE GB/IE GB/IE
GB/IE GB/IE GB/IE GB/IE GB/IE GB/IE GB/IE GB/IE GB/IE GB/IE GB/IE GB/IE
GB/IE GB/IE GB/IE GB/IE GB/IE GB/IE GB/IE GB/IE GB/IE GB/IE GB/IE GB/IE
GB/IE GB/IE GB/IE GB/IE GB/IE
FR/BE
Appuyez sur la touche SET et maintenez-la
enfoncée pour passer de ºC à ºF ou inv
Appuyez sur la touche SET pour afficher la
température maximale (HI) mesur
présent.
Réappuyez sur la touche SET pour afficher la
température minimale (L
présent.
Appuyez sur la touche SET et maintenez-la
enfoncée jusqu’à affichage de la température
maximale ou minimale pour remettre à zér
valeurs mémorisées.
CHRONO: chronomètre
Appuyer sur la touche SET pour démarrer le
chronomètre.
Réappuyez sur la touche SET pour arr
chronomètre.
Appuyez sur la touche SET et maintenez-la
enfoncée pour remettre le chr
CONS CAL: consommation actuelle de calories
A
PLOSION ! Remplacez t
toutes les piles en même temps et
utilisez uniquement des piles de même type.
Retirez sans délai la pile de l’appar
est usée. Il existe un risque éle
des piles!
V
jetez pas dans un feu, ne la court-circuitez ou
ne la démontez pas.
Si vous constatez que la pile a coulé dans le
boîtier
tout endommagement de l’appareil!
Évitez tout contact avec la peau, les yeux e
les muqueuses. En cas de contact avec l’acide,
rincez abondamment la zone à l’eau claire
et
FR/BE
Speed or distance are
not displayed.
Adjust magnet and
sensor correctly
- C
ins
arranged the right way
round.
Display is black The ambient temperature
is too high or the bicycle
computer was e
to direct sunlight for too
long. Remov
from direct sunlight and
let it cool off for a while.
The L
irregular symbols.
Remov
replace it again.
The bike computer has the following
functions:
Advanced users’ functions:
CL
TRIPDIST >
MAXSPEED
> A
STPW
CAL RATE > CAL
KM+/- > TIME+/- > SCAN
Beginners’ functions:
TRIPDIST > A
Using functions
Note: All the functions and secondar
are described in the following list.
CL
Press the SET button
12
and keep it
pressed for
3 seconds to access the time settings.
T
Press the SET button and k
3seconds to access the wheel size settings
and total distance.
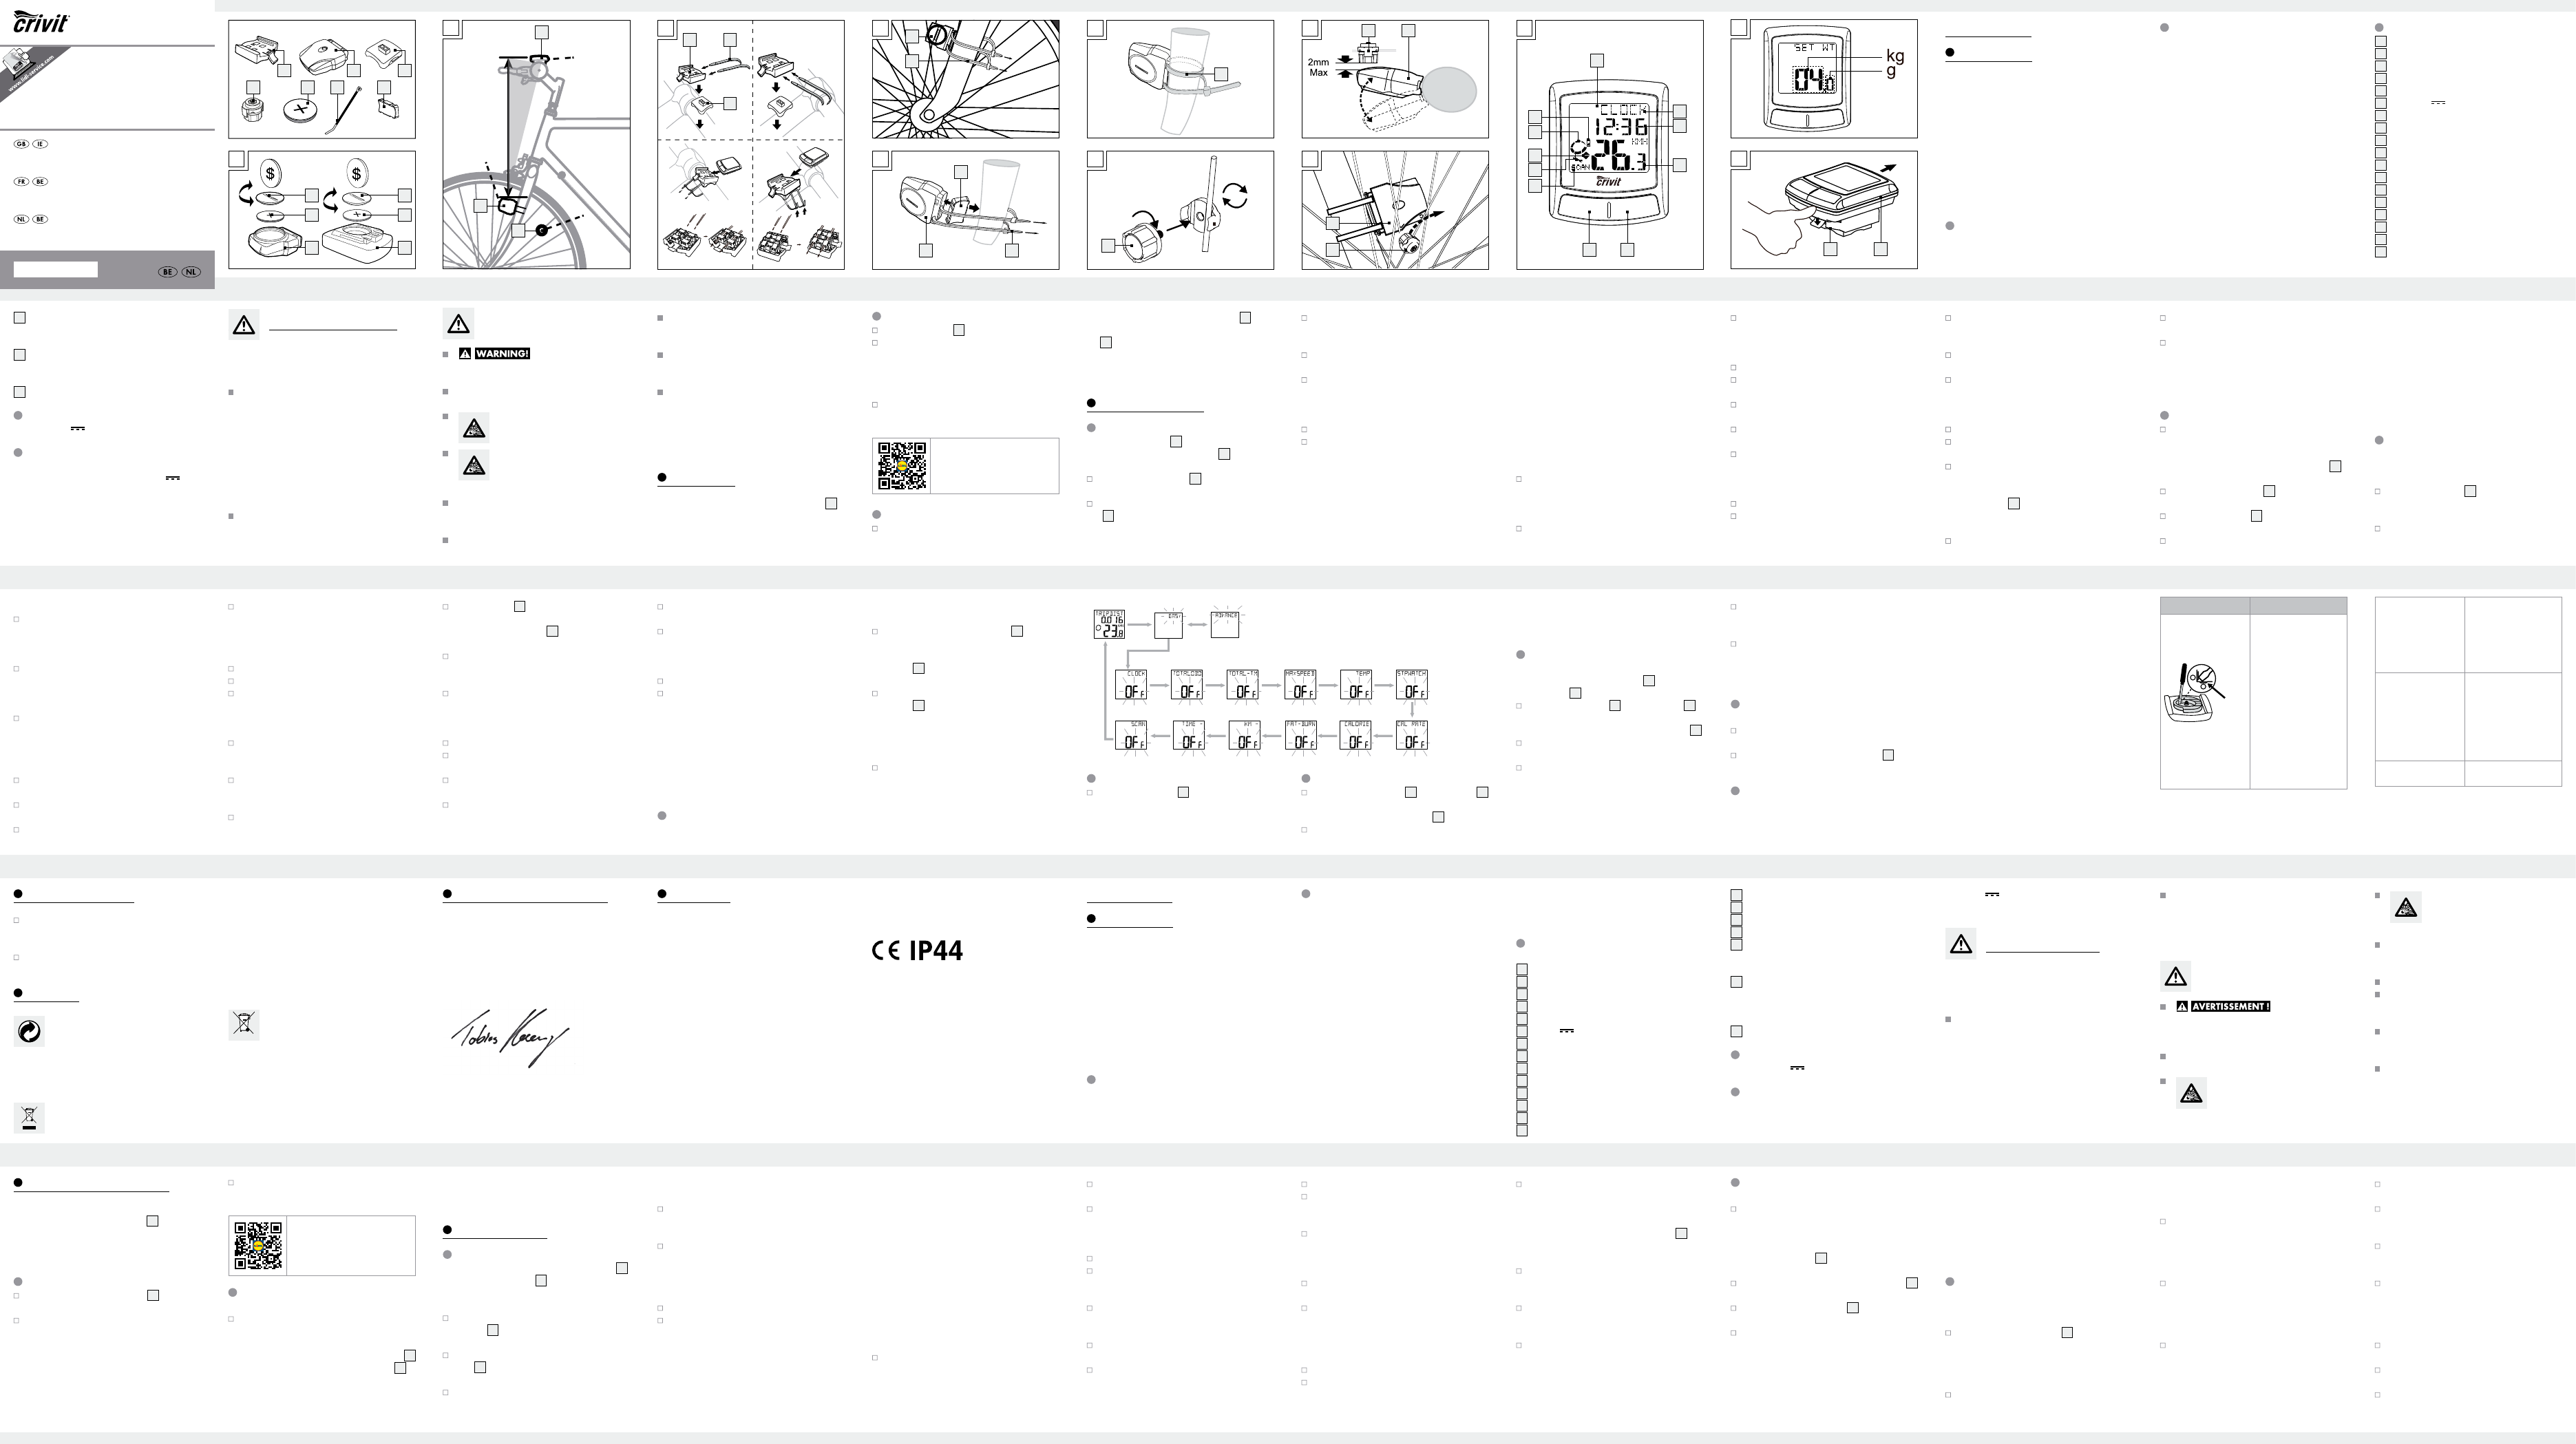
Description of parts
1a
Bracket
1b
Sensor
1c
Cushion
1d
Battery compar
2
Magnet
3
Batter 3 , type CR2032 button cell
4
Cable tie
5
Sensor cushion plate
6 a
Bike computer’s battery compartment cover
6 b
Bike computer
7
L
8
Function indicator
9
Secondary function value display
10
Primar
11
MODE button
12
SET button
13
SCAN indicator
14
Servicing inter
FR/BE FR/BE
FR/BE
FR/BE
accéder au réglage de la dimension de pneu
et à la remise à zéro du nombr
TIME-TO
Appuyez sur la touche SET et maintenez-la
enfoncée pendant env
céder à une modification de la durée totale de
trajet mémorisée.
DISJOUR: remise à zéro du nombr
Appuyez sur la touche SET et maintenez-la
enfoncée pendant env
remettre à zér
couru, la vitesse moyenne et la dur
VIT-MAX: vitesse maximale
Appuyez sur la touche SET et maintenez-la
enfoncée pendant 3 secondes pour remettre à
zéro la vitesse maximale.
VITMO
TEMPP
TEMP: thermomètre
V
pas les dommages dus à une manipulation
non conforme, à la non-observation des
consignes de sécurité et du mode d’emploi ou
à l’utilisation par des personnes non autorisées.
relative aux piles
DANGER DE MORT!
Les piles peuvent être av
un danger mortel. Contactez immédiatement
un médecin en cas d’ingurgitation d’une pile.
Lorsque l’appareil res
période prolongée, retir
A
PLOSION ! Ne tentez jamais de
recharger les piles!
Problem Solution
Empty LC-display or no
response after putting
the batteries in again
RESET
Remov
area marked RESET of the
battery compar
touch the plus and minus
terminals at the same time
using a screwdriv
a 3V battery into the bat-
tery compar
a way that the + terminal
points upwards. R
the battery cover on the
battery compar
microprocessor is r
and restarted.
Press the MODE button repeatedly until °C or
°F appears in the L
Confirm your choice by pr
Y
If you want t
follow the steps in “Rese
section and reset all basic setting data again.
Note: If the bike computer remains unused for
more than 5 minutes, it automatically switches
into the stand-by mode. Press an-
tiv
8
shows the current mode.
Press the MODE button
11
repeatedly to
page through the various modes.
Press the SET button
12
to change into the sec-
ondary function for any function.
Press the SET button and k
or reset up any sav
Functions
–
– Clock
– Stopwat
–
–
–
–
–
–
– Speed tendency
–
–
–
– Calories
– Fat-burning
–
continuous loop)
– Backlight
FR/BE
HEURE > DIST-TO
VIT-MAX > VITMOYEN > TEMPP
CHRONO > CONS CAL > CALORIE > GRAS >
KM+ / - > TIMER+ / - > SCAN
Fonctions pour débutants:
DISJOUR > VITMO
Remarque: la liste suivante décrit toutes les
fonctions et fonctions secondaires.
HEURE: affichage de l’heure
Appuyez sur la touche SET
12
et maintenez-la
enfoncée pendant env
der au réglage de l’heure.
DIST-TO
kilomètres
Appuyez sur la touche SET et maintenez-la
enfoncée pendant env
2
, type
pile-bouton CR2032
1mode d’emploi
CONSERVER T
SÉCURITÉ ET INSTRUCTIONS POUR
CONSUL
Cet appareil peut être utilisé par des enfants
de 8 ans et plus ainsi que par des personnes à
capacités physiques, sensorielles ou mentales
réduites ou manquant d‘expérience et de
connaissance que sous surveillance ou s‘ils ont
été instruits de l‘utilisation sûre de cet appareil et
des risques en découlant. Les enfants ne doivent
pas jouer avec cet appareil. Le netto
maintenance domestique de l‘appareil ne doit
pas
FR/BE
- If errors occur in the display
devices from the vicinity of the product. In the case
of such malfunctions, remov
then reinsert again.
Press the MODE button repeatedly until 12 for
the 12-hour format or 24 for the 24-hour format
appears in the L
Confirm your choice by pr
Y
A four-digit number appears in the L
Enter the current time. Press the MODE button
repeatedly until the desired number appears
as the first digit.
Confirm your choice by pr
Repeat this process for all the r
Y
Press the MODE button repeatedly until the
desired number of units of distance to y
next intended bicy
val indicator
14
) appears in the L
Note: Y
or 800
Confirm your choice by pressing the SET button.
Y
Bike Computer
Introduction
W
device. Y
The instructions for use are part of the product.
They contain important information concerning
safety, use and disposal. Befor
please familiarise yourself with all of the safety
information and instructions for use. Only use the
unit as described and for the specified applica-
tions. If you pass the product on to an
please ensure that you also pass on all the docu-
mentation with it.
Proper use
The product is intended for use as a cy
Not for commercial use.
FR/BE FR/BE FR/BE FR/BE FR/BE FR/BE FR/BE FR/BE FR/BE
FR/BE
15
Speed comparison indicato
r
▲ higher than your aver
▼ lower than y
16
Acceleration – anticlockwise
rotation
Decelerat
ion – clockwise rotation
17
Battery state indicator
T
Battery 3 (CR2032 button cell)
Included items
1 Bike computer
1 Bike computer br
1 Magnet
1 Sensor
4 Cable ties
2
, type
CR2032 button cell
1 Operating instructions
General safet
KEEP ALL THE SAFETY ADVICE AND INSTRUC-
TIONS IN A SAFE PLACE FOR FUTURE REFERENCE!
This appliance can be used by children aged
from 8 year
reduced phy
or lack of experience and knowledge if the
have been given supervision or instruction
concerning use of the appliance in a safe way
and understand the hazards in
shall not play with the appliance. Cleaning
and user maintenance shall not be made by
children without supervision.
Please note that the warranty does not cover
damage arising from improper tr
observance of the operating instructions and
safety advice or unauthor
Safet
batteries
RISK OF LOSS OF LIFE!
If batteries are swallo
life. Seek medical attention if a battery is swal
lowed.
Remov
used for a long period.
CAUTION! RISK OF EXPLO-
SION! Never r
batteries!
CAUTION! DANGER OF EXPL-
SION! Always r
at the same time and only use batte
ries
of the same type.
If the battery is exhausted, remove it fr
device immediately
more lik
Make sur
round (polarity).
Keep the battery away from childr
throw the battery into a fire. Nev
it or take it apart.
If your battery leaks, remov
immediately to prev
damaged.
Do not let the fluid from a leaking battery come
into contact with your skin, e
membranes. In the ev
leaking from a battery
affected area with water and
advice of a doctor!
Before use
Remov
7
before first use.
Note: This product is not recommended to use
with E-bikes. Interference from the motor may affect
the performance of the product.
Inserting t
T
3
, proceed as shown in F
T
coin to assist you to turn the battery compartment
cover in anti-clockwise dir
you fit the battery the right way round (polarity).
This is shown inside the battery compar
T
coin to assist you to turn the battery compart-
Scan the QR code with your
smartphone and watch the video
to find out how to assemble the
product.
Attac
T
Figs. B to I.
Note: Make sure that the bik
6 b
is
attached with less than 70
sor
1b
. Fix the bike computer to the sensor within a
30° angle as shown in figure B.
Note: Make sure the cable is attached properly
must not get caught in the spokes or tr
Basic settings
Note: The LC display
7
comes on automatically
approx. 2 seconds after the battery
3
is inserted.
Y
Press the MODE-button
11
repeatedly until the
desired language appears.
Confirm your choice by pr
12
. Y
user profile.
Press the MODE button repeatedly until the
desired
user profile (AD or EASY)
appears.
Confirm your choice by pr
Now you can choose the wheel siz
A four-digit number appears in the L
Now enter the tyre circumference of y
in mm. Press the MODE button repeatedly until
the desired number appears as the first digit.
Confirm your choice by pr
Repeat this process for each of the thr
remaining digits.
Note: Y
circumference
by multiplying y
tyre diameter by 3.1416.
The following list contains the tyre circumfer
ences
of the most common cycle tyres.
T T
20” 1598 mm
22” 1759 mm
24” 1916 mm
26” (650 A) 2073 mm
26.5” (tubular) 2117 mm
26.6” (700x25C) 2124 mm
26.8” (700x28C) 2136 mm
27” (700x32C) 2155 mm
28” (700B) 2237 mm
A 1888 mm
A 1995 mm
A 2030 mm
A 2045 mm
A 2099 mm
27”x1 2138 mm
27”x1 1 / 4 2155 mm
Now select your desir
speed. Press the MODE button repeatedly until
SET KM KMH or SET MILE MPH appears in
the L
Confirm your choice by pr
Y
A two-digit number appears in the L
Now enter your age. Pr
repeatedly until the desired number appears
as the first digit.
Confirm your choice by pressing the SET butto
n.
Repeat this process for the r
move on to selecting the unit of w
Press the MODE button repeatedly until SET
K
Confirm your choice by pr
Y
A three-digit number appears in the L
Now enter your w
repeatedly until the desired number appears
as the first digit (see Fig. K).
Confirm your choice by pr
Repeat this process for all the r
Y
T
Press the SET button and k
3seconds to make changes to the sav
time cycling.
TRIPDIST: T
Press the SET button and k
3seconds to reset the trip distance, the
average speed and the trip time display
MAXSPEED: Highest speed
Press the SET button and k-
onds to the maximum speed display to 0.
A
TRIPTIME: T
TEMP: Thermometer
Press the SET button and k
switch between °C and °F
Press the SET button to display the highest tem-
perature (HI) measur
Press the SET button again to display the low-
est temperature (L
Press and hold down the SET button while the
highest or lowes
switch back to the current temperature t
reset the saved data.
STPW
Press the SET button to start the stopwatch.
Press the SET button again to stop the stopw
Press the SET button and k
reset the stopwat
CAL RATE: Curr
CALORIE: Calorie meter
Press the SET button and k
reset the calorie counter to 0.
F
Press the SET button and k
reset the fat burning value to 0.
KM: Odometer
Press the SET button and k
change the odometer settings.
The L
7
shows the symbol for count-
ing forwards or
backwards (+ or - r
Press the MODE button
11
repeatedly until the
desired symbol is shown.
Confirm your choice by pr
Y
odometer
A 5-digit number appears in the LC display
ter
the desired distance. Press the MODE button
repeatedly until the desired number appears
as the first digit.
Confirm your choice by pr
Repeat this process for all the r
TIME: Timer
Press the SET button and k
change the timer settings.
The L
forwards or backwards (+ or - r
Press the MODE button repeatedly until the
desired symbol is shown.
Confirm your choice by pr
Y
A 5-digit number appears in the L
Enter the desired time. Press the MODE button
repeatedly until the desired number appears
as the first digit.
Confirm your choice by pr
Repeat this process for all the r
SCAN: Scan
Note: The scan mode automatically switches
between the trip distance, highest speed, aver
speed and trip time displays.
Note: Refer to the section on “Basic settings” to
see how you mak
Note: To turn off the SCAN function, press the
MODE button to return to clock mode.
CUSTOMIZE mode
Apart from the ADV
can make y
CUST
11
to enter
the CUST
Note: By repeatedly pressing the MODE
button
11
, you can toggle betw
ADV
In the EAS
button
12
. Press the MODE button to switch
the settings on or off (e.g. time). Choose „On“,
to add the chosen adjustment to the EASY
modes. Choose „Off“, if you do not w
add the adjustments.
Press the SET button, to confirm your entry
Press the SET button
12
to switch on the back-
light temporarily
extinguishes after a short period.
Press the MODE button
11
and SET button
12
at the same time and keep them pressed until
{{----}} appears in the L
7
.
Now press the MODE button and k
pressed. This allow
set basic setting data (language, age, weight,
time). The rest of the stored data will be deleted
(ex
Note: The batteries of the bike computer must be
replaced when the battery symbol
17
appears on
the L
7
.
Press the MODE ke
11
and the SET ke
12
at the same time and keep them pressed until
the {{-----}} symbol appears in the L
7
.
T
figure A.
T
coin to assist you to turn the battery compart-
ment cover in anti-clockwise dir
the old battery and replace with a new batter
Make sur
round (polarity). This is shown inside the batter
compartment.
coin to assist you to turn the battery compart-
ment cover in clockwise dir
Press the SET ke
to normal operating mode.
Note: Once the batteries are removed, all s
data will be erased after approx. 20 seconds.
Remo
from the bike
Slide out the bike computer b
the bracket lock (See F
T
4
, use
other tools to assist (e.g. cutter pilers).
Troubleshooting
Note: This device has delicate electronic compo-
nents. Therefore interference may occur when it is
near devices which transmit r
Cleaning and care
Do not use any liquids or cleaning agents for
cleaning. Other
the device.
The device should only be cleaned on the out-
side with a soft dr
Disposal
environmentally friendly materials that
can
be disposed of at a local recycling centr
Contact your local refuse disposal authority for more
details of how to dispose of y
throw out y
hold refuse. T
where it can be disposed of properly
Y
where the collection centres ar
and their opening times.
Defective or exhaus
st be recycled
in accordance with Directiv
amendments
. Return the batteries and
device through the appr
Improper disposal of batt
can damage the environment!
Batteries must not be disposed of with the house-
hold refuse. They may contain to
and require to be handled as special w
chemical symbols of heavy metals are: Cd = cad-
mium, Hg = mercury
you must dispose of discar
communal disposal centre.
W
D-74167 Neckarsulm, hereb
sole responsibility that the product
Model No.: HG00734A / HG00734B /
HG00734C / HG00734D
, Version: 02 / 2016,
to
which this declaration refers, complies with the
stan
The complete declaration of conformity can be
viewed at: www
Warranty
The device has been manufactured to strict quality
guidelines and meticulously ex
In the event of pr
against the retailer of this product. Y
are not limited in an
below
The warranty for this device is 3 years fr
of purchase. Should this device sho
materials or manufacture within three year
date of purchase, we will r
our choice - free of charge to y
The warranty period begins on the date of purchase.
Please keep the original sales receipt in a safe location
.
This document is required as y
This warranty becomes void if the device has been
damaged or improperly used or maintained.
The warranty applies to faults in material or manu-
facture. This warr
subject to normal wear
consumables (e.g. batteries) or for damage to fragile
parts, e.g. switches, rechargeable batteries or glass
parts.
Compteur vélo
Introduction
Félicitations pour l‘acquisition de vo
V
mode d‘emploi fait partie intégrante de ce produit. Il
contient des indications importantes pour la sécurité,
l’utilisation et la mise au rebut. V-
cieusement toutes les indications d‘utilisation et de
sécurité du produit. Ce produit doit uniquement êtr
utilisé conformément aux instructions et dans les
domaines d‘application spécifiés. Lors d‘une cession
à tiers, veuillez également reme
Utilisation conforme à
l’usage prévu
Le produit est conçu pour une utilisation en tant
qu’or
commerciale.
–
mises en communication)
– Rétroéclairage
et éléments
1a
Support
1b
Capteur
1c
Amortissement
1d
2
Aimant
3
Pile 3 , t
4
Attache-câbles
5
6a
6b
Ordinateur de vélo
7
Ecran à cristaux liquides
8
T
9
Affichage valeur fonction secondaire
10
Affichage valeur fonction principale
11
T
12
T
13
Affichage balayage
14
Affichage inter
15
▲ supérieur à votre vitesse mo
▼ inférieur à votre vitesse mo
16
Accélération – Ro-
raire
Décélération – Ro
17
Affichage de l’usure des piles
Spécifications techniq
Pile: 3 (modèle bouton CR2032)
Livraison
1 ordinateur de vélo
1
ordinateur de vélo
1 aimant
1 capteur
4 attache-câbles
Fonctions
–
– Horloge
– Chronomètre
–
–
–
–
–
–
– T
–
rebours ou croissant)
–
croissant)
–
–
–
Retirez le film de pr
liquides avant la premièr
7
.
Remarque : Ce produit ne doit pas être utilisé
sur un vélo électrique. Le moteur du vélo pourr
occasionner le dysfonctionnement du produit.
Pour le r
3
, procédez
comme le montre les fig. A.
Utilisez une pièce de monnaie pour ouvrir le
compartiment à pile. À l‘aide de la pièce,
tournez le couvercle du compartiment à pile
dans le sens anti-horaire.
V
ment (respect de la polarité). La polarité cor-
recte est indiquée dans le compartiment à pile.
l‘aide de la pièce de monnaie dans le sens
anti-horaire afin de le fermer
Scannez tout simplement le code
QR à l'aide de votre smartphone,
et visionnez la vidéo d'instruc-
tions pour savoir comment
monter votre pr
de vélo
Pour mettr
comme le montrent les figures B à I.
Remarque: veillez à monter l’
6 b
à une distance inférieure à 70
1b
.
Fixez l’
par rapport au capteur
Remarque : V
Évitez qu´il ne soit pris entre les ray
pende à côté.
Remarque: après la mise en place de la pile
3
,
l’écran à cristaux liquides
7
s’allume automatique-
ment passées 2 secondes environ. V
directement au choix de langues.
Appuyez de manière r
MODE
11
jusqu’à ce que la langue recher-
chée s’affiche.
V
SET
12
. V
choix du profil d’utilisateur
Appuyez de manière r
MODE jusqu’à ce que le profil d’utilisateur
recherché sA (Av
FA (Débutant)).
V
SET
dimension de pneus (T
Un numéro à quatre chiffr
à cristaux liquides. Saisissez la circonférence
du pneu de la roue en mm. Appuyez d
manière répétée sur la touche MODE jusqu’à ce
que le premier chiffre r
V
Recommencez le processus pour chacun des
trois chiffres suiv
Remarque: vous obtenez la cir
du pneu en multipliant son diamètre par
3,1416. La liste suivante vous indiq
circonférences des pneus les plus cour
Diamètre pneu Circonférence pneu
20” 1598 mm
22” 1759 mm
24” 1916 mm
26” (650 2073 mm
26,5” (tubulaire) 2117 mm
26,6” (700x25C) 2124 mm
26,8” (700x28C) 2136 mm
27” (700x32C) 2155 mm
28” (700B) 2237 mm
A 1888 mm
A 1995 mm
A 2030 mm
A 2045 mm
A 2099 mm
27”x1 2138 mm
27”x1 1 / 4 2155 mm
Sélectionnez ensuite l‘unité de mesure de lon-
gueur et la vitesse souhaitées. Appuyez de ma-
nière répétée sur la touche MODE jusqu‘à ce
que ADJUST KM KMH ou AD
s‘affiche sur l‘écran à cristaux liquides.
V
SET
Un numéro à deux chiffres s
à cristaux liquides. Saisissez votre âge. Appuy
de manière répétée sur la touche MODE jusqu’à
ce que le premier chiffre r
V
Recommencez le processus pour le chiffr
vant. V
de poids.
Appuyez de manière r
MODE jusqu’à ce que A
LB s’affiche sur l’écran à cristaux liquides.
V
SET
Un numéro à trois chiffr
à cristaux liquides. Saisissez votre poids. Appuyez
de manière répétée sur la touche MODE jusqu’à
ce que le premier chiffre r
Fig. K).
V
Recommencez le processus pour t
suivants. V
système horair
Appuyez de manière r
MODE jusqu’à ce que 12 pour le format horaire
12 heures ou 24 pour le format horair
heures s’affiche sur l’écran à cristaux liq
V
SET
Un numéro à quatre chiffr
à cristaux liquides. Saisissez à présent l’heure
actuelle. Appuyez de manière r
touche MODE jusqu’à ce que le premier chiffre
recherché s
V
Recommencez le processus pour t
suivants. V
l’intervalle de maintenance.
Appuyez de manière r
MODE jusqu‘à affichage du nombre de kilo-
mètres souhaité après lesquels v
faire effectuer la prochaine r
(affichage d‘inter
14
).
Remarque: vous pouvez choisir entre 200,
400, 600 et 800
V
SET
de température.
Appuyez de manière r
MODE jusqu’à ce que ºC ou ºF s’affiche sur
l’écran à cristaux liquides.
V
SET
Suivez les instructions au chapitre „R
zéro de l‘ordinateur pour v
fier les réglages de base. Entrez alors de
nouveau les données.
de vélo
Remarque: si vous n’utilisez plus l’
teur de vélo pendant 5 minutes, celui-ci passe
automatiquement en mode veille. Appuy
n’importe quelle touche pour le réactiver
chage de fonction
8
indique le mode dans
lequel se trouve l’
Appuyez plusieurs fois sur la touche MODE
11
pour basculer entre les différents modes.
Appuyez sur la touche SET
12
pour passer au
deuxième paramétrage de chaque fonction.
Appuyez sur la touche SET et maintenez-la
enfoncée pour visualiser ou remettre à zér
des valeurs mémorisées.
L
plusieurs fonctions:
Fonctions pour utilisateurs av
BIKE COMPUTER
IAN 275091
BIKE COMPUTER
FIETSCOMPUTER
COMPTEUR VÉLO
G
F
4
A
1b 6 b
3 3
1d 6 a
I
2
1b
H
2 1b
J
8
9
10
11
13
14
15
16
17
7
2 3 5
1a 1b 1c
C
1c
41a
D
1b
4
2
K
L
1a 6 b
E
1b 4
5
B
6 b
1b
2