Danfoss Ally™
Radiator T
Quick Guide
Danfoss Ltd.
Oxford Road, UB9 4LH Denham, United Kingdom
Capswood Business Centr
Homepage:
ww
Dan
bro
ter i
order pro-
tia
mar
Danfoss and the Danfoss
All r
AN31775663747302 06/2021
PDF
GUIDE
smar
Download Guide
EN: Please use the manual provided with
your gatewa
to download the App
DE: Bitte verwenden Sie das Handbuch
ihres Smart Home Routes/Gateways
und folgen Sie den Instruktionen zum
Herunterladen der dazu passenden App
DK:
der er vedlagt din gatewa
vejledningen til at downloade appen.
FR: Merci de télécharger l’
et suivez les instructions.
ITUtilizzare il manuale del pannello/
gateway e seguir
l’
PL: Post
dołączoną do bramki sieciowej, ab
aplikację mobilną.
CZ: Použijt
centrální jednotkou (gatew
podle pokynů ke stažení aplikace.
UБу
інструкцією, що додається до вашого
шлюзу
завантажити до
EN: Continue system setup in the App
DE: Setzen Sie die Systemeinrichtung
in der App fort.
DK: Fortsæt system installation via appen.
FR: Continuez la mise en service dans
l’application.
I Continuare l’
tramite l’
PL: Kontynuuj konfigurację systemu
w aplikacji mobilnej.
CZ: S nastavením syst
v aplikaci.
UПродовжуйте налаштування системи
в додатк
Y
Video Guide
Safety precautions
SIMPLIFIED EU DECLARA
Hereby
Danfoss Ally™ is in compliance with Dir
The full text of the EU declaration of conformity is available
at the following int
The thermostat is not intended for childr
be used as a toy
children may be tempted t
extremely dangerous. Do not attempt to disman
the thermostat as it contains no user-serviceable parts.
RA
1
2
014G0251
1
2
R
014G0250
R
1
2
014G0250
M30
1
2
30mm
014G0252
RTD
1
2
014G0253
CALEFFI
1
2
(M30) 014G0263
GIA
1
2
(M30) 014G0263
M28
28mm
014G0264
1
2
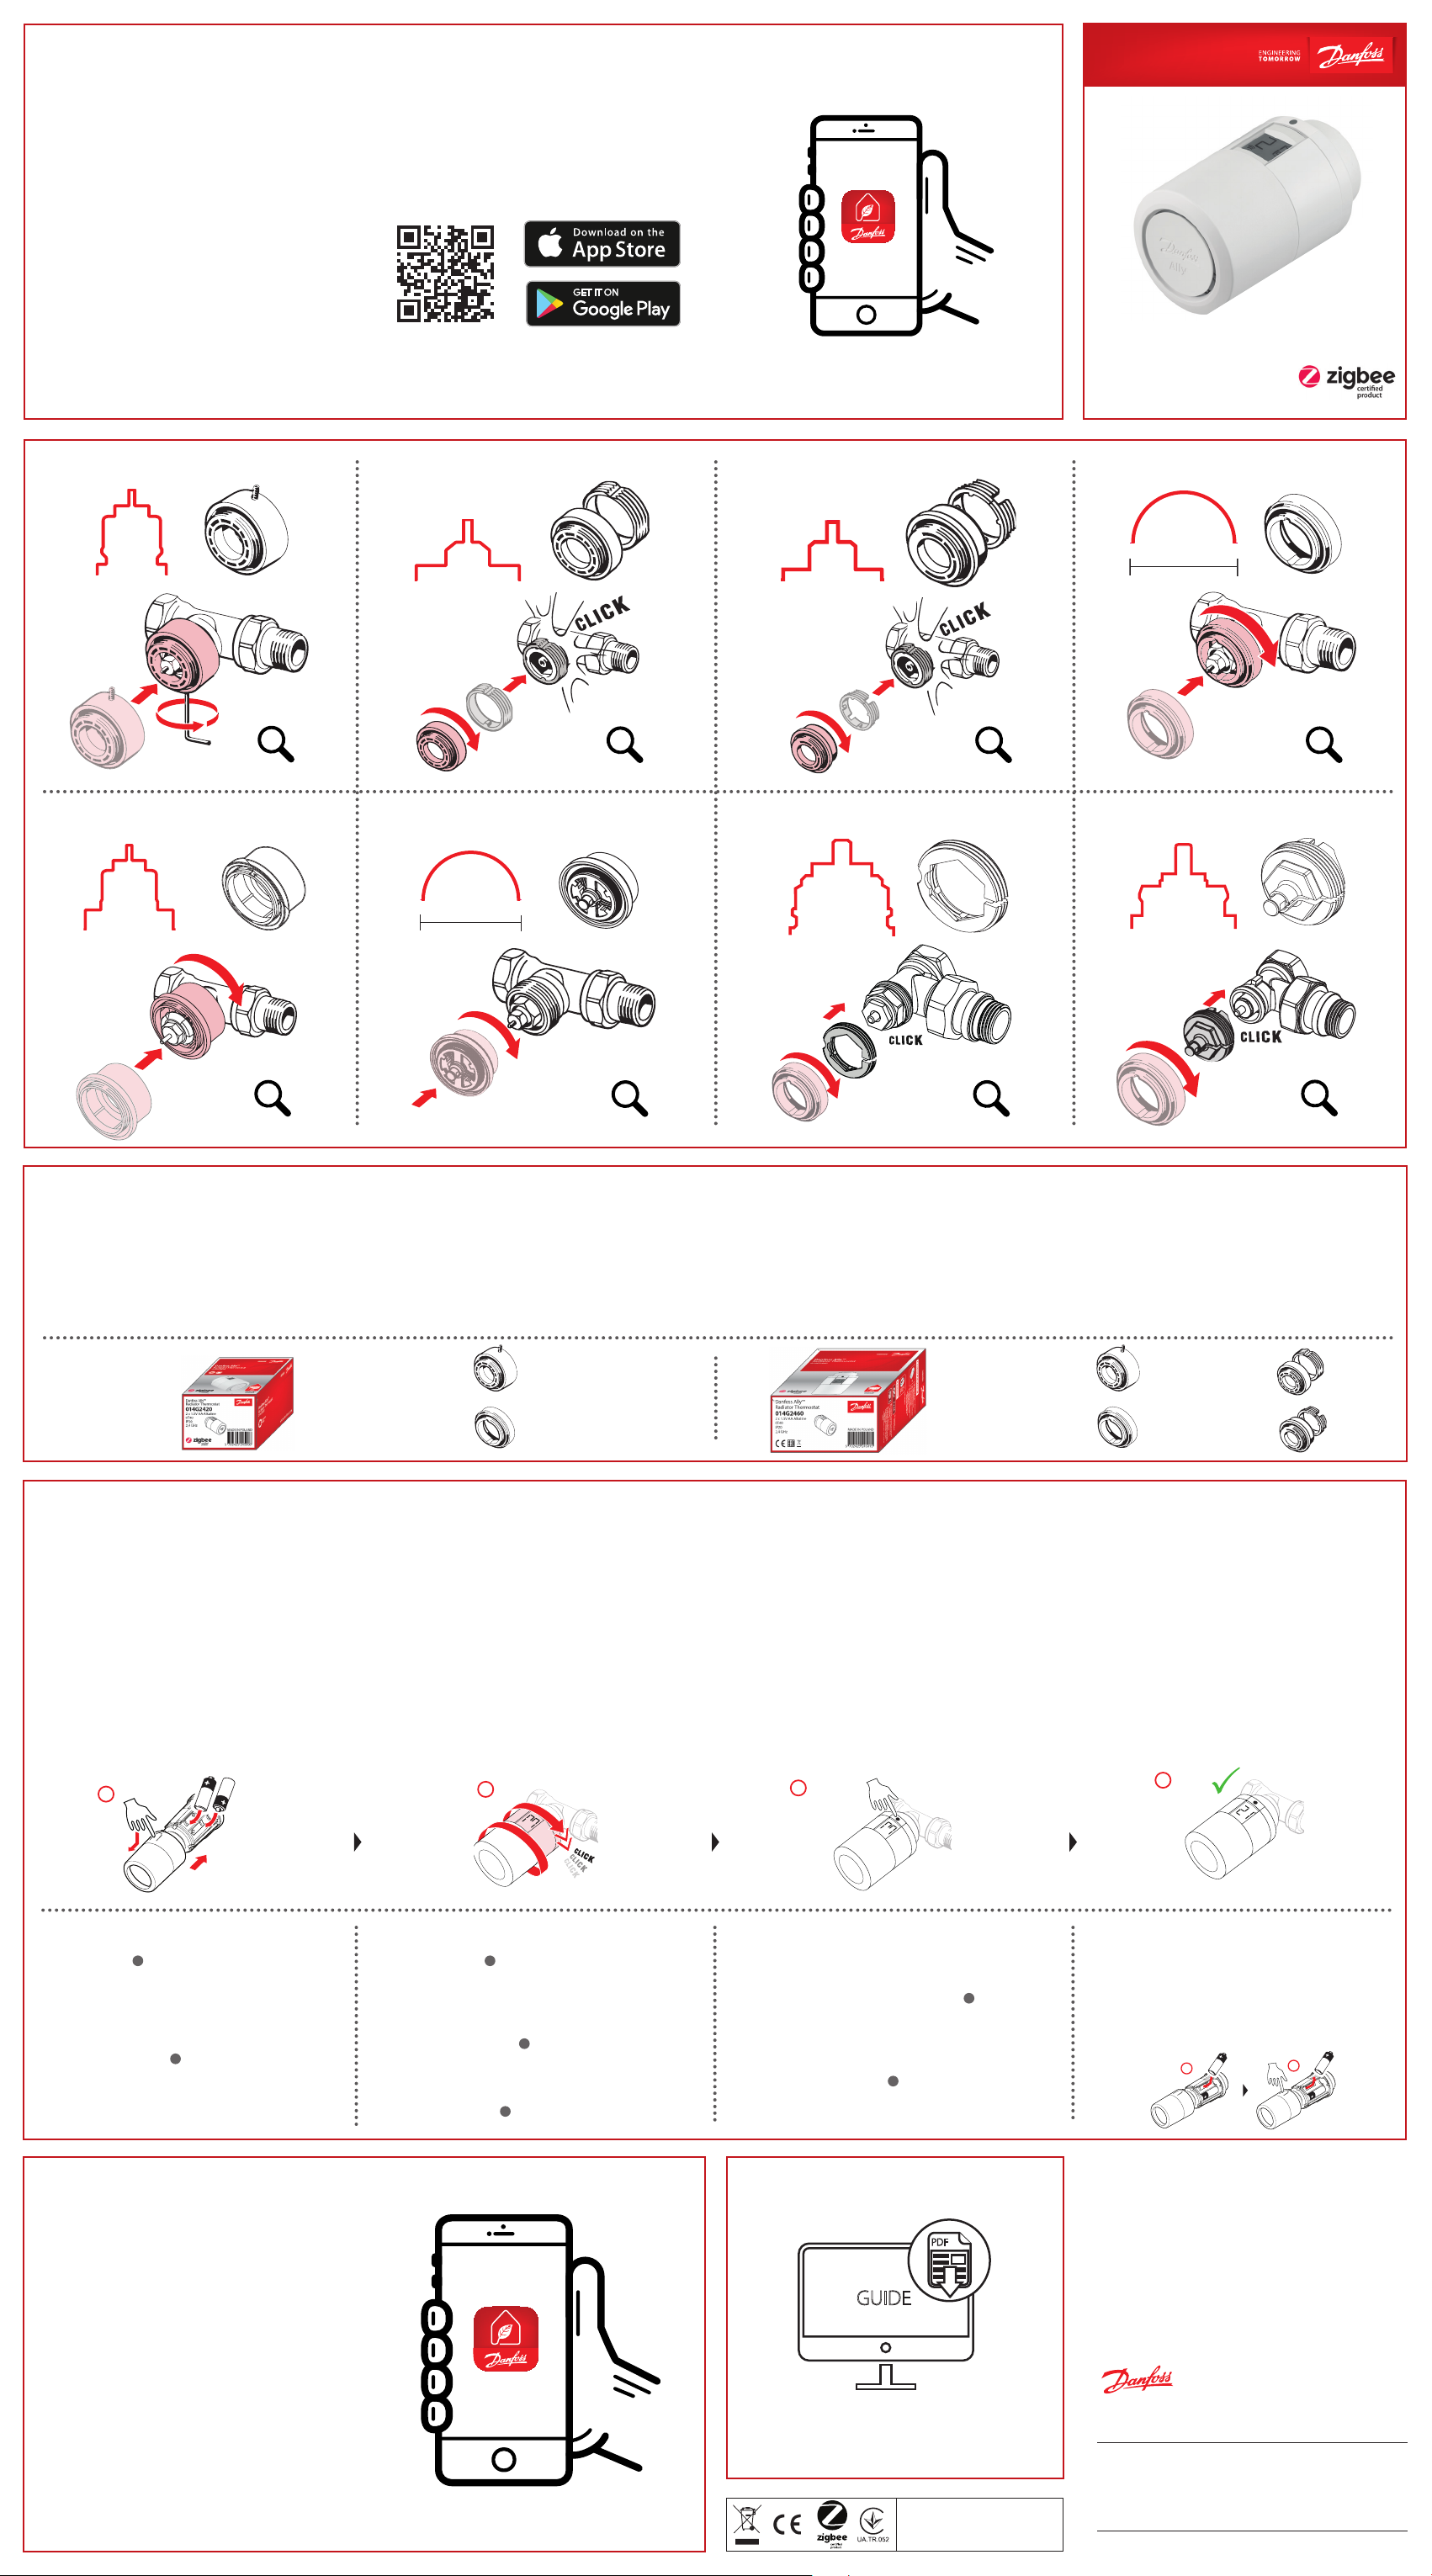
EN: The adapters fr
included. Remaining adapters in the overview
above must be purchased separ
code numbers can be found below each adapt
illustration.
DE: Die seitlich gezeigten Adapter sind im Lief
erumfang enthalten. Die anderen A
Übersicht müssen separat erworben werden. Die
Adapter-Codenummern finden Sie unter jeder
Adapterabbildung
DK: Adapterne ved siden af er inkluderet i kass-
en. Resterende adaptere i o
separat. Adapterkodenumr
hver adapterillustra
FR: Les adaptateurs à côt
boîte. L
doivent être achetés sépar
de code de l’adaptateur se tr
illustration de l’adaptateur
I Gli adattatori laterali sono inclusi nella con-
fezione. Gli adatta
ica devono essere acquistati separ
I codici dell’adattat
illustrazione
PL: Adaptery wskazane z boku znajdują się w pu-
dełku. Po
no, ich numery katalogowe znajdują się pod ilus-
tracją każdego z adapterów
CZ: Adaptéry jsou součástí balení. Zbývající
adaptéry uvedené v přehledu je nutné zakoupit
samostatně. Kódy pro objednání jsou uv
pod obrázky jednotlivých adaptérů.
UA: Деякі адаптери входять до складу дан-
ної упаковки. Інші адаптери у наведеном
вище огляді слід купувати окремо. Номери
коду адапт
ілюстрацією адаптера.
RA
M30
R
R
RA
M30
EN: How to moun Remove the
battery cover as shown in the diagram and insert
two AA batteries. Make sure the batt
correctly oriented. Screw the Danf
the mounted adapter until a click sound appears.
Press and hold the butt-
perature set point will show on the scr
the Danfoss Ally™ is mounted
DE: Wie das Entfer-
nen Sie die Batterieabdeckung wie in der Abbil-
dung gezeigt und legen Sie zwei AA-Batterien
ein.
richtig ausgerichtet sind. Drehen Sie den Danf
Ally™ auf den montierten Adapter
geräusch zu hören ist. Halten Sie die
Sekunden gedrückt. Der T
scheint in der Anzeige, sobald der Danf
montiert ist.
DK: Sådan monteres termostaten. Fjern bat-
teridækslet som vist på diagrammet, og indsæt
to AA-batterier
orienterede. Skru Danfoss Ally™ på den mont-
de adapter
hold knappen nede i 3 sekunder
temperatur vises på skærmen når Danfoss Ally™
er monteret.
FR: Comment montRetirez le
couvercle des piles c-
ma et insérez deux piles AA. Assurez-v
piles sont correctement orientées. -
foss Ally™ sur l’adaptat
déclic apparaisse. Appuyez sur le bout-
tenez-le enfoncé pendant 3 sAllyndes
consigne de températur
fois le Danfoss Ally™ mont
I Come montare il termostaRimuovere
il coperchio della batteria come mostr-
lo schema e inserire due batterie AA. Assicu-
rarsi che le batterie siano orientate corr-
mente. A
montato fino a quando non viene emesso un
clic.
Il set point della temperatura verrà visualizza-
to sullo schermo una volta montato Danf
Ally™.
PL: Jak zamontowZdejmij pokry-
wę baterii, tak jak pokazano na schemacie, nas-
tępnie włóż dwie baterie AA zgodnie ze w
polaryzacją. Prz
aż usłyszysz klik-
cisk przez 3 sekundy-
peratura zadana po zamontow
CZ: Jak připojit termostat. Odejměte kryt
baterie podle obrázku a vložte dvě AA ba
Ujistěte se, že jsou ba
Našroubujte Danfoss Ally™ na připojen
dokud se neozve cvak-
ko po dobu 3 sekund. Po připojení Danf
se na obrazovc
UA: Як встановити терморегулятор. Зніміт
кришку акумуляторног
на схемі, і вставт-
конайтесь, що ба
Накрутіть Danfoss Ally™ на встановлений адап-
тер, до характерног
і утримуйте кнопку протяг
встановлення Danfoss Ally™ на екрані з’явиться
задана температура.
EN: How to reset the thermostat
1. Remove the cov
2. Press and hold , Keep holding while reinserting
the battery.
approximat
DE: Wie die
1. Entfernen Sie die Abdeckung und nehmen Sie
eine Batterie heraus.
2. Halten Sie die gedrückt, während Sie
die Batterie wieder einlegen. Der Bildschirm geht
nach ca. 3 Sekunden aus, danach die
loslassen.
DK: Sådan nulstilles termostaten.
1. Fjern dækslet, og tag et batteri ud.
2. nede, og fortsæt med at holde,
mens du sætter batteriet i igen. Skærmen bliver
blank efter ca. 3 sekunder
FR: Comment r
1. Retirez le couver
2. Maintenez appuyé tout en réinsér
L
I Comment réinitialiser le thermosta
1. Rimuovere il coper
2. T , continuare a tenere pr
mentre si reinserisce la batt
diventerà vuoto dopo cir
PL: Jak zresetow
1. Zdejmij pokry
2. Naciśnij i prz podczas
wkładania baterii. Ekran po około 3 sekundach
zgaśnie.
CZ: Jak resetov
1. Odejměte kr
2. Stiskněte a přidržte , držte po celou dobu
vracení baterie . Obrazo
3 sekundách.
UA: Як повернути терморегулятор
до заводських налаштувань.
1. Зніміть кришку та вийміть одн
2. Натисніть т
кнопку встановіть батарею на місце. Екран
погасне приблизно через 3 секунди. Кнопку
відпустити, терморегулят
заводських налаштувань.
12
1
2
3
12 4
3 sec
3
The thermostat must be
disposed of as electronic waste.