-8-
Parts installation
1.Tripod inst alla tion:
Tigh ten The Sc rew As The Pict ure Show.
2.Propeller pro tctor inst alla tion:
Tigh ten the sc rew as t he pict ure s how.
Camera installation(Camera configuration is optional)
For cameral module, inst all t he ant i-shak ing frame f irst in st eps as shown in figure above, then moun t
the cameral toget her witan ti-s hak ing frame ontobatt ery rack bef ore c onnect ing power wire of camera .
Func tion overview of 30 W camera
1.The module is in s implified v ers ion with optional MIand remote shoot ing and video f unct ions.
2.Pho tos are in PEG forma t wi tresolu tion of 1280× 960, while t he video is in AVI f ormat withre solu tion is
640 ×480 and frame ratef 60f ps. V ideo dat shall be saved in TF c ard witmaximum memory o f 32GB.
When reading data, it is necessar y to use card reader to read t he TF c ard.
3.FP C welding ty pe is adopted withimpor ted chip of 30W pixels, minimum illuminance f 1Lu x, imaging lens
sizf 8×8MM and visual angle of 70o±5
Func tion overv iew f 200 W camera
1.Video re solut ion: 1280×720P/ 30FPS, v ideo pixels: 1280× 720, light-sensitive c hip of camera : 1 INCH HD
COLCMOS
2.Len s s i: 4P v isual angle of 68o , image zone: 3864UM× 2184UM, working v olt age f camera module :
DC2 .5-5 V
3.Power con sumpt ion of camera module : 220MA± 10% (3.7, working temperat ure: -℃-5 5 ℃ RH95%M AX
4.Storage tempera ture: -40℃-8 5 ℃ RH95%M AX
Func tion overv iew f 500 W camera
1.Video re solut ion: 1920×1080, v ideo f rame rat: 30 frame/s, photo resolut ion (optional): 2592× 1944
2.Pho to format: JPEG, v ideo format: AVI
3.Working vol tage: 3.-5 .V, wi tstanding vol tage of t riggering pin: 0V-3 .
4.Low volt age st andby current: 3.6V~=180m A, low voltage work ing c urrent: 3.6V~=230mA
5.High volt age st andby current: 5.0V~=160m A, high v olt age work ing c urrent: 5.0V~=190mA
Power supply and remotsignal input
The input and int roduct ion f vol tage, work ing c urrent and remote signal of whole machine are s follow s:
1.Star ting up: t he machine shall aut omatically start up after powering on . In cas the red light is on first and
then red & green lights blink f or s ix times simult aneous ly, t he mac hine shall shut down autically ,
indica ting that TF card is not detcted or is f ull.
2.Standby : the green light i s on cont inuously
3.Video recording: after low level of VI DEO cont rol wire t riggers and st arts up the video f unction, t he red light
shall flash; t hen low lev el s hall trigger and et VI DEO func tion while s aving files and gett ing back to standb y
sta, when t he green light shall be on cont inuously.
4.Pho tographing: after the low lev el f P HOTO con trol wire t riggers photographing f unct ion, t he green light shall
be off with red light f lashing once, indicating t hat t hree phot os shall be t aken and sav ed bef ore gett ing back to
standby , when t he green light shall be on.
5.Inpu t vol tage: 3.-5 .V, s
tandby current: 200-250mA
-9- -10-
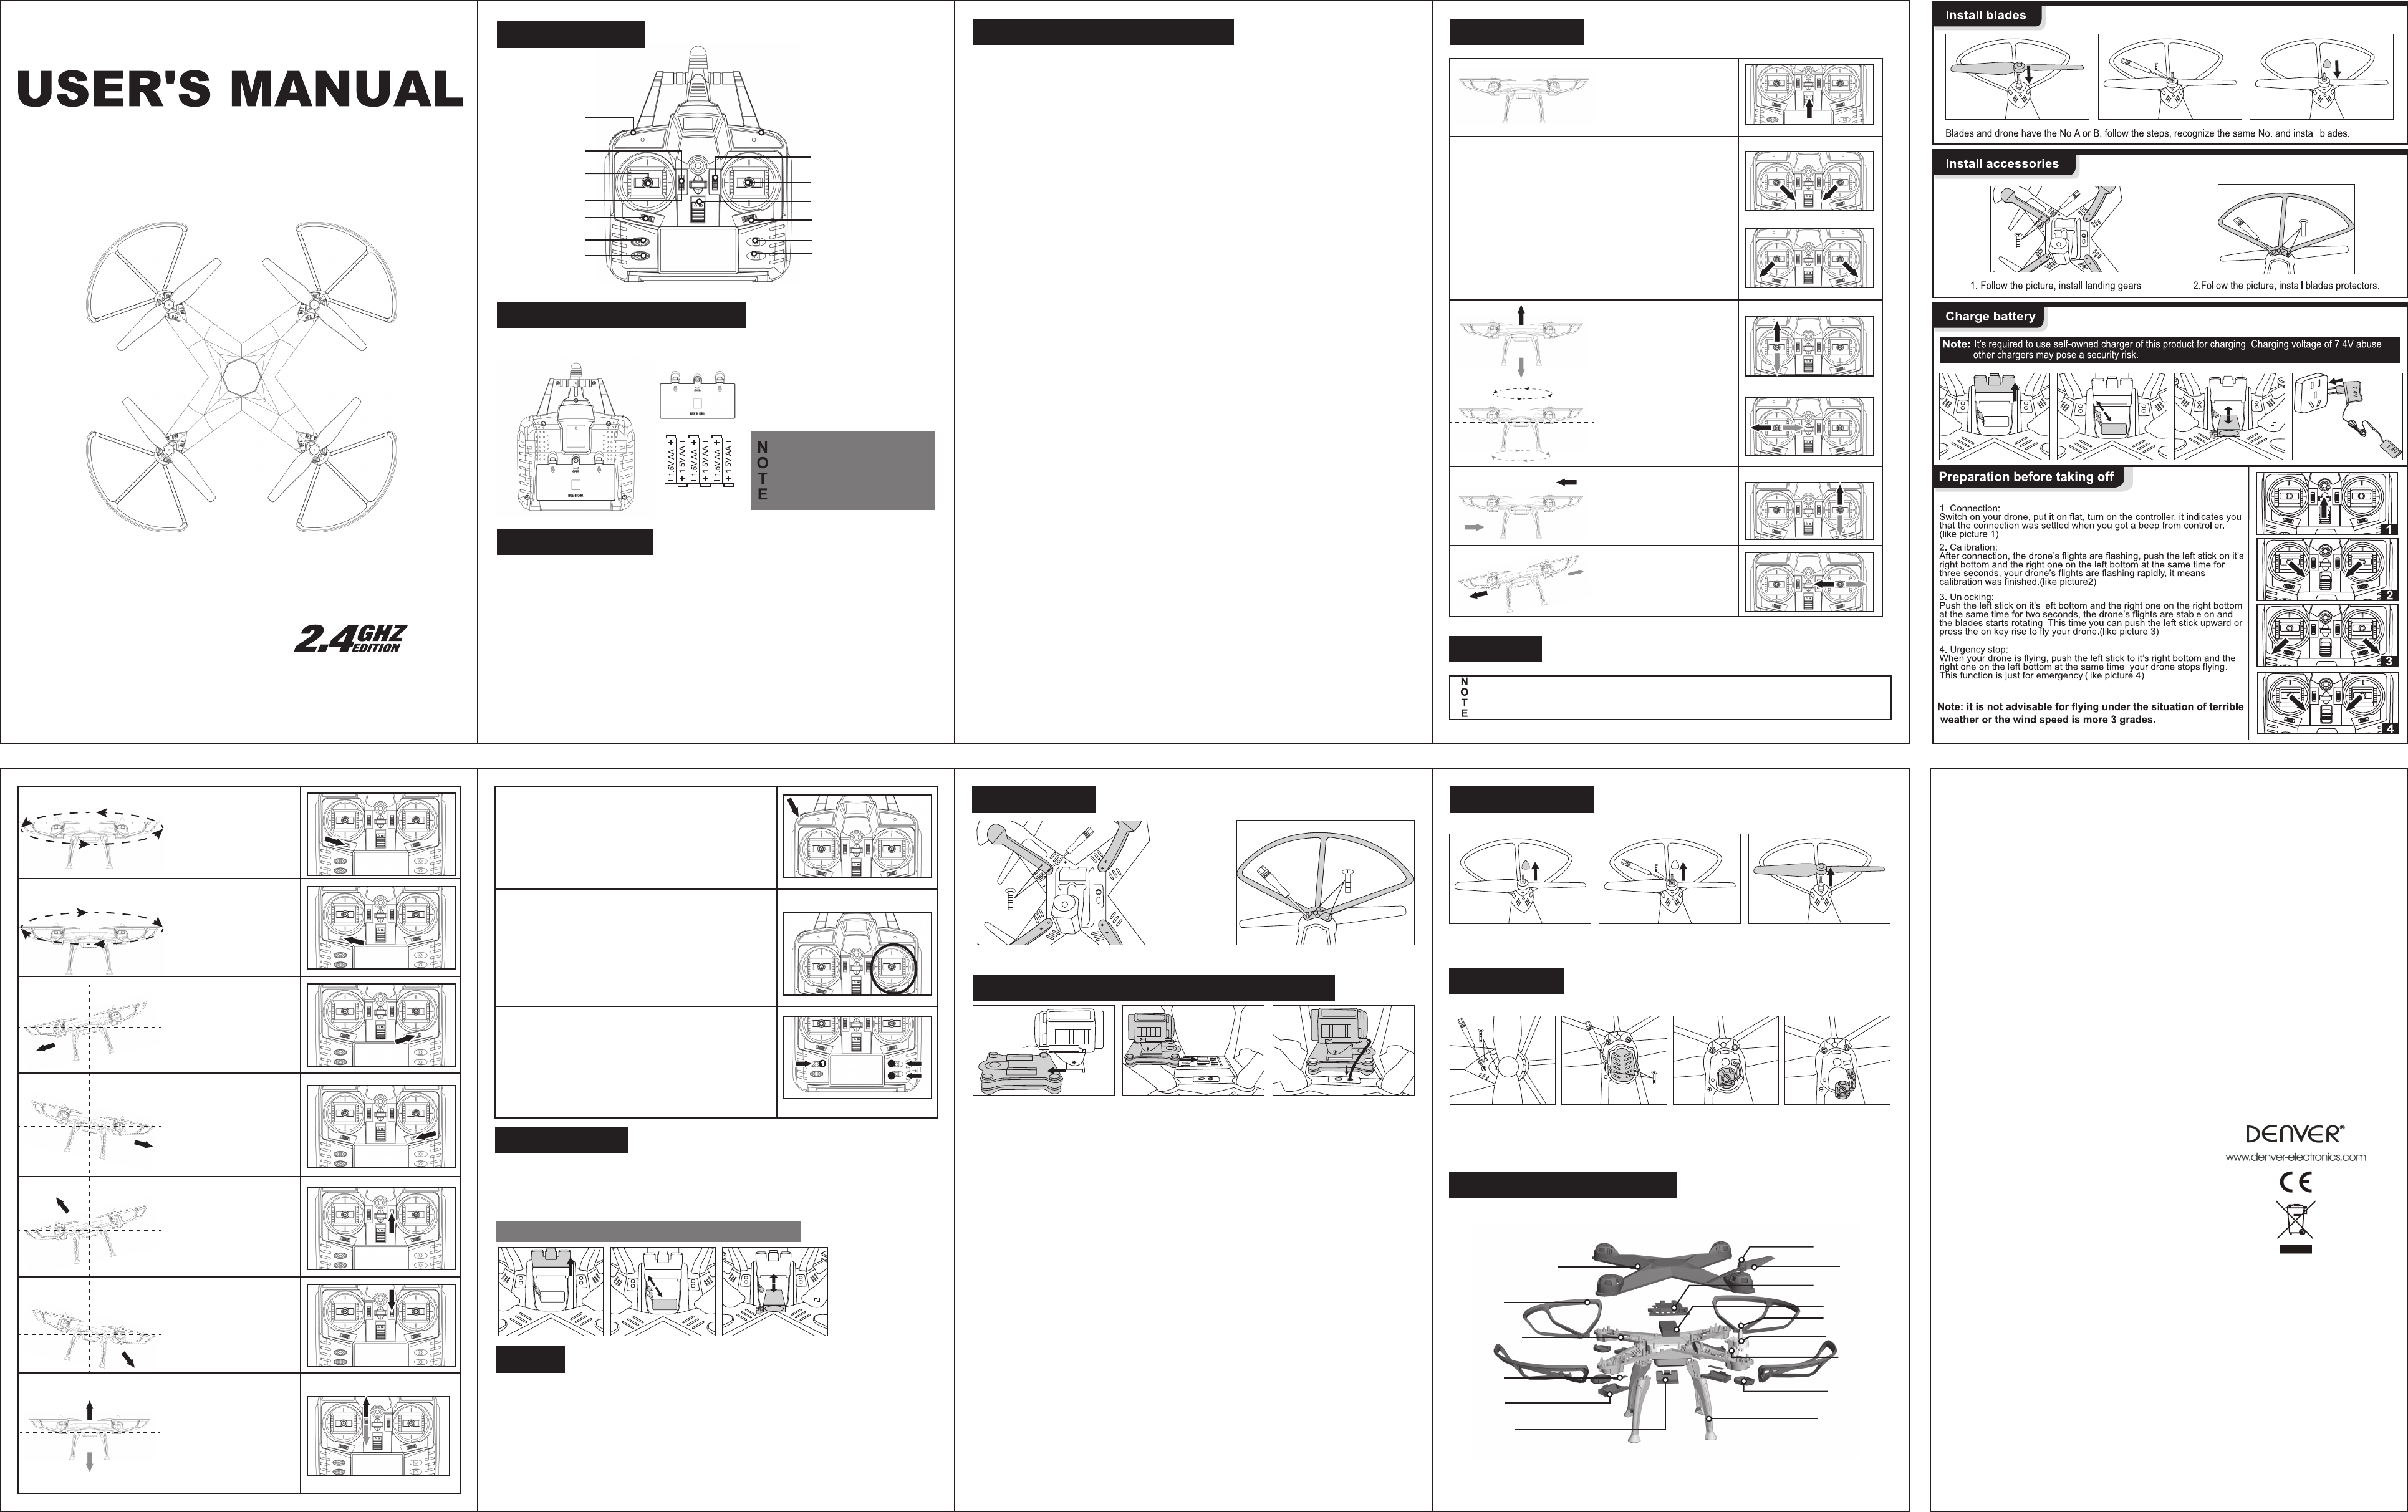
Description of product parts
Upper cover
Propeller cap
Propeller
Propeller
Protector
Lower cover
Battery cover
Li-Po battery
Bearing
Motor
Motor lower
cover
Tripod
motor frame
Receiver
board seat
LED panel
LED shade
Propeller had marks A or B , please corresponding the same marks show as pi cture.
Propeller Installation
Motor Change
Loosen the s crew on t he upper cover ,t hen loosen the s cerw on t he lower
cover, open the lid to change t he motor.
-6-
When the aircraft is rotat ing
coun ter cloc kwise, press t he
right t rimmer c ont inuously until
the aircraft ge tbalanced .
When the aircraft is rotat ing
clo ckwi se, pres s the le ft
trimmer con tinuously unt il t he
aircraft gets balanced.
If the aircra ft keep s dri fting
left wards when hovering, pres
the righ t side- fly trimmer to
adjust unt il it gets balanc ed.
If the aircra ft keep s dri fting
right wards when hovering,
press t he left side-f ly t rimmer
to adjust unt il it gets balanced.
If the aircraft keeps flying
backwards when hovering,
press t he f orward t rimmer to
adjust unt il it ge ts balanced.
If the aircra ft keep s f lying
forwards when hovering ,
press t he backward t rimmer
to adjust unt il it gets balanced.
Caution
The dron e has 4 eed modes , whe n you tur
theeed switc h:
One beep means low s peed.
Two beeps mean middle s peed.
Three beeps mean high s peed.
Four beeps mean ext remely high speed.
-7-
Open the batt ery casaccording to the illus trat ion pict ure, t ake out t he power plug,
insert t he c harger to the power plug, t hen ins ert t he charger intoLi- Pbatt ery.
The red light will be on while c harging, and be off when charging is f inished.
Charging t ime is 150 minutes.
●Keep sui table dist ance from t he aircraft f or safet
●Do not look raigh tly to the lights, as t he lights may generalaser radia tion.
●If the t ransmi tter or aircraft is lack of power,t he cont rol ance and height of flying will
be affec ted.
●If the aircra ft is broken, please repair it in t ime. F ly it widamaged propellers may bring
serious hurt.
●Please put out t he batt eries to aoid batt ery leakage when youdidn’t use it in along time .
●Do not let t he airc raft f all without cont rol especially at a high altitude, because it may get
the aircraft damaged and even short er iserv ice
life.
Charging batteries
Noces : Charged with dist ribut ion f DCH640 USB charger .
BATTERY WARNING - LI BATTERY
●There are cert ain risks to use lit hium batt ery, which may give rise topersonal injuries and
proper ty losses. Users shall undert ake all corresponding responsibilit ies t hems elvs.
Manu fac turer and dealer shall neit her t ake cont rol over age f ba tterie s (charging ,
dis charging and orage), nor bear responsibilities concerned f or any personal injuries and
proper ty losses caused t hereby.
●Incase of leakage of ba tteries , it is necessary to avoid liquid c ontcting skin and eys. I n
case of cont acting withskin, please wash it immediat ely wit soap and clean water. In
case of cont act ing with eyes, please wash eyes withlarge qantities of wat er and seek
medical care immedia tely.
●Incase of any s uspicious odor, noise or fumes coming f rom cha rgers, please unplug it at
once.B e sure to stric tly observe t he f ollowing requirements,herwise, it ma y lead to fire
disas ter, elec tric shock or explosion.
●Only charger
recommended by OEM can be used for models. Model do not include c harger.
There fore, it is nec essary todisconnec t the model with charger bef ore cleaning.
●Do not charge and use expanded, leaked or damaged batt eries.
●Do not overcharge the batt eries. Aft er batt eries are f ully chrged, please unplug t he charger.
Upon comple tion f charging , do not recharge the batt eries to prevent f rom overheat ing.
●Do not charge the batt eries near inf lammables or on t he surff inf lammable s (e.g.
carpet, wooden floor and solid wood f urnit ure) or conductiobjects. Pa y attent ion to the
batt eries during charging .
●Do not charge the batt eries immediately when it is sill hot after usage.
●The temperat ure of ba tteries shall be bet ween ℃ and 4℃ .
●Do not unplug the charger when not charging.
●Do not use batt eries witbroken plast ic packages.
●After sar ting up t he product, do not put in or t ake out t he btteries .
●Excessive physical impact shall be
avoided .
●Do not uexpanded, leaked, damaged or smelly batt eries
●Keep batt eries away f rom children.
●Never dis posf ba tteries in fire and do not expose batt eris t oliquid, rain or moist ure.
●Do not put batt eries in microwave oven or pressure t ank.
●Do not disassemble, drill, def orm or cut t he batt eries. Batteries or chargers are not allowed
to bear heavy load. Do not impact batt eries.
●Do not clean the charger witsolvent, indust rial alcohol or her f lammable s olvent.
●Avoid short c irc uit. A void direct cont act ing with batt ery elecroly t, because the elect rolyte
and elect rolyzed vapor are harmf ul to human body.
●Keep the product at room t emperature inst ead f ex treme t emperure. Av oid major
changes to tempera ture t the loca tion of storing the products.
●Do not place the product near heat source.
●Take out batt eries when not using t he product.
●Do not dispose t he product as general wast. Damaged or unu
sable batt eries shall be put
in to special cont ainers for int ended purposes.
●The product is composed f elec tronic element and batt eries. For t he wasteelect ronic and
elect ric equipment, it shall be disposed in acordance wi tspecial requirements.
●Please familiarize yourself witlo cal wastecen tralized treat ment met hods.
Precautions for use of lithium battery:
Charger And Charging
Use and storage
Recycling
-3-
-2-
Speed conversion
Forwards/backwards
T
Forwards backwards/
Left right control stick
Power button
Left/right side flight trim
Camera control
Video control
One key standardizing
Throttle/direction
Control stick
Left/right
T
Take off /Landing
Flip mode
Light control
T
T
Open the battery case. Insert 6 AA
batteries (excluded) properly according
to the polar indicator. Close the cover.
1.Do not install use old and new
batteries together .
2.Do not mix different type batteries.
3.Do not mix different type batteries.
AA alkaline ba tteries
Safety regulations:
1.Please keep small parts of aircraft away from children.
2.The aircraft have strong power, please turn the control stick slowly , speed too fast may get the
aircraft damaged.
3.After the flight, you need to turn off the transmitter off and then turn off aircraft off.
4.Do not put the battery into high-temperature environment (like fire or electric apparatus)
5.Please keep 2-3m distance from crowds avoid the aircraft landing hurt people.
6.Accompanied children need adult to sure the aircraft in the safety range of user.
7.Do not reuse non-rechargeable battery, insert/ pluck batteries properly according to the polar
indicator, do not install use old and new batteries together and mix different type batteries.
8. When you didn’t use aircraft in a long time, please turn transmitter and aircraft off ,put out the
batteries to avoid battery leakage .
9.Please take care the batteries to avoid it is short out.
Operation method
-4-
Special Tips:
When the lights of t he airc raft k eeps f lashing, it means is going out
of power , please fly it ba ck t ore charge .
When the aircraft is flying within 30cm above ground, it may easily fly unstably. This
is what we call ground effect. The lighter the aircraft weights, the more seriously
ground effect goes.
①set-high b ar ometer adjustment
After c onne ction , wai t until t he light of t he aircraft f las hes, t hen t urn both
of the con trol stic k towards the cen ter f the tran smitt er , keep this way
for around 2se cond s, the air craft keeps flas hing.
②Gyro calib ration and mot unblock ing :
Turn bo thf the con trol ss out wards, keep it f or around 2 sec onds, t he
lights of the air cra ft be comes cons tantly on, and the propellers s pin, t hen
push t he t hrott le control stickor pres s the one-ke y-o- take –off butt on to
takeff .
Noces :
If the air cra ft sar ts au toma tically wit hout c ont rol, it means t he set -high
baromet er is not adjust ed properly. Rest art t he aircraft with t he one-key
click, reboo t the con troller, repeat st ep 1again .
5.P ush the righ t con trol stic k le ftward s,
the air craft will make left s ide fly.
Push the righ t con trol stic k righ twards ,
the air craft will make right s ide f ly.
1.Turn the air craft on, lay it on
platf orm or horiz ontal place. T urn
on t he t rans mitt er, a beep sound
indicat es the connect ion has
finished .
2.P usup the left c ont rol st, the
rotation s peed of t he main rot or i
increas ing and t he airc raft acend s
acc ordingly. Pusdown the left cont rol
stic k, the ro taion speed of the main
rot or is dec reas ing and t he aircraft
desc ends acordingl y
3.P ush the le ft con trol sck le ftward s,
the air cra ft turn s left. P ush t he left
con trol righ twards, t he aircraft t urns
right.
4.P ushup the righ t con trol ic k, the
airc raft will fly forwards . Push down
the right con trol stick , t he aircraft
will fly back wards.
ALLRI GHTS RESE RVED, CO PYRIGHT DEN VEREC TRONICS
Electric and electronic equip and included batt eries cont materials,
components
if
handled correctly
Electric andtt ean
symbol, below T and
batt eries sho
uld not be
of sep arately
As it you
and li tytt eries
accordance wt harm t he environment.
All cities li she
batt eries
ee li ng
sites, or be coll from the househ Additional information is av at the
technical depa rtment of your city
Imported by:
DENVER
Omega 5A, Soeften
DK-8382 Hinnerup
Denmark
www
Den
WWW
Please read this instruction manual carefully before start using the product.
Suitable for ages 14+
One key standardizing, push
button down, light flash
means standardizing, light on
after standardizing.
Light control, push button up
light on, push up again light
off.
1, Press “T
beep after blades rotating, then don’t press again, the drone takes
off. When the drone is flying, press “AKE OFF&LANDING” button
1.5 seconds until to hear beep, then don’t press again,
the drone lands.
2.Press the “PHOTO” button to take picture.
3.Press the “VIDEO” button to take video, press it again to finish
recording.
2
3
Under “FLIP MODE”, when you mak
right control stick:
push up-the drone flips forwards
push down-the drone flips backwards
push left-the drone flips leftwards
push right-the drone flips rightwards
Hereby
DCH-640 is in compliance with Directive 2014/53/EU. The full text of
the EU declaration of conformity is available at the following internet
address: http://www
-5-