Drayton
Installation Guide
Programmable Room
Thermostat
24 Hour
Models:
22084 / 22088
Power Supply:
Battery / Mains
Invensys Controls Europe
Technical Helpline: +44 (0) 845 130 7722
www.draytoncontrols.co.uk
Installation / User Guide 06490045001 (0905)
Drayton
User Guide
Programmable Room
Thermostat
24 Hour
Models:
22084 / 22088
Power Supply:
Battery / Mains
Invensys Controls Europe
Technical Helpline: +44 (0) 845 130 7722
www.draytoncontrols.co.uk
Installation / User Guide 06490045001 (0905)
Warning
If you do not have the knowledge to install the Digistat+2
safely, arrange for a competent electrician to install it for you.
Wiring should conform to the current IEE wiring regulations.
Isolate mains supply before removing an existing room
thermostat and fitting Digistat+2.
Digistat+2 programmable room thermostats are double
insulated therefore Neutral and Earth connections are not
required. Unused existing cables should be safely insulated.
Location
Care should be taken to mount the
Digistat+2 on a wall, in a postion
which is not subject to direct
sunlight or draughts. Preferably it
should be mounted on an inside
wall about 1.5M (5ft) above the
floor in a position where it can
respond to room temperature but
away from the direct influence of radiators or other appliances
giving off heat.
Installation
1. Remove the front cover using a flat screwdriver and separate
from back plate (Fig 1).
2. Fix the back plate directly onto the wall using suitable wall
plugs and screws or mount over existing wall box (Fig 2).
3. Complete the wiring according to the connection suggestions
shown in (Fig 3). For Basic boiler, Combi boiler and Basic
boiler with zone valve applications Digistat+2 with battery or
mains supply are suitable.
For Electric Heat application use Digistat+2 with mains supply only.
4. Replace the front cover by locating in position and pushing
fully onto the back cover (Fig 4).
5. Remove the battery cover using a coin (Fig 5). Battery model only.
6. Install the 2 AA batteries provided (Fig 6). Battery model only.
7. Replace battery cover (fig 7). Battery model only.
8. The Digistat+2 is now installed and will automatically start to
control the room temperature according to the pre-set
program 1 as shown in the User Guide.
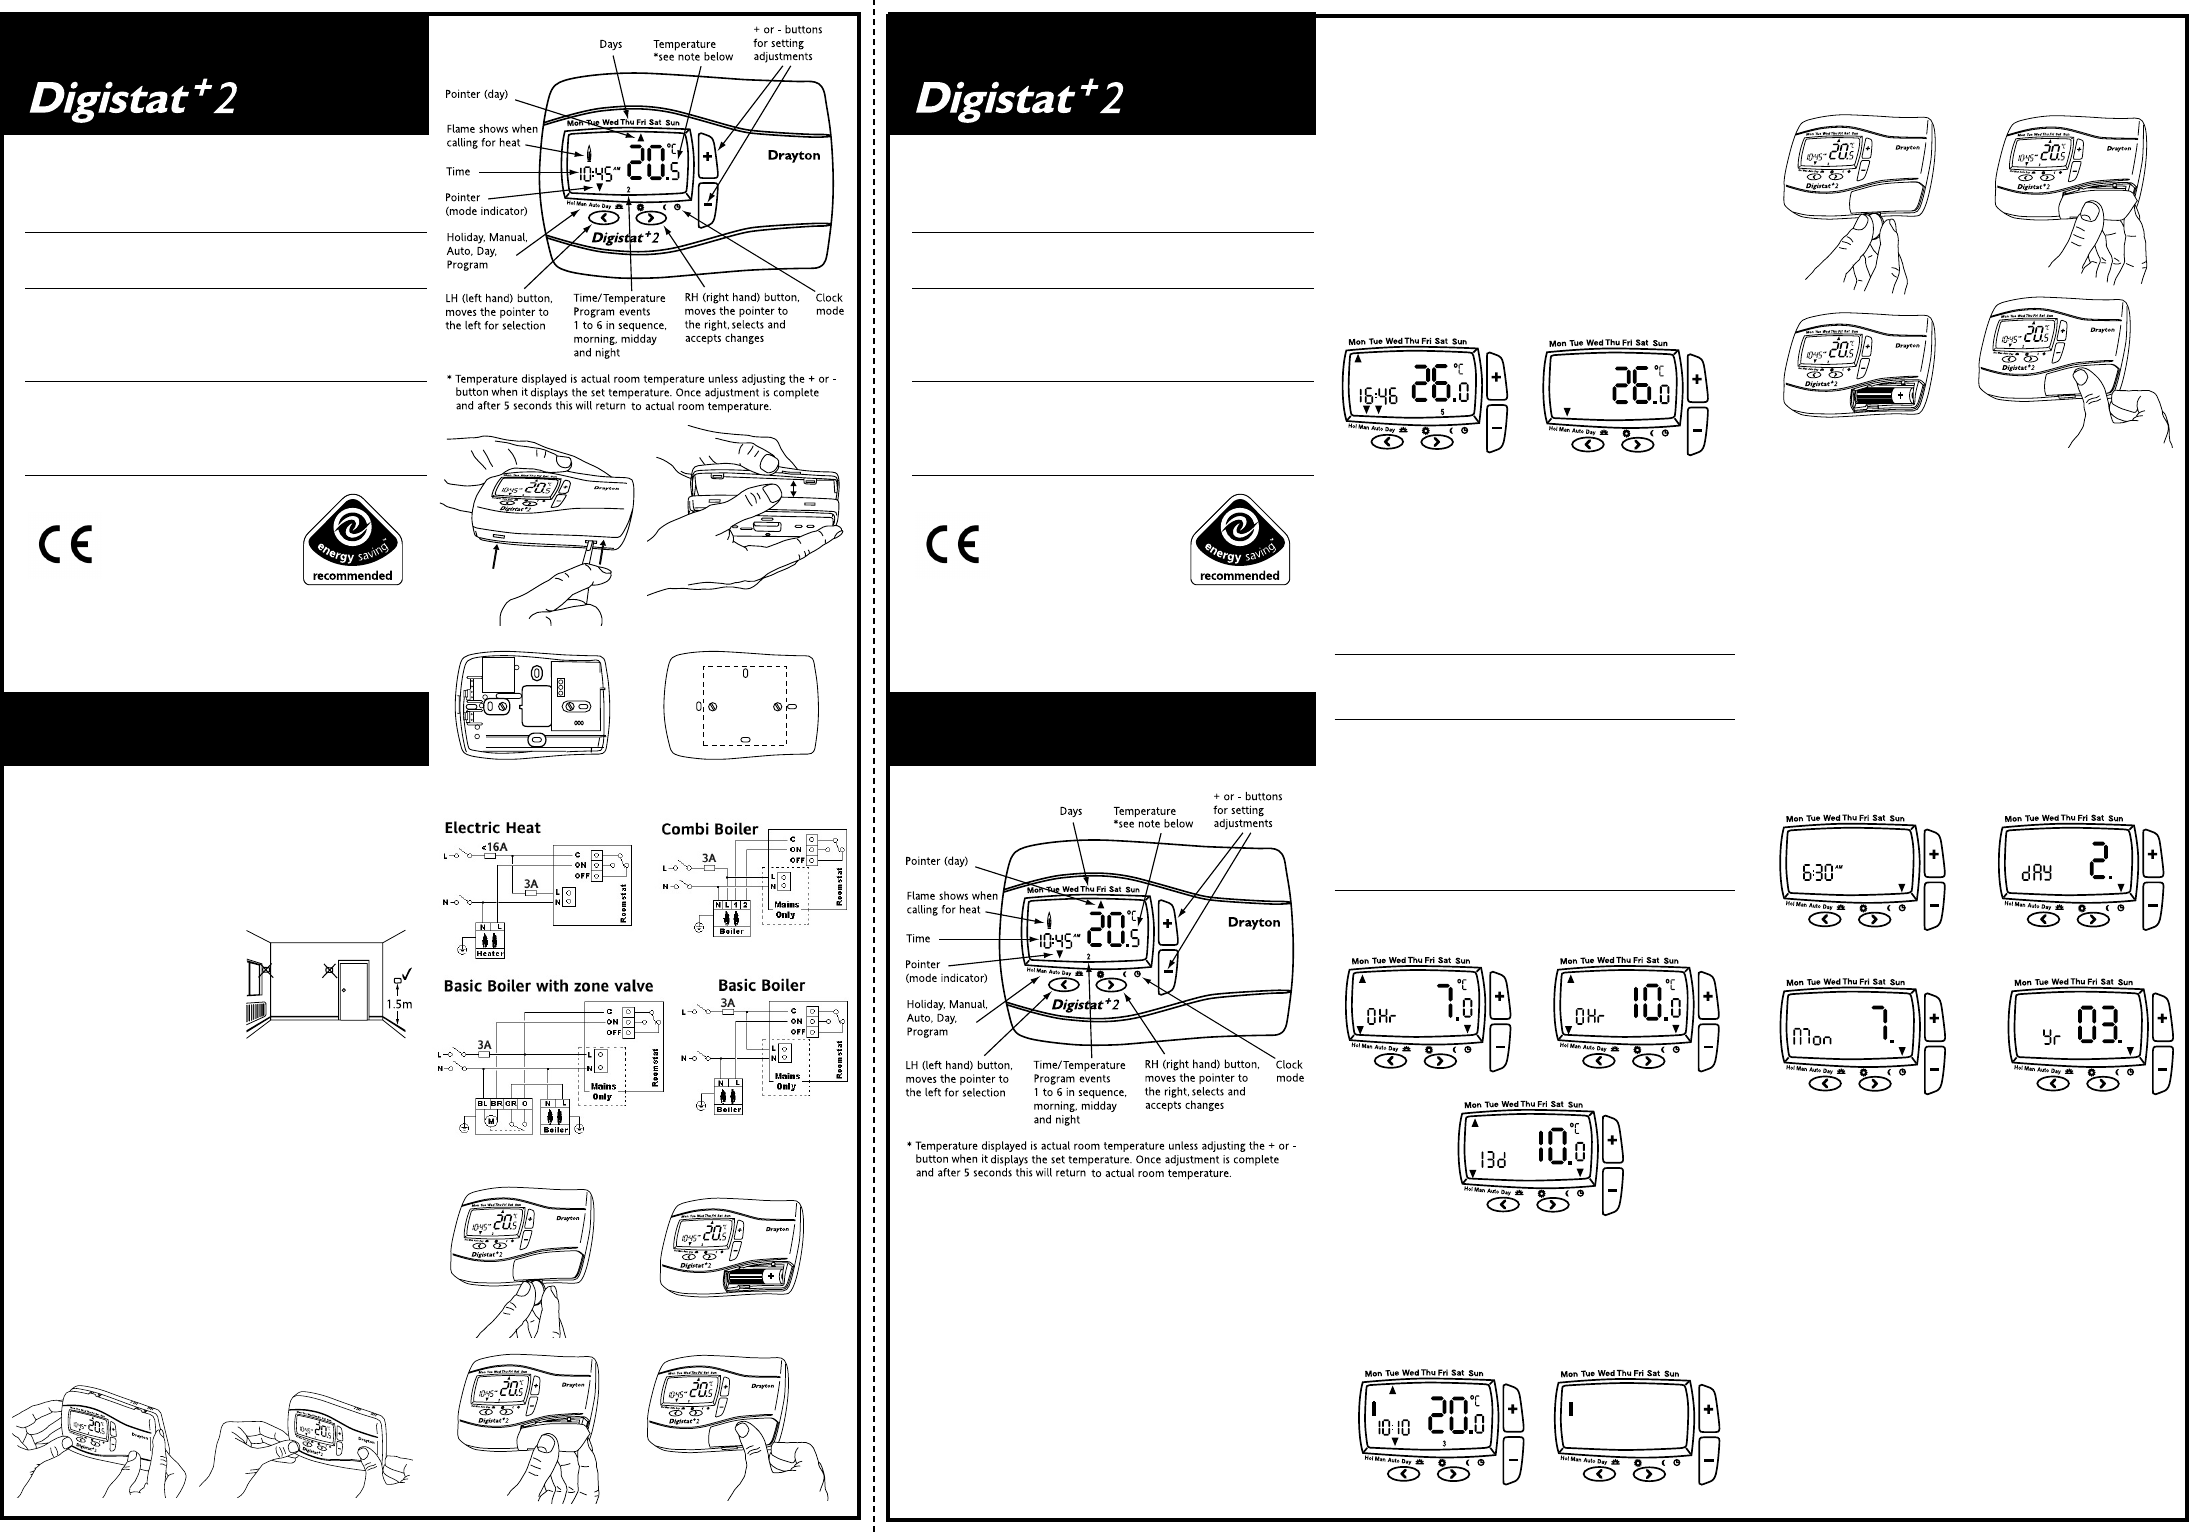
The display shows the correct time and date which is
automatically set together with the actual room temperature.
Your Digistat+2 programmable room
thermostat. 24 Hour
Digistat+2 programmable room thermostat allows you to set
time and temperature periods (up to 6 per day) to suit your own
lifestyle. Once fully installed and powered the Digistat+2 will
automatically set the correct time and in auto mode will control
your heating system according to pre-set program 1 (9 till 5).
The temperature is controlled by sensing air temperature,
switching on the heating when the air temperature falls below
the thermostat setting and switching it off once this set
temperature has been reached.
(Fig 1)
(Fig 2)
How to change the temperature for a short time (Override).
When in Auto mode you can override the existing temperature
setting by pressing + or -. During adjustment the temperature will
flash then stop. The Digistat+2 will now control at this
temperature until the next programmed time/temperature event is
reached, when the Digistat+2 will revert back to Auto mode.
Whilst in temperature override the pointer indicates both Man and
Auto. To exit override press > to return to Auto. (Fig 1) shows
Digistat+2 in override.
How to set a constant room temperature (Manual mode).
Manual mode will allow you to set a temperature, over-riding all
programs, until you exit manual mode. In this mode all pre-set
time temperature events will be disabled.
To enter manual mode press < until the pointer indicates MAN
(Fig 2). The screen will only show the temperature, which can be
adjusted by pressing + or -.
Once you have set the temperature it will flash for 5 seconds and
then stop. The Digistat+2 will now control at this temperature until
you adjust using + or - or exit by pressing > to enter Auto mode.
(Fig 3)
(Fig 1) (Fig 2)
(Fig 4)
(Fig 6)
(Fig 7)
(Fig 5)
TEAR HERE TEAR HERE
(Fig 3)
How to set my room temperature for my holiday period.
(Holiday Mode)
When going on holiday you can lower the temperature of your
home for the duration of your holiday, but set Digistat+2 to
return to your normal programming ready for your return.
Holiday mode works by counting down the days or hour until
your return.
Time periods of between 1 to 24hr then 1 day to 199 days can
be set.
Example
I am ready to leave for my 2 week (14 day) holiday and would like
the house temperature held at a constant 10.0 ºC during this time
and on my return the house temperature will be already running
at my normal pre-set temperature.
To enter Holiday mode press the < button until the pointer is
indicating HOL (fig 3). The temperature will flash and by pressing
the + or - buttons you can change to the temperature required
(in this example to 10.0 ºC) (Fig 3a).
Then press < again to set the time period.(in this example 14
days) using the + or - buttons. (it would be advisable in this
example to set the time period 1 day less (13 days) to ensure the
house temperature is back to normal on your return). (Fig 3b)
Once you have set your time period the time will flash for 10
seconds and then start the holiday period. To exit the Holiday
mode press either < or > to return to auto mode.
When changing time the display will scroll through Hr (Hours)
1-24 then d (Days) 1-99.
The display will show holiday time period and set temperature.
(Fig 3) (Fig 3a)
(Fig 3b)
(Fig 4) (Fig 5)
Battery Model only.
How do I know when to change the batteries.
When the batteries start to run low a battery icon will blink for
15 seconds every 15 seconds to indicate “low battery” during this
time the Digistat+2 will function normally (see fig 4).
Please replace batteries with (2 x AA 1.5V Alkaline batteries).
After 6 months the Digistat+2 will cease to function and will
permanently display the battery icon and nothing else, shown in (fig 5).
(Fig6)
(Fig 8)(Fig 7)
(Fig 10)(Fig 9)
How to change the time, day, month & year.
Digistat+2 comes with a pre-set clock, which also automatically
adjusts for summer/winter time changes. It is activated
automatically on 1st installation. There should be no need to
change these settings, however, should you wish to, it can be
done in clock mode.
To enter the clock mode press > to move through Day and all 6
time/temperature events until the arrow points to the clock
symbol. The time will now flash and can be adjusted (Fig 7) by
pressing + or - then press > to accept and move to Day.
Change day. (Fig 8).
If you wish to change the day press + or - then press > to accept.
Digistat+2 will move to the next field - month.
Change month. (Fig 9).
If you wish to change the month press + or - then press > to
accept. Digistat+2 will move to the next field - Year.
Change year. (Fig 10).
If you wish to change the year press + or -, then press > to
accept. Digistat+2 will now return to Auto mode.
Display Error code E1 or E2.
When the display shows E1 or E2 this indicates a sensor fault
and your heating system will remain Off. Please contact your
installer.
How to select another pre-set time/temperature program.
There are 3 pre-set time/temperature programs already held in
memory as shown, if pre-set program 1 is the best program to
suit your lifestyle do nothing and the Digistat+2 will control to
program 1.
If you would like to select one of the other pre-set programs,
refer to ‘How to change User Options’, Option 3 and select your
preferred program.
How to replace the batteries see fig 6.
Remove the battery cover using a coin. Replace the spent
batteries with 2 x AA 1.5V alkaline batteries ensuring correct
orientation. Replace the battery cover pressing fully home.