INTRODUCTION
Congratulations on your purchase. Please read all instructions carefully before you use
your device. Y
recording your rides and dangerous situations or accidents on the road during driving.
P
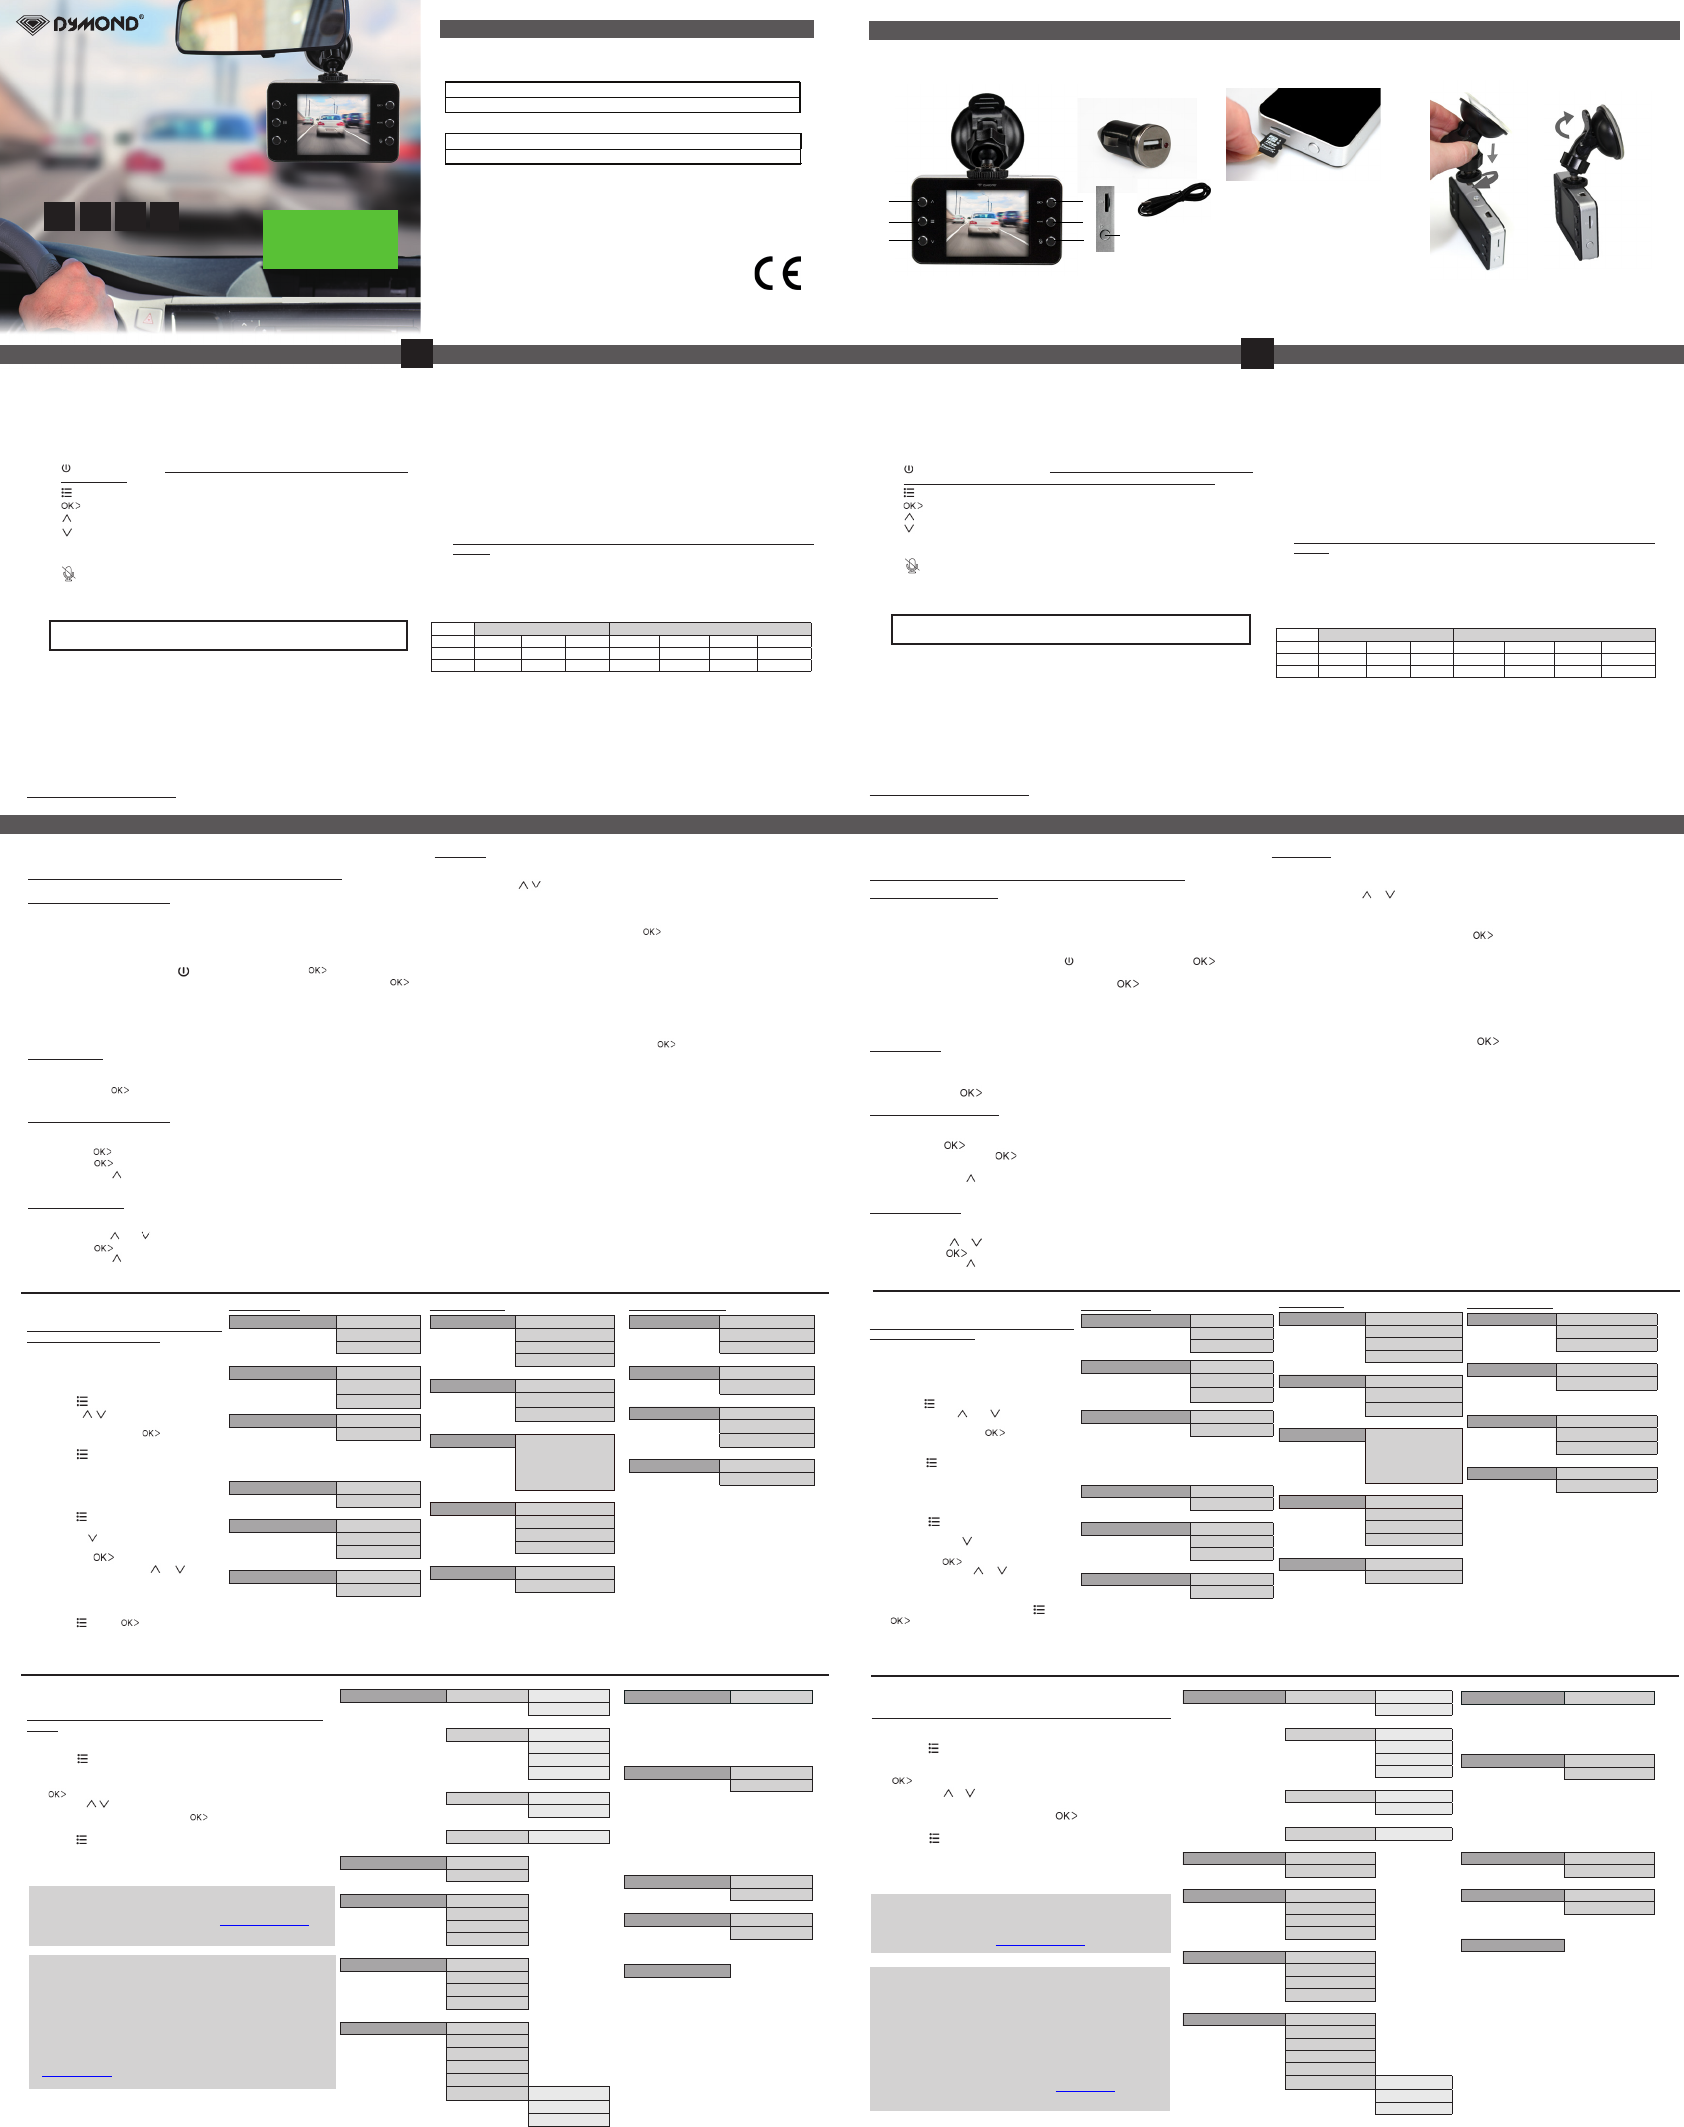
See illustration I
1. Camera DVR unit
a. : Turn device on/off (Press & hold for turning on/of
power source)
b. : Enter/exit the menu
c. : Conrm the selected option
d. : Go up or 1/2/3/4 x digital zoom in
e. : Go down or 1/2/3/4 x digital zoom out
f. MODE: Mode switching between VIDEO recording / PHOTO /
recording/PLA
g. :
2. Suction cup
3. USB connection cable for data and charging
4. 12V DC 5V Car Charger - max. 700mA
This 12V Car Charger was designed ONL
DASHBOARD CAMERA, DO NOT use it to charge other devices!
CHARGING
• The device has a built-in Li-ion rechargeable battery that has to be fully charged
and decharged 3 times to activate the maximum capacity of the battery
time is about 1 hour maximum.
• When the battery is completely charged, the display will show a “full battery”
symbol. Operation time without connection to a power source is max. 15 minutes
for emergency use.
Charging options:
Connect the device to a computer/laptop using the USB connection cable (3). See “PC
mode” before connection.
OR
Plug the device into the USB car charger (4) for car use.
Only when used with car charger:
As soon as the car engine is started, the recording will start automatically
The
DYMOND DASHBOARD CAMERA
will now be charged during recording. When the
car charger is disconnected from the unit, the
DYMOND DASHBOARD CAMERA
will shut
down automatically after
Caution: With low battery
protection state. Please charge the battery to make sure you can turn on the device.
USING SD CARD (not supplied, optionally available)
See illustration II
• Insert your SD card into the SD slot until it clicks into place.
• T
pull the card out.
• With no card in the SD slot, the displays shows “No card”.
Note:
1. We recommend using a 16 GB SDHC card (or higher) with class 10 (or
higher). (not supplied, optionally available)
2. Without SD card, the unit will NOT function!
3. If SD is in wrong (difcult insert), may the
device and the memory card. This is the user’s responsibility!
4. The device will set the SD card after it has been inserted.
5. Format the SD card in the menu of the DYMOND DASHBOARD CAMERA. See
System Settings.
* Depends on SD card brand, model and class type. Data are approximate.
MOUNTING
See illustration III
• Mount the DYMOND DASHBOARD CAMERA
• Moisten the suction cup, place it on the inside of your windshield and close the cup
using the lever
the right side of the rear view mirror
• Adjust the bracket by using the adjustment knobs.
• Make sure the camera is mounted horizontal for the best view
• Connect the USB car charger (4) to the car lighter for power
PC MODE
• YDYMOND DASHBOARD CAMERA to your PC by using
the supplied USB cable (3
). Y
• Press the / buttons (d-e) to choose the mode:
» MSDC: It is a computer interface between a computer and a digital
camera which shows the digital camera as a removable disk drive
attached to the computer
» CAM/Recording mode: Press the button to start video recording.
Y
your PC because these are already installed by Windows in the Windows pack*.
Y
1. Make sure the battery is charged.
2. Only use the SUPPLIED USB cable, that was in the packaging.
3. Turn the camera ON.
4. Connect the USB cable with the camera (at the top side) and only then with the
PC.
5. Select “MSDC” on the Camera and press the button (c).
6. The driver will now install itself and in the folder “My computer” on your desktop
you will see a new (hard)disk (it is possible that a window will appear in which you
can indicate how you would like to view the les).
7.
Y
the standard Windows Media Player or
Note:
• Y
a (built-in) SD card reader from your PC or a separate SD card reader if you have
one. This is a quick and more easy-to-use solution.
* In case
can download the USB drivers from the website www
MENU SETTINGS
Attention! This menu will not function
when MSDC mode is active.
1. Power on the unit using the charged
battery or the USB car charger
2. Press MODE (f) until you have selected
the desired mode.
3. Press (b) to enter the menu.
4. Press / buttons (d-e) to scroll
through the submenus.
5. After selection, click (c) or MODE
(f) to conrm and save the setting.
6. Press (b) to exit.
For example: to set date and time, please
follow these steps:
1. Make sure the battery is charged.
2. Turn the Camera ON.
3. Press (b).
4. Press MODE (f).
5. Use the (e) button to go to DA
TIME.
6. Press the button (c).
7. Y & buttons
(d-e) to change the date and time and
conrm each setting by pressing the
MODE button (f).
8.
As soon as you are ready
press (b) or (c) to conrm the
settings.
VIDEO MENU
Movie Size (HD) 1280x720
Video resolution
(D1) 848x480
(640) 640x480
Date stamp Off
Date indication
during recording
Date
Date & Time
Motion Detect * Off *
Automatic recording
when movement is
detected when used
on battery
On
Loop Rec. * Off
Cycle recording
On *
Loop Time * 2 min *
Saving time of each
section on SD card
5 min
10 min
Video sound On
Sound recording
Off
PHOT
Resolution (5MP) 2592x1944
(3MP) 2048x1536
(2MP) 1600x1200
(1MP) 1280x1024
Quality Super Fine
Fine
Normal
Exposure
-2.0/ -1.7/ -1.3/
-1.0/ -0.7/ -0.3/
+0.0/ +0.3/ +0.7/
+1.0/ +1.3/ +1.7/
+2.0
Luminance
adjustment
Capture Mode Off
Photo timer
Self-timer 2S
Self-timer 10S
Burst
Date stamp Off
Date indication
on photo
Date&Time
PLA
Lock Lock/Unlock one
File locking
Lock All
Unlock All
Delete One
File removal
All
Slide show Start
Interval
Repeat
V Add
Delete
SYSTEM SETTINGS
Attention! This menu will not function when MSDC mode is
active.
1. Power on the unit.
2. Press (b) to enter the menu
when the device is in recording
mode.
3. Press MODE (f) until you can select the Setup menu. Press
(c) to select.
4. Use the / buttons (d-e) to scroll through the submenus.
5. After selection, click MODE (f) or (c)
setting.
6. Press (b) to exit.
7. Settings will be changed after restart of the unit.
Sounds Shutter On
Shutter sound
Off
Start-up None
Select start-up
sound
1
2
3
Beep On
Key tone
Off
V 0/ 1/ 2/ 3
Power frequency 50 Hz*
60 Hz
Power save 1 Min
Automatic power off
when use on battery
3 Min
5 Min
Off*
Panel protect 30sec.
Screensaver when
used on battery
1min.
2min.
OFF*
Date & Time Y
Month
Day
Hour
Minute
Time Style MM/DD/YYYY
DD/MM/YYYY
YYYY/MM/DD
Language
English, Dutch, French, Spanish
Italian, Portuguese, Czech, Hungarian,
Swedish, Russian
Polish, German, T
Format Ye
Formatting the
SD card
No
If you would have problems with
your SD card (like “memory full”) we
advise you to format the card using
this menu, and make a “reset all*” to
factory settings
LED light Off*
On
*Reset all Ye
Reset to factory
settings
No
V
Software version information
CUSTOMER SUPPORT
For more information, technical questions and return requests
concerning this product, you should contact
support@dymond.nl
.
GUARANTEE
Copyright © Dymond. Dymond is a registered
trade
mark of TE-
Group NV
Dymond
brand stands for superior product
quality and outstanding customer service. That is why
Dymond
warrants this product against all defects in material
and workmanship for a period of two (2) years from the date
of original purchase of the product. The conditions of this
guarantee and the extent of responsibility of
Dymond
under
this guarantee can be downloaded from our website:
www.
VIDEO* IMAGE*
SD CARD 1280X720 848X480 640X480 1280X1024 1600X1200 2048X1536 2592X1944
32GB 480 min 480 min 520 min 24320 23040 21920 18880
16 GB 240 min 240 min 260 min 12160 11520 10960 9440
INLEIDING
Gefeliciteerd met uw aankoop. Gelieve alle instructies aandachtig te lezen voordat u het
apparaat gebruikt. U kunt de DYMOND DASHBOARD CAMERA
uw ritten en gevaarlijke situaties en ongevallen op de weg tijdens het rijden op te nemen.
INHOUD V
Zie afbeelding I
1. Camera DVR-systeem
a. : apparaat in- en uitschakelen (indrukken en ingedrukt houden om in en uit te
schakelen wanneer het apparaat niet op een stroombron aangesloten is)
b. : in/uit het menu gaan
c. : de geselecteerde optie bevestigen
d. : omhoog of 1/2/3/4 x digitaal inzoomen
e. : omlaag of 1/2/3/4 x digitaal uitzoomen
f.
MODE: omschakelen tussen VIDEO-opnamen/FOTO/AUDIO-opnamen/
AFSPELEN/
geselecteerde optie bevestigen
g. : Audio Aan/Uit
2. Houder met zuignap
3. USB-aansluitkabel voor data en opladen
4. 12V DC 5V
Deze 12V Autolader werd ontworpen ENKEL
DASHBOARD CAMERA, gebruik deze NIET om andere toestellen op te laden!
OPLADEN
• In het apparaat is een oplaadbare Li-ion batterij ingebouwd die 3 keer volledig
opgeladen en ontladen moet worden om de maximale capaciteit van de batterij te
activeren. De oplaadtijd bedraagt ongeveer 1 uur (maximum).
•
Wanneer de batterij volledig opgeladen is, verschijnt op het display het symbool “volle
batterij’. De camera werkt max. 15 min. in noodgevallen wanneer hij niet op een stroombron
aangesloten is.
Opties voor het opladen:
Sluit het apparaat met behulp van de USB-aansluitkabel (3) op een computer/laptop aan. Bekijk
“PC modus” voor de verbinding.
OF
Plug het apparaat in de USB autolader (4) voor gebruik in de wagen.
Enkel bij gebruik met een autolader:
Zodra de motor van de auto wordt opgestart, begint de camera automatisch beelden
op te nemen. De DYMOND DASHBOARD CAMERA
opgeladen. Wanneer de autolader van het toestel wordt losgekoppeld, valt de DYMOND
DASHBOARD CAMERA
Opgelet:
Wanneer de batterijcapaciteit laag is, gaat de DYMOND DASHBOARD CAMERA
beschermingsstand staan. Laad de batterij op, zodat u het apparaat zeker kunt inschakelen.
GEBRUIK V
Zie afbeelding II
• Schuif uw SD-kaart in de SD-sleuf tot ze op haar plaats klikt.
• Druk licht op de SD-kaart als u ze uit de sleuf wilt halen. De kaart wordt dan
gedeeltelijk uitgeworpen, waarna u ze gemakkelijk kunt uitnemen.
•
Op het display staat het bericht ‘Geen kaart’ wanneer er geen kaart in de SD-sleuf zit.
Opmerking:
1. Wij adviseren het gebruik van een 16GB SDHC-kaart (of hoger) met klasse 10 (of
hoger).
(niet meegeleverd, optioneel te verkrijgen)
2. Zonder SD-kaart, werkt het toestel NIET!
3. Als de SD-kaart verkeerd wordt ingevoerd (moeilijk om in te voeren), bestaat
het risico dat het apparaat en de geheugenkaart beschadigd raken. Dit is de
verantwoordleijkheid van de gebruiker
4. Het apparaat stelt de SD-kaart in nadat ze werd ingevoerd.
5. Formateer vervolgens de kaart in het menu van de DYMOND DASHBOARD CAMERA.
Bekijk “Systeeminstellingen”.
* Afhankelijk van het merk, model en “klasse”-type van de SD kaart en bij benadering.
MONT
Zie afbeelding III
• Monteer de DYMOND DASHBOARD CAMERA (1) op de houder met zuignap (2).
• Maak de zuignap vochtig, plaats ze op de binnenkant van de voorruit en
sluit de zuignap met behulp van de hendel. We adviseren u om de DYMOND
DASHBOARD CAMERA
• Stel de houder in met behulp van de stelknoppen.
• Monteer de camera horizontaal, zodat u het beste zicht krijgt.
•
Sluit de USB autolader (4) aan op de sigarettenaansteker in de auto voor de nodige
stroom.
VIDEO* IMAGE*
SD CARD 1280X720 848X480 640X480 1280X1024 1600X1200 2048X1536 2592X1944
32GB 480 min 480 min 520 min 24320 23040 21920 18880
16 GB 240 min 240 min 260 min 12160 11520 10960 9440
GEBRUIK V
MODI
Let op! Dit menu werkt niet indien de MSDC modus geactiveerd is.
VIDEO-OPNAMEMODUS
In
•
Wanneer de
DYMOND DASHBOARD CAMERA
op de voeding van uw auto is
aangesloten, begint hij videobeelden op te nemen zodra de motor van de auto wordt
opgestart. Hij stopt met opnemen zodra de auto tot stilstand is gekomen.
• Wanneer de DYMOND DASHBOARD CAMERA
auto is aangesloten, moet u op de knop (a) en daarna op de knop (c)
drukken om beelden te beginnen op te nemen. Het toestel staat automatisch
in de video-opnamemode. Druk nog eens op (c) als u de opname wilt
stoppen en de bestanden automatisch wilt opslaan.
• Opnemen in een lus: tijdens het opnemen slaat het apparaat ieder
videobestand elke 2, 5 of 10 minuten automatisch op. Wanneer de SD-kaart
vol is, wist het toestel het oudste videobestand automatisch.
FOT
In de linkerbovenhoek van het display wordt een fotopictogram weergegeven.
• Druk 1 keer op de MODE-knop (f) als u foto's in plaats van videobeelden wilt
nemen.
• Druk op de knop (c) telkens wanneer u een foto wilt nemen.
AUDIO-OPNAMEMODUS
In de linkerbovenhoek van het display wordt een audiopictogram weergegeven.
• Druk 2 keer op de MODE-knop (f) als u alleen audio-opnamen wilt maken en
druk op (c) om met de opname te beginnen.
• Druk nog eens op (c) als u de opname wilt stoppen en de bestanden
automatisch wilt opslaan.
• Druk op de -knop (d) als u de opname tijdelijk wilt onderbreken of als u
opnieuw wilt beginnen op te nemen.
AFSPEELMODUS
In de linkerbovenhoek van het display wordt een afspeelpictogram weergegeven.
• Druk 3 keer op de MODE-knop (f) als u de afspeelmode kiest.
• M.b.v de & knoppen (d-e) kunt u doorheen de opnamen scrollen.
• Druk op (c) om met het afspelen te beginnen.
• Druk op de -knop (d) als u de opname tijdelijk wilt onderbreken of als u
opnieuw wilt beginnen af te spelen.
PC MODUS
• U kunt de DYMOND DASHBOARD CAMERA
USB-kabel (3) op uw PC aansluiten. Hiermee kunt u een back-up maken of
kunt u bestanden op uw PC afspelen.
• Druk op de & knoppen (d-e) om de mode te kiezen:
» MSDC: dit is een computerinterface tussen een computer en een digitale
camera, die de digitale camera weergeeft als een losse diskdrive die met
de computer verbonden is.
» CAM/Opnamemode: druk op de knop om videobeelden op te nemen.
Om de DASHBOARD CAMERA
aangezien deze door Windows zelf geïnstalleerd en voorzien zijn in het Windows
pakket*. U moet de DASHBOARD CAMERA
1. Zorg dat de batterij geladen is.
2. Maak enkel gebruik van de MEEGELEVERDE USB kabel, die in de verpakking zit.
3. Zet de camera AAN.
4. V
met de PC.
5. Kies op de camera “MSDC” en druk op de knop (c) op de camera.
6. De driver zal zichzelf nu installeren en onder “Deze computer” op uw bureaublad
zal dan een nieuwe (harde)-schijf aangemaakt zijn en te zien zijn (het kan ook zijn
dat er automatisch een venster geopend wordt waarin u kan aangeven hoe u de
bestanden wilt bekijken).
7. U kunt dan de bestanden zien in een map en deze dubbelklikken om de video te
laten afspelen door de standaard Windows Media Player of
eventueel zelf selecteren).
Opmerking:
• U kunt ook de SD-kaart uit de DASHBOARD CAMERA halen en deze in een
(ingebouwde) SD-kaart lezer plaatsen van uw PC of een losse SD-kaartlezer
gebruiken indien u deze zou hebben. Dit gaat sneller en is gemakkelijker in gebruik.
*
wordt, kunt u de USB drivers downloaden via www
INSTELLINGEN MENU
Let op! Dit menu werkt niet indien de MSDC
modus geactiveerd is.
1. Schakel het toestel in via de reeds
opgeladen batterij of via de USB
autolader
2. Druk op MODE (f) tot u de gewenste
mode hebt geselecteerd.
3.
Druk op (b) om in het menu te gaan.
4. Druk op de & knoppen (d-e)
om doorheen de submenu’s te scrollen.
5.
Klik na de selectie op (c) of MODE (f)
om uw keuze te bevestigen en de instelling
op te slaan.
6.
Druk op (b) om het menu te verlaten
.
Bijvoorbeeld: V
tijd, volgt u de volgende stappen:
1. Zorg dat de batterij geladen is.
2. Zet de camera
3. Druk op (b).
4. Druk dan op MODE (f).
5. Ga dan met de (e) knop naar DA
& TIJD (Date & Time).
6. Druk op de knop (c)
.
7. U kunt nu met de & knoppen (d-e)
de data wijzigen alsmede de tijd en deze
elke keer bevestigen met de MODE knop
(f).
8. Zodra u klaar bent drukt u op (b) of
(c) ter bevestiging.
VIDEOMENU
Formaat (HD) 1280x720
Videoresolutie
(D1) 848x480
(640) 640x480
Datumstempel Uit
Weergave datum
tijdens het opnemen
Datum
Datum & tijd
Bewegingsdetectie * Uit *
Automatisch
opnemen wanneer
er beweging wordt
gedetecteerd indien
gebruikt in accu-
stand.
Aan
Loop Opname * Uit
Cyclusopname
Aan *
Loop duur * 2 min *
Tijd van ieder deel op
de SD-kaart opslaan
5 min
10 min
Video Geluid Aan
Opname geluid
Uit
FOT
Resolutie (5MP) 2592x1944
(3MP) 2048x1536
(2MP) 1600x1200
(1MP) 1280x1024
Kwaliteit Zeer jn
Fijn
Normaal
Belichting
-2.0/ -1.7/ -1.3/
-1.0/ -0.7/ -0.3/
+0.0/ +0.3/ +0.7/
+1.0/ +1.3/ +1.7/
+2.0
Instelling
helderheid
Opname Modus Uit
Foto timer
Zelfontspan. 2s
Zelfontspan. 10s
Serie
Datumstempel Uit
Weergave
datum op de
foto
Datum & tijd
AFSPEELMENU
V 1 vergr
V
bestand
Alles vergrend.
Alles ontgrend.
Wissen Eén
V
bestand
Alles
Diashow Start
Interval
Herhalen
Stem Opname T
Wissen
KLANTENONDERSTEUNING
V
aanvragen met betrekking tot dit product dient u rechtsreeks
contact op te nemen met support@dymond.nl
GARANTIE
Copyright © Dymond. Dymond
is een gedeponeerd
handelsmerk van TE-Group NV
Dymond
merk staat voor
superieure productkwaliteit en uitstekende dienstverlening
aan de klanten. Dat is de reden waarom
Dymond
voor dit
product een garantie van twee (2) jaar , vanaf de originele
aankoop van het product, biedt tegen alle materiaal- en
verwerkingsfouten. De voorwaarden van deze garantie en de
reikwijdte van de aansprakelijkheid van
Dymond
in het kader
va
n deze garantie kunnen van onze website www word
en
gedownload.
SYSTEEMINSTELLINGEN
Let op! Dit menu werkt niet indien de MSDC modus geactiveerd is.
1. Schakel het toestel in.
2. Druk op (b) om in het menu te gaan wanneer het apparaat in de
opnamemode staat.
3. Druk op MODE (f) tot u het instelmenu kunt selecteren. Druk op
(c) om een keuze te maken.
4. Druk op de & knoppen (d-e) om doorheen de submenu’s te
scrollen.
5. Klik na de selectie op MODE (f) of (c) om uw keuze te
bevestigen en de instelling op te slaan.
6. Druk op (b) om het menu te verlaten.
7. De instellingen worden veranderd nadat het toestel opnieuw wordt
opgestart.
Geluiden Ontspanknop
Aan
Geluid sluiter
Uit
Opstarten
Uit
Selecteer
startgeluid
1
2
3
Pieptoon
Aan
T
Uit
V
0/ 1/ 2/ 3
Net frequentie 50 Hz*
60 Hz
Energie sparen 1 Min
Automatisch
uitschakelen bij
gebruik op batterij
3 Min
5 Min
Uit*
Schermbeveiliging 30 sec.
Screensaver indien
gebruikt in accu-
stand.
1 min.
2 min.
Uit*
Datum & tijd Jaar
Maand
Dag
Uren
Minuten
Tijdnotatie
MM/DD/YYYY
DD/MM/YYYY
YYYY/MM/DD
T Engels
Engels, Nederlands, Frans, Spaans
Italiaans, Portugees, T
Hongaars, Zweeds, Russisch, Pools
Duits, Turks, Grieks
Formatteren Ja
SD-kaart
formatteren
Nee
Indien u problemen zou hebben met uw
SD-kaart (zoals “memory full”) raden we u
aan om uw kaart via dit menu te formatteren
en te kiezen voor “beginwaarden*” om de
fabrieksinstellingen te herstellen.
LED licht Uit*
Aan
*Beginwaarden Ja
T
fabrieksinstellingen
Nee
V
Informatie over softwareversie
GB
NL
ILLUSTRA
USER’S MANUAL
GB
NL
FR D
* Recommended setting.
MODES
Attention! This menu will not function when MSDC mode is active.
VIDEO RECORDING MODE
A
• When the DYMOND DASHBOARD CAMERA is connected to your car’s
power supply
It will stop recording after the car is stopped.
• When the DYMOND DASHBOARD CAMERA
power supply button (a), and press the button (c) to start
recording. The unit will automatically be in Video recording mode. Press
(c) again to stop recording and save the les automatically
• Loop recording: During recording, the device will
5 or 10 minutes automatically
the oldest video le automatically
PHOT
A
• Press the MODE button (f) 1x if you want to make pictures instead of recordings.
• Press the button (c) every time you want to take a picture.
AUDIO RECORDING MODE
An audio icon would be shown in the upper left corner of the display
• Press the MODE button (f) 2x if you want to make Audio recordings only
press (c) to start recording.
• Press (c) again to stop recording and save the les automatically.
• Press the button (d) to pause or begin recording again.
PLA
A
• For Playback mode, press the MODE button (f) 3x.
• Using the and buttons (d-e) you can scroll through the recordings.
• Press (c) to start playback.
• Press the button (d) to pause or begin playback again.
USE OF THE DYMOND DASHBOARD CAMERA
* Aanbevolen instelling.
Illustration II Illustration III
DECLARA
We, the undersigned
Company: TE-GROUP nv
Address: Kapelsestraat 61, 2950 Kapellen - BELGIUM
declare, that the following equip
Product Name: Dymond Dashboard Camera HD
#
Product Type: Dashboard Flat Camera
Complies with the essenal requirements, which are specified in the direcves
2011/65/EU, 2004/108/EC on the approximaon of the laws on the Member States
relang to electromagnec compability.
This product has been tested against following standards and specificaons,
applying versions valid on January 2016:
EN 55022
EN 55024
------------------- Manual/Dymond Dashboard Camera HD/04-16/V02 --------------------
Copyright © Dymond
Illustration I
* Recommended setting. * Aanbevolen ins
Guarantee,
questions and service:
support@ dymond.nl
#
INTERPOLA
1.
d.
b.
e.
c.
f.
g.
a.
2.
3.
4.