647933
1
Zoom out
Zoom in
Vorherige Seite
1/2
Nächste Seite
Users Manual
DECLARATION OF CONFORMITY
----------------------- Manual/Splashproof RGB LED strip/07-16/V01 --------------------
Copyright © Dymond
ILLUSTRATION 1
ILLUSTRATION 2
ILLUSTRATION 3
ILLUSTRATION 4
D
GB NL
F
E
5 METER - 150 LED - ADVANCED REMOTE
PACKAGE CONTENTS
* 5m flexible150 RGB LED strip - IP44 splashproof
* 230V DC adapter - IP44 splashproof
* RGB LED controller - IP44 splashproof
* RGB Infrared remote control
* Mounting parts & clips
INSTALLATION
Before installing the strip, it is important to check the proper functioning of all parts. Unroll
the strip, make all necessary connections and do a test before choosing the final location
for the strip!
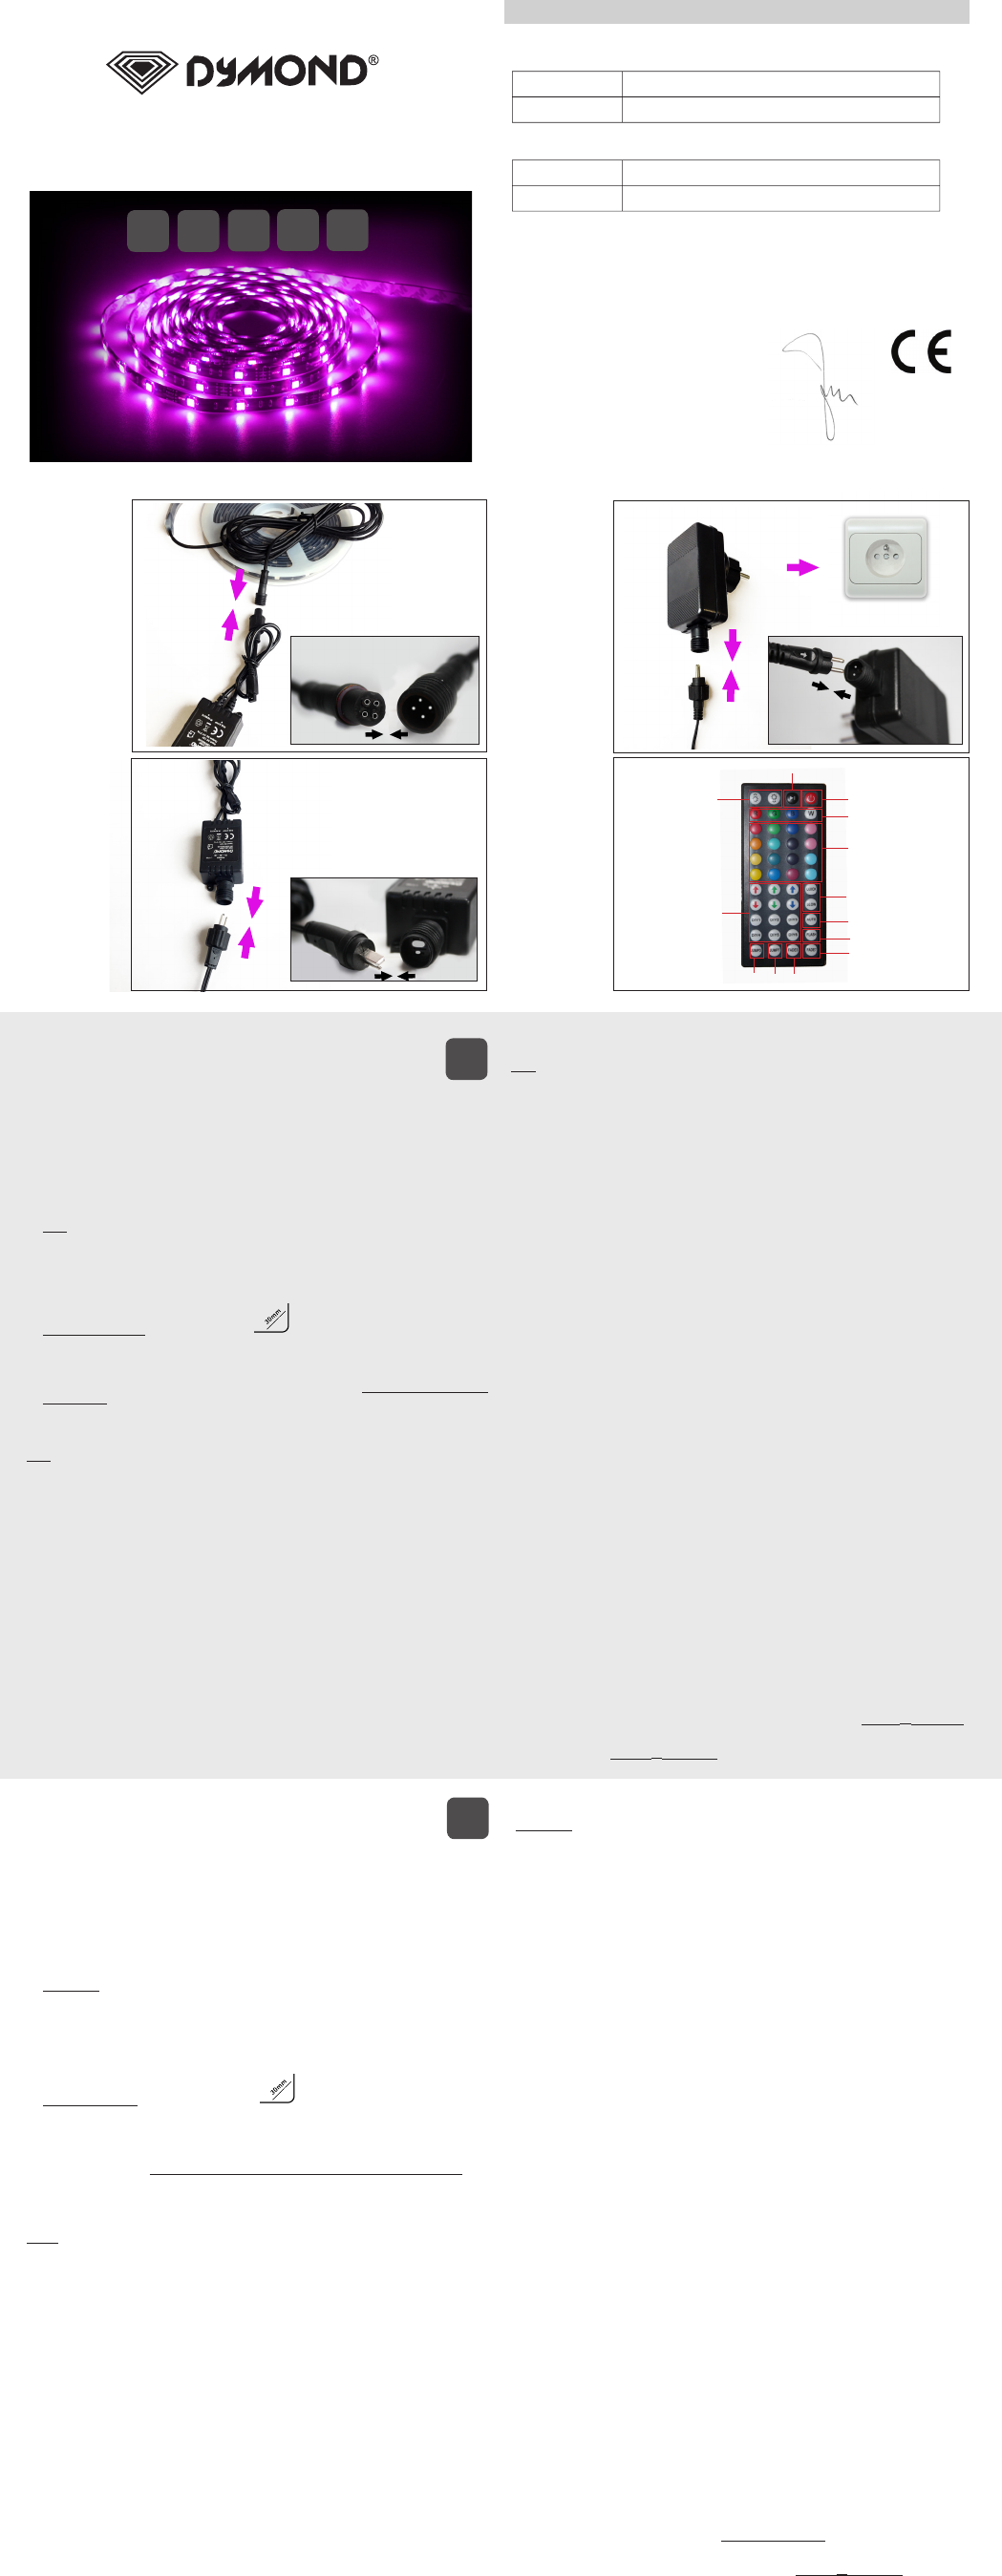
1. See illustration 1
Connect the splashproof RGB LED controller wire with the splashproof strip.
Attention: The 12V connection of the strip (see arrow indication on the strip’s connector)
and the arrow on the plug of the RGB controller should be pointing towards each other.
There is only 1 correct way to connect both parts! See detail image.
Note: The controller can be fixed using tape (included) or screws (not included).
2. See illustration 2
Connect the other side of the splashproof RGB controller with the splashproof adapter
connection cable.
3. See illustration 3
Connect the adapter to the adapter cable and then to the outlet.
4. Install the strip with the mounting clips and screws on the desired indoor or outdoor
location.
Note:
Do not fold the strip (max. 30mm folding )
The mounting clips may only be placed on the scissors symbols shown on the strip to
have the best clip positions.
If needed, the strip can be shortened every 3 LED’s/10 cm, starting at the end of the strip.
The correct location for cutting is indicated by the scissors symbols on the strip! The strip
can be made shorter only when used indoors & in dry spaces. When cut, it is no longer
splashproof! A closing cap is included.
The strip cannot be extended!
Do not submerge any part of the LED strip set in/under water!
DESCRIPTION OF THE REMOTE CONTROL (not splashproof)
Note: Take out the battery protection foil before use!
See illustration 4
1. ON/OFF: Turn the strip ON/OFF
2. Play/Pause: Play/Pause the chosen light effect
3. DIM-buttons: Brighten or darken the chosen color
4. Main colors: Red, green, blue and white
5. Predefined colors: Change the main colors
6. QUICK/SLOW: Adjust the speed of the chosen light effect
7. AUTO: All available light effects are shown one by one
8. FLASH: The strip will flash in white color (#)(*)
9. FADE 7: 7 colors of the strip will slowly change, from one color shade to another, without
flashing (#)
10. F
ADE 3: 3 RGB colors will slowly change, from one color shade to another, with flashing (#)
11. JUMP 7: 7 colors of the strip will change quickly (#)(*)
12. JUMP 3: The strip changes into 3 RGB colors quickly (#)(*)
(#) The speed of all these light effects can be adjusted using the Quick/Slow buttons (6).
(*) The brightness of all these light effects can be adjusted using the DIM buttons (3).
13. DIY buttons and Arrow buttons: There are 3 groups of “up” and “down” arrow buttons
for Red/Green/Blue colors and 6 DIY color setting buttons. The DIY color setting buttons
can be used to store your favorite color effects. Press a DIY button, for example DIY 1, to
enter the DIY color mode. You can now adjust the brightness of the Red/Green/Blue color
using the 6 arrow buttons until you have created your desired light effect. Press the DIY1
button again to store the selected light effect. The next time this button is pressed, it will
display the color which you saved the last time. There are 6 DIY buttons, so you can save
your favorite 6 colors/brightnesses.
The remote control is NOT splashproof, so you should keep it indoors!
Note:
Point the remote control to the RGB LED controller. Max. distance is 5~7 meters.
If another button is pressed during the color setting process, the selected light effect will not
be saved!
All DIY buttons are independent. For example: if you press DIY 1 button first and then
press DIY 2 button, DIY 1 button will be invalid until DIY 2 button will be pressed again
and the current color will be saved.
SAFETY INSTRUCTIONS
Installation should be performed only by a competent person or professional electrician.
Never open the RGB controller.
Never touch the plug contacts with sharp or metal objects.
Make sure that cables cannot cause a trip hazard.
Use only the original power supply and original accessories.
Do not expose the unit to direct sunlight.
Never place the device in the vicinity of heat sources.
Never place the unit on surfaces that are heat sensitive.
Unplug the unit at the main power socket before cleaning. Do not use any solvent based
cleaning agents, only a soft, dry anti-static cloth.
Do not attempt repairs yourself.
If the unit is not properly installed or operated DYMOND
®
cannot accept liability.
TECHNICAL DATA
- Operating voltage: 230V AC
- Power supply: Europlug
- Power consumption: max 24 watts
- Ambient operating temperature: -10 ~40 °C
- Humidity: 10% - 85% (none condensing)
- Storage temperature: -20 ~60 °C
- Storage humidity: 5% - 90% (none condensing)
- Protection class (IP44 = splash-/rain-/moist proof):
Strip: IP44 - Controller: IP44 - Adapter: IP44 - Remote control: only for indoor use
- Dimensions (L*W*H):
Strip: 5000x10x3 mm - Controller: 50x35x22 mm - Adapter: 85x50x75 mm
Strip:
LED Flex Strip RGB IP44
DC 12V, 2A, 16,5W max.
150 3-CHIP LEDs, 5050SMD
Max. 850 lumen
120° viewing angle
Length: 5000mm, cuttable every 3 LED’s/10 cm (The correct location for cutting is indicated
by the scissors symbol on the strip)
Controller:
DC 12V, 3*1A
20 color buttons + 6 different color-light programs + DIM/faster/slower function + Pause
+ Auto + 6 programmable DIY buttons + 6 “mix” buttons (arrow buttons) + CR2025 battery
Adapter:
Input: 220-240V * Output: 12V / 2A
GUARANTEE
Dymond
®
is a registered trademark of TE-Group N.V. The Dymond
®
brand stands for superior
product quality and outstanding customer service. That is why Dymond
®
warrants this
product against all defects in material and workmanship for a period of two (2) years from
the date of original purchase of the product. The conditions of this guarantee and the extent
of responsibility of Dymond
®
under this guarantee can be requested at support@dymond.nl.
For more information, technical questions and return requests concerning this product,
you should contact support@dymond.nl.
1
4
5
6
7
8
9
3
13
12
11
10
2
SPLASHPROOF RGB LED STRIP
Hereby,
Par la présente,
Company:
Entreprise:
Address:
Adresse:
declare that the following equipment:
déclare que le disposif suivant :
Product name:
Nom du produit:
Product type:
Type de produit:
conforms with the following safety requirements of the direcves 2014/30/EU, 2014/35/EU,
2011/65/EU. Conformity is guaranteed by the CE-symbol.
est conforme aux exigences de sécurité suivantes des direcves 2014/30/EU, 2014/35/EU,
2011/65/EU. La conformité est garane par le symbole CE.
This product has been tested against following standards and specicaons, applying
versions valid in July 2016.
Ce produit a été testé par rapport aux normes et spécicaons suivantes, appliquant les
versions valides en Juillet 2016.
EN 55015
EN 61000
EN 61547
EN 61347
EN 60529
Joseph van Oosterum, CEO TE-Group NV
TE-Group NV
Kapelsestraat 61, 2950 Kapellen, Belgium
Dymond Splashproof RGB LED strip 150 set (5mt)
RGB LED Strip - Bande LED RVB
INHOUD VERPAKKING
* 5m flexibele150 RGB LED strip - IP44 spatwaterdicht
* 230V DC adapter - IP44 spatwaterdicht
* RGB LED controller - IP44 spatwaterdicht
* RGB infrarode afstandsbediening
* Bevestigingsonderdelen & clips
INSTALLATIE
Voordat u de strip installeert, is het belangrijk om de goede werking van alle onderdelen te
controleren. Rol de strip uit, maak alle benodigde aansluitingen en doe een test voor u de
uiteindelijke locatie voor de strip kiest!
1. Zie illustratie 1
Verbind de draad van de spatwaterdichte RGB LED controller met de spatwaterdichte strip.
Let op: De 12V aansluiting van de strip (zie pijl indicatie op de connector van de strip) en
de pijl op de controllerstekker moeten naar elkaar wijzen! Er is maar 1 juiste manier
om beide delen te verbinden! Zie de detailafbeelding.
Opmerking: De controller kan bevestigd worden met tape (inbegrepen) of schroeven (niet
inbegrepen!).
2. Zie illustratie 2
Verbind de andere kant van de spatwaterdichte RGB LED controller met de
adapteraansluiting.
3. Zie illustratie 3
Sluit de adapter aan op de adapterkabel en vervolgens op het stopcontact.
4. Installeer de strip met de bevestigingsklemmen en schroeven op de gewenste binnen- of
buitenlocatie.
Opmerking:
Vouw de strip niet! (max. 30mm plooibaar )
De bevestigingsklemmen mogen alleen op de plaats van de schaarsymbolen op de strip
geplaatst worden om de beste posities voor de clips te verkrijgen.
Indien nodig kan de strip ingekort worden om de 3 LED’s / 10 cm, te beginnen van het
einde van de strip. De juiste locatie voor het inkorten wordt aangegeven door het schaar
symbool op de strip! De strip kan ENKEL korter worden gemaakt bij gebruik binnenshuis
en in droge ruimten. Na het inkorten van de strip, is deze niet meer spatwaterdicht! Een
afsluitkapje is inbegrepen.
De strip kan niet verlengd worden!
Dompel geen enkel onderdeel van de LED-strip set in / onder water!
BESCHRIJVING VAN DE AFSTANDSBEDIENING (niet spatwaterdicht)
Let op: Haal de beschermingsfolie van de batterij voor gebruik!
Zie illustratie 4
1. ON/OFF: Strip aan-/uitschakelen
2. Play/Pause: Het gekozen lichteffect afspelen/pauzeren
3. DIM-toetsen: Gekozen kleur helderder of donkerder maken
4. Hoofdkleuren: Rood, groen, blauw en wit
5. Vooraf gedefinieerde kleuren: Maken het mogelijk de hoofdkleurtinten te wijzigen
6. QUICK/SLOW: De snelheid van het gekozen lichteffect aanpassen
7. AUTO: Alle beschikbare lichteffecten worden een voor een weergegeven
8. FLASH: De strip knippert in de witte kleur (#)(*)
9. FADE 7: Laat 7 kleuren van de strip langzaam veranderen, van de ene kleurtint naar de
andere, zonder te knipperen (#)
10. FADE 3: Laat 3 RGB kleuren van de strip langzaam veranderen, van de ene kleurtint naar
de andere, met knipperen (#)
11. JUMP 7: Laat 7 kleuren snel veranderen (#)(*)
12. JUMP 3: Laat 3 RGB kleuren snel veranderen (#)(*)
(#) Voor al deze lichteffecten kan de snelheid ingesteld worden met behulp van de Quick/
Slow-toetsen (6).
(
*) Voor al deze lichteffecten kan de helderheid ingesteld worden met behulp van de DIM-
toetsen (3).
13. DIY toetsen (“doe-het-zelf”) en Pijl-toetsen: Er zijn 3 groepen van “op” en “neer”
pijltoetsen voor Rood/Groen/Blauw en 6 DIY (“doe-het-zelf”) toetsen om kleuren in te
stellen. De DIY toetsen kunnen gebruikt worden om uw persoonlijk favoriete kleureffecten
in te stellen.
Druk op een DIY toets, bijvoorbeeld DIY 1, om de DIY kleurmodus te activeren. U kunt
nu de helderheid van de Rode/Groene/Blauwe kleur aanpassen door gebruik te maken
van de 6 pijltoetsen tot u uw eigen gewenste lichteffect heeft gecreëerd. Druk nogmaals
op de DIY 1 toets om het geselecteerde lichteffect op te slaan. De volgende keer dat u
op deze toets drukt, zal deze het effect weergeven dat u heeft opgeslagen. Er zijn 6 DIY
toetsen, dus u kunt 6 favoriete kleuren/helderheidopties opslaan.
De afstandsbediening is NIET spatwaterdicht, dus deze moet binnen bewaard worden!
Opmerking:
Richt de afstandsbediening naar de RGB LED controller. Max. afstand 5 ~ 7 meter.
Als u op een andere toets drukt tijdens het instellen van het gewenste kleureffect, zal het
geselecteerde effect niet worden opgeslagen!
Alle DIY toetsen zijn onafhankelijk. Bijvoorbeeld: als u eerst op de DIY 1 toets drukt en
vervolgens op de DIY 2 toets, zal de DIY 1 toets nietig worden tot de DIY 2 toets nogmaals
wordt ingedrukt en de huidige kleurinstelling opgeslagen is.
VEILIGHEIDSINSTRUCTIES
De installatie dient enkel door een vakpersoon uitgevoerd te worden.
Open nooit de RGB controller.
Raak nooit de stekkercontacten met scherpe en metalen voorwerpen aan.
Zorg ervoor dat kabels zo gelegd worden dat niemand erover kan struikelen of erop kan
trappen.
Gebruik enkel origineel toebehoren.
Stel het apparaat nooit aan rechtstreekse zonnestralen bloot.
Zet het apparaat nooit in de nabijheid van warmtebronnen.
Zet het apparaat nooit op oppervlakken die gevoelig voor warmte zijn.
Bescherm het apparaat tegen nattigheid, stof, vloeistoffen en wasems.
Gebruik voor het reinigen geen schoonmaakmiddelen met oplosmiddel, maar uitsluitend
een zachte, droge en antistatische doek.
Probeer niet om zelf reparaties uit te voeren.
• Als de strip niet goed geïnstalleerd is of gebruikt wordt, aanvaardt DYMOND
®
geen
enkele aansprakelijkheid.
TECHNISCHE GEGEVENS
- Bedrijfsspanning: 230V AC
- Voeding: Eurostekker
- Stroomverbruik: tot 24 watt
- Omgevingstemperatuur voor gebruik: -10 ~ 40 °C
- Luchtvochtigheid: 10% - 85% (niet condenserend)
- Temperatuur voor opberging: -20 ~ 60 °C
- Luchtvochtigheid voor opberging: 5% - 90% (niet condenserend)
- Veiligheidsklasse (IP44 = spatwater-/regen-/vochtbestendig)
Strip: IP44 - Controller: IP44 - Adapter: IP44 - Afstandsbediening: enkel voor gebruik
binnenshuis
- Afmetingen (L*B*H):
Strip: 5000x10x3 mm - Controller: 50x35x22 mm - Adapter: 85x50x75 mm
Strip:
LED Flex Strip RGB IP44
DC 12V, 2A, 16,5W max.
150 3-CHIP LED’s, 5050SMD
Max. 850 lumen
120° uitvalshoek
Lengte: 5000mm, alle 3 LED’s/10 cm inkortbaar (De juiste locatie voor het inkorten wordt
aangegeven door het schaarsymbool op de strip!)
Controller:
DC 12V, 3*1A
20 verschillende kleurtoetsen + 6 lichtprogramma’s + DIM / sneller / trager functie + Pauze
+ Auto + 6 programmeerbare DIY toetsen + 6 “mix” toetsen (pijltoetsen) + CR2025 batterij
Adapter:
Ingang: 220-240V * Uitgang: 12V / 2A
GARANTIE
Dymond
®
is een gedeponeerd handelsmerk van TE-Group N.V. Het merk Dymond
®
staat
voor producten van superieure kwaliteit en een uitstekende klantenservice. Daarom
garandeert Dymond
®
dat dit product vrij is van materiaal- en fabricagefouten gedurende
een periode van twee (2) jaar na de oorspronkelijke aankoopdatum van het product. De
voorwaarden van deze garantie en de omvang van de verantwoordelijkheid van Dymond
®
onder deze garantie kunt u opvragen via support@dymond.nl.
Voor meer informatie, technische vragen of retouraanvragen met betrekking tot dit
product dient u rechtstreeks contact op te nemen met support@dymond.nl.
NL
GB
1

Brauchen Sie Hilfe? Stellen Sie Ihre Frage.

Forenregeln

Missbrauch melden von Frage und/oder Antwort

Libble nimmt den Missbrauch seiner Dienste sehr ernst. Wir setzen uns dafür ein, derartige Missbrauchsfälle gemäß den Gesetzen Ihres Heimatlandes zu behandeln. Wenn Sie eine Meldung übermitteln, überprüfen wir Ihre Informationen und ergreifen entsprechende Maßnahmen. Wir melden uns nur dann wieder bei Ihnen, wenn wir weitere Einzelheiten wissen müssen oder weitere Informationen für Sie haben.

Art des Missbrauchs:

Zum Beispiel antisemitische Inhalte, rassistische Inhalte oder Material, das zu einer Gewalttat führen könnte.

Beispielsweise eine Kreditkartennummer, persönliche Identifikationsnummer oder unveröffentlichte Privatadresse. Beachten Sie, dass E-Mail-Adressen und der vollständige Name nicht als private Informationen angesehen werden.

Forenregeln

Um zu sinnvolle Fragen zu kommen halten Sie sich bitte an folgende Spielregeln:

Neu registrieren

Registrieren auf E - Mails für Dymond SPLASHPROOF RGB LED STRIP wenn:


Sie erhalten eine E-Mail, um sich für eine oder beide Optionen anzumelden.


Das Handbuch wird per E-Mail gesendet. Überprüfen Sie ihre E-Mail.

Wenn Sie innerhalb von 15 Minuten keine E-Mail mit dem Handbuch erhalten haben, kann es sein, dass Sie eine falsche E-Mail-Adresse eingegeben haben oder dass Ihr ISP eine maximale Größe eingestellt hat, um E-Mails zu erhalten, die kleiner als die Größe des Handbuchs sind.

Ihre Frage wurde zu diesem Forum hinzugefügt

Möchten Sie eine E-Mail erhalten, wenn neue Antworten und Fragen veröffentlicht werden? Geben Sie bitte Ihre Email-Adresse ein.


Info