•If a key is not depressed within 15 seconds, the display will return
to its initial state – Current time.
•When setting the time with the keys 2 or 3, the setting speed is
accelerated when the key is kept depressed.
•Up to three preset times can be set and activated on this Mini-
Clock. Each preset time is deactivated after the heating period,
and it must be newly activated for each new heating period – see
activate / deactivate the preset time.
Setting functions on the Mini-Clock
Setting-up for the first time:
After connection to the power supply all symbols on the display will
start to flash. The heater cannot be turned on in this state. The
current time has to be set first.
Press key 1: The clock time flashes. Set the time with key 2 or 3.
Press key 1: The time is displayed; the colon flashes.
Setting the time:
Press key 1 for more than 3 seconds: The time flashes. Set the time
with key 2 or 3. Press key 1 within 5 seconds: The time is displayed
and the colon flashes.
Note:
If, after the time has been set, key 1 is not pressed within 5 seconds,
the Mini-Clock will be transferred to the mode “Setting the Heating
Time”.
Setting the heating time:
Press key 1 for more than 3 seconds: The time flashes. The Mini-
Clock is automatically transferred to the mode “Setting the Heating
Time” if no key is pressed for 5 seconds.
The heating symbol is displayed, and the heating time flashes.
Set the heating time (10 to 120 minutes) with key 2 or 3.
Press key 1: The time is displayed once again and the colon flashes.
Setting the preset time:
Press key 1 once, twice or three times to call the preset time 1, 2
or 3. The display will then indicate the preset time, for instance 1
and symbol 1. Set the preset time with key 2 or 3. The preset time
is activated or deactivated with key 4. The “ON” symbol is displayed
when the preset time has been activated.
Symbol 1, 2 or 3 is displayed when the preset time is activated.
Operating functions of the Mini-Clock
Switching on the heater:
Press key 4. The heating duration is … minutes.
The display indicates the remaining heating time and symbol 7.
Switching off the heater:
Press key 4. The heating continues for approx. 3 minutes.
The display indicates the current time.
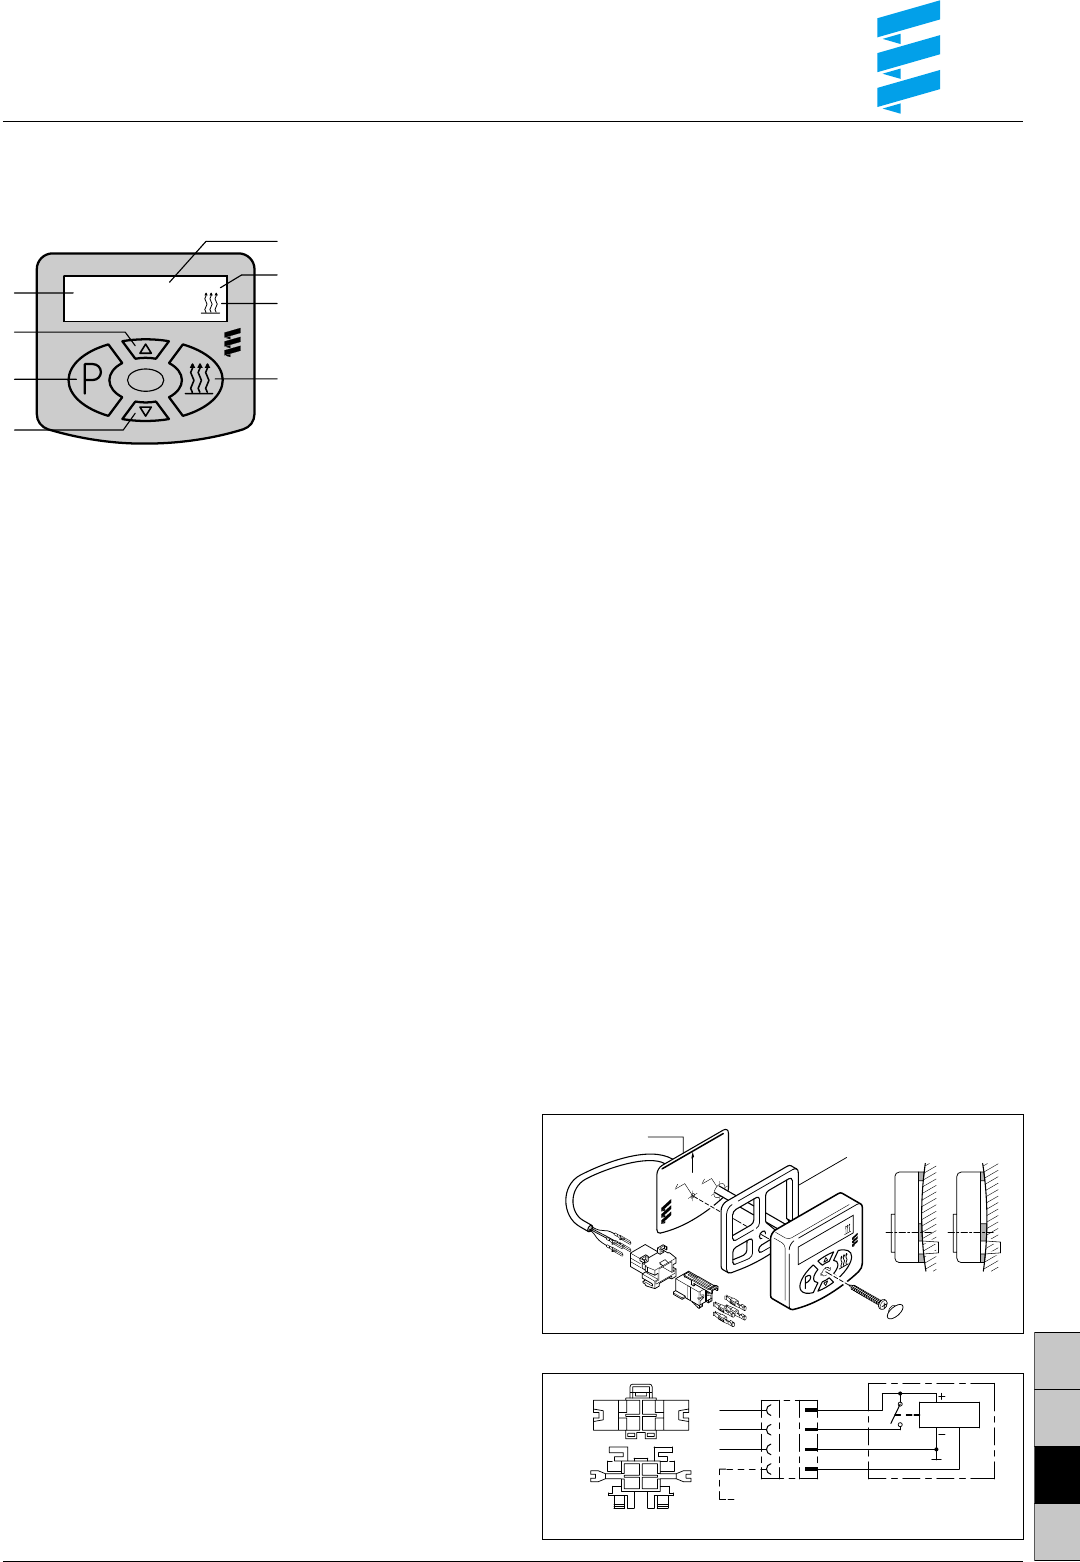
1Key to activate the setting capabilities
2 / 3Time setting keys forwards / backwards
4ON / OFF key to activate / deactivate the preset time
5Current time, preset time and heating time
6Symbol for activated preset time
7Symbol for heater operation
8Symbol for preset time 1, 2 or 3
Continuous operation:
Press key 3 and keep it depressed while pressing key 4. The
heater will now remain switched on until key 4 (switching off the
heater) is pressed again.
Preset time – Activate / deactivate:
Press key 1 to select the preset time 1, 2 or 3. Activate or deacti-
vate the preset time with key 4.
The “ON” symbol is displayed when the preset time is activated.
Symbol 1, 2 or 3 is displayed when the preset time is activated.
Special functions only in conjunction
with the TP41 / TP41i remote control
Programming the receiver to recognize the transmitter:
Press key 2 and keep it depressed while pressing key 4.
The display indicates 2 horizontal lines.
The display returns to its initial state when the receiver has been
successfully programmed. The display automatically returns to the
initial status after 35 seconds if the transmitter is not recognized. In
this case repeat the above procedure once again.
Installing and connecting the Mini-Clock
Follow the drawing to install the Mini-Clock.
The drilling template (can be peeled off and is self-adhesive)
is applied on the front.
Follow the diagram to connect the Mini-Clock.
Note:
Do not press the display and control panel when installing the Mini-
Clock.
Connecting diagram
1
2
3
ON
20
:05
o 7,5
o 2,5
E
b
e
r
s
p
ä
c
h
e
r
Mounting drawing
4
2
3
1
2
4
1
3
13
24
B1 S1
88:88
ge
br
bl
rt
0,5 br
0,5 ge
0,5 rt
4 3 2 1
B1
S1
Drilling template
Resilient base
for uneven mounting surfaces
Connection for TP41 / TP41i remote control
Plug and socket case are shown from the line entry side.
Brauchen Sie Hilfe? Stellen Sie Ihre Frage.
Missbrauch melden von Frage und/oder Antwort
Libble nimmt den Missbrauch seiner Dienste sehr ernst. Wir setzen uns dafür ein, derartige Missbrauchsfälle gemäß den Gesetzen Ihres Heimatlandes zu behandeln. Wenn Sie eine Meldung übermitteln, überprüfen wir Ihre Informationen und ergreifen entsprechende Maßnahmen. Wir melden uns nur dann wieder bei Ihnen, wenn wir weitere Einzelheiten wissen müssen oder weitere Informationen für Sie haben.
Art des Missbrauchs:
Forenregeln
Um zu sinnvolle Fragen zu kommen halten Sie sich bitte an folgende Spielregeln:
Lesen Sie zuerst die Anleitung;
Schauen Sie nach, ob die Frage bereits gestellt wurde;
Stellen Sie die Frage so deutlich wie nur einigermaßen möglich;
Erwähnen Sie was Sie bereits versucht haben um das Problem zu lösen;
Ist Ihr Problem von einem Besucher gelöst dann lassen Sie ihn / sie wissen in diesem Forum;
Falls Sie reagieren möchten, so verwenden Sie bitte das Antworten- Formular;
Da ihre Frage für alle Besucher sichtbar ist, sollten Sie lieber keine persönliche Daten erwähnen.
Neu registrieren
Registrieren auf E - Mails für Eberspacher Mini-Clock wenn:
neue Frage gestellt werden
neue Handbücher vorhanden sind
Sie erhalten eine E-Mail, um sich für eine oder beide Optionen anzumelden.
Das Handbuch wird per E-Mail gesendet. Überprüfen Sie ihre E-Mail.
Wenn Sie innerhalb von 15 Minuten keine E-Mail mit dem Handbuch erhalten haben, kann es sein, dass Sie eine falsche E-Mail-Adresse eingegeben haben oder dass Ihr ISP eine maximale Größe eingestellt hat, um E-Mails zu erhalten, die kleiner als die Größe des Handbuchs sind.
Ihre Frage wurde zu diesem Forum hinzugefügt
Möchten Sie eine E-Mail erhalten, wenn neue Antworten und Fragen veröffentlicht werden? Geben Sie bitte Ihre Email-Adresse ein.