EM6640 e-Domotica Wireless Emergency Pendant Button / Draadloze Noodoproep Knop
www.e-domotica.com
Installatie van de alarmontvanger
1. Schroef de bovenkant los van de bodemplaat van de (2 schroeven).
2. Markeer met behulp van de bodem en een stift of potlood twee gewenste
boorgaten.
3. Indien de alarmontvanger aan een betonnen wand wordt gemonteerd: Boor met
een 6mm boor twee gaten van ruim 5cm diepte in de wand. Steek daarna de
bijgeleverde pluggen in de gaten
4. Bevestig de bodemplaat met de schroeven aan de muur.
5. Zet de bovenkant weer op de bodemplaat. Haal de bovenkant over de twee
nokjes van de bodemplaat en schroef deze vast met de twee schroeven.
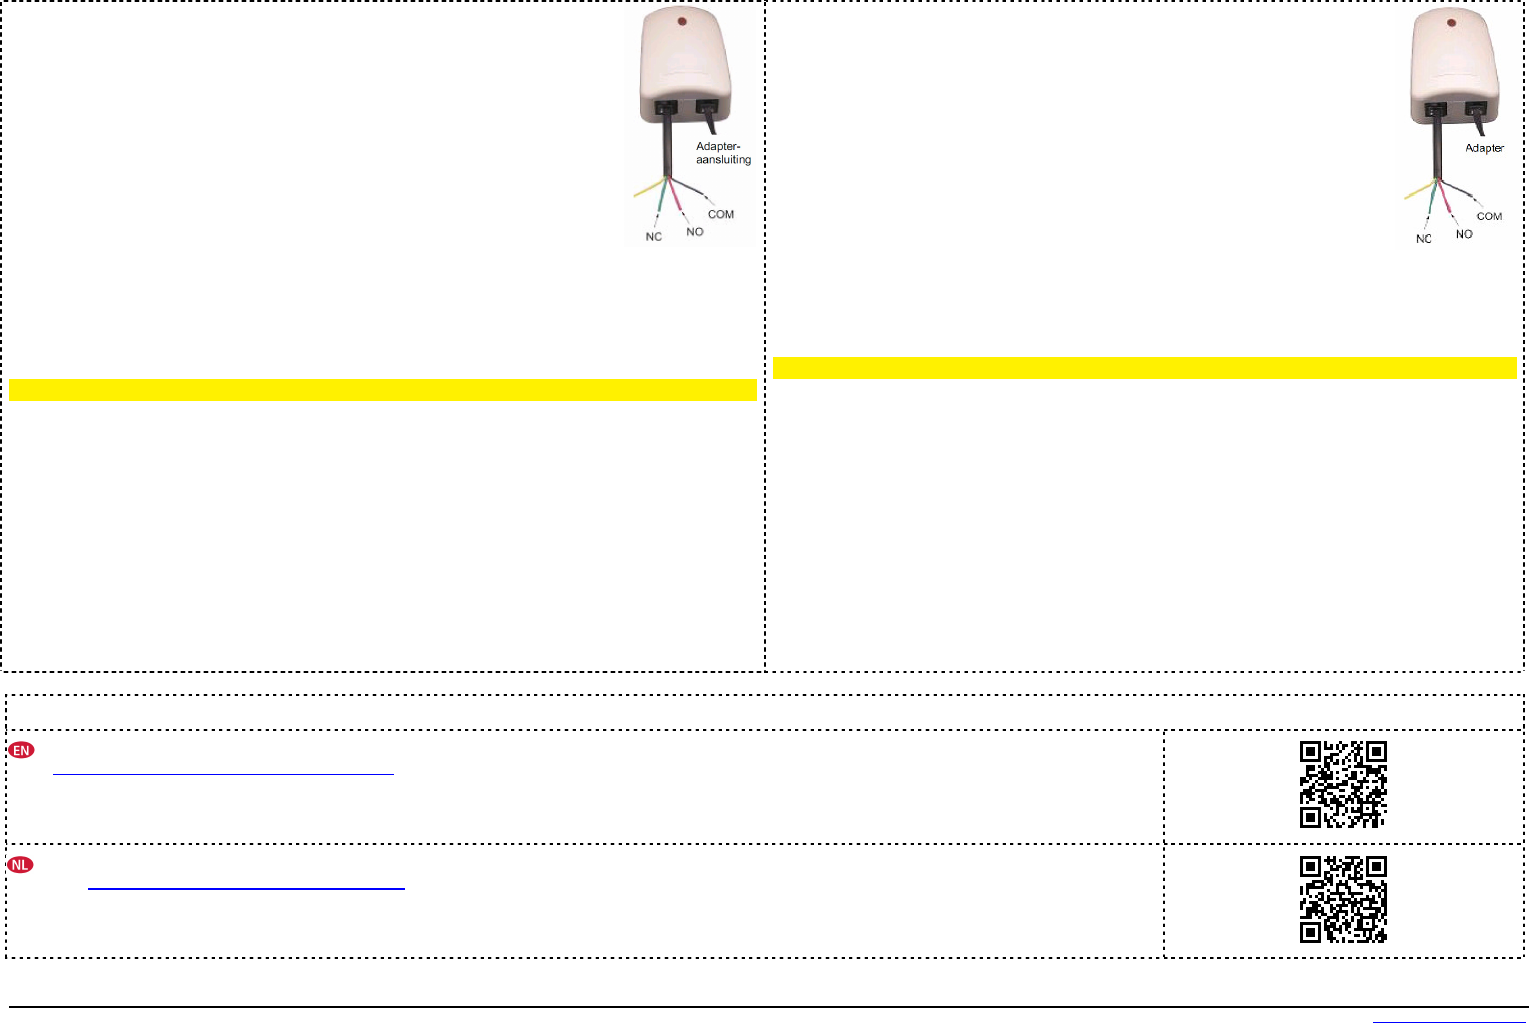
6. Sluit de voedingskabel van de adapter aan op de rechter RJ12 ingang (zie afbeelding).
7. Sluit de datakabel aan op de linker RJ12 ingang. Dit is het potentiaalvrije signaleringsrelais. Sluit de
NO draad (Normally Open, rood) en de COM draad (common, zwart) aan op de witte potentiaalvrije
contacten van de EM6515. De groene draad en gele draad worden in deze situatie niet gebruikt.
Let op! Het potentiaalvrije signaleringsrelais is NIET geschikt om 230V netspanning te schakelen.
Noodoproep knop gebruiken
De noodoproep knop is in de verpakking al aangemeld op de alarm ontvanger en kan op verschillende
manieren gebruikt worden:
•De noodoproep knop is standaard uitgerust met een koord om deze als medaillon te gebruiken. Het
koord is instelbaar en beveiligd tegen verstikking (veiligheidsslot).
•Dankzij de clip aan de achterzijde van de noodoproep knop, kan de knop ook aan kleding
vastgemaakt worden.
•Haal de achterkant van de noodoproep knop los en gebruik de polsband om de noodoproep knop
aan de pols te gebruiken. De polsband is instelbaar dankzij de flexibele band.
Installing the alarm receiver
1. Unscrew the (top) cover of the alarm receiver (2 screws).
2. Mark the desired drill holes using the bottom part and a marker or pencil.
3. If you need to mount the alarm receiver on a concrete wall: Drill two holes with
5cm depth using a 6mm drill. Next, plug in the dowels.
4. Mount the bottom part to the wall using the screws.
5. Mount the (top) cover onto the bottom part. Use the two notches on the top side
to mount it correctly. Screw both parts together with the two screws.
6. Connect the power supply (adapter) onto the right hand sided RJ12 socket.
7. Connect the data cable to the left hand sided RJ12 socket. This is a potential
free signal relay. Connect the NO wire (Normally open, red) and the COM wire (common, black) to
the white potential free wires of the EM6515. The green and yellow wires are not used in this
situation.
Note! The potential free signal relay is not suitable to switch 230V mains power.
Using the Emergency Pendant
The emergency pendant button is connected wirelessly to the alarm receiver inside the giftbox, you can
use the pendant button in several manners:
•By default, the emergency button is equipped with a cord to use as a pendant around your neck.
The cord adjustable and protected against suffocation (safety lock).
•Use the clip on the back side to attach the emergency button to your clothing.
•Remove the back panel of the button and use the wrist band to use the button around your wrist.
You can adjust the wrist band because it is flexible.
Support
Find more support on our website (online advanced manuals, instruction videos, download, examples etc.). Scan the QR code or go to:
http://www.e-domotica.com/en/customer-service
Ga naar onze website voor meer ondersteuning (online uitgebreide handleidingen, instructie video’s, downloads, voorbeelden etc.). Scan de QR code of ga
Libble nimmt den Missbrauch seiner Dienste sehr ernst. Wir setzen uns dafür ein, derartige Missbrauchsfälle gemäß den Gesetzen Ihres Heimatlandes zu behandeln. Wenn Sie eine Meldung übermitteln, überprüfen wir Ihre Informationen und ergreifen entsprechende Maßnahmen. Wir melden uns nur dann wieder bei Ihnen, wenn wir weitere Einzelheiten wissen müssen oder weitere Informationen für Sie haben.
Art des Missbrauchs:
Forenregeln
Um zu sinnvolle Fragen zu kommen halten Sie sich bitte an folgende Spielregeln:
Lesen Sie zuerst die Anleitung;
Schauen Sie nach, ob die Frage bereits gestellt wurde;
Stellen Sie die Frage so deutlich wie nur einigermaßen möglich;
Erwähnen Sie was Sie bereits versucht haben um das Problem zu lösen;
Ist Ihr Problem von einem Besucher gelöst dann lassen Sie ihn / sie wissen in diesem Forum;
Falls Sie reagieren möchten, so verwenden Sie bitte das Antworten- Formular;
Da ihre Frage für alle Besucher sichtbar ist, sollten Sie lieber keine persönliche Daten erwähnen.
Neu registrieren
Registrieren auf E - Mails für Eminent EM6640 e-Domotica wenn:
neue Frage gestellt werden
neue Handbücher vorhanden sind
Sie erhalten eine E-Mail, um sich für eine oder beide Optionen anzumelden.
Das Handbuch wird per E-Mail gesendet. Überprüfen Sie ihre E-Mail.
Wenn Sie innerhalb von 15 Minuten keine E-Mail mit dem Handbuch erhalten haben, kann es sein, dass Sie eine falsche E-Mail-Adresse eingegeben haben oder dass Ihr ISP eine maximale Größe eingestellt hat, um E-Mails zu erhalten, die kleiner als die Größe des Handbuchs sind.
Ihre Frage wurde zu diesem Forum hinzugefügt
Möchten Sie eine E-Mail erhalten, wenn neue Antworten und Fragen veröffentlicht werden? Geben Sie bitte Ihre Email-Adresse ein.