Cleaning
CAUTION
Before you start cleaning, turn o the power and unplug the AC adapter.
Exterior
Wipe the dirt o with a soft cloth. If it is very dirty, use a cloth wrung out of
water.
CAUTION
Never use chemicals or solvents such as benzine, thinner, or alcohol, or use a
chemical duster.
Printhead
Clean the printhead with a cotton swab.
Adding a symbol
Press .
Select a category with and press .
Select a symbol with and press .
MEMO
For available symbols, see "Symbol List" on the separate sheet.
Delete key
Length > Auto, 3.0cm to 40.0cm
Sets the length of the label.
When "Auto" is selected, the label length is adjusted to the current
text.
Select the layout of the text from "Left", "Center", "Justify", and
"Right" after setting the length of the label.
Frame & Table "Symbol List" on the separate sheet
Decorates the text with a frame or inserts a table.
Margins > Minimum, Short, Middle, Long, Tape width /3, Tape width
Sets the left and right margins.
Layout > Left, Center, Justify, Right
Adjusts the layout when multiple lines are used.
Style > Outline, Normal, Shadow, S+O
Applies a character style to text.
Char. spacing > None, Narrow, Normal, Wide
Sets the inter-character spacing.
Border & Line > Strikeout, Underline, None, Border, Round brdr,
Shading, Brdr mesh, Round mesh
Applies border, underline, shade etc. to text.
Char. Width > Smaller, Small, Narrow, Normal, Wide
This allows you to change the width or height of characters.
Background > None, 1 Wave, 2 Diamond, 3 Flower, 4 Cards,
5 Arabesq., 6 Mesh, 7 Dotted
Sets the background pattern.
Bold & Italic > Italic, Normal, Bold, B+I
Changes the text in bold or italics.
Vertical > O , On
The orientation of the label can be changed to vertical.
When entering two-digit numbers
Set "Vertical" to "On" in advance.
1. Press .
2. Select "Doublefigure" with and
press .
3. Enter numbers and press .
Font size > Equal, 1 Line, 2 Lines, 3 Lines, 4 Lines, 5-8 Lines
You can change the font size of text or a block line by line. Among
the preset setting items, select one with the same number of lines
as that of the text or block you want to change.
To restore the previous settings, select "Equal".
Font > SansS., SansS.HG, SansS.ST, Gothic, B.Gothic, Roman,
US Roman, CL Roman, Mincho, Gyosho, Reisho, BR, CB, ScriptPL
Changes the font type of text.
Procedure for setting
Place the cursor.
Place the cursor on the left of the characters to which you want to
apply a function.
If you apply the function to a speci c line or block, con rm that the
cursor is in the line or block.
Press .
Example: to apply "Bold & Italic"
Select "Bold & Italic" with and press
.
Select "B + I" with and press .
Select an area to which you want to apply
the function with and press
.
When "character" is selected, the function is
applied to all characters on the right of the
cursor.
MEMO
When "Length", "Margins", or "Background" is selected from Edit
menu, the settings are applied to the whole label.
Setting special print
Print copies
When "Until stopped" is selected, labels are printed continuously until
any key is pressed.
Mirror print
Press .
Select a function with and press .
Select an option with and press .
When "Print copies" - "Set number" is selected, enter the number of
copies and press .
Select "Start print?" with and press .
Printing starts.
Print settings +
Print density
Adjustable in seven levels. Usually use "0".
Auto cut
When "O " is selected, the label is not automatically cut.
When cutting the tape, cut it with the "Feed and cut" function.
"Feeding the tape"
Press + .
Select a function with and press .
Select an option with and press .
When a message appears
This section explains the remedies when the following messages appear on the
display.
Check battery
Change alkaline
The batteries run out. Turn o the power and replace all
batteries with new ones.
For how to replace batteries, see the following:
"Using batteries (commercially available)"
Check battery
Change Ni-MH!
Cover open!
Powering o .
Top cover is open. Close the cover, and turn on the power
again.
Insert tape Check if the tape cartridge is loaded or correctly set.
For how to install a tape cartridge, see the following:
"Installing a tape cartridge"
Check tape
cartridge
The loaded tape is not supported. Insert a correct cartridge.
Insert 24* tape! Printing is available only for 24 mm tape. Use a 24 mm tape.
Load wider tape Unable to print on the loaded tape. Change to wider tape.
Too many lines. Delete some lines because they exceed the speci ed value.
Printing length
too long!
Shorten the text. Unable to print because the text length
exceeds 16 m.
Text is too long
Continue?
Text over ows for the speci ed length. Shorten the text or
press for printing label in text length.
No more
sequence No.!
Only one serial number sequence can be set at a time.
No more barcode!
Only one barcode can be created at a time.
QR CODE too big!
Perform either of the following:
Use a wider tape. Reduce the text or cell size. Lower "ECC Level".
Overheated! The printhead is overheated. Turn o the power and remove
the tape cartridge, then leave the product until it cools down.
Motor error! The motor is abnormal. The power is automatically turned o .
Turn the power back on. If the error persists, contact your local
Epson customer support centre.
Changing the font
Press .
The font used for the entire text will change.
The fonts appear in the following order.
SansS. SansS.HG SansS.ST Gothic B.Gothic Roman
US Roman CL Roman Mincho Gyosho Reisho BR
CB Script PL Back to SansS.
MEMO
To change the setting by line or character, use .
Creating labels with serial numbers
Press .
Enter a number(0-9 or 00-99) or alphabet(A-Z
or a-z) and press .
Select a repetition number with and press .
If the repetition number is two or more, the same label is printed for the
number of times, then the number/alphabet increases.
If a one-digit number such as "2" is entered in Step 2, the following is
displayed.
On: becomes "10" after "9" and goes up to "99".
O : goes back to "0" after "9".
Adding a barcode +
Supported barcode types:
EAN-8, EAN-13,CODE128, CODE39,
QR CODE, ITF, CODABAR, UPC-A, UPC-E
Press + .
Select an item with and press .
Move on to the next options until the setting is complete.
When [| ] appears on the display, enter the barcode number.
MEMO
Only one barcode can be inserted into a label.
Creating a label or editing a created label
Initializing the settings
Initialize the settings if LW-700 does not operate normally such as the display is
interrupted.
Attention
This function initializes the settings. Take extreme care before initializing it.
All the created text will be lost and the settings you made will be reset.
If the power is on, press to turn it o .
Press and hold + , and press .
When a message appears, press .
The settings will be initialized.
MEMO
To cancel initialization, press a key other than .
Preference menu
You can adjust LW-700 for more comfortable use by setting the
following.
Contrast
You can adjust the difference between light and dark on the
display.
Backlight
Turns the backlight of the display on/o .
Battery type
If you use Nickel-hydride batteries, select "Ni-MH".
"Alkaline" is selected by default.
Language
You can select the language shown on the display from the
following:
English, Español, Italiano, Português-EU, Français, Nederlands,
Deutsch, Svenska, Suomi, Norsk, Dansk, Português-Br
inch:cm
The unit of length used to indicate the label size can be switched
between inch and cm.
Procedure for setting
Press .
Select a function with and press .
Select an item with and press .
Creating a tab and multi label
Press .
Select a function with and press .
Select the length and press .
Enter characters and/or symbols.
When "Panel"is selected, press , then
enter text for the next label.
Press .
MEMO
6 mm tape cannot be used for this function.
To create a label other than a tab or multi label:
1. Press .
2. Select "Exit" and press .
•
•
Creating a label for cables
Press .
Select a function with and press .
Select the length and press .
Enter characters and/or symbols.
Press .
MEMO
When creating a "Wrap:H" label, use 24mm tape.
To create a label other than a label for cables:
1. Press .
2. Select "Exit" and press .
•
•
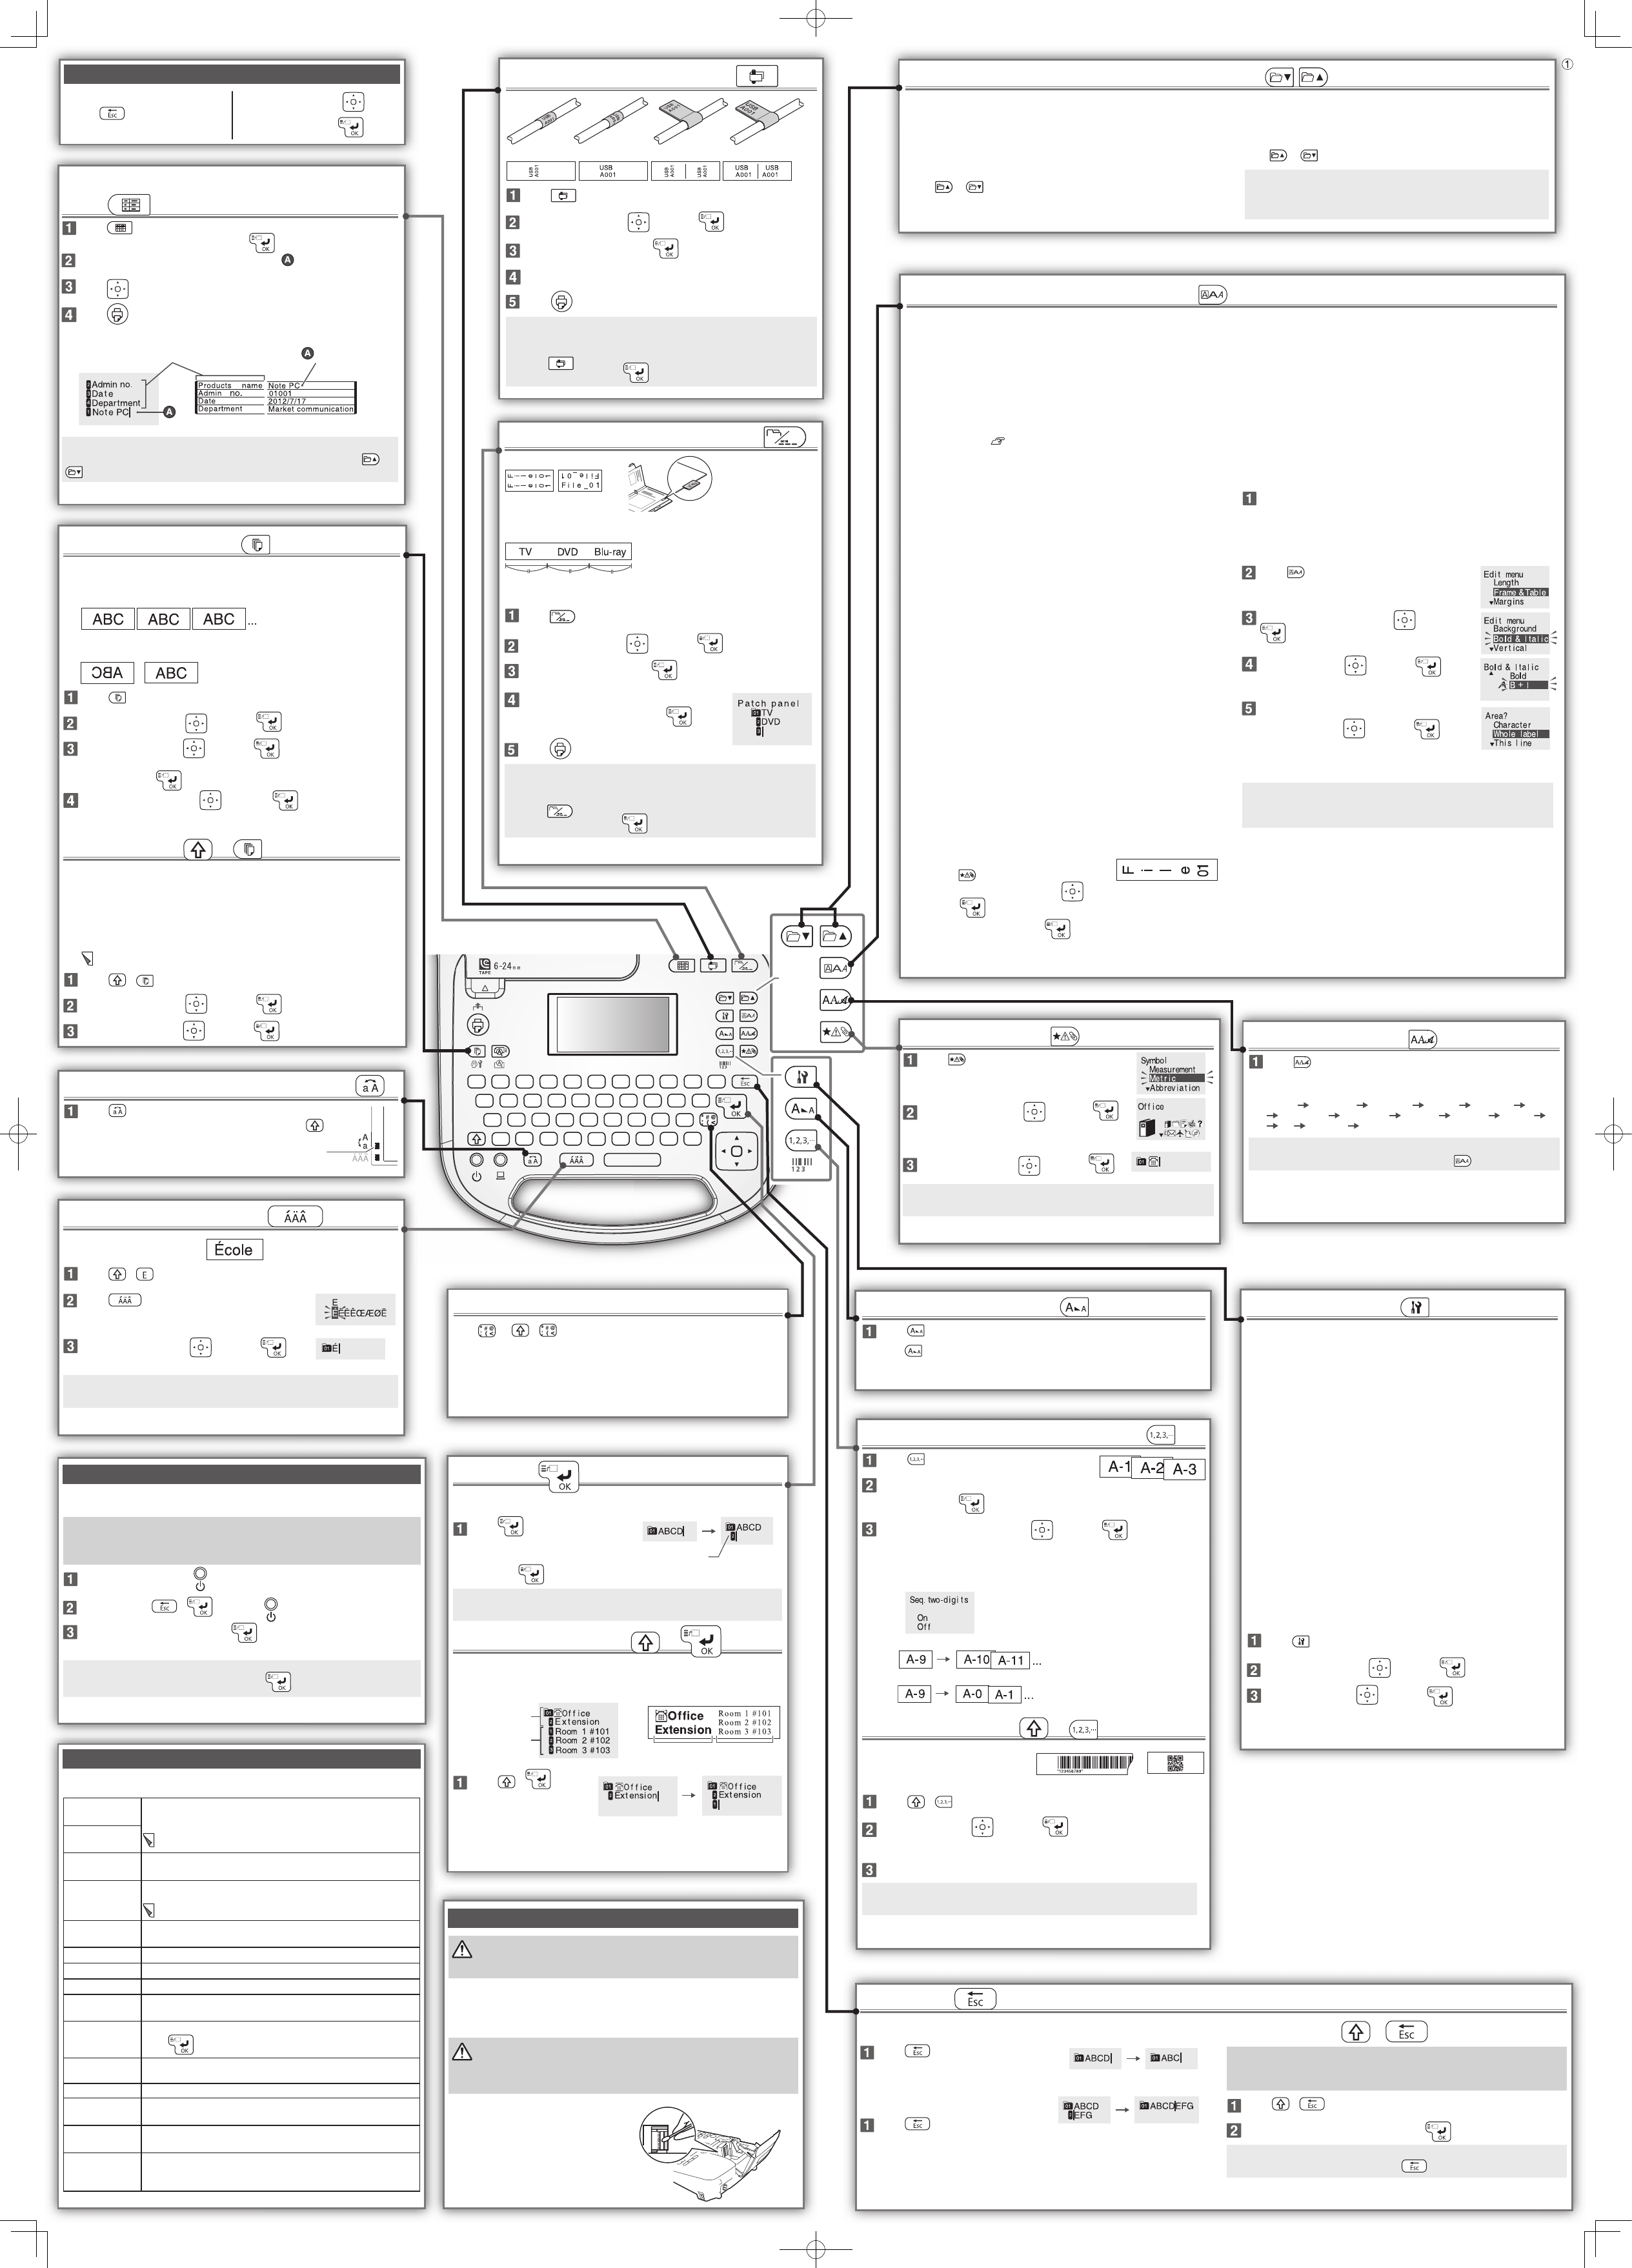
Creating an equipment management
label
Press .
When "Overwrite text?" appears, press .
Enter text for "Products name" shown with in the sample below.
Press to go to the next line, and enter text.
Press .
MEMO
To create a label other than an equipment management label, press or
.
Switching upper case or lower case
Press .
To capitalize characters partially, press and hold , and
enter characters.
Adding an accent mark
When entering "É" for example
Press + .
Press .
A list of characters appears.
Select a character with and press .
MEMO
For available accented characters, see "Symbol List" on the separate sheet.
Changing the font size
Press .
Press repeatedly until an appropriate font size appears.
Enter key
Adding a line
Press .
To break a line, place the cursor
where you want to break the line,
then press .
MEMO
If "Too many lines." appears, reduce the number of lines.
Adding a New Block +
By dividing text into blocks, you can change the style and the number of
lines block-by-block.
Press + .
A new block is started
from the character next to
the cursor.
Adding a punctuation mark
Press (or + ) for the next mark.
* The location of the punctuation key and symbols printed on it will vary
depending on the region of purchase.
Decorating your label (Edit menu)
You can decorate your label by setting the following.
The text you have entered before turning LW-700 o is stored unless
deleting it or initializing the settings.
So, when LW-700 is turned on, the display shows the text you entered
before LW-700 was previously turned o .
When text appears:
Overwrite the displayed text. (The overwritten text is deleted.)
Press or and select a label number in which there is no text,
then enter text.
•
•
When no text appears:
Enter text there.
To create the next label continuously:
Press or and select a label number to use, then enter text.
MEMO
The label number is between 00 and 99. Up to 100 labels can be
created at a time.
Deleting characters
Press .
A character is deleted backward.
Deleting lines
Press at the line number.
Deleting all text +
Attention
This operation deletes all the text for the current label. The deleted text
cannot be restored.
Press + .
When "Delete all text?" appears, press .
MEMO
To exit without deleting any text, press .
Key functions during operation
To redo or exit without changing the
setting:
To select a setting item:
To con rm the setting:
Block1 Block2
Block1
Block2
Label
Display
Wrap:V
Wrap:H Flag:V
Flag:H
On
O
The second line
Text in is for this cell.
Automatically entered.
LabelDisplay
Tab:V Tab:H
The indicator shows which case
you are using.
Panel
Creates labels with the same width when the length is speci ed in
"Length".
When "Auto" is selected in "Length", the margins of the label become
the same.