1.Unpack the printer.2.Attach the paper support and plug in the printer.
Installing the Ink Cartridges
1.Press Pbutton to turn on the printer.2.Remove the ink cartridges from their protective bags,
then peel off the yellow tape.
.
c
Caution:
Do not shake the ink cartridges; this can cause leakage.
3.Install the ink cartridges as shown below.
c
Caution:
❏Do not move the print head by hand; otherwise, you may damage the printer.
❏Do not load paper until ink charging is complete.
Note:
Install both ink cartridges. The printer will not work unless both cartridges are installed properly.
4.Press the eink cartridge replacement button.
The printer begins ink charging. It takes about one and a half minutes. While charging, the printer produces a variety of mechanical
sounds. This is normal. When the green lamp stops flashing, ink charging is complete.
c
Caution:
Do not turn off the printer during the ink charging process.
Note:
The ink cartridges packaged with your printer are partly used during initial setup. In order to produce high quality printouts,
the print head in your printer will be fully charged with ink. This one-off process consumes a quantity of ink and subsequent
cartridge sets will last for their full rated life.
Safety Instructions
Read all of the instructions in this section when setting up and using your printer.
When choosing a place for the printer
❏Avoid places subject to rapid changes in temperature and humidity. Also, keep the printer away
from direct sunlight, strong light, or heat sources.
❏Avoid places subject to dust, shocks, and vibrations.
❏Leave enough room around the printer to allow for sufficient ventilation.
❏Place the printer near a wall outlet where the plug can be easily unplugged.
❏Place the printer on a flat, stable surface that extends beyond the printer base in all directions. If
you place the printer by the wall, leave more than 10 cm between the back of the printer and
the wall. The printer will not operate properly if it is tilted at an angle.
❏When storing or transporting the printer, do not tilt it, put it vertically or turn it upside down;
otherwise, ink may leak from the cartridge.
When choosing a power source
❏Use only the type of power source indicated on the printer’s label.
❏Be sure your AC power cord meets the relevant local safety standard.
❏Do not use a damaged or frayed power cord.
❏If you use an extension cord with the printer, make sure that the total ampere rating of the devices plugged
into the extension cord does not exceed the cord’s ampere rating. Also, make sure that the total ampere
rating of all devices plugged into the wall outlet does not exceed the wall outlet’s ampere rating.
❏If you plan to use the printer in Germany, the building installation must be protected by a 10 or 16 amp
circuit breaker to provide adequate short-circuit protection and over-current protection for this printer.
When handling ink cartridges
❏Do not open the ink cartridge packages until just before you install them.
❏Keep ink cartridges out of the reach of children. Do not allow children to drink from or otherwise
handle the cartridges.
❏Be careful when you handle used ink cartridges, as there may be some ink remaining around the
ink supply port. If ink gets on your skin, wash the area thoroughly with soap and water. If ink gets
into your eyes, flush them immediately with water. If discomfort or vision problems remain after a
thorough flushing, see a doctor immediately.
❏Do not shake the ink cartridges; this can cause leakage.
❏You must remove the yellow tape seals from the cartridges before installing them; otherwise, the
cartridges will become unusable.
❏Do not remove the blue portion of the tape seal from the top of the cartridges.
❏Do not remove the tape seals from the bottom of the cartridges.
❏Do not touch the green IC chip on the side of the cartridge.
❏The IC chip on this ink cartridge retains a variety of cartridge related-information, such as the
amount of ink remaining, so that a cartridge may be removed and reinserted freely. However,
each time the cartridge is inserted, some ink is consumed because the printer automatically
performs a reliability check.
When using the printer
❏Do not put your hand inside the printer or touch the ink cartridges during printing.
❏Do not block or cover the openings in the printer.
❏Do not attempt to service the printer yourself.
❏Unplug the printer and refer servicing to qualified service personnel under the following conditions:
The power cord or plug is damaged; liquid has entered the printer; the printer has been dropped
or the cabinet damaged; the printer does not operate normally or exhibits a distinct change in
performance.
❏Do not insert objects through the slots in the printer.
❏Take care not to spill liquid on the printer.
❏Leave the ink cartridges installed. Removing the cartridges can dehydrate the printer head and
may prevent the printer from printing.
Information for United Kingdom Users
Use of options
EPSON (UK) Limited shall not be liable against any damages or problems arising from the use
of any options or consumable products other than those designated as Original EPSON
Products or EPSON Approved Products by EPSON (UK) Limited.
Safety information
w
Warning:
Refer to the rating plate for the voltage and check that the appliance
voltage corresponds to the supply voltage.
Important:The wires in the mains lead fitted to this appliance are coloured in
accordance with the following code:
Blue — Neutral
Brown — Live
If you have to fit a plug:
As the colours of the mains lead of this appliance may not match the coloured markings used
to identify the terminals in a plug, please observe the following:
❏The blue wire must be connected to the terminal in the plug marked with the letter N.
❏The brown wire must be connected to the terminal in the plug marked with the letter L.
❏If the plug is damaged, replace the cord set or consult a qualified electrician.
❏Replace fuses only with fuses of the correct size and rating.
The contents may vary in certain locations.
The power cord comes attached in some countries.
Setup
printer
ink cartridgespaper supportpower cordCD-ROM
Do not touch
this part.
Do not remove the blue portion.
Do not remove the tape seal
from the ink supply ports.
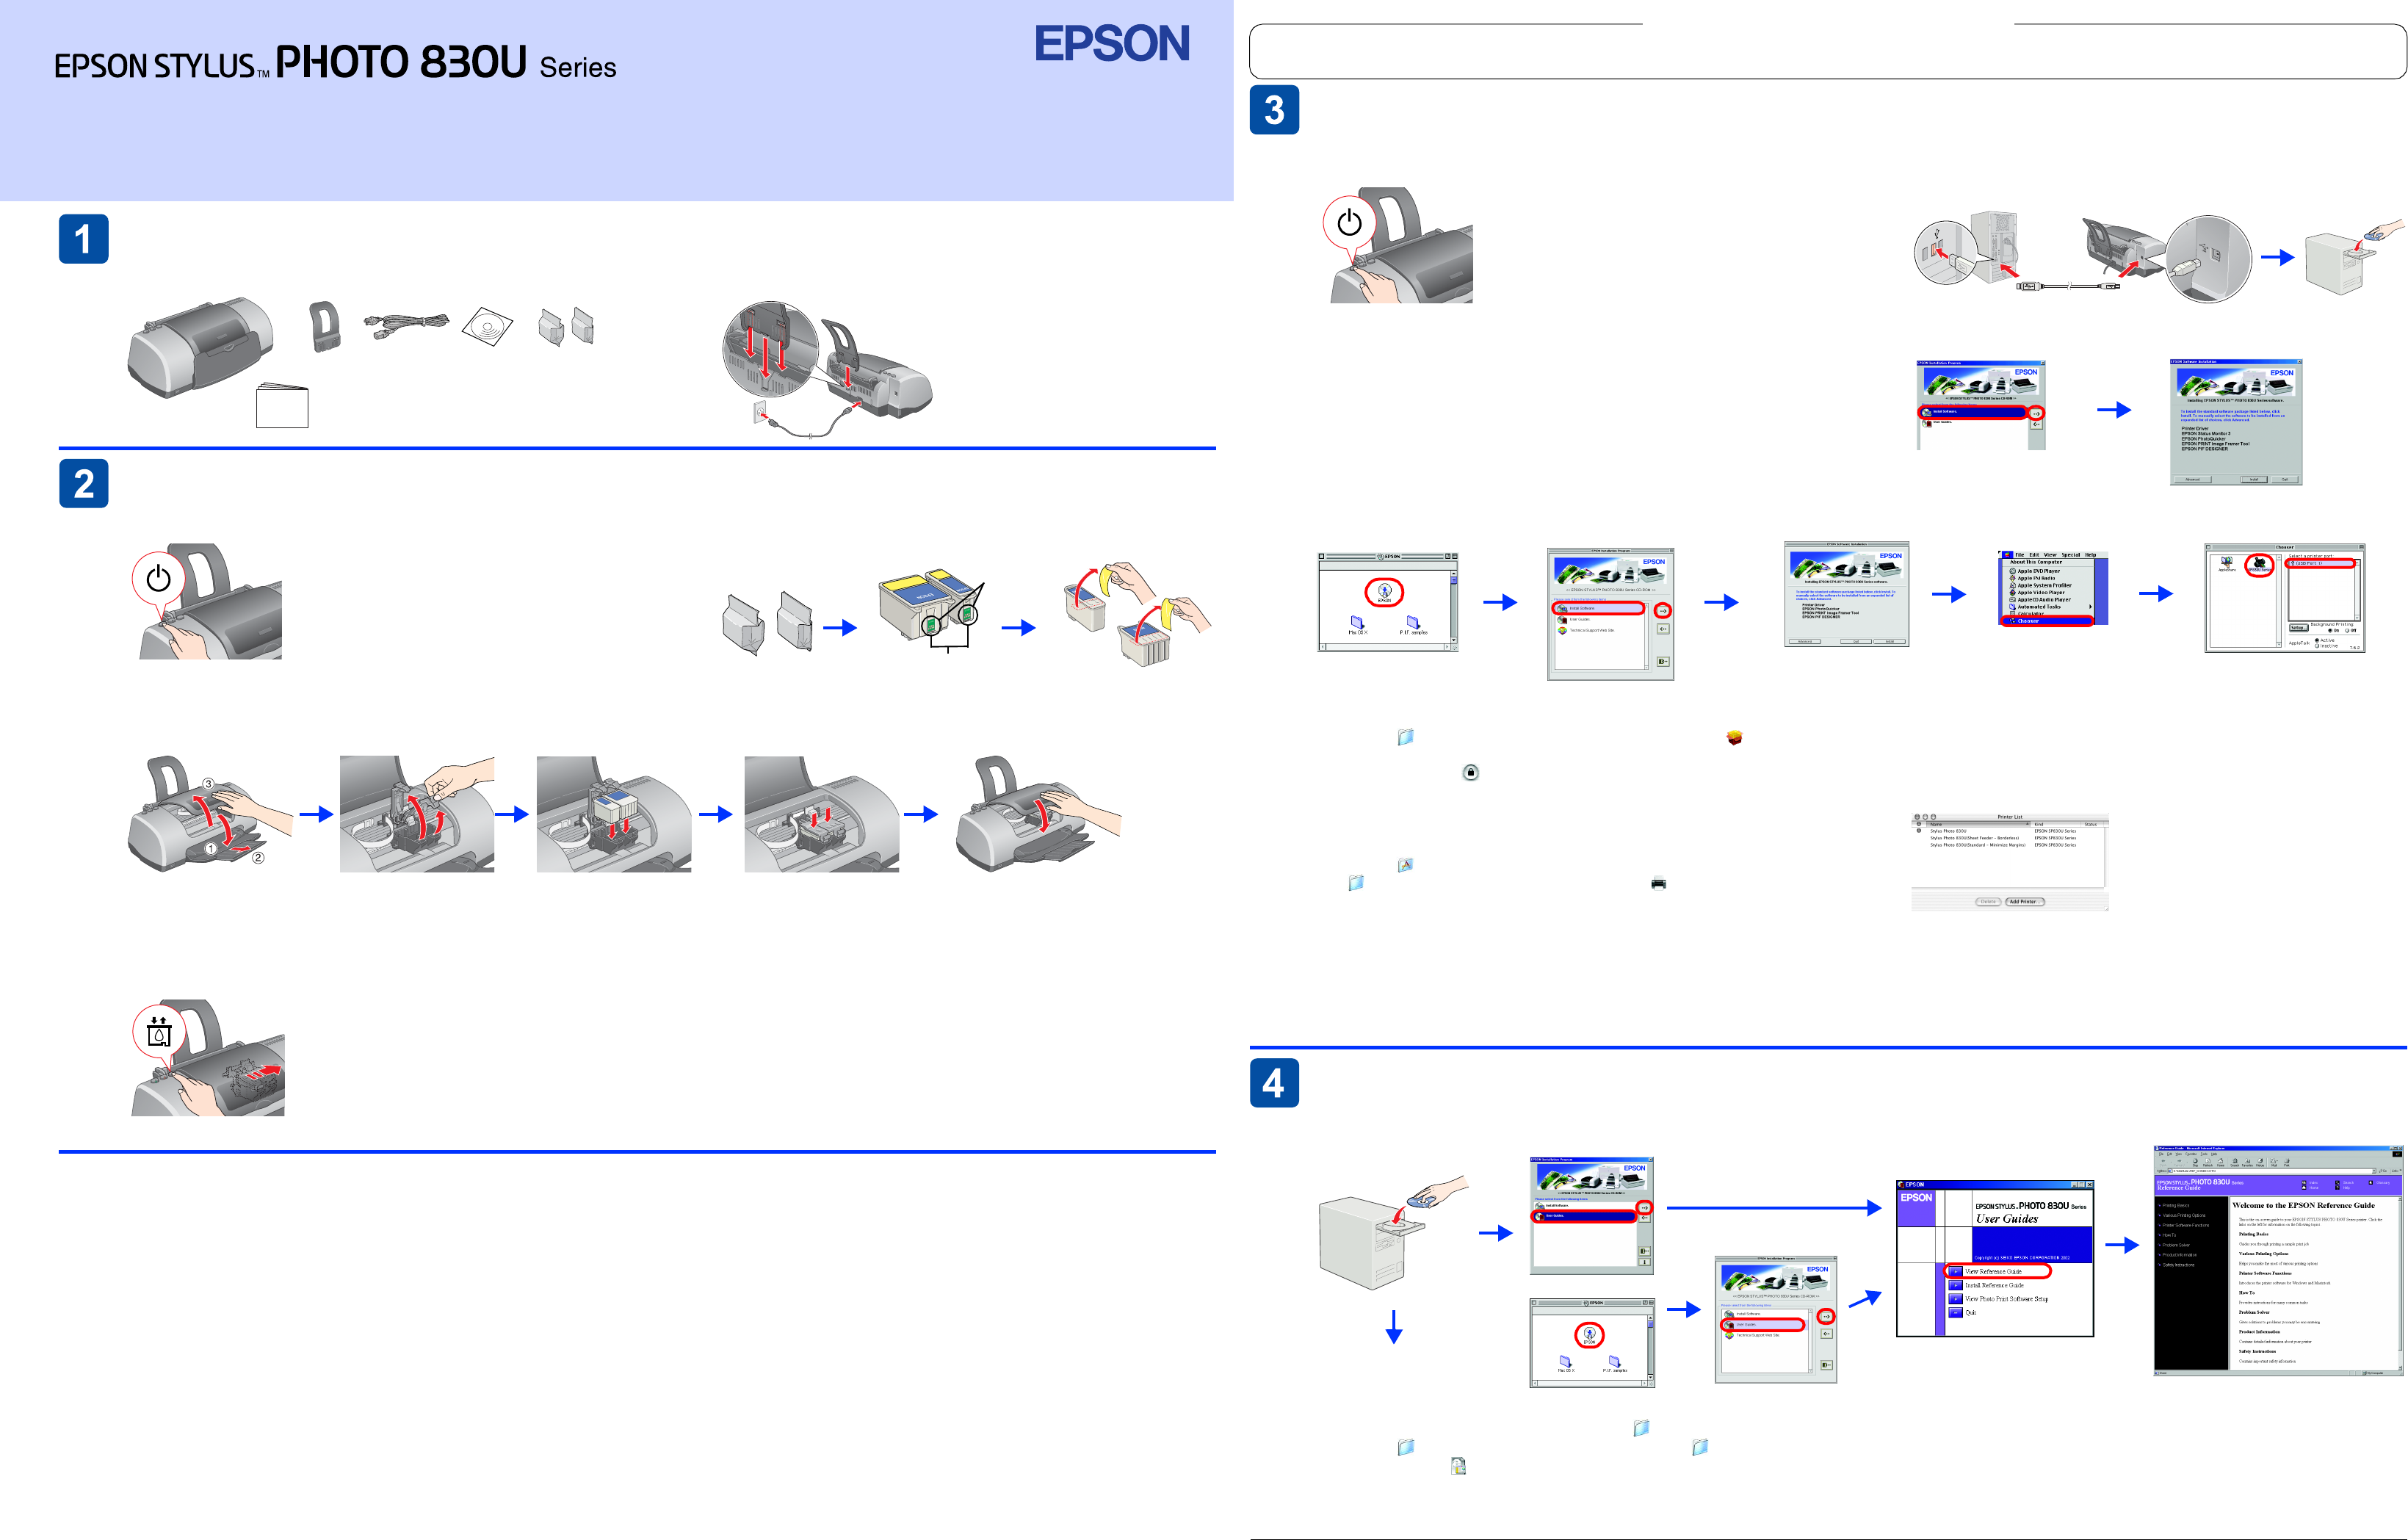
Installing the Printer Software
1.Press the Ppower button to turn off the printer. The
green light goes off.
2.Connect the printer and computer with a USB cable,
then insert the printer software CD into the CD-ROM
drive.
3.Install the printer software.
Except where otherwise instructed, click or double-click the areas
circled in red to proceed.
c
Caution:
Macintosh users turn off all virus protection programs before
installing the printer software.
Note:
For information about installing the Photo Print Software, refer to
the Photo Print Software Setup under User Guides on the printer
software CD.
For Windows
For Max OS 8.6 to 9.X
For Mac OS X
1.Open the Mac OS X folder, then double-click the
SP830USeries_xxxx.pkg icon. If the Authorization dialog box
appears, click the icon (Mac OS X 10.1.x only), enter the
Password or phrase, then click OK.
2.Follow the on-screen instructions to install the software.
3.After installing the software and restarting the computer, press
the P button to turn on the printer.
4.Open the Applications folder on your hard drive, then open
the Utilities folder and double-click the Print Center icon.
Click Add Printer in the Printer List dialog box.
5.Select EPSON USB from the pop-up menu. Select SP830U
Series(USB) in the Product list, then select All from the Page
Setup pop-up menu. Click Add.
6.Make sure the Printer List contains the printer(margin-type)
options as illustrated below. See the Reference Guide on the
printer software CD-ROM for more details.
7.Close Print Center.
Note:
When you print, be sure to match the Format for setting in the Page Setup dialog box and the Printer setting in the Print dialog box. Otherwise,
the data may not be printed correctly. See the Reference Guide for more details.
After installation is complete, see Printing Basics on the online Reference Guide for detailed information about printing
from your computer for the first time.
Accessing the Reference Guide
The Reference Guide provides detailed information about printing from a computer, printer maintenance, problem solving, and safety.
For Mac OS X
1.Use the scroll bar to scroll down until the English folder appears, then open it.
2.Open the User Guides folder, then open the REF_G folder.
3.Double-click the INDEX.HTM icon to open the online Reference Guide.
Follow the on-screen instructions.
If the installation dialog box does not
appear, double-click the SETUP file
on the CD-ROM.
1
2
Follow the on-screen instructions.
After installing the software and restarting
the computer, turn on the printer.
Select your printer and the port that your printer
is connected to, then close the chooser.
1
1
2
2
Windows
Mac OS 8.6 to 9.X
1
2
1
2
Mac OS 8.6 to 9.X
Setup
w
Warnings must be followed carefully to
avoid bodily injury.
Warnings, Cautions and Notes
Notes contain important information and useful
tips on the operation of your printer.
All rights reserved. No part of this publication may be reproduced, stored in a retrieval system, or transmitted in any form or by any means, electronic, mechanical, photocopying, recording, or otherwise, without the prior written permission
of SEIKO EPSON CORPORATION. The information contained herein is designed only for use with this EPSON printer. EPSON is not responsible for any use of this information as applied to other printers. Neither SEIKO EPSON CORPORATION
nor its affiliates shall be liable to the purchaser of this product or third parties for damages, losses, costs, or expenses incurred by the purchaser or third parties as a result of: accident, misuse, or abuse of this product or unauthorized
modifications, repairs, or alterations to this product, or (excluding the U.S.) failure to strictly comply with SEIKO EPSON CORPORATION's operating and maintenance instructions.
SEIKO EPSON CORPORATION shall not be liable for any damages or problems arising from the use of any options or any consumable products other than those designated as Original EPSON Products or EPSON Approved Products by
SEIKO EPSON CORPORATION. SEIKO EPSON CORPORATION shall not be held liable for any damage resulting from electromagnetic interference that occurs from the use of any interface cables other than those designated as EPSON
Approved Products by SEIKO EPSON CORPORATION. EPSON is a registered trademark and EPSON Stylus is a trademark of SEIKO EPSON CORPORATION.
Microsoft and Windows are registered trademarks of Microsoft Corporation.
Apple and Macintosh are registered trademarks of Apple Computer, Inc.
General Notice: Other product names used herein are for identification purposes only and may be trademarks of their respective owners. EPSON disclaims any and all rights in those marks.
English
4041716-00
xxx
Color Ink Jet Printer
c
Cautions must be observed to avoid damage to
your equipment.
Brauchen Sie Hilfe? Stellen Sie Ihre Frage.
Missbrauch melden von Frage und/oder Antwort
Libble nimmt den Missbrauch seiner Dienste sehr ernst. Wir setzen uns dafür ein, derartige Missbrauchsfälle gemäß den Gesetzen Ihres Heimatlandes zu behandeln. Wenn Sie eine Meldung übermitteln, überprüfen wir Ihre Informationen und ergreifen entsprechende Maßnahmen. Wir melden uns nur dann wieder bei Ihnen, wenn wir weitere Einzelheiten wissen müssen oder weitere Informationen für Sie haben.
Art des Missbrauchs:
Forenregeln
Um zu sinnvolle Fragen zu kommen halten Sie sich bitte an folgende Spielregeln:
Lesen Sie zuerst die Anleitung;
Schauen Sie nach, ob die Frage bereits gestellt wurde;
Stellen Sie die Frage so deutlich wie nur einigermaßen möglich;
Erwähnen Sie was Sie bereits versucht haben um das Problem zu lösen;
Ist Ihr Problem von einem Besucher gelöst dann lassen Sie ihn / sie wissen in diesem Forum;
Falls Sie reagieren möchten, so verwenden Sie bitte das Antworten- Formular;
Da ihre Frage für alle Besucher sichtbar ist, sollten Sie lieber keine persönliche Daten erwähnen.
Neu registrieren
Registrieren auf E - Mails für Epson STYLUS PHOTO 830U wenn:
neue Frage gestellt werden
neue Handbücher vorhanden sind
Sie erhalten eine E-Mail, um sich für eine oder beide Optionen anzumelden.
Das Handbuch wird per E-Mail gesendet. Überprüfen Sie ihre E-Mail.
Wenn Sie innerhalb von 15 Minuten keine E-Mail mit dem Handbuch erhalten haben, kann es sein, dass Sie eine falsche E-Mail-Adresse eingegeben haben oder dass Ihr ISP eine maximale Größe eingestellt hat, um E-Mails zu erhalten, die kleiner als die Größe des Handbuchs sind.
Ihre Frage wurde zu diesem Forum hinzugefügt
Möchten Sie eine E-Mail erhalten, wenn neue Antworten und Fragen veröffentlicht werden? Geben Sie bitte Ihre Email-Adresse ein.