1.Remove the new ink cartridges from their protective
bag.
c
Caution:
❏Do not shake the ink cartridge; this can cause
leakage.
❏Do not remove the blue portion of the tape
seal from the top of the cartridges.
❏Do not remove the tape seals from the bottom of the cartridges.
2.Lower the output tray, and then open the printer
cover.
c
Caution:
Do not move the print head by hand, as this
may damage the printer.
3.Install the ink cartridges as shown in the illustration
below.
c
Caution:
Make sure that the ink cartridge tabs are not under the
tabs protruding from the base of the opened ink
cartridge clamps, as this can damage the clamps.
Note:
The printer will not work unless all cartridges are properly
installed.
4.Press the H ink button. The printer moves the print
head and begins charging the ink delivery system.
This process takes about one and half minutes.
During the ink charging process, the Ppower light
flashes and the printer produces a variety of
mechanical sounds. This is normal.
c
Caution:
❏Do not turn the power off during the ink charging process.
❏Do not load paper until ink charging is complete.
Note:
❏If the ink end error occurs after the print head moves to its home
position, the ink cartridge may not be installed properly. Press the Hink
button again, and reinstall the ink cartridge so that it clicks into place.
❏In order to produce high quality printouts, the print head in your printer
must be fully charged with ink during the initial setup. This process
consumes ink from the ink cartridges packed with your printer.
Replacement cartridges will last for their full rated life.
5.When the ink charging process is finished, the Ppower light stops flashing
and remains on.
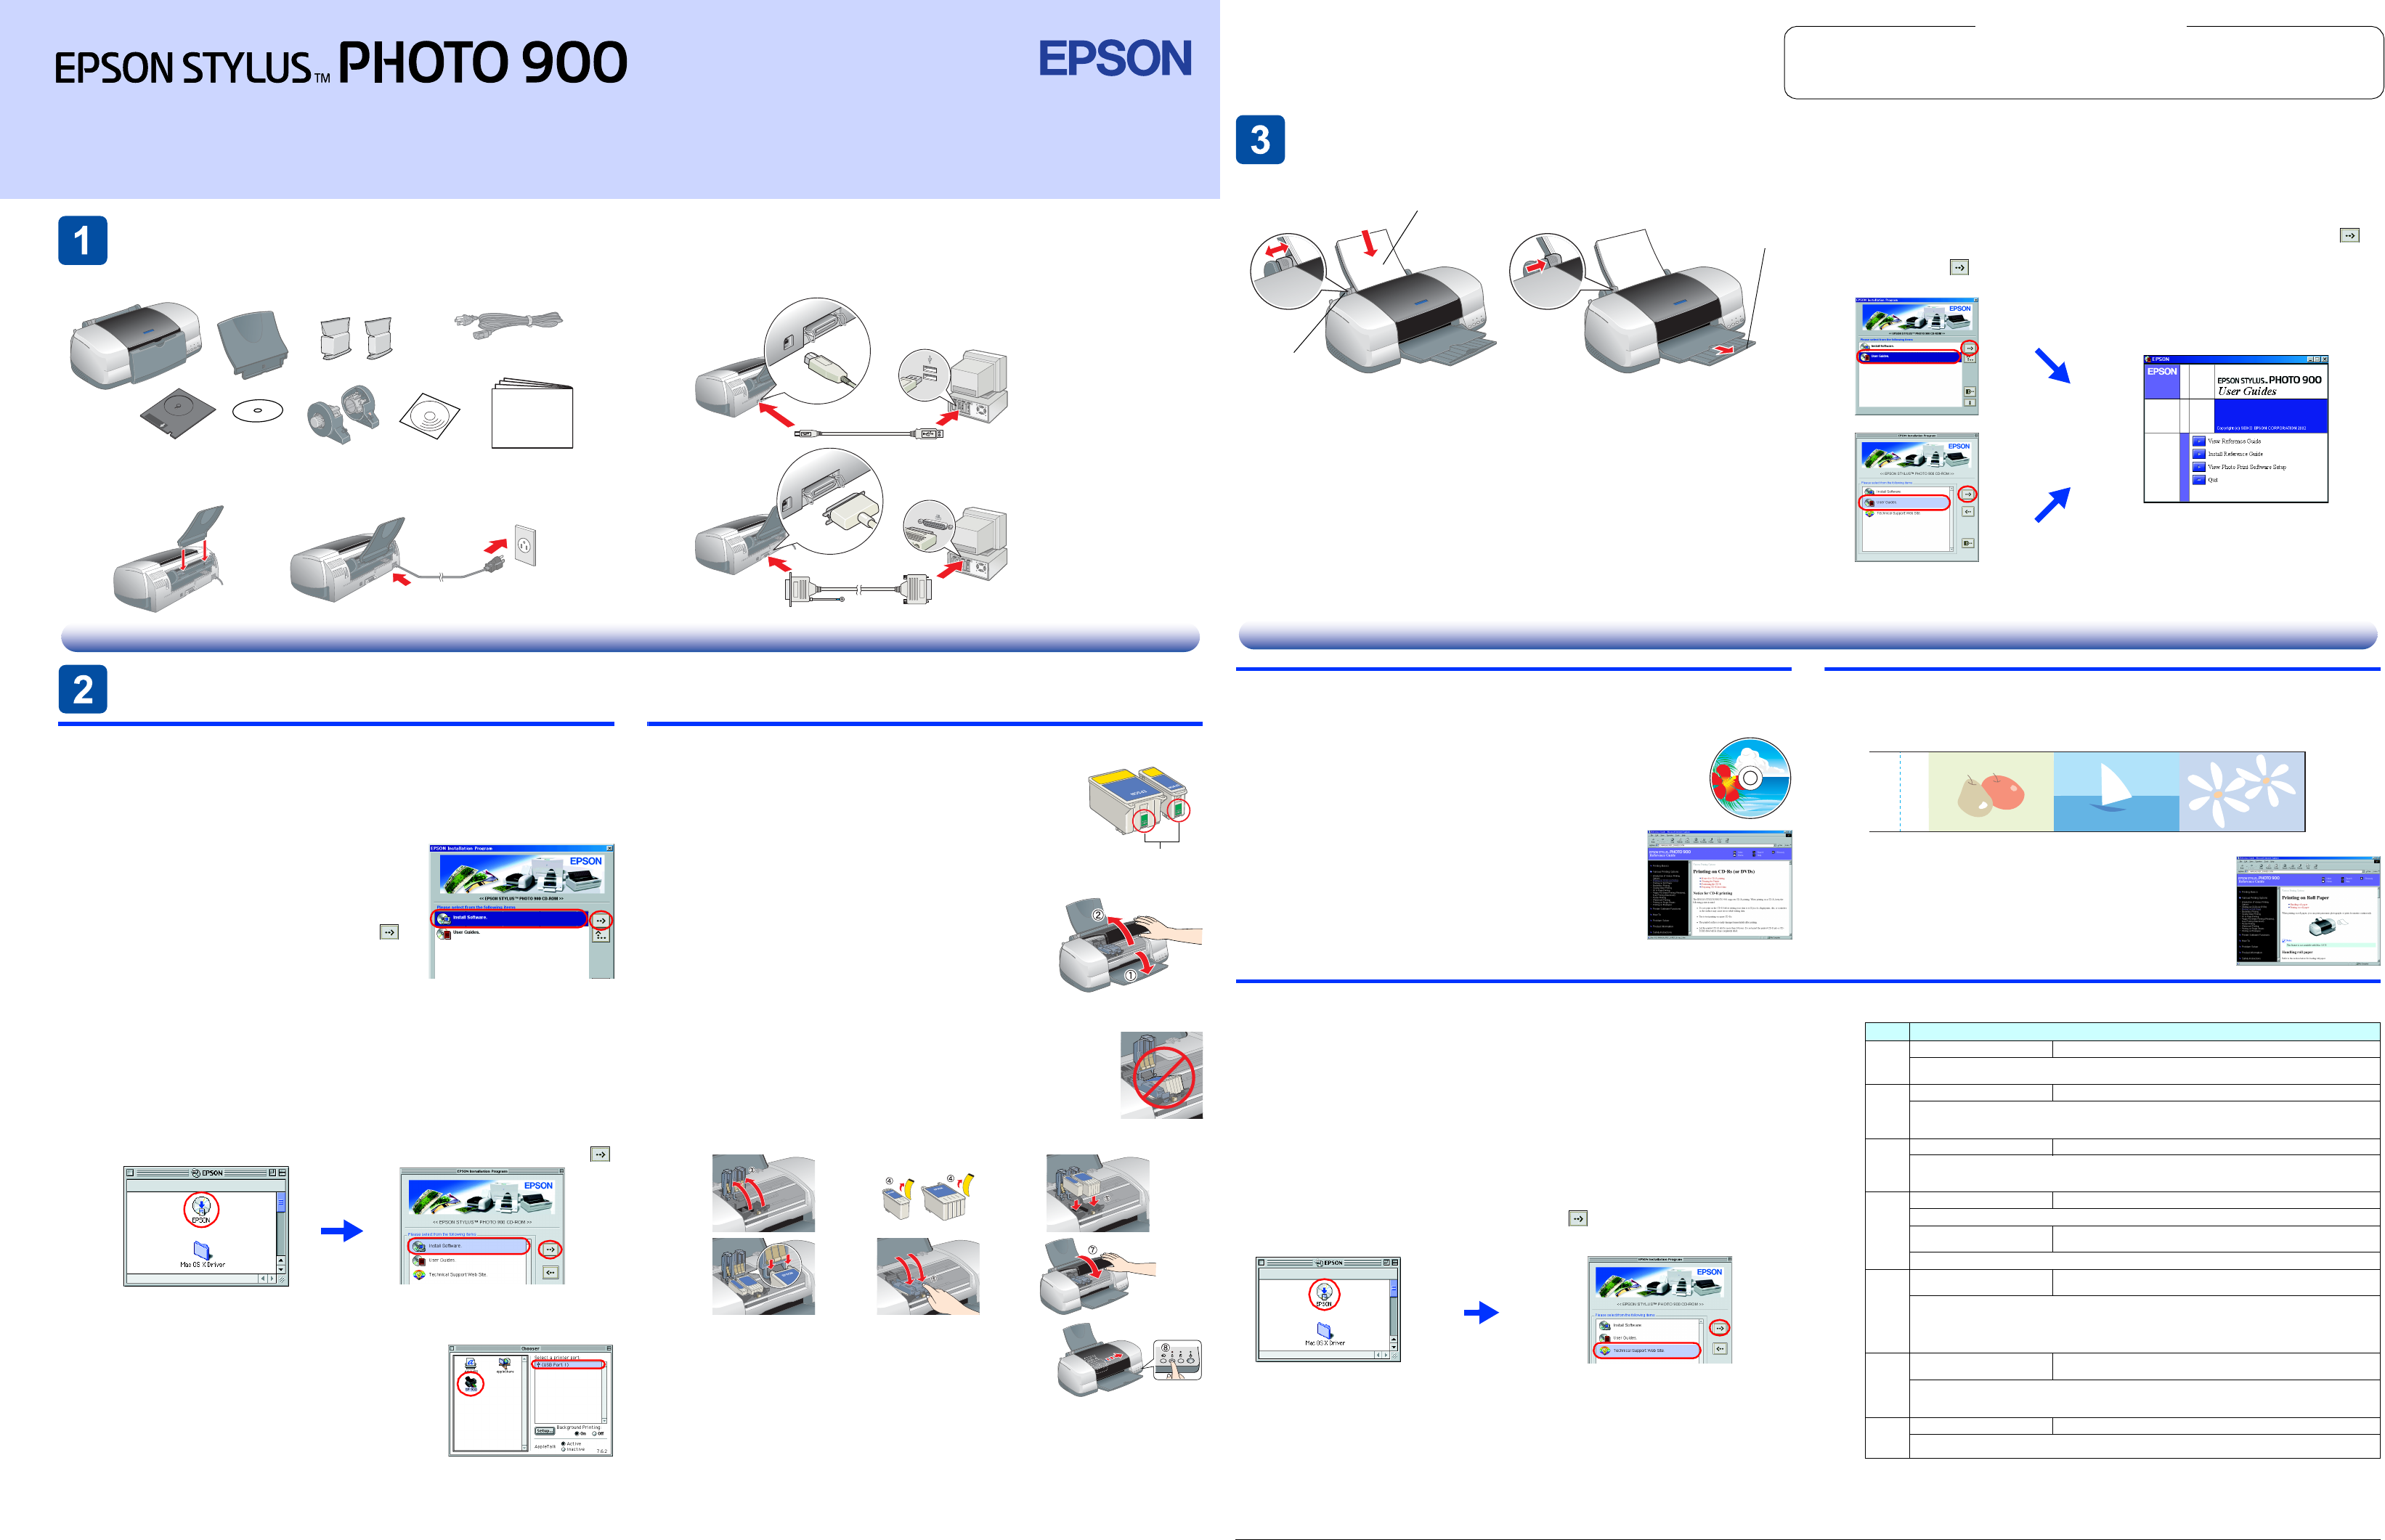
The contents may vary in certain locations.
The power cord may come
attached in some countries.
Setup
Do not touch this part.
Checking the Printer
Loading Paper
Your printer is now ready to use.
See “Printing Basics” in the online Reference Guide for detailed instructions
when printing for the first time.
The online Reference Guide also contains the following information:
❏Various Printing Options
❏Printer Software Functions
❏How To
❏Problem Solver
❏Product Information
❏Safety Instructions
Refer to the online Reference Guide for more details.
Accessing the Online Reference Guide
Follow these steps to access the online Reference Guide.
1.Insert the printer software CD in the CD-ROM drive.
2.For Windows, select User Guides in the dialog box, and then click .
For Macintosh, double-click the EPSON icon, select User Guides, and
then click .
In Mac OS X, the dialog box does not appear when the printer software CD is
inserted. To access the online Reference Guide, double-click English\User
Guides\REF_G\INDEX.HTM.
Printing on CD/DVD
Introduction
You can create attractive CD/DVD labels like the sample shown here.
For details on CD/DVD printing, see the online Reference
Guide.
Printing on Roll Paper
Introduction
Roll paper printing is fun and enables you to print banners like the sample shown.
For details on roll paper printing, see the online Reference
Guide.
Problem Solver
Online problem-solving
The EPSON’s Technical Support Web site provide you with tips to help solve problems. Access
the Technical Support in the following ways:
For Windows
❏Click Technical Support in the Status Monitor 3 dialog box or on the Main menu of the printer
software.
For further information on the customer support services available in your area, see the online
Reference Guide.
For users of Mac OS 8.1 or later (except Mac OS X)
1.Insert the CD in the CD-ROM drive.
2.Double-click the EPSON icon.
3.Select Technical Support Web Site, and then click .
For further information on the customer support services available in your area, see the online
Reference Guide.
For users of Mac OS X
Access the Web site at:
http://support.epson.net/StylusPhoto900/
Error indicators
You can identify many common problems using the lights on the printer’s control
panel. Use the following table of light patterns to diagnose the problem, and then
follow the recommended corrective measures.
O O= on, N = off, k k= flashing
Black ink cartridge T007/Color ink cartridge T009
printable side up
left edge guide
output tray
extension
Windows
Macintosh
LightsProblem and solution
O m
Paper outNo paper is loaded in the printer.
Load paper in the sheet feeder, and then press the mpaper button. The printer resumes printing
and the light goes out.
k m
N H
Paper jamPaper has jammed in the printer.
Press the mpaper button to eject the jammed paper. If the error does not clear, open the printer
cover and remove all of the paper inside, including any torn pieces. Then, reload the paper in
the sheet feeder and press the mpaper button to resume printing.
k H
Ink lowThe black or color ink cartridge is nearly empty.
Obtain a replacement black or color ink cartridge. To determine which cartridge is nearly
empty, check the ink levels using EPSON Status Monitor 3 (Windows) or EPSON StatusMonitor
(Macintosh).
O H
Ink outAn ink cartridge is empty or not installed.
Replace the black or color ink cartridge with a new one.
Wrong cartridgeThe currently installed ink cartridge cannot be used with this
printer.
Replace the incompatible cartridge with an appropriate black or color ink cartridge.
O P
O H
Incorrectly installed ink
cartridge
An ink cartridge is not installed correctly.
If the print head is at the home position, press the H ink button to move the print head to the
ink cartridge replacement position. Remove and reinsert the ink cartridge. Then, continue with
the ink cartridge installation.
If the print head is at the ink cartridge replacement position, remove and reinsert the ink
cartridge. Then, continue with the ink cartridge installation.
N P
k m
k H
Carriage errorThe print head carriage is obstructed by jammed paper or other
foreign material and cannot return to the home position.
Turn off the printer. Open the printer cover and remove any paper or other obstructions from
the paper path by hand. Then, turn the printer back on.
If the error does not clear, contact your dealer.
N P
k m
k H
Unknown printer errorAn unknown printer error has occurred.
Turn off the printer and contact your dealer.
c
Cautions must be observed to
avoid damage to your equipment.
Notes contain important information
and useful tips on the operation of your
printer.
English
Cautions and Notes
Setup
All rights reserved. No part of this publication may be reproduced, stored in a retrieval system, or transmitted in any form or by any means, electronic, mechanical, photocopying, recording, or otherwise, without the prior written permission of SEIKO EPSON CORPORATION.
The information contained herein is designed only for use with this EPSON printer. EPSON is not responsible for any use of this information as applied to other printers. Neither SEIKO EPSON CORPORATION nor its affiliates shall be liable to the purchaser of this product or
third parties for damages, losses, costs, or expenses incurred by the purchaser or third parties as a result of accident, misuse, or abuse of this product or unauthorized modifications, repairs, or alterations to this product, or (excluding the U.S.) failure to strictly comply with SEIKO
EPSON CORPORATION's operating and maintenance instructions.
SEIKO EPSON CORPORATION shall not be liable for any damages or problems arising from the use of any options or any consumable products other than those designated as Original EPSON Products or EPSON Approved Products by SEIKO EPSON CORPORATION.
SEIKO EPSON CORPORATION shall not be held liable for any damage resulting from electromagnetic interference that occurs from the use of any interface cables other than those designated as EPSON Approved Products by SEIKO EPSON CORPORATION. EPSON is a
registered trademark and EPSON Stylus is a trademark of SEIKO EPSON CORPORATION.
Microsoft and Windows are registered trademarks of Microsoft Corporation.
Apple and Macintosh are registered trademarks of Apple Computer, Inc.
General Notice: Other product names used herein are for identification purposes only and may be trademarks of their respective owners. EPSON disclaims any and all rights in those marks.
4040986-00
xxx
Brauchen Sie Hilfe? Stellen Sie Ihre Frage.
Missbrauch melden von Frage und/oder Antwort
Libble nimmt den Missbrauch seiner Dienste sehr ernst. Wir setzen uns dafür ein, derartige Missbrauchsfälle gemäß den Gesetzen Ihres Heimatlandes zu behandeln. Wenn Sie eine Meldung übermitteln, überprüfen wir Ihre Informationen und ergreifen entsprechende Maßnahmen. Wir melden uns nur dann wieder bei Ihnen, wenn wir weitere Einzelheiten wissen müssen oder weitere Informationen für Sie haben.
Art des Missbrauchs:
Forenregeln
Um zu sinnvolle Fragen zu kommen halten Sie sich bitte an folgende Spielregeln:
Lesen Sie zuerst die Anleitung;
Schauen Sie nach, ob die Frage bereits gestellt wurde;
Stellen Sie die Frage so deutlich wie nur einigermaßen möglich;
Erwähnen Sie was Sie bereits versucht haben um das Problem zu lösen;
Ist Ihr Problem von einem Besucher gelöst dann lassen Sie ihn / sie wissen in diesem Forum;
Falls Sie reagieren möchten, so verwenden Sie bitte das Antworten- Formular;
Da ihre Frage für alle Besucher sichtbar ist, sollten Sie lieber keine persönliche Daten erwähnen.
Neu registrieren
Registrieren auf E - Mails für Epson Stylus Photo 900 wenn:
neue Frage gestellt werden
neue Handbücher vorhanden sind
Sie erhalten eine E-Mail, um sich für eine oder beide Optionen anzumelden.
Das Handbuch wird per E-Mail gesendet. Überprüfen Sie ihre E-Mail.
Wenn Sie innerhalb von 15 Minuten keine E-Mail mit dem Handbuch erhalten haben, kann es sein, dass Sie eine falsche E-Mail-Adresse eingegeben haben oder dass Ihr ISP eine maximale Größe eingestellt hat, um E-Mails zu erhalten, die kleiner als die Größe des Handbuchs sind.
Ihre Frage wurde zu diesem Forum hinzugefügt
Möchten Sie eine E-Mail erhalten, wenn neue Antworten und Fragen veröffentlicht werden? Geben Sie bitte Ihre Email-Adresse ein.