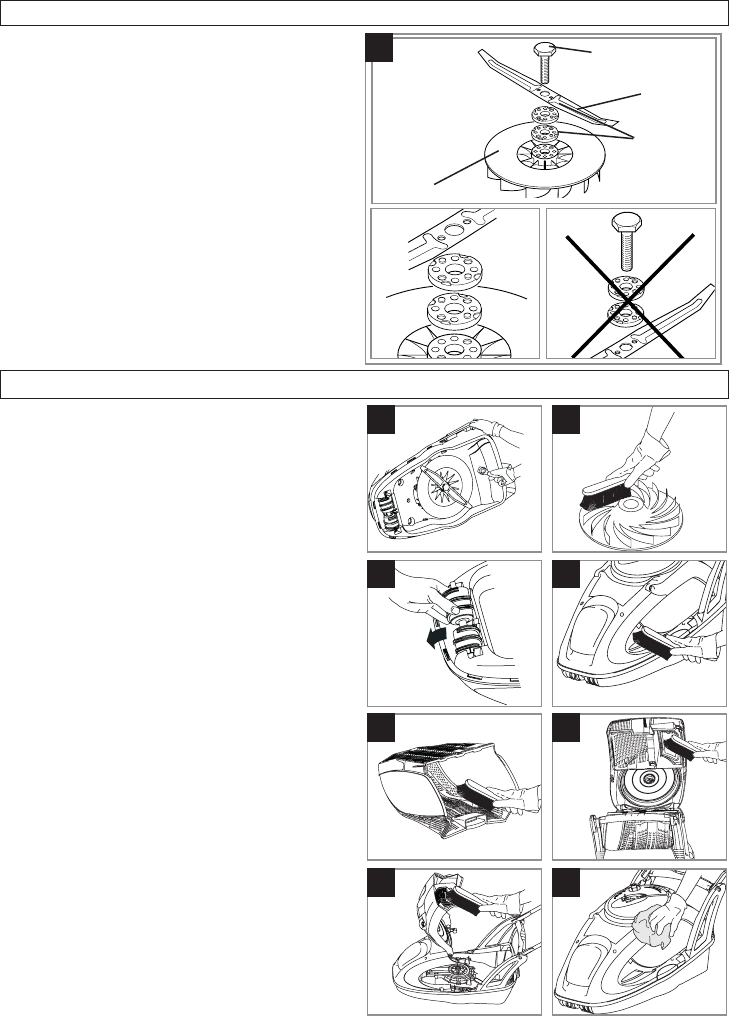
Removing and fitting the Blade and Fan
R
blade bolt
blade
fan
spacers
Caring for your Lawnmower
Cleaning
IMPORTANT: It is very important that you keep your
lawnmower clean. Grass clippings left in any of the air
intakes or under the hood could become a potential fire
hazard. USE GLOVES.
Switch off and remove the plug from the mains be-
fore cleaning.
It is recommended that you clean your lawnmower
straight after mowing while the grass is still wet.
1. Remove grass from under the hood with the span-
ner/scraper tool provided. (S1)
2. Remove the blade, see Figure R, to gain access to
the fan and clean with a soft brush. (S2)
3. Lever the roller out of position and clean with a soft
brush. (S3)
4. Using a soft brush, remove grass clippings from:
• all air intakes (S4)
• grassbox (S5)
• inside of grassbox lid (S6 & S7)
5. Wipe over the surface of your lawnmower with a dry
cloth.(S8)
• IMPORTANT
Never use water for cleaning your lawnmower. Do not
clean with chemicals, including petrol, or solvents -
some can destroy critical plastic parts.
S1
S8
Removing the Blade and Fan
1. To remove the blade bolt, hold the fan firmly and with
the spanner provided loosen the blade bolt by turning
it anti-clockwise (Q).
2. Remove the blade bolt, blade, spacers and fan. (R)
3. Inspect for damage and clean as necessary.
• Renew your metal blade after 50 hours mowing or
2 years whichever is the sooner - regardless of
condition. If the blade is cracked or damaged re-
place it with a new one. Never use a blade bolt if
the insulated head is damaged cracked or missing.
Fitting the Blade and Fan
1. Ensure the fan is located correctly.(R)
2. Place the spacers onto the fan ensuring the pegs have
located into the holes.(R)
3. Place the blade onto the spacers ensuring the pegs have
located into the holes on the blade and ensuring the
blades is positioned as illustrated in Figure R
4. Place the blade bolt through the centre hole of the blade.
5. Tighten down clockwise by hand.
6. Hold the fan firmly and tighten the blade bolt with the
spanner provided.
S4
S5
S6
S7
S2
S3