5
Adjusting the Cutting Height
Adjusting the Cutting Height
• THERE ARE 4 CUTTING HEIGHTS
• Always handle the plastic cutters with care -
sharp edges could cause injury. USE GLOVES
1. Disconnect from the mains electricity supply and
wait until the cutting head has stopped rotating
2. Turn your lawnmower upside down.
3. T
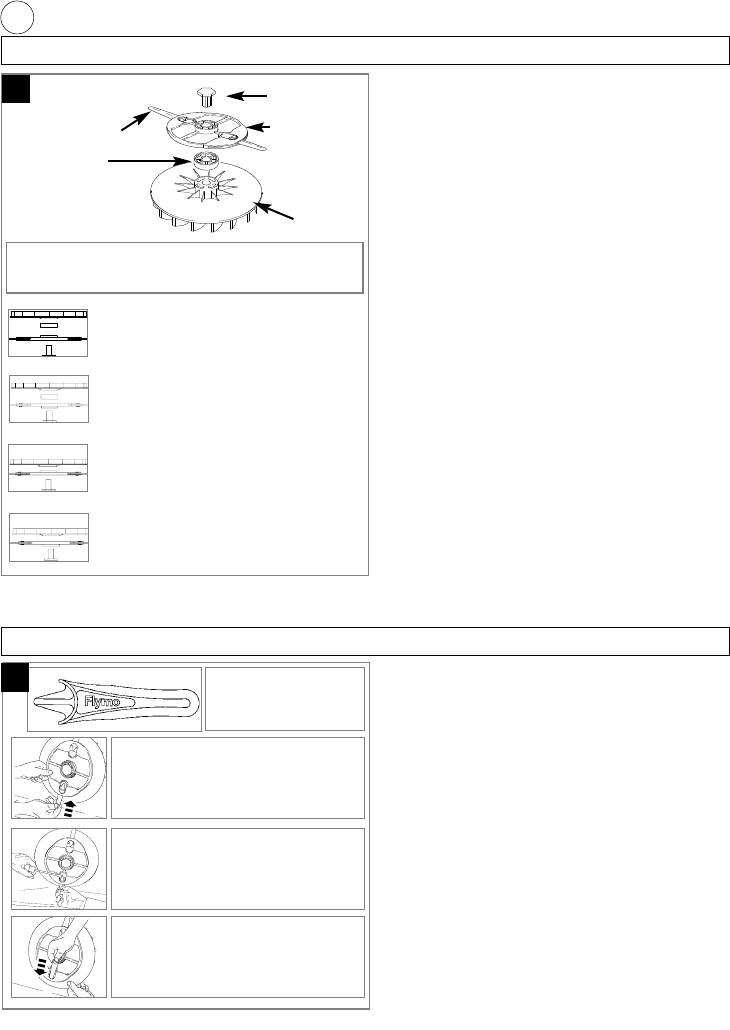
O REMOVE THE CUTTING HEAD FIXING NUT
Hold the cutting head and fan firmly and with the
spanner provided loosen the cutting head fixing bolt
by turning it anti-clockwise
4. Remove cutting head fixing nut, cutting head and
cutting height spacer (if used).
5. Adjust the height of cut as required.
6. If using spacers, place the spacers onto the fan,
ensuring the pegs are located in to the holes.
6. Replace the cutting head fixing nut into the cutting head
and cutting height spacer (if used). Ensure the nut is
correctly located through the centre hole of the cutting
head, cutting height spacer (if used) and fan.
7. Tighten down clockwise by hand.
8. Hold the fan firmly and tighten the cutting head fix-
ing nut with the spanner provided. DO NOT OVER
TIGHTEN.
• Use only the cutting head fixing nut supplied
with the lawnmower - it is insulated for your pro-
tection.
• Never use a cutting head fixing nut if it is dam-
aged or cracked.
• If a replacement cutting head fixing nut is
required - use only the genuine Flymo replace-
ment cutting head fixing nut specified for this
product.
Cutting System Maintenance
Checking your Cutting System
The cutting system must be kept in good condition and
inspected before and after use.
1. Turn your lawnmower upside down.
2. Visually check cutting head for wear. Replace if
damaged.
3. Visually check plastic cutters for wear and replace
when necessary.
4. Plastic cutters should be straight. Replace if bent or
twisted.
Replacing Plastic cutters (N)
• Plastic cutters must be replaced in pairs to
retain balance.
• Two plastic cutters of the same type should be
fitted.
• Never fit a steel bar blade to this product.
• Always handle the plastic cutters with care -
sharp edges could cause injury.
• IMPORTANT: Ensure plastic cutters are correctly
located.
M
cutting head
fixing nut
fan
cutting height
spacer
plastic cutter
cutting head
Cutting height spacer must only be fitted between
the cutting head and the fan and NEVER between
the cutting head and the cutting head fixing nut
Cutting Height 1- Lowest Height of Cut
Fit the cutting height spacer to the fan and
the raised side of the cutting head to the
spacer.
Cutting Height 4- Highest Height ofCut
Fit the level side of the cutting head to
the fan. Do not fit the cutting height
spacer.
Cutting Height 2
Fit the cutting height spacer to the fan
and the level side of the cutting head to
the spacer.
Cutting Height 3
Fit the raised side of the cutting head to
the fan. Do not fit the cutting height
spacer.
Use only genuine Flymo
replacement plastic
cutters specified for
this product
1. Push plastic cutter towards cen-
tre of cutting disc. Lift plastic cut-
ter away from cutting disc.
2. If the plastic cutter is broken dur-
ing use - lever cutter out of the
slot, and dispose of carefully.
3. Fit new plastic cutters into the
slots at each side of the cutting
disc and pull into place.
N