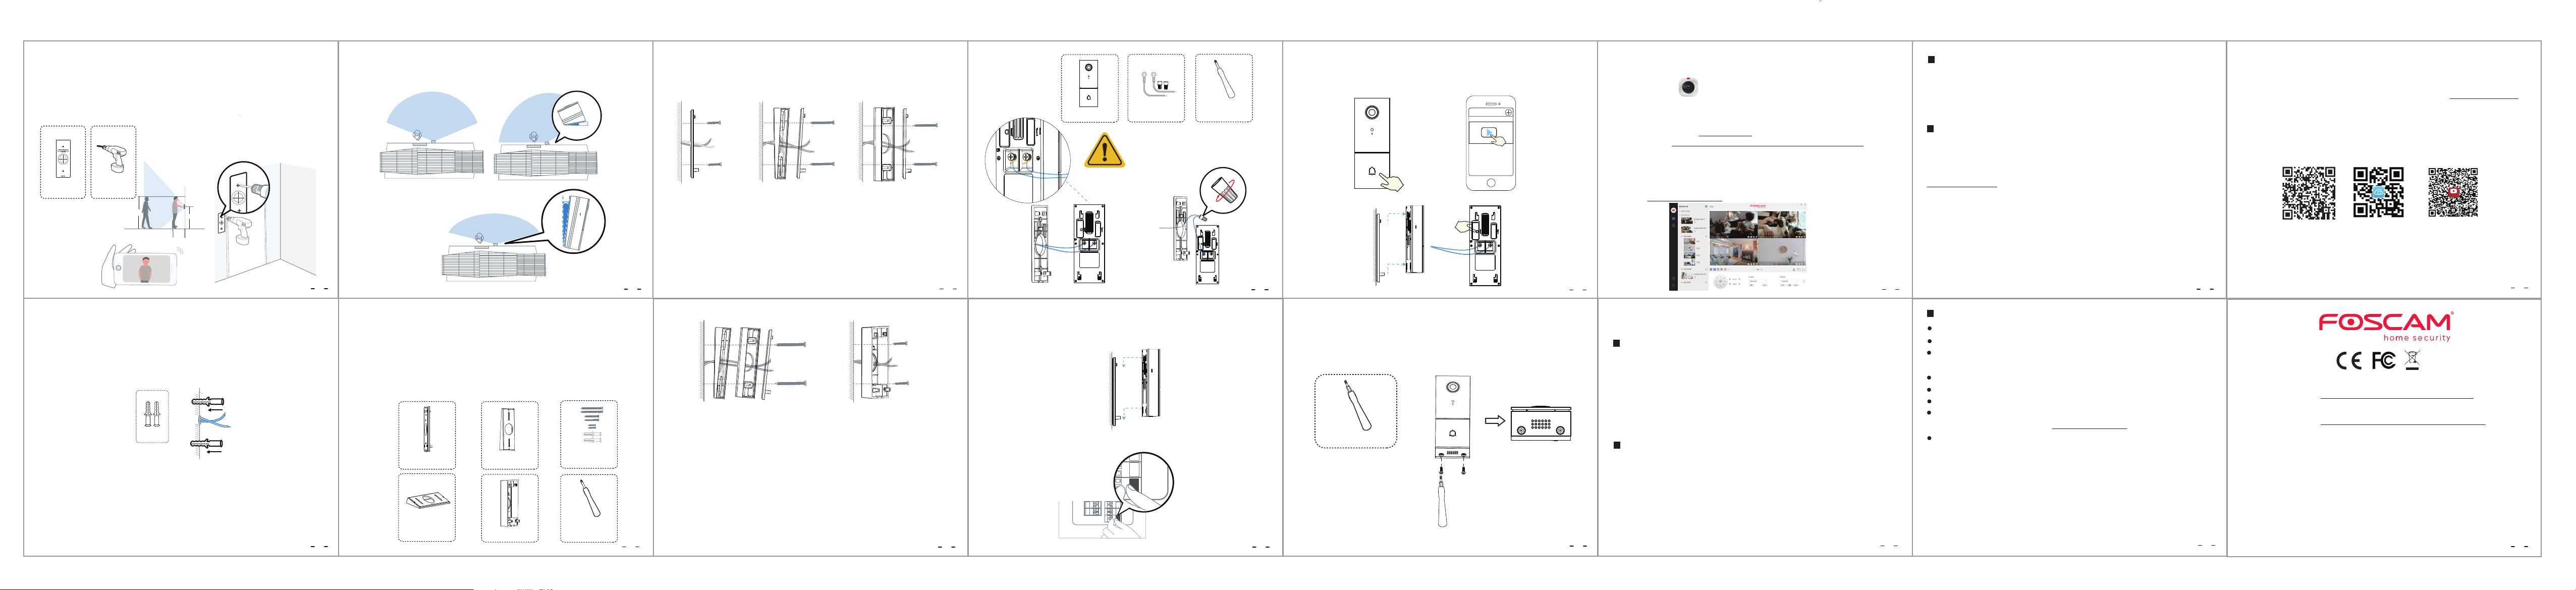
Step 7
Video Doorbell
Door Video Doorbell
Optional: Use the 15° mounting bracket or 5° mounting bracket as a supplementary mounting
bracket if you wish to adjust the doorbell camera's eld of view to cover more of one side.
www.foscam.com
CE Certificate statement Website:
https://www.foscam.com/company/ce-certificate.html
Exporter and Importer Information Opened to Public:
https://www.foscam.com/company/open-information.html
Due to product upgrades and other reasons, this guide may be slo
with the ocial website information. Please take the ocial w
current standard.
Manufacturer: Shenzhen Foscam Intelligent Technology Co., Ltd
Addr: Room 901-902, Building 1B, Xingke 1st Street, Shenzhen International Innovation
Valley, Nanshan Dist., Shenzhen, 518055, China
Support email: support@foscam.com
Video Doorbell
Door
5°
16
Step 8
Lead the two existing doorbell wires through the central square hole on the bracket before you
start mounting.
Insert the two provided screws through the screw holes, or through the 5° Vertical angle bracket /
15° Horizontal angle bracket / Thick mounting bracket,( install the mounting bracket to the 5°
Vertical angle bracket / 15° Horizontal angle bracket ), and fasten the screws tightly.
What is required: Mounting Bracket / Screw Packs / 5° Vertical angle bracket(Optional) /
15° Horizontal angle bracket (optional) / Dual-purpose screwdriver
17
With 5° Vertical angle bracket
Optional Install B Optional Install C
Wall Wall
5° Vertical
angle
bracket
Mounting
Bracket 15°
Horizontal
angle bracket
Mounting
Bracket
35mm(1.38’’)
Mounting Screws
35mm(1.38’’)
Mounting Screws
With 15° Horizontal angle bracket
Without angle bracket
Mounting
Bracket
Wall
Optional Install A
22mm(0.87’’)
Mounting Screws
18
Step 9
Connect the wires to the two terminals at the back of the doorbell, then tighten the terminal
screws. Wire can connect to any terminal as the electric current is alternating current.
Note: To prevent short-circuit, make sure the wires are not touching each other after connecting
them to the terminals. If the wires are too short, use the extension wires and wire nuts provided
to make them longer. Use electrical wiring tape to secure the connection if the wall doesn't have
space for wire nuts.
What are required: Extension Wires and Wire Nuts (Optional) / Video doorbell /
Philips-Head Screwdriver
Wall Wall
15°
Vertical
angle
bracket
Mounting
Bracket
5°
Horizontal
angle
bracket
Thick mounting bracket
45mm(1.77’’)
Mounting Screws
22mm(0.87’’)
Mounting Screws
Optional Install D Optional Install E
With 5° Vertical angle bracket and
15° Horizontal angle bracket
With Thick mounting bracket
This installation method can be used for
Type-c cable for DC power supply
19
Extension Wires and
Wire Nuts (Optional)
Dual-purpose
screwdriver (Phillips
screwdriver side)
Please note that it is forbidden
to connect the doorbell to AC
and
the same time.
20
Hook the doorbell on top of the mounting bracket and then snap the doorbell bottom to the
bracket. You may hear a "click" sound.
Step 10
Step 11
Switch the master circuit breaker in your house back to ON.
ON
21
Press the doorbell to test the chime connection.
Did your doorbell chime? If yes, it’s working! If no, check that wires are secure.
Open the foscam APP again and check if you can view live video.
Foscam_camera
On
If not, please remove the doorbell and press the reset button to re-add it in the app.
Step 12
Reset
22
Use the included screwdriver to tighten the anti-theft screw.
Step 13
What's required: Dual-purpose screwdriver
Dual-purpose screwdriver
(
23
Foscam VMS
Foscam
Mac, supporting all Foscam HD cameras and up to 36 cameras at the same time
to manage multiple cameras, we suggest y
VMS ”foscam.com/vms , and can download the "F
from the APP store: https://apps
Add the IP Camera
1. Run Foscam
2.
Please visit foscam.com/downloads t
Note: F
Other
24
Doorbell Username & Password
Impor
The doorbell username & password are used to access and manage your doorbell. Having a strong
password can signicantly improve the security of your doorbell.
If you have forgotten either of them, please press the "Reset" button and hold it for more than 10
seconds while the doorbell is powered on. After hearing the voice prompt, release the button. The
doorbell will automatically reboot and the default settings will be restored.
You can then reconnect the camera by following this Quick Setup Guide.
Your Foscam Cloud service account and password may be used to access both the Foscam App
and the Foscam Cloud service website. Therefore, you can register your account username &
password on either one.
Foscam Cloud Service Account Username & Password
25
StorageMedia
Your doorbell supports cloud, NVR (Network Video Recorder), and Micro SD card (supports
FAT-32 and ex-FAT format) storage formats. If you wish to record and play back large amounts of
video, we recommend using a Foscam NVR device as well.
Firmware Upgrades
You can upgrade the rmware of your camera with the Foscam App by using the new
“One-Key-Online Upgrade” feature (Open the Foscam App and Login to the camera, select
“Settings” > “Firmware Upgrade”).
You also can download the latest version to upgrade your camera from our ocial website
foscam.com/upgrades.
26
Safety Tips
Please ensure that the proper power supply is used before using the doorbell.
Please install the doorbell and bracket securely using the screws provided.
Please use this product within the temperature range -4°F~122°F (-20℃ ~50℃ ). When the
ambient temperature is too high or too low, it may cause product failure.
To avoid the risk of re or electric shock, please keep your camera in a cool, dry place.
Please keep the doorbell out of reach of small children.
This product is not a toy; children should use the product under adult supervision.
Change your default port to a greater range to help ensure the safety of your connection. How
to change the default port: please visit foscam.com/downloads to view the user manual.
Check the logs of your Foscam doorbell frequently. Foscam doorbell have embedded logs
telling you which IP addresses are accessing the doorbell.
WLAN frequency range: 2412MHz - 2472MHz and 5725MHz - 5850MHz
Maximum transmission power: < 16dBm
Wireless Standard: IEEE802.11b/g/n (2.4GHz)
IEEE802.11a/n/ac (5GHz)
Power Supply: DC 5V 1.0A 5W or AC 8~24V
Pr
29
T
If you have problems with your Foscam device, please contact the reseller you purchased from,
or you can e-mail the company headquarters technical support team: support@foscam.com
Your valuable comments and suggestions on improving Foscam products are welcomed!
Foscam APP Installation video
on YouTuBe
FAQ
28
27
YouTube
Step 6
Use the provided wall anchors if installing in materials such as stucco, brick, or concrete. If installing
into a wooden doorframe, there is no need to use the wall anchors.
Anchors
Step 5
Determine the mounting position of the doorbell. First check if you can reuse the existing holes in
the wall. Use the drill hole position template to mark the screw holes in the area where the
existing doorbell button was located. Place the drill hole position template at least 1.5m (59") high
from the ground to ensure that the height of the installed doorbell will be suitable, and then drill
the holes (use PH2 drill bit).
1.8m(71in)
1.5m (59in)
0.3m
(12in)
1m
(39.3in)
Drill Hole Position
Template
Power Drill with
PH2 Drill Bit
30
31
Mounting Bracket
15° Horizontal angle
bracket(Optional)
5° Vertical angle
bracket(Optional)
Thick mounting
bracket
Screw Packs(Anchors
are optional)
Dual-purpose
screwdriver (Phillips
screwdriver side)
Video Doorbell