Congratulations on purchasing your Geemarc LoopHEAR150. This is an
induction loop system that can be used in a variety of locations, both public
and private.
TM22
The LoopHEAR will cover an area of approximately 2m /10ft. There is an
option to use an external wire loop to improve the area covered. An external
microphone needs to be used (supplied). This induction loop system is
designed to assist hearing aid users by transmitting direct to their telecoil
equipped hearing aid (which must be switched to the ‘T’ position)
Note: users of digital hearing aids must make
sure their aids have been programmed for use
with the 'T' setting.
It is important that you read the instructions below in order to use your
TMTM
Geemarc LoopHEAR150 to its full potential. Keep this user guide in a safe
place for future reference.
TM
When unpacking the LoopHEAR150, you should find the following in the
box:
TM
ÅLoopHEAR150 with user guide and a set of wall mounting plugs and
screws .
ÅA power adaptor, with replaceable heads. There are several country
specific power inlet heads, suitable for UK, Europe and USA supplied with
the power adaptor. Please use the correct one required in your country of
use.
SETTING UP
Fig 4: Control recess
You need to set up the unit before assembling the stand or installation
in any position for use (See STAND user guide).
Mains Power operation :
1. Unscrew the two control recess door screws (See Fig3: Rear View).
2. Plug the DC cable of the AC adaptor into the power socket found in the
control recess area of the unit (see Fig 4: Control Recess).
3. Plug the supplied lapel microphone into the MIC1 JACK at the back of unit.
You can connect another (optionally available) microphone into the MIC2
JACK.
4. Connect your audio equipment to the 3.5mm socket (blue). The LH150 can
transmit sound through the loop from an external audio source like a TV
set, MP3, MP4 player or computer.
5. Power ON the unit using the switch on the front edge. Keep the switch in
the Low position.
NOTE: The Low position corresponds to the volume level set by the
volume control in step 6, and the Hi position corresponds to the volume
when this switch is set to maximum.
6. Set the volume level using the 5 position volume control switch.
7. Set the Tone level using the 5 position Tone control switch.
NOTE: When either of the microphones are in use, the blue LED light
below the LED lens flashes with an intensity depending on the strength of
the transmitted magnetic signal through the loop.
8. Once the setting is satisfactory, replace the control recess door and the 2
retaining screws.
FOR ALL OTHER OPERATIONS AND OPTIONS SEE USER GUIDES
SUPPLIED WITH THE RELEVANT ACCESSORIES OR GO TO OUR
WEBSITE www.geemarc.com
General Description
Fig 1: Front Edge View
Fig 2: Front View
Fig 3: Rear View
QGLoopHEAR150_En_v1.0
5 Swallow Court
Swallowfields
Welwyn Garden City
Hertfordshire, AL7 1SB
For product support:
01707 384438
www.geemarc.com
T
M
1.
POWER Low SWITCHOff Hi
HOLES FOR WALL MOUNTING
RECESS
DOOR
RETAINING
SCREWS
RECESS
DOOR
RETAINING
SCREWS
DUMMY
BATTERY
CASE
STAND FIXING INSERTS
DUMMY
BUTTON
RETAING
SCREW
CONTROL
RECESS
DOOR
LED LENS
LEDs indicate POWER ON
& Magnetic Field Strength
DUMMY
BUTTON
Manufactured by
are trademarks of Geemarc Telecom International Ltd.
Cable GuidesCable Guides
External Loop
Connector
Internal/External loop
selector switchTone Control
Headset
Volume
Control
Audio INDC Power
Inlet
MIC1
MIC2
En
EnEn
6.
GUARANTEE
TMTM
From the moment your Geemarc product is purchased, Geemarc
guarantee it for the period of two years. During this time, all repairs or
replacements (at our discretion) are free of charge. Should you experience a
problem then contact our help line or visit our website at www.geemarc.com.
The guarantee does not cover accidents, negligence or breakages to any
parts. The product must not be tampered with or taken apart by anyone who is
TMTM
not an authorised Geemarc representative. The Geemarc guarantee in no
way limits your legal rights.
IMPORTANT: YOUR RECEIPT IS PART OF YOUR GUARANTEE AND
MUST BE RETAINED AND PRODUCED IN THE EVENT OF A WARRANTY
CLAIM.
Please note: The guarantee applies to the United Kingdom only
TM
DECLARATION: Geemarc Telecom SA hereby declares that this product is
in compliance with the essential requirements and other relevant provisions
of the Radio and Telecommunications Terminal Equipment Directive
1999/5/EEC and in particular article 3 section 1a, 1b and section 2.
The declaration of conformity may be consulted at www.geemarc.com
Electrical connection: The apparatus is designed to operate from a 230V
50Hz supply only. (Classified as 'hazardous voltage' according to EN60950
standard).
This device complies with Part 15 of the FCC Rules [and with RSS-210 of
Industry Canada].
Operation is subject to the following two conditions:
(1) this device may not cause harmful interference
AND
(2) this device must accept any interference received, including interference
that may cause undesired operation.
For product support and help visit our website at
www.geemarc.com
Telephone 01707 384438
Or fax 01707 832529
TM
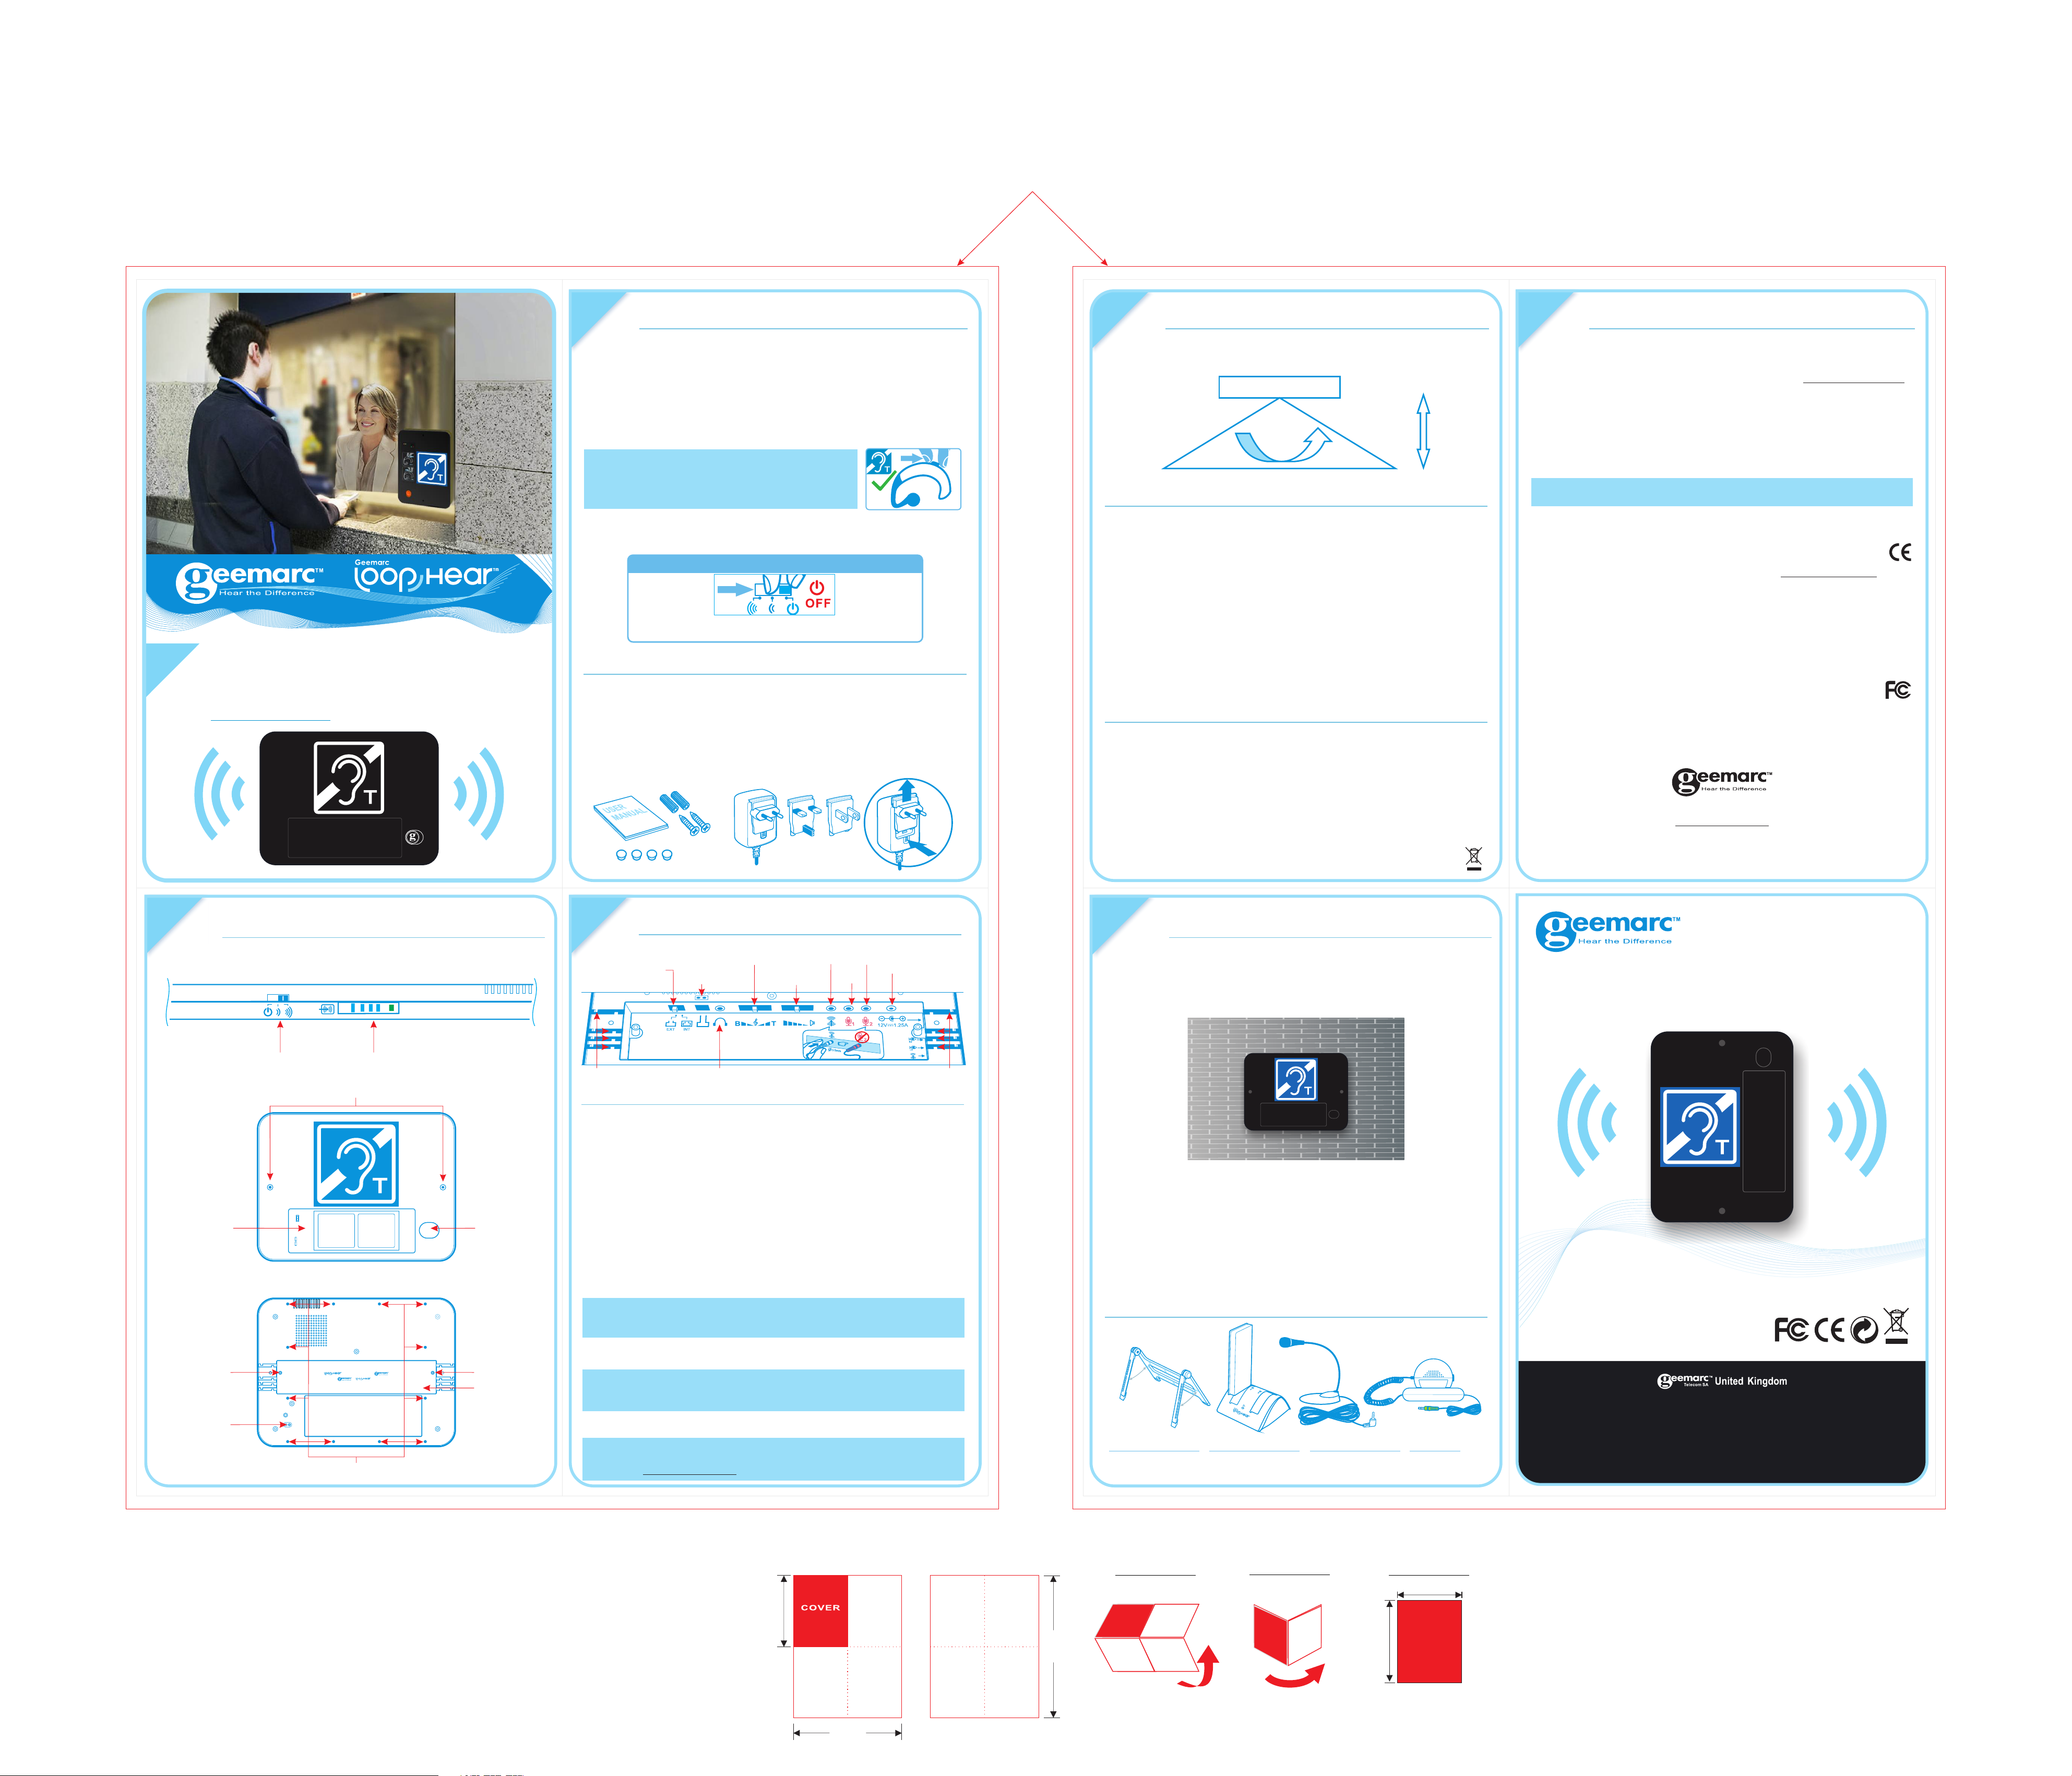
Locating the LoopHEAR150
SAFETY INFORMATION
RECYCLING DIRECTIVES
TM
In order to receive the optimal sound from the LoopHEAR150, the ideal
location is facing the user.
The best coverage distance and angle is as below:
General
Do not open the unit. Contact the helpline for all repairs.
Cleaning
TM
Clean the LoopHEARwith a soft cloth. Never use polish or cleaning agents -
they could damage the finish or the electronics inside.
Environmental
Do not expose to direct sunlight.
Do not cover or block the air circulation ducts to avoid overheating the unit.
TM.
Always ensure there is a free flow of air over the surfaces of the LoopHEAR
Do not place any part of your product in water and do not use it in damp or
humid conditions e.g. bathrooms.
Do not expose your product to fire or other hazardous conditions.
The WEEE (Waste Electrical and Electronic Equipment) has been put in place
for the products at the end of their useful life are recycled in the best way.
When this product is finished with, please do not put it in your domestic waste
bin.
Please use one of the following disposal options:
- Remove the batteries and deposit them in an appropriate WEEE skip.
Deposit the product in an appropriate WEEE skip.
- Or, hand the old product to the retailer. If you purchase a new one, they
should accept it.
Thus, if you respect these instructions you ensure human health and
environmental protection.
INSTALLATION INSTRUCTIONS
OPTIONAL EXTRAS AVAILABLE FROM YOUR DEALER
NOTE:
BEFORE INSTALLING THE LH150 FOR USE PLEASE ENSURE YOU
HAVE COMPLETED THE SET UP PROCEDURE DESCRIBED ON Page 3
OF THIS MANUAL.
DIRECT WALL MOUNTING :
1. DRILL 2 HOLES OF DIAMETER SUITABLE FOR THE SUPPLIED WALL
PLUGS 244 mm APART ON THE WALL OR PANEL WHERE YOU WISH
TO INSTALL THE LH150.
2. INSERT THE WALL PLUGS
3. USING THE 2 SCREWS SUPPLIED WITH THE WALL PLUGS FIX THE
LH150 FIRMLY ONTO THE WALL OR PANEL
4. INSERT THE SCREW CAPS SUPPLIED TO COVER THE SCREW
HEADS.
5.4.
TM
LoopHEAR150
O
120
up to 2m
(LH150_Wall/Desk_pack)
Stand
(LH150_BATTERY_pack)
Battery pack and
double charger
(SP_TABMICRO_LH101)
Desktop
microphone
(LHA2_BLK)
Desktop
receiver
Adaptor +
Europe plugUK plug USA plug
RECOMMENDATION
We recommend that to preserve the environment,
you switch the button on/off to off after each use.
THE RED LINE IS DIE CUT,
NO NEED TO BE PRINTED
SIZE: 420x295mm (A3)
TO FOLD to 1/4: 210x147mm (A5);
FRONT SIDE REAR SIDE
295mm
420mm
210mm
124
210 mm
147 mm
A3A3A5
Brauchen Sie Hilfe? Stellen Sie Ihre Frage.
Missbrauch melden von Frage und/oder Antwort
Libble nimmt den Missbrauch seiner Dienste sehr ernst. Wir setzen uns dafür ein, derartige Missbrauchsfälle gemäß den Gesetzen Ihres Heimatlandes zu behandeln. Wenn Sie eine Meldung übermitteln, überprüfen wir Ihre Informationen und ergreifen entsprechende Maßnahmen. Wir melden uns nur dann wieder bei Ihnen, wenn wir weitere Einzelheiten wissen müssen oder weitere Informationen für Sie haben.
Art des Missbrauchs:
Forenregeln
Um zu sinnvolle Fragen zu kommen halten Sie sich bitte an folgende Spielregeln:
Lesen Sie zuerst die Anleitung;
Schauen Sie nach, ob die Frage bereits gestellt wurde;
Stellen Sie die Frage so deutlich wie nur einigermaßen möglich;
Erwähnen Sie was Sie bereits versucht haben um das Problem zu lösen;
Ist Ihr Problem von einem Besucher gelöst dann lassen Sie ihn / sie wissen in diesem Forum;
Falls Sie reagieren möchten, so verwenden Sie bitte das Antworten- Formular;
Da ihre Frage für alle Besucher sichtbar ist, sollten Sie lieber keine persönliche Daten erwähnen.
Neu registrieren
Registrieren auf E - Mails für Geemarc LoopHear 150 wenn:
neue Frage gestellt werden
neue Handbücher vorhanden sind
Sie erhalten eine E-Mail, um sich für eine oder beide Optionen anzumelden.
Das Handbuch wird per E-Mail gesendet. Überprüfen Sie ihre E-Mail.
Wenn Sie innerhalb von 15 Minuten keine E-Mail mit dem Handbuch erhalten haben, kann es sein, dass Sie eine falsche E-Mail-Adresse eingegeben haben oder dass Ihr ISP eine maximale Größe eingestellt hat, um E-Mails zu erhalten, die kleiner als die Größe des Handbuchs sind.
Ihre Frage wurde zu diesem Forum hinzugefügt
Möchten Sie eine E-Mail erhalten, wenn neue Antworten und Fragen veröffentlicht werden? Geben Sie bitte Ihre Email-Adresse ein.