762016
1
Zoom out
Zoom in
Vorherige Seite
1/2
Nächste Seite
English
Model SBT600ss
Test Mode:
1) Press and hold the Snooze and Time buttons for 3 seconds to enter the Test Mode.
The display will show "7ES7" to indicate it is in TEST Mode.
2) If within 1 minute no button is pressed, then it will exit the Test Mode and return back
to the Time Mode.
3) Press any button within 1 minute (except the Snooze & Time buttons, which has no
effect), it will exit the Test Mode immediately.
4) While in Test Mode, sliding the Function Switch will demonstrate the different functions
of the clock:
a) Function Switch at OFF, it will have a continuous "Vee" sound to indicate it is in the
Test Mode.
b) Function Switch at BUZZ, it will demonstrate the buzzer sound.
c) Function Switch at VIB, it will demonstrate the vibrator.
d) Function Switch at VIB & BUZZ, it will demonstrate the buzzer sound & the vibrator.
WARNING: TO PREVENT FIRE OR SHOCK HAZARD, DO NOT
EXPOSE THIS APPLIANCE TO RAIN OR MOISTURE.
CAUTION:
TO REDUCE THE RISK
OF ELECTRICAL
SHOCK, DO NOT
REMOVE THE COVER
(OR BACK) FROM THE
PRODUCT. NO USER
SERVICEABLE PARTS
INSIDE. REFER
SERVICING TO YOUR
SONIC ALERT DEALER.
The Lightning flash with
arrowhead symbol, within an
equilateral triangle, is intended
to alert the user to the presence
of uninsulated “dangerous
voltage” within the product’s
enclosure that may be of sufficient
magnitude to constitute a risk
of electric shock to persons.
The exclamation point within an
equilateral triangle is intended
to alert the user to the presence
of important operating and
maintenance (servicing)
instructions in the literature
accompanying the appliance.
- Attention should be drawn to the environmental aspects of battery disposal.
- This icon indicates separate disposal for electrical and electronic equipment.
Normal function may be disturbed by strong electromagnetic interference. If this is the
case, normal function can be resumed by simply resetting the unit following the procedure
in the instructions manual. If function does not resume,
try moving the unit to another location.
Français
Mode de Test :
1) Appuyez sur les boutons Snooze (rappel d'alarme) et Time (réglage de l'heure) et maintenez-
les enfoncés pendants 3 secondes pour entrer dans le mode de test. L'écran affiche «7ES7»
pour indiquer qu'il se trouve en mode TEST.
2) Si dans la minute qui suit, aucun bouton n'est pressé, il sortira du mode de test et reviendra
en mode de réglage de l'heure.
3) Une pression sur un bouton dans la minute qui suit (sauf sur les boutons Snooze (rappel
d'alarme) et Time (réglage de l'heure), qui n'ont aucun effet), fera quitter immédiatement
l'appareil du mode de test.
4) En mode de test, les fonctions du réveil sont affichées, à savoir l'avertisseur sonore, le flash
et le vibreur (si ce dernier est branché).
5) Une fois les opérations du mode test terminées, appuyez sur un bouton quelconque (sauf
sur les boutons Snooze (rappel d'alarme) & Time (réglage de l'heure), qui n'ont aucun effet)
pour quitter immédiatement ce mode.
IMPORTANT:
- Please read these instructions carefully before use and retain for future reference. See
operating instructions on back.
- Use only the supplied or recomended Sonic Alert adaptor to connect the unit.
Warning:
To prevent fire or shock hazard do not expose this appliance to rain or moisture. Before
connecting to mains/ power make sure that the requirements specified on the apparatus
corresponds to the available power supply in that country i.e. AC100-240V~, 50/60 Hz.
- The ventilation should not be impeded by covering the ventilation openings with items
such as, newspaper, table cloth, curtains, etc;
- No naked flame sources, such as lighted candles should be placed on the apparatus.
- It shall not be exposed to dripping or splashing and that no objects filled with liquids, such
as vases, shall be placed on the apparatus.
- Do not place the product in closed bookcases or racks without proper ventilation.
- Where the mains/ power plug is used as the disconnect device, the disconnect device
shall remain readily operable.
OPERATION INSTRUCTIONS
GENERAL DATA
UL listed Power Adaptor: AC100-240V~, 50/60Hz
Power Consumption: Adaptor Output: DC5V , 800mA
USB Charging Port Rating: 500mA
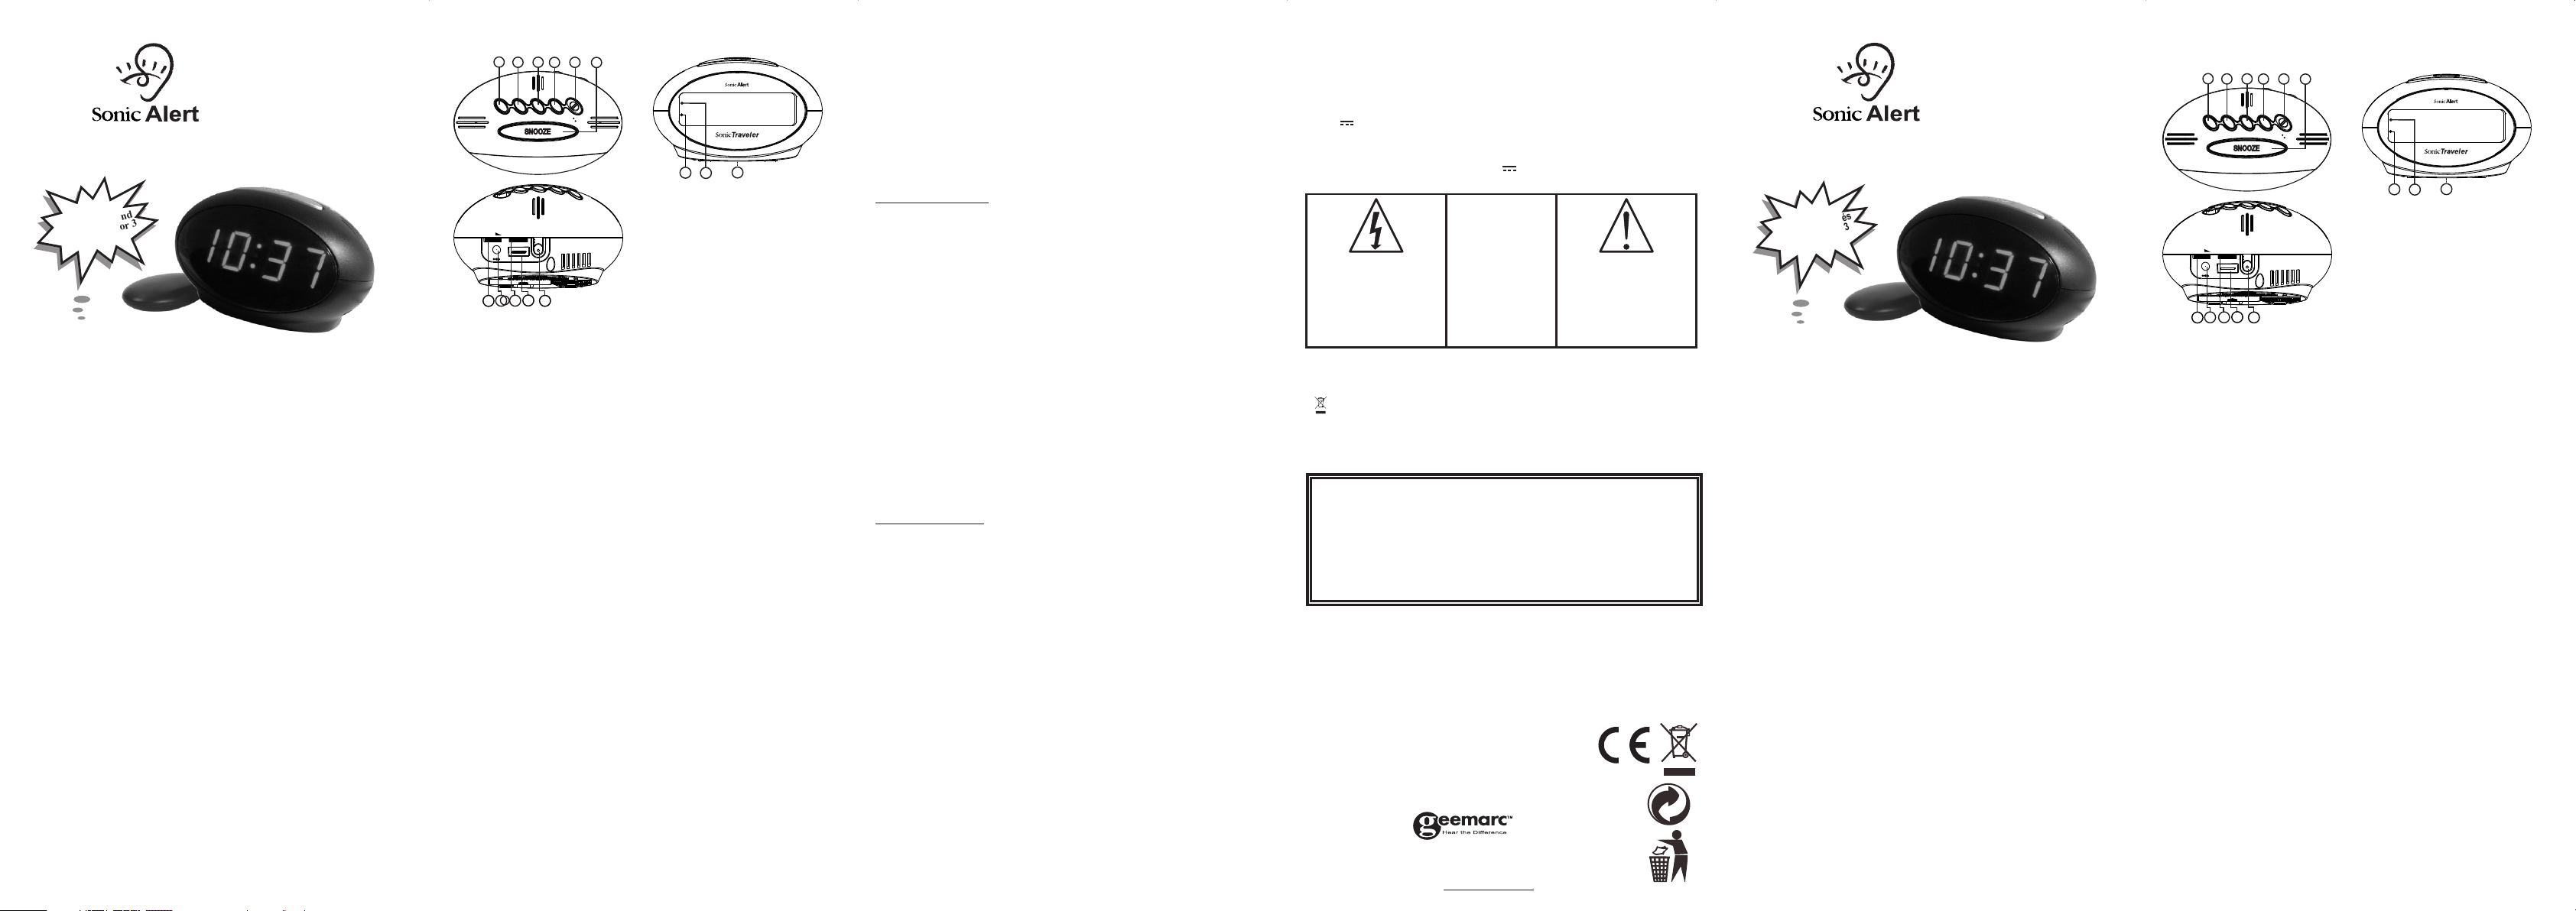
ALARM CLOCK WITH BED SHAKER & USB CHARGING
MODEL SBT600ss
Features
1) Time Set
2) Hour
3) Min
4) Alarm Set / Off
5) Alarm On/Off
6) Snooze / Dimmer
7) Battery Cover
Avertissement : pour éviter tout risque d'incendie ou d'électrocution, n'exposez pas cet
appareil à la pluie ou à l'humidité.
Avant de raccorder l'appareil au réseau électrique, assurez-vous que les exigences spécifiées
sur l'appareil correspondent à l'alimentation électrique disponible dans le pays, soit
CA100-240V~, 50/60 Hz.
-- La ventilation ne doit pas être entravée, les orifices d'aération doivent rester libres de tout
objet, tel que des journaux, des nappes, des rideaux, etc.;
-- Aucune source de flamme nue, comme une bougie allumée ne doit être placée sur l'appareil.
-- L'appareil ne sera pas installé à proximité d'un dispositif qui goutte ou soumis à des
éclaboussures et aucun objet rempli de liquide ne doit être placé sur l'appareil, tel qu'un
vase par exemple.
-- Ne placez pas l'appareil dans un meuble fermé ou sur un rack ne disposant pas d'une
ventilation adéquate.
-- Lorsque la fiche secteur est utilisée comme dispositif de déconnexion, celle-ci doit toujours
être facilement accessible.
MODE D'EMPLOI
IMPORTANT:
- Veuillez lire attentivement cette notice et la conserver pour toute consultation ultérieure.
Voir les instructions de fonctionnement au verso du document.
- Utilisez exclusivement l'adaptateur fourni ou recommandé Sonic Alert pour brancher l'unité.
Réveil Bombe Sonique & Vibreur de Lit
avec 5-niveaux variateur et USB Rechargement
Modèle SBT600ss
Les caractéristiques
Sonic Boom Alarm Clock & Bed Shaker
with 5-Level Dimmer & USB Charging Réveil USB Bombe Sonique avec Vibreur pour Lit
et variateur 5-niveaux
avec le
mode de test
maintenez enfoncés
Snooze et Time 3
secondes
With
Test Mode
Press Snooze and
Time button for 3
seconds
Specialized Hearing Solutions
Setting the correct time –
1) Press and hold the Time Set Button (1) at the same time press the Hour Button
(2) to advance the clock display rapidly until the hour is correct.
2) Press and hold the Time Set Button (1) at the same time press the Minute
Button (3) to advance the clock display rapidly until the minute is correct.
A lighted dot (8) in the upper left of the clock display indicated the time is PM.
For AM time indication, the dot does not light up.
Setting the alarm time –
1) Press and hold the Alarm Set Button (4) at the same time press the Hour
Button (2) to advance the alarm display rapidly until the hour is correct.
2) Press and hold the Alarm Set Button (4) at the same time press the Minute
Button (3) to advance the alarm display rapidly until the minute is correct.
3) Make sure the alarm time is correctly set for AM or PM, the lighted dot (8)
indicated PM. Please be sure to release the HOUR and MIN button before
releasing the ALARM Set button (4).
Selecting 12 or 24 hours format –
Press and hold the Hour button (2) for 6 seconds to enter the hour selection
mode, release the Hour button (2) when the display shows "12 H" or "24 H". Press
and release the hour button to toggle between 12 or 24 hours. If no selection is
made within 4 seconds, then the last displayed hour format will be chosen and the
display will return to the normal Time mode.
Waking to Alarm –
1) If only the buzzer is required, do not plug in the vibrator.
2) Set desired volume using the Volume wheel (12) for buzz sound.
3) If only vibrator is required, the plug in the vibrator into Vibrator socket (14) and
turn off the volume by using the Volume wheel (12).
4) If both the Buzzer and vibrator are required, plug in the vibrator and set the
volume to the desired level.
Set alarm wake time per instructions for setting alarm time above.
Adjusting The Alarm Duration Time -
The default alarm duration time setting is 30 minutes, you may adjust the alarm
duration between 1 minute and 59 minutes as desired. To adjust the alarm duration:
1) Press and hold the AL. SET button (4) for six seconds. The clock display will
show the default alarm duration as '30', release the AL. SET button.
8) PM indicator
9) Auto (Alarm indicator)
10) Tone
11) DC5V input
12) Volume
13) USB Charging
14) Vibrator Input
Shutting Off Alarm –
Alarm can be shut off temporarily for the day or shut off permantently.
1) When the alarm goes off, simply press the AL off button (4) the alarm
will shut itself off for the day and come back on the next day at the same
time if the alarm setting has not changed.
2) To shut off the alarm permanently, slide ON/OFF Switch (5) to off
positon. The alarm will not come on until ON/OFF Switch (5) is set to
ON position again.
3) When the display is showing the desired alarm duration time, it will
return to the normal clock mode after 3 seconds. The new alarm duration
time setting becomes the new default and remains in the memory until
you change it again.
Snooze Operation
SNOOZE button (6) – press after alarm has sounded. The alarm will be
turned off for 9 minutes for extra sleep. The alarm will come back again
after 9 minutes. You may repeat many time up to 119 minutes .
Adjusting The Snooze Time
The default snooze time setting is 9 minutes but you may adjust the
snooze time between 1 minute and 30 minutes as desired. To adjust
the snooze time:
1) Press and hold the SNOOZE button (6) for four seconds. The clock
display will show the default snooze time '9'. Release the Snooze
button.
2) Press the MIN button (3) to adjust the snooze time to the desired
setting, from 1 minute to 30 minutes.
3) When the display is showing the desired snooze time, it will return
to the normal clock mode after 3 seconds. The new snooze time
setting becomes the new default and remains in the memory until
you change it again.
Volume –
To adjust the volume rotate the Volume wheel (12) until you have reach
the desired level.
Tone –
Adjust the tone by rotating the Tone wheel (10) until you have reach the
desired level.
Dimmer Operation
There is a 5-level brightness control for the LED display. Press the
SNOOZE button (6) once to change the display brightness. The
brightness will cycle from bright to dim then from dim to bright.
*NOTE*: The dimmer function will not work, when the clock is in
snooze mode.
Bed Shaker / Vibrator
1) Attach the bed shaker jack to the back of the clock at VIBRATOR
input (14).
2) Place vibrator under mattress or pillow.
USB Charging
This alarm clock is equipped with a convenient USB charging port on the
back panel that allows you to recharge many brands of mobile phones,
portable music players, and other handheld devices that are supplied
with USB charging cables. The output rating of the USB charging port is
500mA.
To charge your device, connect the USB charging cable that was
supplied with your handled device to the USB charging port (13) on the
back panel of this alarm clock. Observe the charging indicator on your
device to confirm that it is charging.
Note: Charging time will vary depending on the charging current that
your device requires. Therefore some devices will take longer to charge
than others.
display will not show during power failure but the clock will still be
running and keeping proper time until the power is restored.
NOTE: For the best results it is recommended that the battery be
changed every 6-8 months. If the clock is not used for a while, it is
recommended to remove the battery to aviod leakage.
DC 5V Power Input –
Attach the DC power supply input to the back of clock labeled
DC5V IN (11 ). Modèle SBT600ss
Specialized Hearing Solutions
1. Réglage de l'heure
2. Heure
3. Min.
4. Alarme Réglage /
désactivée
5. Alarme activée /
désactivée
6. Rappel d'alarme /
Variateur
7.Couvercle de la batterie
8.Indicateur PM
9.Automatique
(Indicateur d'alarme activée)
10.Tonalité
11.Entrée CC5V
12.Volume
13.Chargement USB
14.Entrée du vibreur
Réglage de l'heure –
1) Appuyez simultanément sur les boutons Time Set (1) (réglage de l'heure) et
Hour (2) (heure) et maintenez-les enfoncés pour faire défiler les heures rapidement
jusqu'au réglage correct.
2) Appuyez simultanément sur les boutons Time Set (1) (réglage de l'heure) et
Minute (3) (minutes) et maintenez-les enfoncés pour faire défiler les minutes
jusqu'au réglage correct.
Un point lumineux (8 ) placé dans le coin supérieur gauche de l'horloge indique les
heures de l'après-midi au format américain (12h). Pour les heures matinales (AM),
le point lumineux n'est pas allumé.
Réglage de l'heure de déclenchement de l'alarme –
1) Appuyez simultanément sur les boutons Alarm Set ( 4) (réglage de l'alarme) et
Hour (2) (heure) et maintenez-les enfoncés pour faire défiler les heures rapidement
jusqu'au réglage correct.
2) Appuyez simultanément sur les boutons Alarm Set ( 4) (réglage de l'alarme) et
Minute (3) (minutes) et maintenez-les enfoncés pour faire défiler rapidement
l'affichage d'alarme jusqu'au réglage correct.
3) Assurez-vous que l'heure de déclenchement de l'alarme est correctement réglée
pour le matin (AM) ou l'après-midi (PM), le point lumineux (8) indiquant les heures
de l'après-midi. Veillez à relâcher les boutons HOUR et MIN avant de relâcher le
bouton ALARM.
Sélection du format 12 heures ou 24 heures –
1) Appuyez sur le bouton Hour (heure) (2) et maintenez-le enfoncé pendant 6
secondes pour entrer dans le mode de sélection de l'heure; relâchez le bouton
Hour (2) lorsque l'écran affiche «12H» ou «24H».
2) Appuyez sur le bouton de l'heure et relâchez-le pour basculer entre les formats
12 heures et 24 heures. Si aucune sélection n'est faite dans les 4 secondes, le
dernier format d'heure s'affichera et l'appareil reviendra en mode horaire normal.
Alarme du réveil –
1) Si seul l'avertisseur est requis, ne branchez pas le vibreur.
2) Réglez le volume de l'avertisseur sonore souhaité à l'aide du bouton de volume (12).
3) Si seul le vibreur est requis, ne le branchez pas dans la prise du vibreur (14) et
désactivez le son à l'aide du bouton de volume (12).
4) Si les deux fonctions, avertisseur sonore et vibreur, sont requises, branchez le
vibreur et réglez le volume sur le niveau souhaité.
5) Réglez l'alarme de réveil selon les instructions citées ci-dessus.
10
TIME SET HOUR MIN ALARM SET
OFF OFF
ON
2
1456
3
A
U
T
O
P
M
97
8
VOL TONE VIB
DC5V USB CHRG
11
12 13 14
10
5 Swallow Court, Swallowfields, Welwyn Garden City,
Hertfordshire, AL7 1SB,
For product support: 01707 384438
www.geemarc.com
Distributed by : United Kingdom
SONIC ALERT'S 2 YEAR LIMITED WARRANTY
Geemarc Telecom, 5 Swallow Court, Swallowfields,
Welwyn Garden City, Hertfordshire, AL7 1SB, UK
From the moment your Sonic Alert product is purchased, Sonic Alert guarantee it for the
period for 2 years. The guarantee does not cover accidents, negligence or breakage to
any parts. The product is covered by the legal guarantee of conformity as provided by
applicable law.
Important: your receipt is part of the guarantee and must be retained and produced in
event of warranty claim. After sales telephone number: +44(0)1707 384438
RECYCLING DIRECTIVES
The WEEE (Waste Electrical and Electronic Equipment) has been put in place for the products
in end of life are recycled in the best way.
When this product is out of order, please do not put it in your domestic waste bin.
Please use one of the following disposal options:
- Remove the batteries and deposit them in an appropriate WEEE skip. Deposit the product in
a appropriate WEEE skip.
- Or hand the old product to the retailer. If you purchase a new one, they should accept it.
Thus if you respect these instructions you ensure human health and
environmental protection.
CE Declaration: Hereby Sonic Alert declares that this product is
in compliance with the essential requirements and other relevant
provisions of the Electromagnetic compatibility (EMC) 2004/108/EC,
and of Low Voltage Directive (LVD) 2006/95/EC (if applicable).
The declaration of conformity may be consulted at www.geemarc.com
2) Press the MIN button (3) to adjust the alarm duration to the desired setting,
from 1 minute to 59 minutes.
Battery Backup –
To use the battery backup, you can install 1 pieces of 9V size battery at
the base of the clock under the battery cover (7). Please note the LED
TIME SET HOUR MIN ALARM SET
OFF OFF
ON
2
1456
3
A
U
T
O
P
M
97
8
VOL TONE VIB
DC5V USB CHRG
11
12 13 14
10
1

Brauchen Sie Hilfe? Stellen Sie Ihre Frage.

Forenregeln

Missbrauch melden von Frage und/oder Antwort

Libble nimmt den Missbrauch seiner Dienste sehr ernst. Wir setzen uns dafür ein, derartige Missbrauchsfälle gemäß den Gesetzen Ihres Heimatlandes zu behandeln. Wenn Sie eine Meldung übermitteln, überprüfen wir Ihre Informationen und ergreifen entsprechende Maßnahmen. Wir melden uns nur dann wieder bei Ihnen, wenn wir weitere Einzelheiten wissen müssen oder weitere Informationen für Sie haben.

Art des Missbrauchs:

Zum Beispiel antisemitische Inhalte, rassistische Inhalte oder Material, das zu einer Gewalttat führen könnte.

Beispielsweise eine Kreditkartennummer, persönliche Identifikationsnummer oder unveröffentlichte Privatadresse. Beachten Sie, dass E-Mail-Adressen und der vollständige Name nicht als private Informationen angesehen werden.

Forenregeln

Um zu sinnvolle Fragen zu kommen halten Sie sich bitte an folgende Spielregeln:

Neu registrieren

Registrieren auf E - Mails für Geemarc Sonic Alert SBT600ss wenn:


Sie erhalten eine E-Mail, um sich für eine oder beide Optionen anzumelden.


Andere Handbücher von Geemarc Sonic Alert SBT600ss

Geemarc Sonic Alert SBT600ss Bedienungsanleitung - Englisch - 5 seiten

Geemarc Sonic Alert SBT600ss Bedienungsanleitung - Holländisch - 2 seiten


Das Handbuch wird per E-Mail gesendet. Überprüfen Sie ihre E-Mail.

Wenn Sie innerhalb von 15 Minuten keine E-Mail mit dem Handbuch erhalten haben, kann es sein, dass Sie eine falsche E-Mail-Adresse eingegeben haben oder dass Ihr ISP eine maximale Größe eingestellt hat, um E-Mails zu erhalten, die kleiner als die Größe des Handbuchs sind.

Ihre Frage wurde zu diesem Forum hinzugefügt

Möchten Sie eine E-Mail erhalten, wenn neue Antworten und Fragen veröffentlicht werden? Geben Sie bitte Ihre Email-Adresse ein.


Info