8
9
BATTERY INSTALLATION: REMOTE UNIT
1. Remove the screws on the battery compartment.
2. Select the channel
3. Install 2 batteries (UM-3 or AA size 1,5V) strictly according to the polarities shown.
4. Replace the battery compartment door and secure its screws.
BATTERY INSTALLATION: MAIN UNIT
1. Open the battery compartment door.
2. Install 2 batteries (UM-3 or AA size 1,5V) strictly according to the polarities shown.
3. Replace the battery compartment door.
LOW Battery warning
When it is time to replace batteries for the remote sensor, the respective low-battery indicator will show up on the outdoor temperature & hygrometer
display.
HOW TO USE THE TABLE STAND OR WALL MOUNTING
The main unit has a removable table stand, which when connected, can support the unit on a fl at surface. Or you can remove the stand and mount the unit
on a wall using the recessed screw hole. As for the remote unit, you can place it on a fl at surface or mount the unit on a wall using the recessed screw hole.
Getting started
1. Setting up the barometer
a ) When batteries are installed , the display will show the hPa and Mbar. User should press the Unit key to adjust the unit of pressure, it will shows 0 nd
meter. User can use the or keys to change to feet, or use the Unit key to confirm the unit.
b) After user confirmed the unit of height, it will shows 10 with meter or 32 with feet. User can use the or keys to change to height of the place, and
use the Unit key to confirm the height.
Remark: the default unit of pressure is hPa/mBar, unit of height is meter, height is 10 meters. It will use the default value if no key is pressure
for 60 seconds.
Setting up the thermo – hygrometer and radio controlled clock
a) Once batteries are in place for the remote unit, they will start transmitting temperatue ad humidity readings at around 45 seconds intervals. The main unit
will also start searching for signals for about two minutes once batteries are installed. 10 seconds upon successful reception, the outdoors temperatures
and humidity will be displayed. the main unit will automatically update its readings at about 45-second intervals.
b) If no signals are received, blanks will be displayed. Hold for 2 seconds to enforce another search for about 2 minutes. This is useful in
synchronizing the transmission and reception of the remote and main units.
c) When remote signal reception is fi nished, it will automatically synchronize its current time and dated when brought within rang of the DCF77 signal .
Repeat this step whenever you fi nd discrepancies between the reading shown on the main unit and that on the remote unit.
HOW TO CHECK REMOTE AND INDOOR REMPERATURES
Temperatures and humidity
The wave display on the outdoors temperature indicates the reception of the remote unit is in good order.
If no readings are received from the remote unit for more than two minutes, blanks will be displayed until further readings are successfully searched.
Check the remote unit is sound and secure. You can wait for a little while or hold DOWN for 2 seconds to enforce an immediate search. If the
temperature or humidity goes above or below than the measuring range of the main unit or the remote unit (stated in specification), the display will show
& HHH or LLL respectively.
HOW TO READ THE KINETIC WAVE DISPLAY
The kinetic wave display shows the signal receiving status of the main unit. There are three possible forms:
The unit is in searching mode.
Temperature readings are
securely registered
No signals
MAXIMUM AND MINIMUM TEMPERATURES AND HUMIDITY
The maximum and minimum recorded indoor temperature, humidity and outdoor temperatures, humidity will be automatically stored in memory. To display
them, Press MEM once to display the minimum readings and again the maximum readings.
The respective indicators, MIN or MAX will be displayed. To clear the memory, hold MEM for 3 seconds. The maximum and minimum readings will be
erased. If you press MEM now, the maximum and minimum readings will have the same values as the current ones until different readings are recorded.
TEMPERATURE AND HUMIDITY TREND
The trend indicator shows the trend of temperatures and humidity collected at that particular remote sight. Three trends: rising, steady, and falling will be
shown.
Arrow indicator
Temperature Humidity Trend
Rising Steady Falling
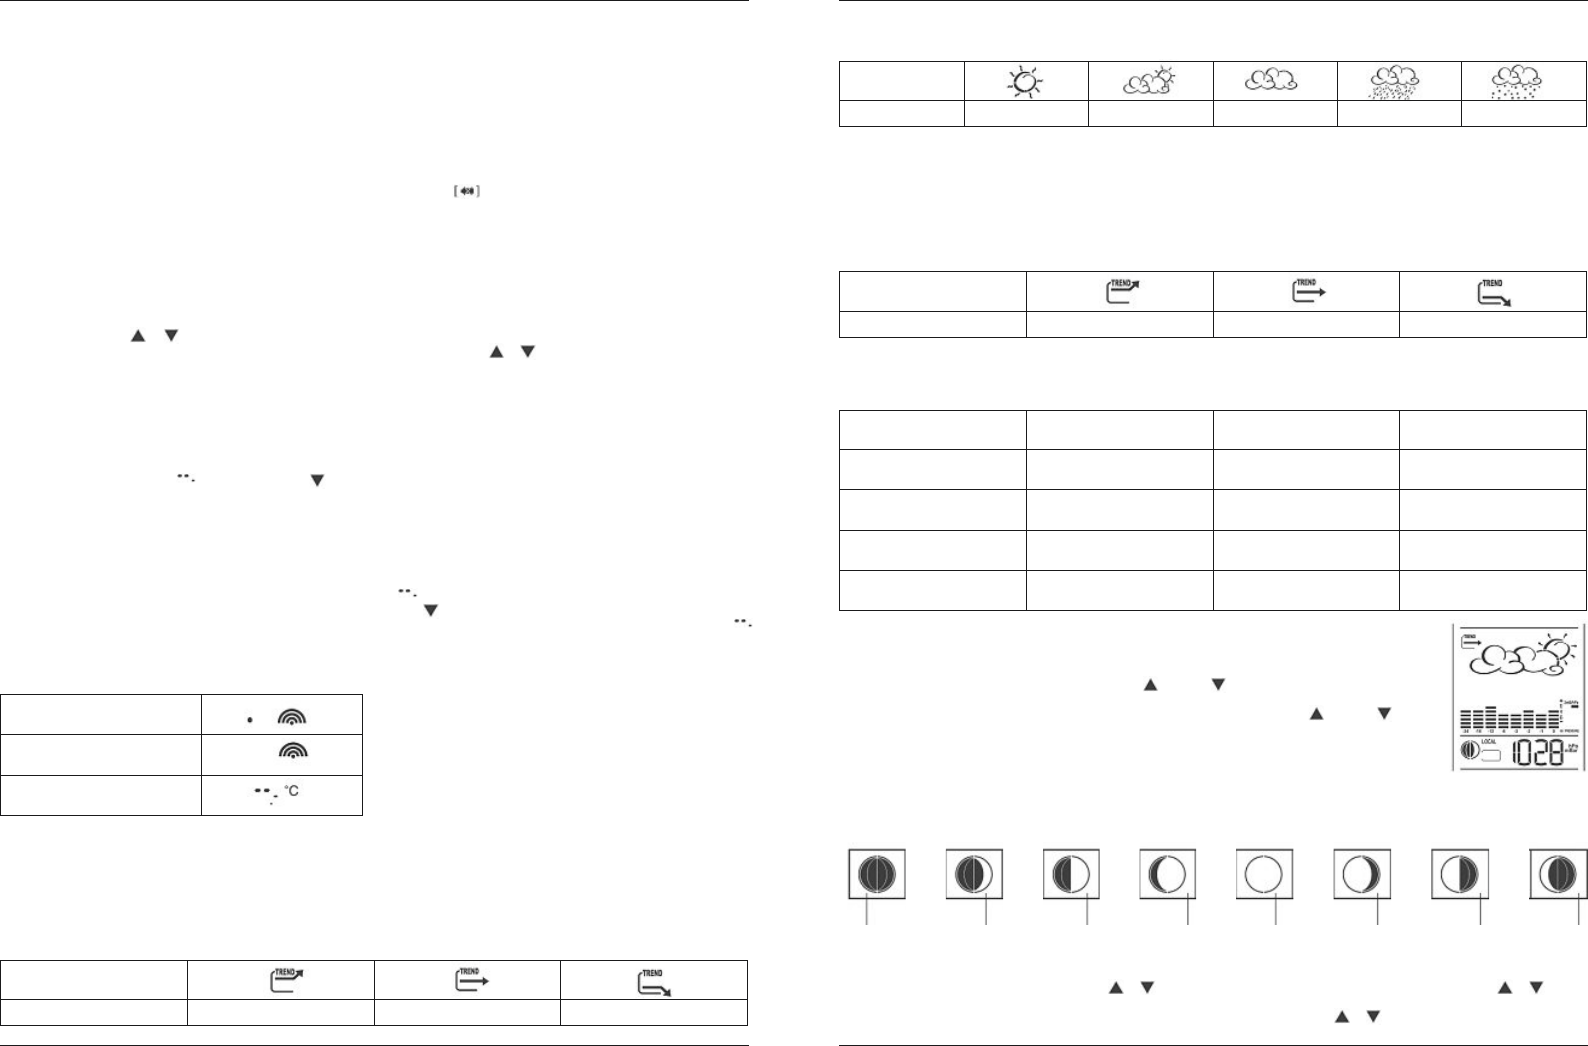
WEATHER FORECAST
The unit is capable of detecting atmospheric pressure changes. Based on collected data, it can predict the weather for the forthcoming 12 to 24 hours.
Icon on the
display
Forecast
Sunny Slightly Cloudy Cloudy Rainy Snowy
NOTE:
1. The accuracy of a general pressure-based weather forecast is about 70 %.
2. The weather forecasts. It may not necessarily reflect the current situation.
3. The “Sunny” icon, as applies to night time, implies clear weather.
ATMOSPHERIC PRESSURE
The atmospheric pressure indicator, in the weather forecast window, uses arrows to indicate if the atmospheric pressure is increasing, remaining stable, or
decreasing.
Arrow indicator
Pressure Trend
Rising Steady Falling
COMFORT LEVELINDICATORS
The comfort level indicators COM ; WET or DRY will tell you if the current environment is comfortable, too wet or too dry. The comfort indicators will appear
on the display of the main unit when the following conditions are satisfied.
Indicator displays on the unit Temperature Range Humidity Range Shows that the Current
Environment
COM
20°C to 25°C
(68°F to 77°F)
40% RH-70%RH Ideal range for both relative
humidity and temperature
WET
-5°C to +50°C
(23°F to 122°F)
OVER 70%RH Contains excess moisture
DRY
-5°C to +50°C
(23°F to 122°F)
Below 40% RH Contains inadequate moisture
No indicator
Less than 20°C (68°F) or
More than 25°C (77°F)
40% RH to 70%RH No comment
HOW TO CHECK THE BAROMETERIC PRESSURE
The current and historical barometric pressure is shown on the atmospheric pressure window.
For user staying at a higher altitude such as in the mountain area, see-level barometric pressure applies. Use
PRESSURE/ALTITUDE key to toggle the display to sea level pressure display. Press and hold the PRESSURE/ALTITUDE
key to enter the sea level pressure adjusting mode. Use the UP or DOWN key to enter sea level pressure and use
PRESSURE/ALTITUDE to confirm. The atmospheric pressure can be displayed in „mbar/hPa“ or „inHg“ or „mmHg“.
To change the pressure unit, press and hold the Unit key at sea level pressure display and use UP or DOWN key to
select. Press the UNIT key to confirm. If you want to check the pressure history for a particular hour during the past
36 hours, press the HISTORY button. Each press on the button will go back by an hour. The recorded atmospheric
changes for the past 24hour are displayed in a bar chart above the atmospheric pressure window.
HOW TO USE AND SCAN THE MOON PHASE
The weather station is equipped with a moon phase display and scanner with which eight moon phases are displayed on the screen from new moon to
waning crescent. The one falls on the current day will fl ash on the screen. If it is a full moon or new moon day ,the icon will fl ash faster. The eight phases
are:
New Moon Waning First Waxing Full Waning Last Waning
Crescent Quarter Gibbous Moon Gibbous Quarter Crescent
To check the moon phase for a particular day ,press the or button once. The clock will enter moon phase scanning mode. Use the or button
to locate the date you want to check. The calendar will be day-driven in this mode. You can go back 39 days travel to next 39 days. The corresponding moon
phase will appear immediately on the screen. The unit will return to the last display mode when the the or buttons are left idle for 2 seconds.