A room thermostat simply switches the heating system on and off as necessary.
It works by sensing the air temperature, switching on the heating when the air
temperature falls below the thermostat setting, and switching it off once this set
temperature has been reached. Turning a room thermostat to a higher setting will
not make the room heat up any faster. How quickly the room heats up depends on
the design of the heating system, for example, the size of boiler and radiators.
Neither does the setting affect how quickly the room cools down. Turning a room thermostat to a lower setting will result in the
room being controlled at a lower temperature, and saves energy.
The heating system will not work if a time switch or programmer has switched it off.
The way to set and use your room thermostat is to find the lowest temperature setting that you are comfortable with, and then
leave it alone to do its job. The best way to do this is to set the room thermostat to a low temperature – say 18°C – and then
turn it up by one degree each day until you are comfortable with the temperature. You won’t have to adjust the thermostat
further. Any adjustment above this setting will waste energy and cost you more money.
If your heating system is a boiler with radiators, there will usually be only one room thermostat to control the whole house.
But you can have different temperatures in individual rooms by installing thermostatic radiator valves (TRVs) on individual
radiators. If you don’t have TRVs, you should choose a temperature that is reasonable for the whole house. If you do have
TRVs, you can choose a slightly higher setting to make sure that even the coldest room is comfortable, then prevent any
overheating in other rooms by adjusting the TRVs.
Room thermostats need a free flow of air to sense the temperature, so they must not be covered by curtains or blocked by
furniture. Nearby electric fires, televisions, wall or table lamps may prevent the thermostat from working properly.
4 5 6
®
Energy Saving ECO feature / Modo Ahorro de Energía ECO / Fonction d’économie
d’énergie ECO / ‘ECO’ energiebesparingsfunctie / Energieeinsparung / Modalità
ECO Risparmio energetico / Energiatakarékos ECO funkció / Energetická úspora /
Oszczędnościowa funkcja ECO / Funkcia Energetická úspory ECO
Operation of the Relay Box / Funcionamiento del Módulo de Relé / Action sur
le récepteur / Bediening van de ontvangermodule / Funktion der Relais- Box /
Funzionamento del Modulo Relé / Reléegység kezelése / Provoz spínací jednotky
/ Obsluga modulu kotlowego / Prevádzka skrinky prijímača
Automatic Operation / Funcionamiento Automático / Fonctionnement automatique / Automatische bediening
/ Automatik Funktionen / Funzionamento automatico / Automata üzem / Automatický režim / Automatyczny
tryb pracy / Automatická prevádzka
Loss of RF communications / Perdida de comunicaciones RF / Perte de communication RF / RF
communicatieverlies / Verlust der Funk- Kommunikation / Perdita della comunicazione in RF / RF
kommunikáció elvesztése / Ztráta RF komunikace / Usterka komunikacji bezprzewodowej / Strata spojenia
Temporary Manual Override / Anulación Manual Temporal / Dérogation manuelle temporaire / Tijdelijk
handmatige bediening / Temporäre manuelle Änderung / Forzatura temporanea manuale / Kézi felülvezérlés
/ Přechodné manuální potlačení funkce / Sterowanie ręczne przekaźnikiem modułu kotłowego / Dočasná
manuálna prevádzka
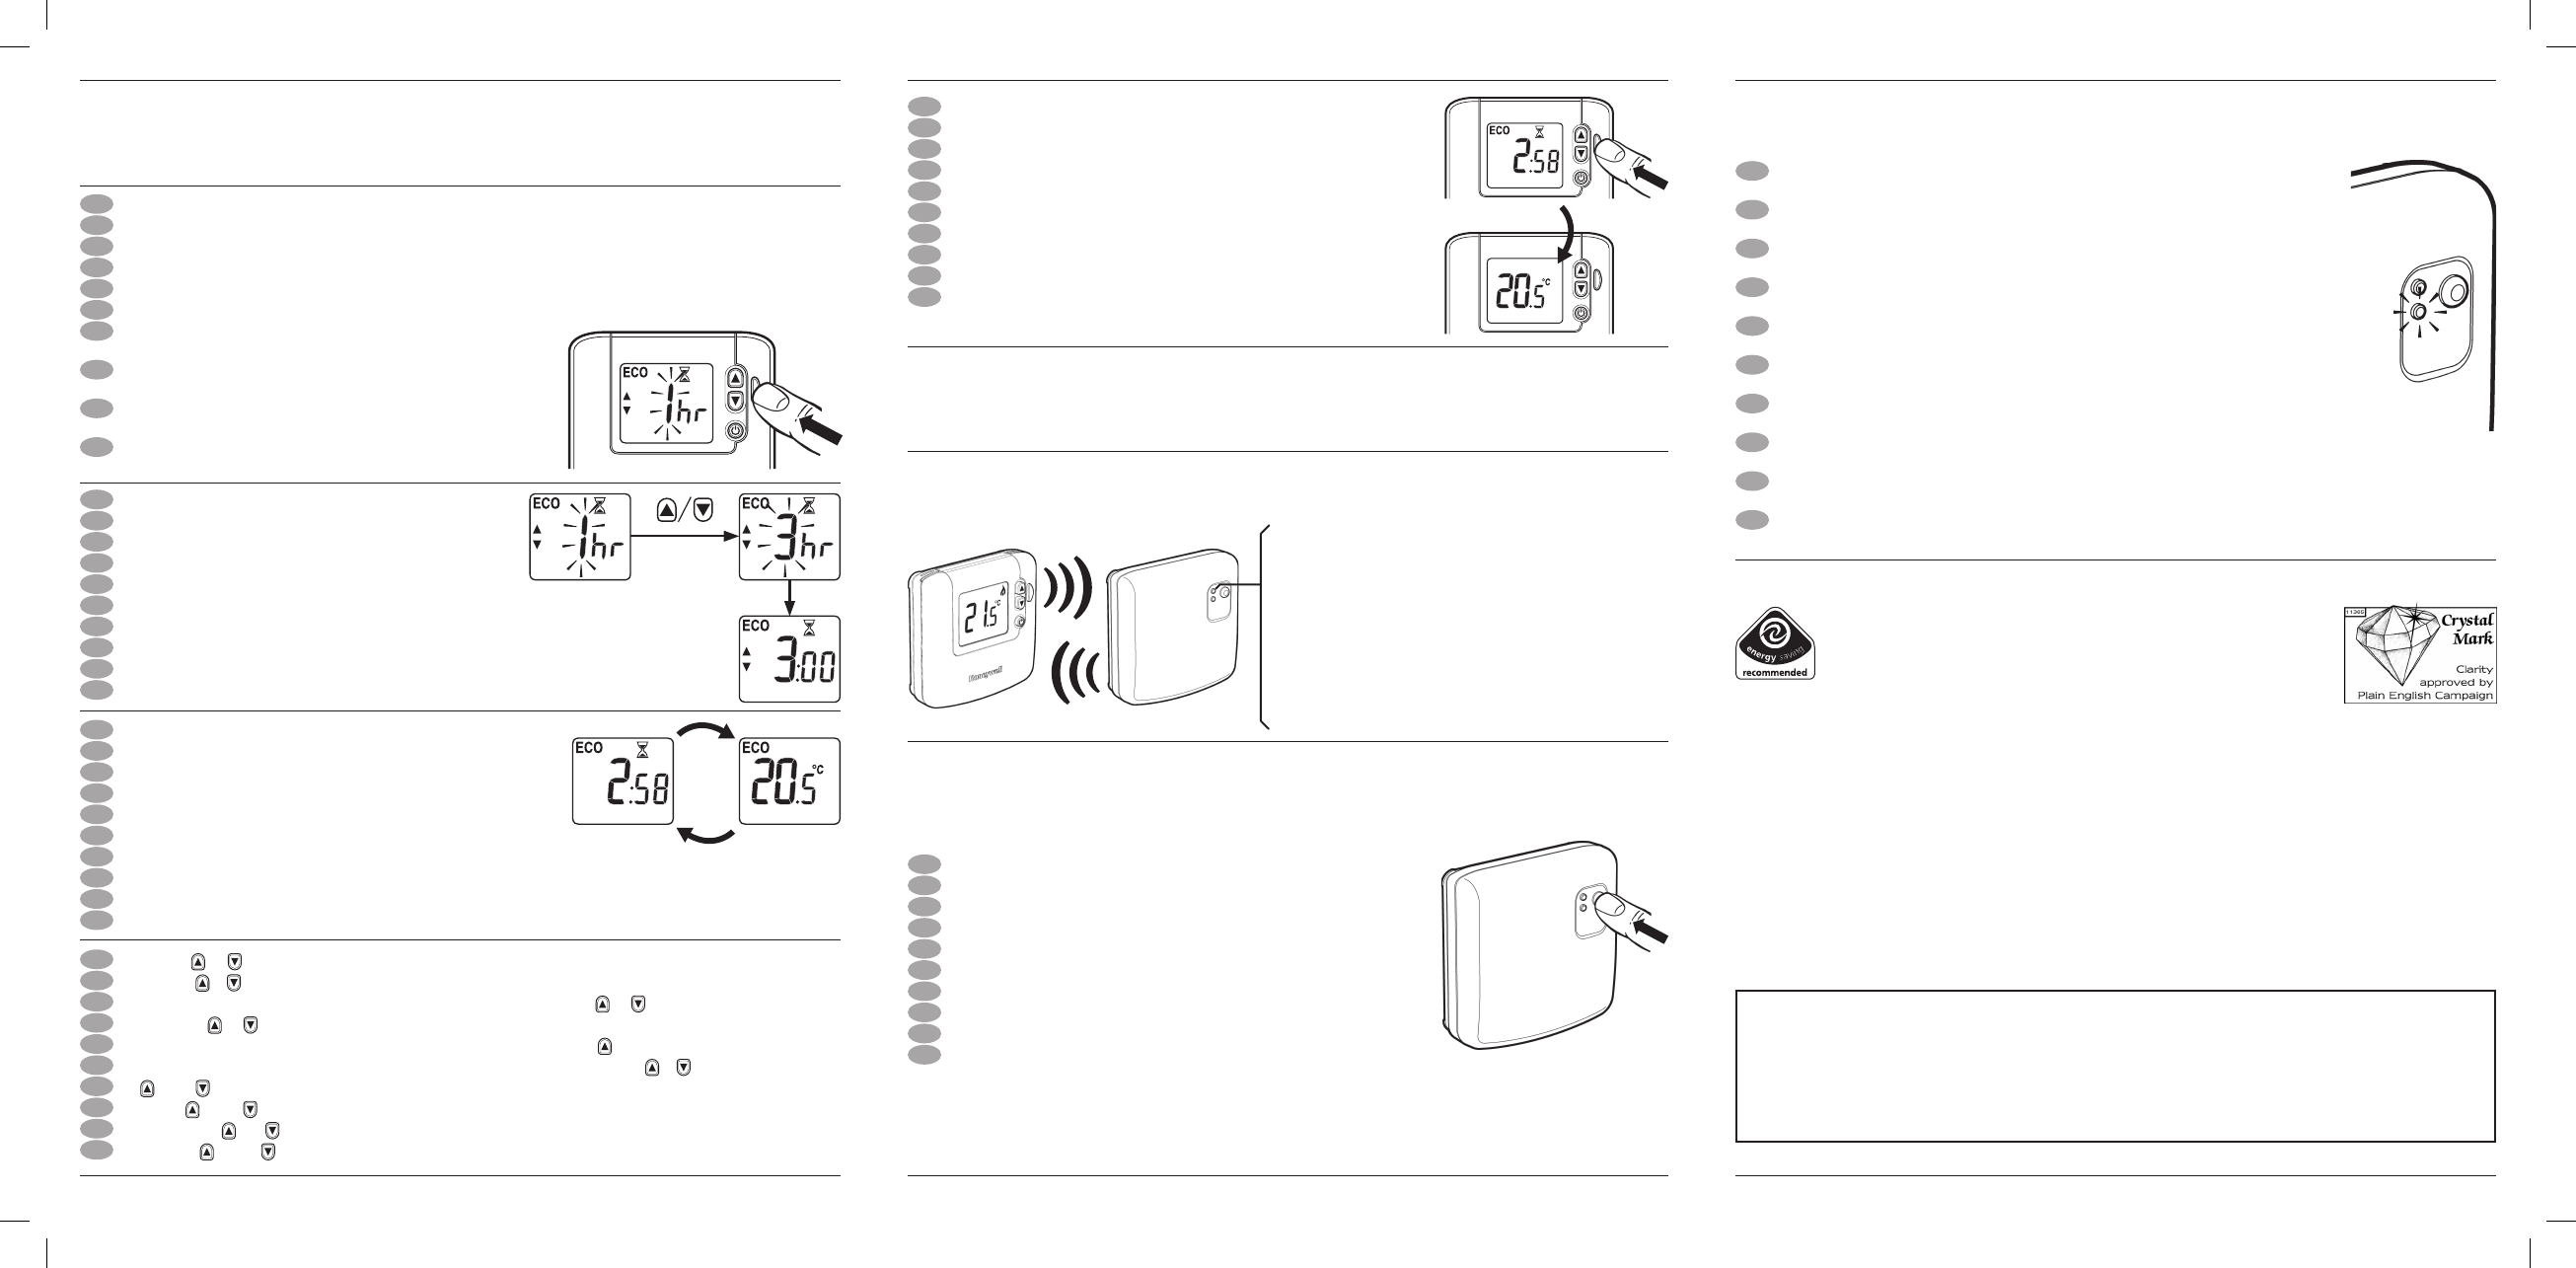
Pressing the green ECO button gives a timed period at a different, predefined temperature
Pulsando el botón verde ECO se activa un periodo a temperatura diferente predefinida
Presser la touche verte ECO active une période d’abaissement de la température à une valeur désirée
Door op de ECO toets te drukken wordt een vooraf ingestelde temperatuur voor een bepaalde tijdsduur actief
Beim drücken der ECO –Taste wird die voreingestellte Sollwerttemperatur und Zeitperiode aktiviert
Premendo il tasto verde ECO si attiva un intervallo a temperatura ridotta predefinita
A zöld ECO gomb megnyomásával egy külön előre
meghatározott hőmérsékletű időszak indul
Stiskem zeleného ECO tlačítka se zadává časový
interval pro provoz na úsporné, předdefinované teplotě
Zielony przycisk ECO umożliwia tymczasowe obniżenie
temperatury na określony okres
Stlačením zeleného ECO tlačítka sa zadáva časový interval
pre prevádzku na úspornú preddefinovanú teplotu
To set the ECO energy savings time period
Para fijar la duración del modo ahorro de energía ECO
Comment régler la période d’abaissement
Instellen tijdsduur ‘ECO’ energiebesparing
Zeitperiode für ECO Energieeinsparung einstellen
Per impostare la durata dell’intervallo ECO per il risparmio energetico
Az ECO energiatakarékos időszak beállítása
Nastavení časového intervalu ECO úsporného provozu
Zmiana okresu obniżenia temperatury
Nastavenie časového intervalu ECO úspornej prevádzky
Display shows countdown of ECO time remaining
La pantalla muestra el tiempo restante de modo ECO
L’écran affiche le temps restant de la période ECO
Scherm toont het aftellen van de resterende ‘ECO’ tijdsduur
verbleibende Zeit im ECO-Mode anzeigen
Il display mostra il tempo rimanente nella modalità ECO
A kijelző a hátralévő ECO üzemmód időt mutatja
Na displeji se odečítá zbývající čas ECO úsporného provozu
Wyświetlacz pokazuje pozostały czas trwania obniżenia temperatury
Na displeji sa odčíta zostávajúci čas ECO úspornej prevádzky
GB
E
F
NL
D
I
HU
CZ
PL
SK
GB
E
F
NL
D
I
HU
CZ
PL
SK
GB
E
F
NL
D
I
HU
CZ
PL
SK
5 s
5 s
5 s
1,2,3,4....,24hr
Pressing or will now allow the ECO temperature to be changed
Pulsando o se podrá modificar temporalmente la temperatura del modo ECO
Vous pouvez modifier la température ECO en pressant les touches▲ et
Door op de of te drukken kan de ‘ECO’ temperatuursinstelling tijdelijk worden gewijzigd
ECO- Temperatur vorübergehend ändern durch drücken der Tasten oder ▲
Potete modificare temporaneamente la temperatura ECO premendo i tasti o
A vagy gomb megnyomásával ideiglenesen megváltoztatja az ECO hőmérséklet szintet
Stiskem nebo je nyní možno přechodně upravit hodnotu ECO teploty
Przyciśnięcie lub umożliwia tymczasową zmianę temperatury w trybie ECO
Stlačením alebo▲ je možné prechodne upraviť hodnotu ECO teploty
To exit ECO mode, press ECO button again
Para salir del modo ECO, volver a pulsar el botón ECO
Pour arrêter la période ECO de manière anticipée, presser le bouton ECO
Om de ECO-functie te beëindigen, druk nogmaals op de ECO toets
ECO-Mode verlassen durch wiederholtem drücken der ECO-Taste
Per uscire dalla modalità ECO premere ancora il tasto ECO
Az ECO gomb ismételt megnyomásával kilép az ECO üzemmódból
Pro opuštění ECO provozu stiskněte opět zelené ECO tlačítko
Ponowne naciśnięcie przycisku ECO przywraca normaly tryb pracy
Pre odchod z ECO prevádzky slačte opätovne zelené ECO tlačítko
If RF communication is lost, red LED lights and Relay Box operates in failsafe
mode, as set in Installer Mode
Si la comunicación RF se ha perdido, el LED rojo se enciende y el Módulo de Relé
funciona en modo a prueba de fallos, como se establece en el Modo de Instalador
Si la communication RF est perdue, le voyant rouge est allumé et le récepteur
fonctionne sur son mode de sécurité, comme réglé dans les paramètres
Als de RF-verbinding langer dan 1 uur uitvalt, gaat de rode LED branden en de
instelling bij communicatieverlies wordt actief, zoals geselecteerd in het installatiemenu.
Falls die Funkkommunikation unterbrochen ist, leuchtet die rote LED und die Relais-
Box wechselt zu dem im Installateur- Menü unter Fehler Mode hinterlegten Wert
Se la comunicazione in RF viene a mancare, il led rosso si accende e il modulo
relé funziona in modalità di sicurezza, come impostato nella Modalità Installatore
Ha az RF kommunikációban hiba lép fel, a piros LED ég és a reléegység a telepítő
által beállított biztonsági üzemmódban működik.
Jestliže dojde ke ztrátě RF komunikace, červená LED svítí a spínací jednotka
pracuje v protiporuchovém módu, tak jak je nastaven v instalačním režimu
W razie usterki komunikacji bezprzewodowej zapalona jest czerwona dioda a
moduł kotłowy pracuje w trybie awaryjnym określonym w trybie instalatora
Ak sa preruší bezdrôtová komunikácia, červená LED svieti a skrinka prijímača
pracuje v bezpečnostnom režime, ktorý bol nastavený v inštalačnom móde.
Press button to temporarily override the current relay position
Pulsar el botón para anular temporalmente la posición del relé
Presser le bouton pour déroger temporairement l’état du relais
Druk op de knop voor het tijdelijk wijzigen van de relais status
Drücken Sie die Taste um die Relais Stellung temporäre zu ändern
Premere il tasto per forzare manualmente la posizione del relé
Nyomja meg a gombot kézi felülvezérléshez
Stiskněte tlačítko pro dočasné zrušení pozice relé
Naciśniecie przycisku zmienia tymczasowo pozycję przekaźnika
Stlačte tlačidlo pre dočasnú zmenu pozície relé
GB
E
F
NL
D
I
HU
CZ
PL
SK
GB
E
F
NL
D
I
HU
CZ
PL
SK
GB
E
F
NL
D
I
HU
CZ
PL
SK
GB
E
F
NL
D
I
HU
CZ
PL
SK
What is a room thermostat? …an explanation for householders
This product and its associated documentation and packaging are protected by various intellectual property rights belonging to Honeywell
Inc and its subsidiaries and existing under the laws of the UK and other countries. These intellectual and property rights may include patent
applications, registered designs, unregistered designs, registered trade marks, unregistered trade marks and copyrights. Honeywell
reserves the right to modify this document, product and functionality without notice. This document replaces any previously issued
instructions and is only applicable to the product(s) described. This product has been designed for applications as described within this
document. For use outside of the scope as described herein, refer to Honeywell for guidance. Honeywell cannot be held responsible for
misapplication of the product(s) described within this document.
Manufactured for and on behalf of the Environment and Combustion Controls Division of Honeywell Technologies Sàrl, ACS-ECC
EMEA, Z.A. La Pièce 16, 1180 Rolle, Switzerland, by its Authorised Representative Honeywell Inc.
http://europe.hbc.honeywell.com
© 2009 Honeywell International Inc.
Green LED on = relay on
LED Verde encendido = relé conectado
Voyant Vert allumé = relais enclenché
Groene LED aan = relais aan
Grüne LED an = Relais an
Led verde acceso = relé acceso
Zöld LED ég = relé bekapcsol
Zelená LED svítí = sepnuté relé
Zielona dioda włączona = styki A-B zwarte
Zelená LED svieti = relé je zapnuté
Green LED off = relay off
LED Verde apagado = relé desconectado
Voyant Vert éteint = relais non enclenché
Groene LED uit = relais uit
Grüne LED aus = Relais aus
Led verde spento = relé spento
Zöld LED nem ég = relé kikapcsol
Zelená LED zhasnutá = rozepnuté relé
Zielona dioda wyłączona = styki A-B rozwarte
Zelená LED nesvieti = relé je vypnuté