�M
�M
�M
�M
Ο Ο Ο Ο Ο Ο
Ο Ο Ο Ο Ο
Ο Ο Ο Ο Ο
Ο
Ο
这两根线需印刷出来
折叠尺寸:6风 1折
展开尺寸:640*75mm
材质:128克
印刷要求:黑色双面印刷,线框不印刷
6
7
Independent Photoelectric
Smoke Detector
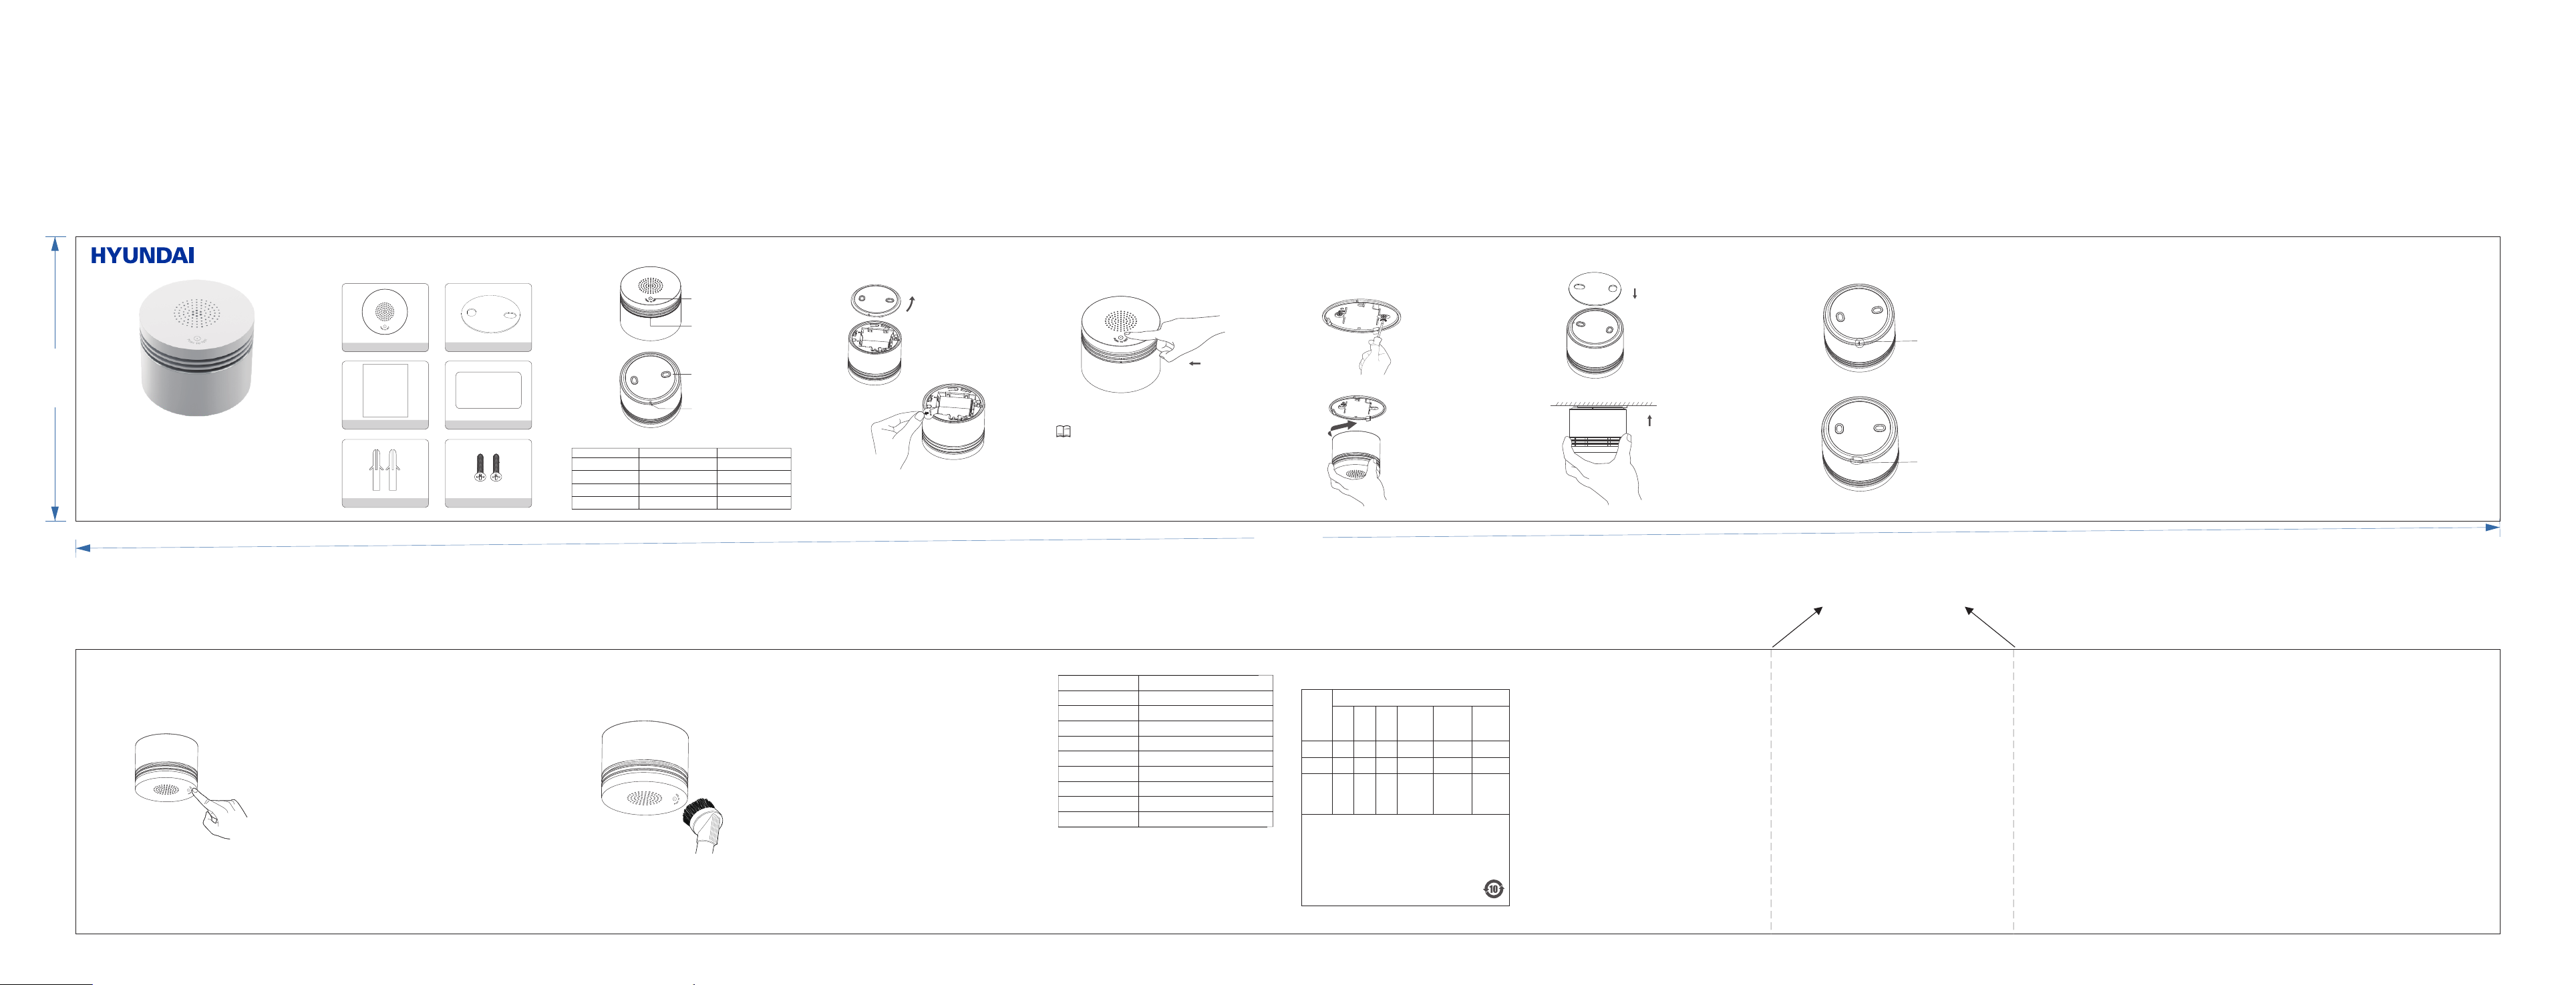
Packing List
After you unpack the product package, check whether the product is intact and
that all accessories are included and complete. The following gures show the
items that should be contained in the product package.
EN Product Description
Indicator and Buzzer States
Network Setting
1. Power on the product.
T
put another battery into the battery slot.
2. Press the reset button for 5S and release, the gr
setting.
Network Setting Steps:
Press the reset button for 5s-10s, the red LED is on, it will turns off after 5s.
Then green LED is on. Release the reset button, the green LED ashes for
network setting.
The green LED will be on for 5s then turns off to indicate network setting
succeeds, the product is in networking detecting status. If network setting fails in
2min, yellow LED is on for 5s then off, Product is in independent detecting status.
Installation Instructions
1. Installation methods
(2) Using 3M sticker (3) Installation checking
Checkif the product is installed properly
2. Precautions
(1) Mount the product only on indoor ceilings.
(2) Install the product at least 50 cm away from lighting products.
(3) Do not install the product in bathrooms or other moist
environments.
(4) Do not install the product in places with non-re smoke or steam.
(5) Ensure that the temperature of the installation environment is
within the range of –10°C to +55°C.
(6) If a cupboard is near the ceiling, install the product at least
60 cm away from the cupboard.
(7) Install the product at least 150 cm away from ventilators, air
conditioners, and air vents.
(8) Y
a 3M sticker to install it, any product damage or safety
accidents incurred therefrom will be your r
(9) If you choose to use a 3M sticker
even, dry
(10) Regularly check whether the product is attached to the
surface securely to prevent it from falling down.
(11) The product cannot be mounted to the mounting base unless
the battery is installed.
(12) If you afx the product to a painted surface, peeling of the paint
may cause the product to fall down. If this occurs, you are
liable for any problems incurred therefr
Fire Alarm Function
1. When the product detects smoke, it immediately sends audible
and visual alarm signals.
2. In case of re, take proper measures immediately
call the re emergency number
out the re.
3. If there is no re, press the mute/self-diagnostic button to mute
the product.
The product will be mute for 90s. During this period, the
product will not generate any audible or visual alarm. After 90s,
the product will be restored to the detection state.
4. The product will generate a re alarm when the following items
contact it directly:
(1) Mist sprayed from pesticides or cosmetics
(2) Smoke generated by cigarettes and incense sticks
(3) Smoke-type or thermal evaporation-type pesticides
(4) Cooking smoke or steam
(5) Condensation
Smoke detector
User manual
QC Pass
User
Manual
Expansion tubes
3M Sticker
Mute / Reset Rotate the mounting base
anticlockwise to open.
Press the reset button
for 5s then release.
Use screws to x the mounting
base to the ceiling.
Rotate the product clockwise
into the mounting base.
Improperly
installed
Properly
installed
Remove the protective lm
from the 3M sticker and attach
the sticker to the mounting
base.
Remove the protective lm
from the 3M sticker and attach
the product to the ceiling.
Self-checking
status LED
Wireless T
T
W
Undervoltage Alarm
W
Detector T
Alarm Sound Pressure
Installation Position
Battery Lifespan
Dimensions
WiFi
Component
Name
T
Lead
(Pb)
Mercury
(Hg)
Cadmium
(Cd)
Hexavalent
chromium
(Cr(VI ))
Polybrominated
biphenyls
(PBBs)
Polybrominated
diphenyl ethers
(PBDEs)
LED
PCB
Cover
and other
components
2.4 GHz
DC 3 V (CR123A battery )
Supported
–10°C to +55°C
Independent smoke detector
≥ 85 dB (3 m in front of the
Ceiling
More than three years (20 times/day)
Φ64 mm x 51 mm
Alignment mark
Red LED ashes
Red LED ashes once
every 50 seconds
Y
every 40 seconds.
Red LED ashes.
Green LED ashes
quickly
The buzzer beeps DI DI--.
The buzzer does not beep.
The buzzer beeps once shortly
The buzzer beeps 4 times .
The buzzer does not beep.
Alarm is triggered.
The product works properly
Battery power is low.
Product is in self-checking
and alarm simulating state.
Product is in network
setting mode.
QC Pass
Screws
(4) If the product generate an alarm when it is monitoring, potential risks
may exist. Do not ignore the alarm and try to locate the cause.
IMPORT
Ignoring the alarm could result in property damage, personal injury
or even death. If the product fails a test, see "T
the fault. If the fault persists, replace the product immediately
Mute Function
If the product generates an alarm, potential risks may exist. Before
you mute the product, ensure that there is no r
product or disable it in any way
provide you with protection.
If the product generates an alarm because it detects smoke in the kitchen
but not a re (for example, bacon frying), press the mute/self-diagnostic
button on the panel to mute the product.
When the product is muted, the status indicator will rapidly blink red.
The product sensitivity will be restored automatically within 90s.
Note: If the smoke density surrounding the product is still high,
the product will generate an alarm again. Open the door and window to
let out the smoke.
If you do not know the cause for the alarm, try to locate the source
of the smoke, as ignoring the alarm could result in property damage,
personal injury
Alarm and T
1. Detection state: The status indicator blinks red at 50s intervals.
2. Self-checking state: When you press the mute/self-checking button, the
status indicator will turn red. If you press and hold the mute/
self- diagnostic button for less than 5s, the product will enter the
self-checking state, the status indicator will ash red, and the buzzer
will beep (same as in alarm state).
(1) When the smoke density reaches the preset alarm threshold, the
product generates an alarm.
(2) During self-checkingtest, keep away from the buzzer to avoid loud
alarm sound from damaging your hearing.
Routine Maintenance
The product has a maintenance-free design. Y
the following routine operations to ensure that the product works pr
1. Suggest to test the product at least once every week. For details on how
to test the product, see "Alarm and T
2. Keep the product clean and remove dust from it with a vacuum cleaner
and soft brush at least once every year
Use a cotton cloth or sponge to clean the product. Do not use
solvents or detergents, which may enter the product and cause
damage to the sensor or circuit.
Note: Do not paint your product. The paint may block smoke
intake vents of the product, causing the product to malfunction.
T
If the product malfunctions, its battery may have reached its valid
lifespan or the product may be affected by dust, smoke residue, or other
dirt. If this is the case, refer to "Routine Maintenance" for instructions on
cleaning the product. If the fault persists, perform the following operations:
1. If the product does not respond, check whether the product is corr
mounted to the mounting base.
2. If the product intermittently beeps (at about 40s intervals), the battery
level is low. Replace the battery within one week.
3. If you often encounter non-re alarm, please try to relocate your
smoke alarm.
4. If the product generates alarms frequently when there is no r
smoke, clean the product or reinstall the product in another position.
IMPORT
If the fault persists after you perform the preceding operations, contact
the local vendor
warranty service for the product will become invalid.
T T
Elements of this Product
This table complies with SJ/T 11364.
Ο: indicates that the toxic or hazardous substance amount contained in
all homogeneous materials of a component does not exceed that
stipulated in GB/T 26572.
X: indicates that the toxic or hazardous substance amount contained in
at least one of the homogeneous materials of a component exceeds
that stipulated in GB/T 26572.
© 2021 The Investment Company Europe B.V
HYUNDAI Corporation, Korea. Licensed to The Investment Company Europe B.V
All rights reserved.
Licensed by HYUNDAI Corporation, Korea. Imported/Distributed by The
Investment Company Europe B.V
Netherlands, Belgium, and Luxembourg.
P
The artwork and design of this package are protected by European copyright law
and may not be reproduced, distributed, displayed, published or used for any
purpose without prior written permission. It is not permitted to alter
any trademarks or copyright notice from this package.
NL / EN - www.alleenonline.nl
BE / FR - www.alleenonline.be
Fingertip Pulse Oximeter
Mounting plate