IT 61
Installazione
A Nel caso in cui si renda impro
necessario spostare l'
posizione verticale; solo se assolutamente necessario, ribaltarlo
sulla schiena.
Collegamento dell'
L
deve esser
I tubi di carico e scarico dell'
verso destra oppur
necessario per ottenere la miglior
Accertarsi che la lavastoviglie non pr
Collegamento del tubo di carico acqua
• Far scorrer
• Fissare saldamente in posizione il tubo di carico e aprir
rubinetto.
Nel caso in cui il tubo di carico non sia sucientemente lungo,
contattare il distributor
La pressione dell'
nella tabella con le caratteristiche tecniche; in caso contr
lavastoviglie potr
Accertarsi che i tubi non siano piegati né schiacciati.
Speciche per il collegamento alla rete idrica
Acqua di mandata fredda o caldo (valor
60°C)
Attacco per l' “3/4 ”
Pressione di mandata
Pressione
0,05 ÷ 1 MPa (0,5 ÷ 10 bar)
7,25 – 145 psi
T
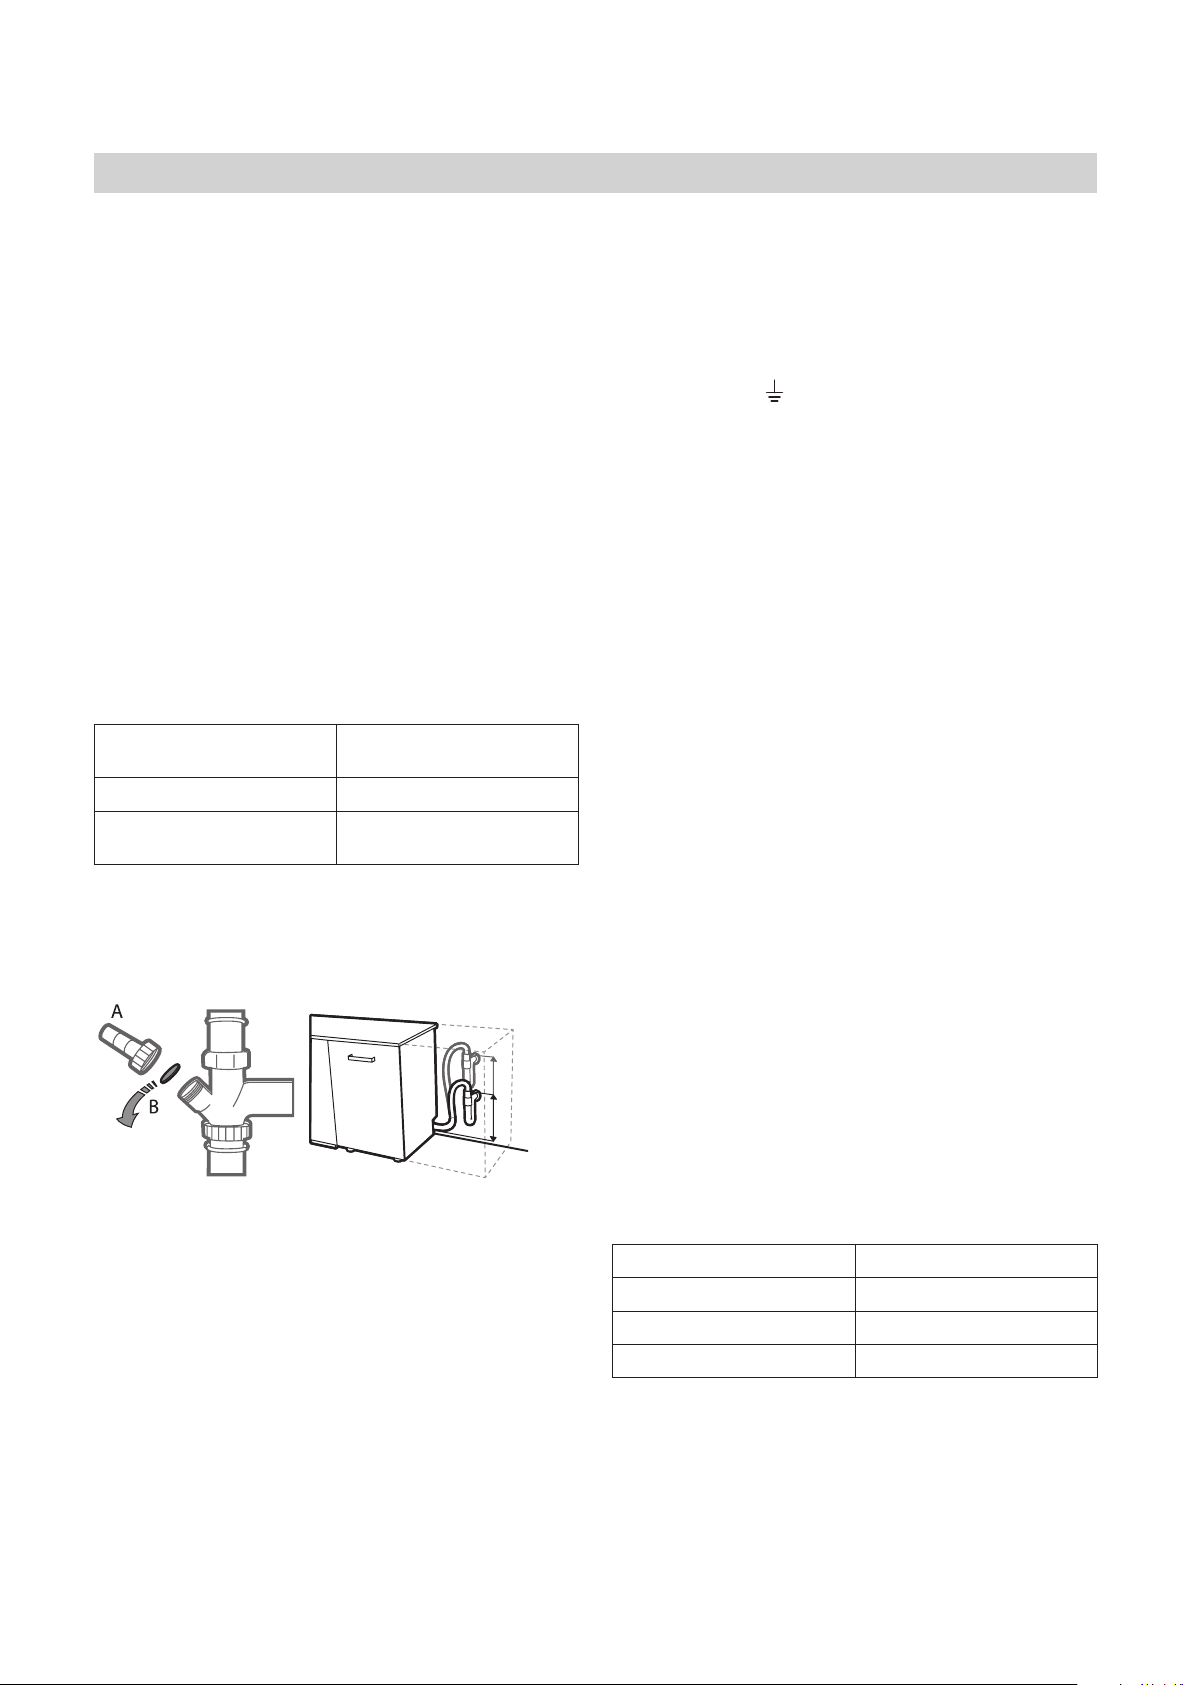
Collegamento del tubo di scarico acqua
Collegare il tubo di scarico a un apposito condotto con diametr
minimo di 2 cm A .
INSTALLATION
ENGLISH
A TTENTION: If the appliance must be moved at any time, keep it
in an upright position; if absolutely necessary , it may be tilted onto
its back.
CONNECTING THE W A TER SUPPL Y
Adaptation of the water supply for installation should only be
performed by a qualified technician
The water inlet and outlet hoses may be positioned towards the
right or the left in order to achieve the best possible installation.
Make sure the dishwasher does not bend or squash the hoses.
CONNECTING THE W A TER INLET HOSE
• Run the water until it is perfectly clear .
• Screw the inlet hose tightly into position and turn on the tap.
If the inlet hose is not long enough, contact a specialist store or
an authorised technician.
The water pressure must be within the values indicated in the
T e c h n i c a l Data table - otherwise the dishwasher may be function
properly .
Make sure the hose is not bent or compressed.
SPECIFICA TIONS FOR THE CONNECTION OF THE W A TER
SUPPL Y HOSE:
CONNECTING THE W A TER OUTLET HOSE
Connect the outlet hose to a drain duct with a minimum diameter
of 2 cm A .
The outlet hose connection must be at a height ranging from
40 to 80 cm from the floor or surface where the dishwasher rests
Before connecting the water outlet hose to the sink drain, remove
the plastic plug B .
ANTI-FLOODING PROTECTION
Anti-flooding protection. T o ensure floods do not occu , the dishwasher
is provided with a special system which blocks the water supply in
the event of anomalies or leaks from inside the appliance.
Some models are also equipped with the supplementary safety
device New Aqua Stop , which guarantees anti-flooding protectio
even in the event of a supply hose rupture.
Under no circumstances should the water inlet hose be cut as it
contains live electrical parts.
ELECTRICAL CONNECTION
W ARNING: Under no circumstances should the water inlet
hose be cut as it contains live electrical parts.
Before inserting the plug into the electrical socket, make sure that:
• The socket is earth and complies with current regulations;
• The socket can withstand the maximum load of the applian-
ce as shown on the data plate located on the inside of the door
(see PRODUCT DESCRIPTION) .
• The power supply voltage falls within the values indicated on
the data plate on the inside of the door .
• The socket is compatible with the plug of the appliance.
If this is not the case, ask an authorised technician to replace the
plug (see AFTER-SALES SER VICE) . Do not use extension ca -
bles or multiple sockets. Once the appliance has been installed,
the power supply cable and the electrical socket should be easily
accessible.
The cable should not be bent or compressed.
If the power supply cable is damaged, have it replaced by the
manufacturer or its authorised T echnical Assistance Service in
order to prevent all potential hazards.
The Company shall not be held responsible for any incidents, if
these regulations are not observed.
POSITIONING AND LEVELLING
1.
2.
Position the dishwasher on a level sturdy floo . If the floor i
u n e v e n , the front feet of the appliance may be adjusted until
it reaches a horizontal position. If the appliance is levelled
correctly , it will be more stable and much less likely to move or
cause vibrations and noise while it is operating.
Before recessing the dishwasher , stick the adhesive transparent
strip under the wooden shelf in order to protect it from any con -
d e n s a t i o n which may form.
3.
4.
Place the dishwasher so that its sides or back panel are in
contact with the adjacent cabinets or the wall. This appliance
can also be recessed under a single worktop.
T o adjust the height of the rear foot, turn the red hexagonal
bushing on the lower central part at the front of the dishwasher
using a hexagonal spanner with an opening of 8 mm. T urn the
spanner in a clockwise direction to increase the height and in
an anticlockwise direction to decrease it.
DIMENSIONS AND CAP ACITY :
MIN 40 cm
MAX 80 cm
W A TER SUPPL Y cold or hot (max. 60°C)
W A TER INT AKE 3/4”
POWER OF W A TER
PRESSURE
0.05 ÷ 1 MPa (0.5 ÷ 10 bar)
7.25 – 145 psi
WIDTH 598 mm
HEIGHT 820 mm
DEPTH 555 mm
CAP ACITY 13 standard place-settings
L
tra 40 e 80cm dal livello del pavimento o dalla supercie di
appoggio della lavastoviglie. Prima di collegar
dell'B .
Dispositivo di protezione antiriusso
Dispositivo di protezione antiriusso. Per e
di allagamento, la lavastoviglie è munita di uno specico
dispositivo per l'interruzione del usso di mandata dell'
in caso di anomalie di funzionamento o di perdite all'interno
dell'
Alcuni modelli sono muniti anche del dispositivo di sicurezza
supplementare Ne
antiriusso anche in caso di rottur
Questo modello è dotato del sistema di protezione Aquastop
Non tagliare il tubo di carico dell'
poiché esso contiene anche componenti elettrici sotto tensione.
Collegamento alla rete elettrica
A
nessun motivo poiché esso contiene anche componenti
elettrici sotto tensione.
Prima di inserire la spina nella pr
segue:
• la presa elettrica è munita di messa a terr
alle normative vigenti;
• la presa elettrica
INSTALLATION
ENGLISH
A TTENTION: If the appliance must be moved at any time, keep it
in an upright position; if absolutely necessary , it may be tilted onto
its back.
CONNECTING THE W A TER SUPPL Y
Adaptation of the water supply for installation should only be
performed by a qualified technician
The water inlet and outlet hoses may be positioned towards the
right or the left in order to achieve the best possible installation.
Make sure the dishwasher does not bend or squash the hoses.
CONNECTING THE W A TER INLET HOSE
• Run the water until it is perfectly clear .
• Screw the inlet hose tightly into position and turn on the tap.
If the inlet hose is not long enough, contact a specialist store or
an authorised technician.
The water pressure must be within the values indicated in the
T e c h n i c a l Data table - otherwise the dishwasher may be function
properly .
Make sure the hose is not bent or compressed.
SPECIFICA TIONS FOR THE CONNECTION OF THE W A TER
SUPPL Y HOSE:
CONNECTING THE W A TER OUTLET HOSE
Connect the outlet hose to a drain duct with a minimum diameter
of 2 cm A .
The outlet hose connection must be at a height ranging from
40 to 80 cm from the floor or surface where the dishwasher rests
Before connecting the water outlet hose to the sink drain, remove
the plastic plug B .
ANTI-FLOODING PROTECTION
Anti-flooding protection. T o ensure floods do not occu , the dishwasher
is provided with a special system which blocks the water supply in
the event of anomalies or leaks from inside the appliance.
Some models are also equipped with the supplementary safety
device New Aqua Stop , which guarantees anti-flooding protectio
even in the event of a supply hose rupture.
Under no circumstances should the water inlet hose be cut as it
contains live electrical parts.
ELECTRICAL CONNECTION
W ARNING: Under no circumstances should the water inlet
hose be cut as it contains live electrical parts.
Before inserting the plug into the electrical socket, make sure that:
• The socket is earth and complies with current regulations;
• The socket can withstand the maximum load of the applian-
ce as shown on the data plate located on the inside of the door
(see PRODUCT DESCRIPTION) .
• The power supply voltage falls within the values indicated on
the data plate on the inside of the door .
• The socket is compatible with the plug of the appliance.
If this is not the case, ask an authorised technician to replace the
plug (see AFTER-SALES SER VICE) . Do not use extension ca -
bles or multiple sockets. Once the appliance has been installed,
the power supply cable and the electrical socket should be easily
accessible.
The cable should not be bent or compressed.
If the power supply cable is damaged, have it replaced by the
manufacturer or its authorised T echnical Assistance Service in
order to prevent all potential hazards.
The Company shall not be held responsible for any incidents, if
these regulations are not observed.
POSITIONING AND LEVELLING
1.
2.
Position the dishwasher on a level sturdy floo . If the floor i
u n e v e n , the front feet of the appliance may be adjusted until
it reaches a horizontal position. If the appliance is levelled
correctly , it will be more stable and much less likely to move or
cause vibrations and noise while it is operating.
Before recessing the dishwasher , stick the adhesive transparent
strip under the wooden shelf in order to protect it from any con -
d e n s a t i o n which may form.
3.
4.
Place the dishwasher so that its sides or back panel are in
contact with the adjacent cabinets or the wall. This appliance
can also be recessed under a single worktop.
T o adjust the height of the rear foot, turn the red hexagonal
bushing on the lower central part at the front of the dishwasher
using a hexagonal spanner with an opening of 8 mm. T urn the
spanner in a clockwise direction to increase the height and in
an anticlockwise direction to decrease it.
DIMENSIONS AND CAP ACITY :
MIN 40 cm
MAX 80 cm
W A TER SUPPL Y cold or hot (max. 60°C)
W A TER INT AKE 3/4”
POWER OF W A TER
PRESSURE
0.05 ÷ 1 MPa (0.5 ÷ 10 bar)
7.25 – 145 psi
WIDTH 598 mm
HEIGHT 820 mm
DEPTH 555 mm
CAP ACITY 13 standard place-settings
è in grado di sopportar
massimo di carico pre
targhetta posta all'interno della porta (vedere DESCRIZIONE
DEL PRODOTTO).
• la tensione di alimentazione corrisponde all'intervallo di
valori riportato sulla targhetta posta all'interno della porta.
• la presa sia compatibile con la spina dell’
Nel caso in cui non vi sia compatibilità, rivolgersi a un tecnico
autorizzato anché sostituisca la spina (vedere SERVIZIO
ASSISTENZA). Non utilizzare cavi di pr
aver completato l'installazione dell'
di alimentazione e la presa elettrica siano facilmente accessibili.
Il cavo non deve risultar
Per scongiurar
di danneggiamento del cavo di alimentazione elettrica è
necessario adare la sua sostituzione al costruttor
Servizio di assistenza tecnica.
In caso di inosservanza della precedente r
Società non è in alcun modo responsabile di e
Posizionamento e livellamento
1. Sistemare la lavastoviglie su supercie solida e piana. Se la
pavimentazione non è in piano, è possibile regolar
dei piedini anteriori dell'
livellamento corretto. Il corr
rende la sua installazione più stabile e molto meno soggetta
a spostamenti o a vibrazioni con eccessiva rumor
durante il funzionamento.
2. Prima di incassare la lavasto
la striscia adesiva traspar
legno per proteggerlo da e
3. Sistemare la lavastoviglie in modo che i pannelli later
lato posteriore siano a contatto con i mobiletti adiacenti o
con il muro. L
anche sotto un singolo piano di lavoro.
4. Per regolare l'
boccola esagonale di colore r
parte inferiore del lato anterior
da 8 mm. Per aumentare l'
chiave in senso orario e ruotarla invece in senso antior
per diminuirla.
Dimensioni e capacità:
Larghezza 598 mm
Altezza 820 mm
Profondità 555 mm
Capacità 13 coperti standard