-1- -2-
-3-
-9- -10-
-11- -12-
-13-
-14-
-15- -16-
SKIPRO WRIST W
This wrist watch includes an integrated ski
computer. The ski computer can be activated by
pressing SENSOR. Press SENSOR again to return
to the normal watch functions.
Function modes of the watch and weather
forecast
The different modes can be entered by pressing
the MODE button. The order of the modes is:
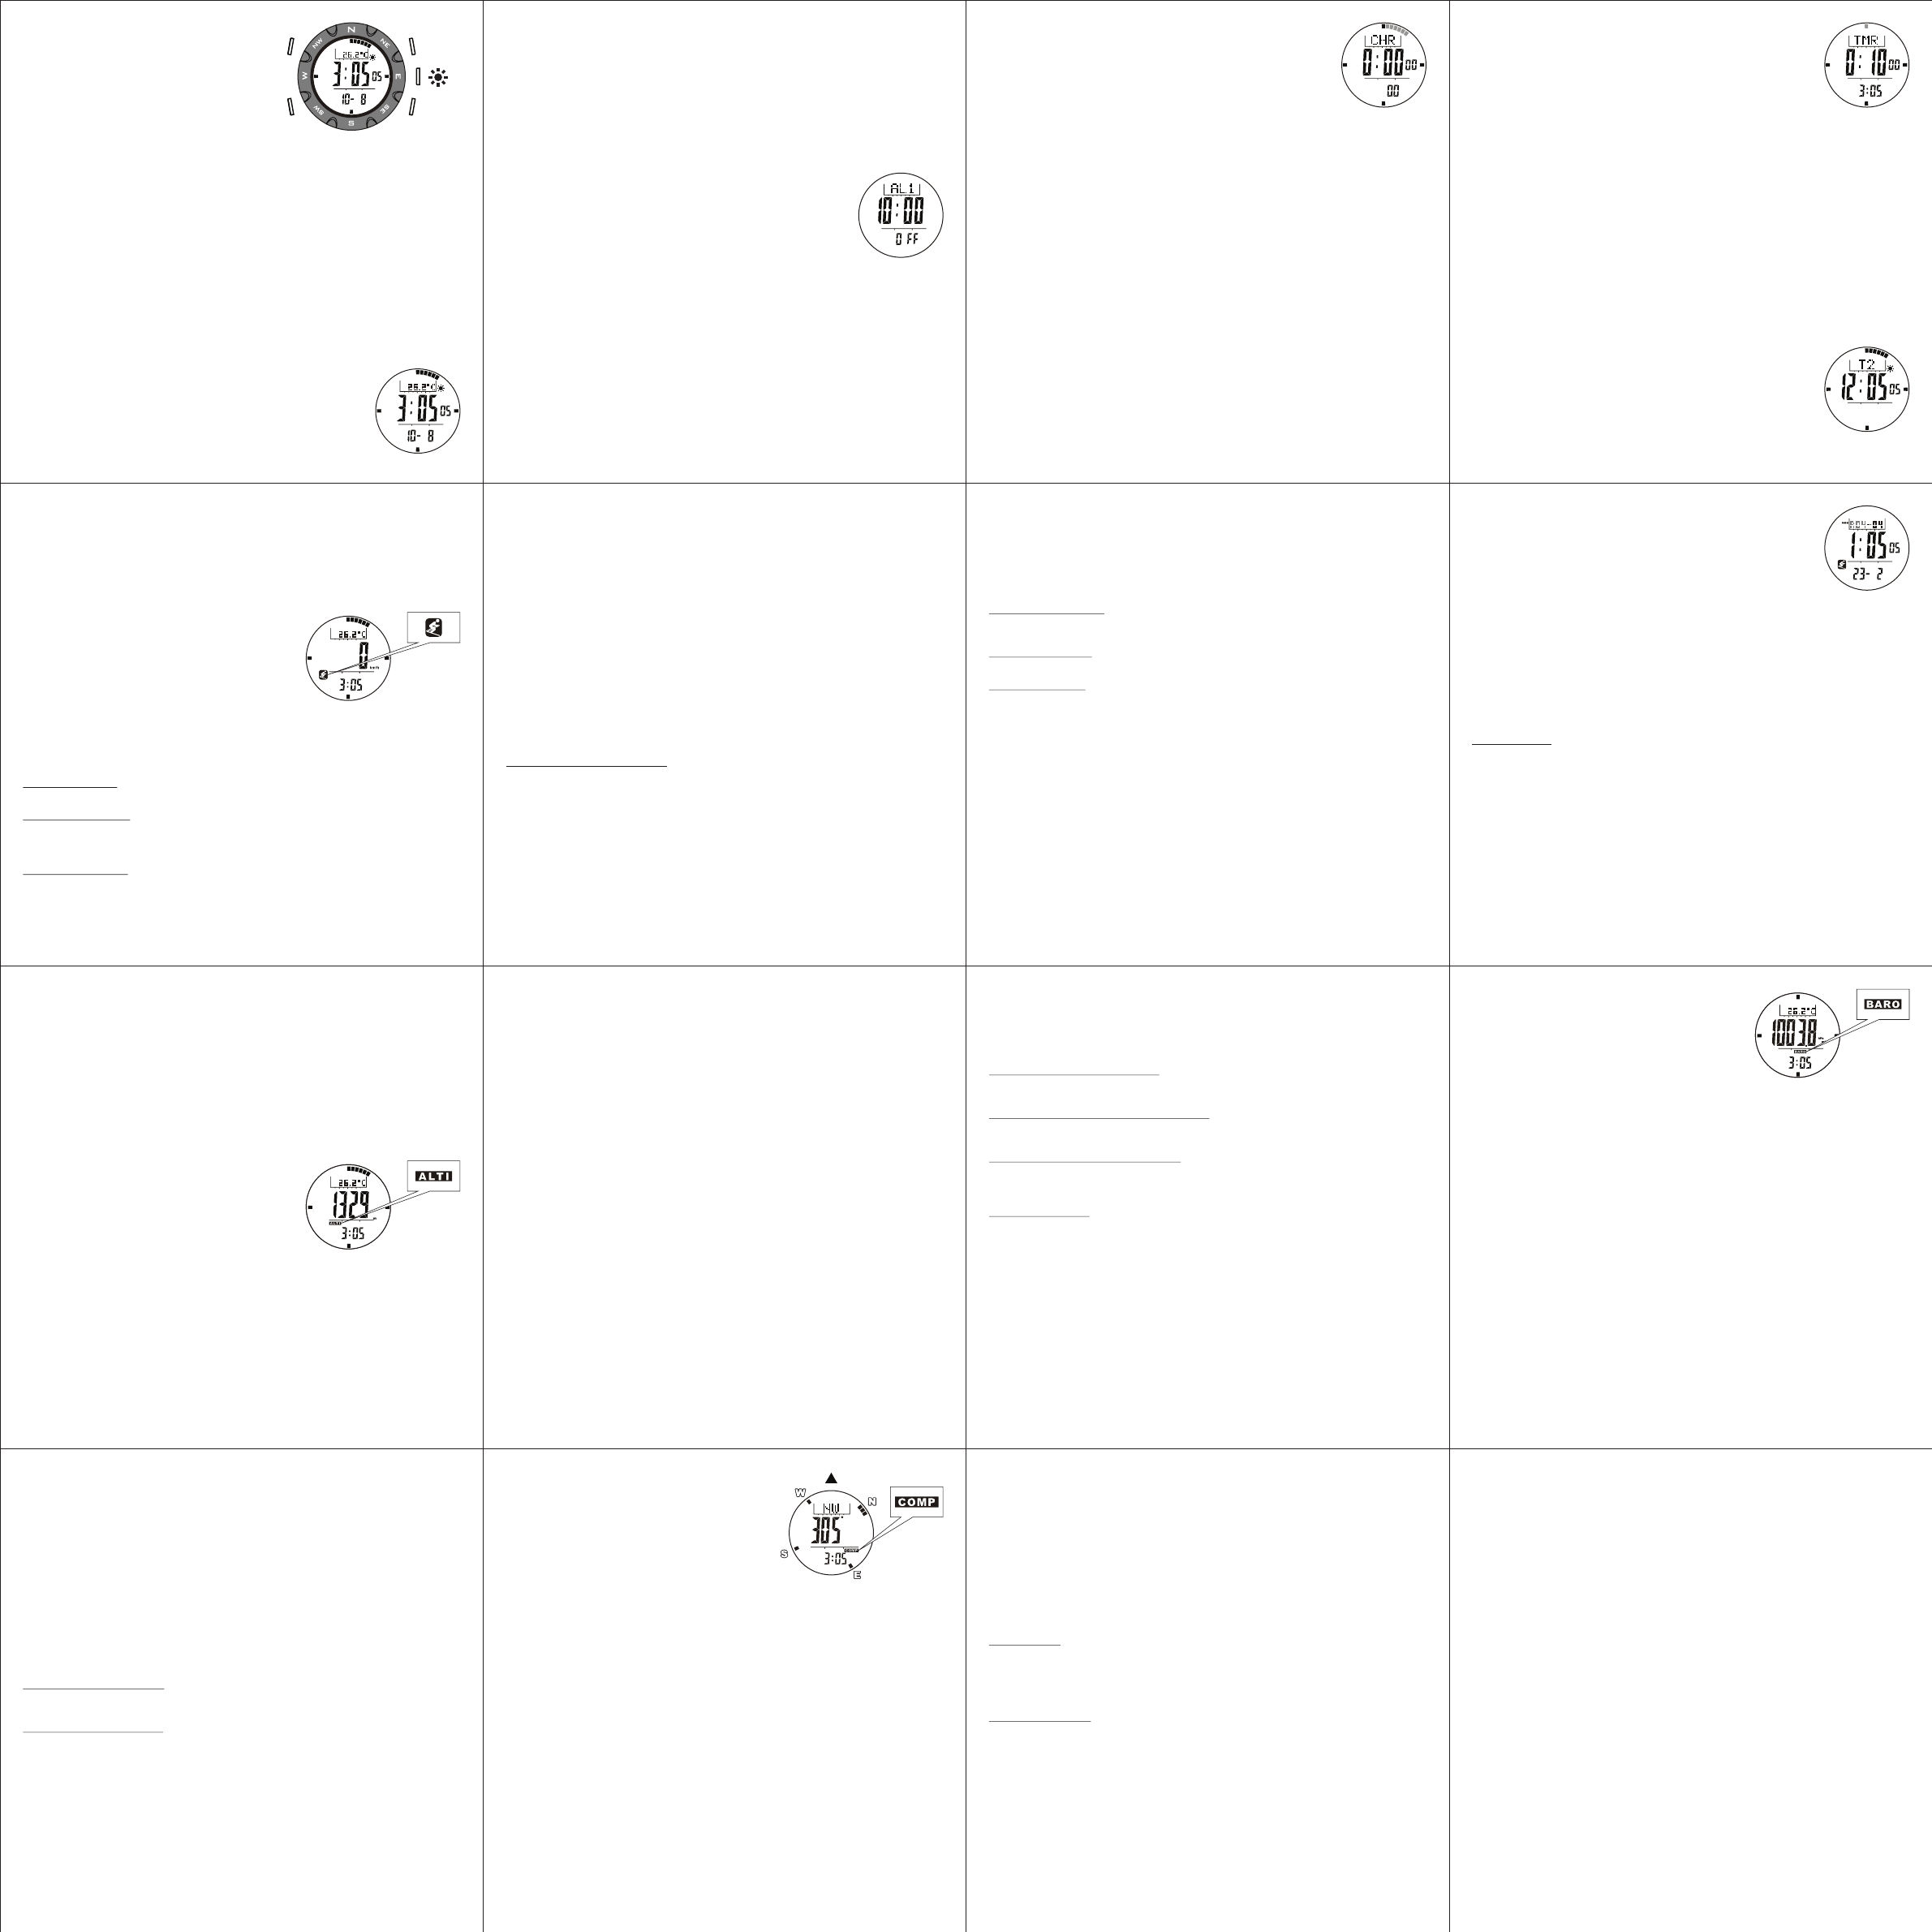
> normal time display > alarm (AL1/AL2) > stop watch (CHR) > timer (TMR) >
second time zone (T2) > normal time display >
Normal time display with additional display features
Press ST
> weekday > thermometer > > Barometer (air pressure tendency)
> weekday >
A
The temperature shown on the display is measured within the watch. Please note that, when wearing
the watch, your body temperature will strongly influence the temperature measurement.
T
from your wrist and expose it to the external temperature for 20 to 30 minutes. Please take care not
to expose the watch to direct sunlight.
Weather forecast
The watch can show one of 4 weather forecast icons in addition to the normal
time display:
sun Y ,slightly cloudy Z , cloudy W , rain X .
A
The weather forecast is calculated by evaluating changes in air pressure. T
achieve an optimal forecast the watch should remain at the same altitude for at
least 8 hours.
Time setting
Press and hold MODE in normal time display for 3 seconds.
The seconds will blink on the display
Press MODE to activate the minute setting. Press ST
and confirm your selection by pressing MODE.
Set the hours, year
hour time display
Press and hold MODE to complete your settings.
Activating/deactivating the alarm and hourly chime
Switch to
Y
Alarm 1 (AL1),
activate or deactivate each of the features.
When the alarm is activated it will sound at the set alarm time. The alarm
sound can be stopped by pressing any key
If the hourly chime is activated (CHIME) the chime will sound at every hour
Setting the 2 alarm times
Enter alarm mode (AL1/AL2) by pressing MODE.
Select the alarm you wish to set (AL1) or (AL2) by pressing ST
Press and hold MODE for 3 seconds.
The minutes will blink on the display
confirm your setting by pressing MODE.
Set the hours in the same manner
Press and hold MODE to complete the setting.
Stop watch
Enter stop watch mode (CHR) by pressing MODE.
Press ST
T
press LAP/RESET to reset it.
Resetting the stop watch will cause all lap times to be deleted.
T
and the stop watch will continue running internally
T
on the display (TTL). Press ST
Press and hold MODE to exit the lap time display mode.
Press and hold LAP/RESET to reset the stop watch and all lap times.
Deleting data records
Press MODE to enter memory mode of the log book (MEM). MEM appears on the display and in the
top row there appears an R followed by the number of the data record.
The starting time appears in the middle row of the display and the start date appears in the bottom
row
Press and hold MODE to activate deletion mode (dEL). Press MODE to select the current (ONE) or
all (ALL) data records.
Press and hold ST
MODE to cancel the deletion.
A
If the ski function is activated the current data record cannot be
deleted.
Altimeter
Enter a by pressing MODE.
Press ST
altitude and graphic altitude history
The graphic altitude history shows the altitude readings of the
last 22 hours. Y
The graphic display will blink to indicate the selected time and the middle and lower row of the display
will show altitude and time of measurement.
Measurement unit of the altimeter
Press and hold ST
Measurement unit for altitude: m (metre) or ft (feet)
Measurement unit for temperature: °C (Celsius) or °F (Fahrenheit)
Absolute and relative altitude
In altimeter mode the absolute altitude (above sea level) or relative altitude (altitude compared to
previously set altitude) can be shown. T
0 at the starting point.
The altimeter function calculates your altitude above sea level by measuring the air pressure.
It can be useful to calibrate the altimeter to compensate for air pressure fluctuations. The following
options are available:
!
Setting to 0 for relative altitude
!
Setting to a known altitude for absolute altitude
!
Setting the air pressure at sea level
!
Reset to factory preset value (1013.3mb)
A
!
The altimeter cannot be calibrated while the ski function is activated.
!
Only one calibration method can be used at a time. Once a new method is selected the old settings
will be overwritten.
Press and hold MODE in altimeter mode. Select one of the setting modes:
> zero setting for relative altitude (ZERO) > absolute altitude (AL> air pressure at sea level
(SEA> reset to factory preset value (F> zero setting for relative altitude (ZERO) >
Confirm your setting by pressing ST
Zero setting for relative altitude (ZERO)
Press ST
and holding MODE.
Setting a known altitude for absolute altitude (AL
The altitude will appear on the display
(press and hold for speed setting). Press and hold MODE to confirm your setting.
Setting the air pressure at sea level (SEA
The air pressure at sea level will appear on the display
ST
your setting.
Reset to factory default
Press ST
holding MODE.
Barometer mode
Enter barometer mode b by pressing MODE.
Press ST
pressure history or air pressure and temperature or air
pressure and air pressure at sea level (SEA
The graphic air pressure history shows the air pressure
readings of the last 22 hours. Y
hours by pressing LAP/RESET
The graphic display will blink to indicate the selected time and the middle and lower row of the display
will show air pressure and time of measurement.
Measurement units of the barometer
Press and hold ST
Measurement unit for air pressure: hPa/mb (Hektopascal/Millibar) or inHG (inch of mercury)
Measurement unit for temperature: °C (Celsius) or °F (Fahrenheit)
Calibrating the barometer
The watch is shipped in calibrated condition and normally will not need to be calibrated again.
There are 2 available methods to calibrate the barometer
!
Set a known air pressure
!
Reset to factory preset
A
!
The barometer cannot be calibrated while the ski function is activated.
!
Y
!
Incorrect calibration will lead to incorrect display of the air pressure and altitude.
Press and hold MODE in barometer mode to enter calibration mode.
Press MODE to select entry of the air pressure (AIRP
your selection by pressing ST
Reset to factory defaults (F
Press ST
holding MODE.
Entering the air pressure (AIRP
The air pressure appears on the display
LAP/RESET (press and hold for speed setting).
Press and hold MODE to confirm your setting.
Compass
A
The compass should not be used in the immediate vicinity of
magnetic objects- for example other compasses.
T
exactly horizontally!
The compass feature c shows the compass direction
in the top row of the display
The middle row of the display shows the bearing in degrees.
After one minute with no key pressed the compass will enter energy saving mode (IDLE). The
compass can be reactivated by pressing ST
If there is an error during the measurement the display will show OFF CAL. Ensure that the compass
is held exactly horizontally and there are no magnetic objects nearby
compass must be recalibrated (Calibrating the compass ).
Backward bearing
Press ST
and an arrow pointing backward will appear on the display R .
Press ST
Compass lock
Press LAP/RESET while the compass is active to lock the display elements of the compass. The key
symbol K appears on the display
The lock is automatically deactivated when the compass goes into energy saving mode.
Calibrating the compass
The compass should be calibrated in the following conditions:
!
Using the compass for the first time
!
After replacing the battery
!
OFF CAL appears even though the compass is used correctly
!
After moving to a distant location
The compass can be calibrated using the rotation method or by entering the declination.
The best result can be achieved by using both methods.
Press and hold MODE in compass mode to enter calibration mode.
Press MODE to select the rotation method (CAL) or entry of the declination (DEC).
Rotation method
Press ST
begin to rotate. Hold the watch exactly horizontally and turn it slowly and steadily in the direction of
the directional display
After 2 full turns you may complete the calibration by pressing ST
Press and hold MODE to return to normal compass display
Entering the declination
The declination is usually printed on hiking maps.
Press ST
Press and hold MODE to return to the normal compass display
Battery level warning indicator
If the battery level warning indicator B appears on the display the battery of the watch should be
replaced. Insert a new battery of the type CR2032.
If possible the battery should be replaced by a watch specialist to avoid damaging the case and the
gaskets.
Please dispose of your batteries properly in containers especially set up at retailers. Batteries do not
belong in household waste.
SENSOR
MODE
ST
LAP/RESET
Disposal
This electrical appliance may not be disposed of with normal household waste. Please hand it in at
an appropriate local collection point.
Batteries
Please dispose of your batteries properly in containers especially set up at retailers. Batteries do not
belong in household waste.
Warranty
We provide a 3-year warranty for this item. The warranty period starts from the date of sale (receipt,
proof of purchase). Within this period we rectify all faults which are attributable to material and
manufacturing defects at no cost. For damage which is attributable to improper treatment, e.g.
dropping, knocking, or water damage, there is no warranty claim.
digi-tech ®, V D-65817 Eppstein
G G G
-7-
Slope setting and sensitivity setting
Slope setting
The slope angle can be set to enable a more precise calculation.
Sensitivity
The ski computer can automatically recognize when a ski run was started by detecting a significant
loss of altitude. The sensitivity of the detection can be adjusted.
Normal sensitivity (NORM)
This is the standard setting. Use one of the other settings (SLOW or F
exact enough.
High sensitivity (SLOW)
Use this setting if the automatic detection does not react to your descent or ascent speed.
Low sensitivity (F
Use this setting if the automatic detection is too sensitive.
Setting the slope angle and sensitivity
Press and hold MODE in ski mode to enter the setting mode. Press MODE briefly to enter setting
mode for the slope angle (SLOPE).
Set the angle by pressing ST
MODE.
The ascent rate sensitivity will now appear (rAtE
LAP/RESET and confirm your setting by pressing MODE.
The descent rate sensitivity will now appear (rAtE dS). Set the sensitivity by pressing ST
or LAP/RESET and confirm your setting by pressing MODE.
Press and hold MODE to save your settings.
G
-4-
Timer
Press MODE to enter timer mode (TMR).
The timer supports preset values (quick-set) and user defined values.
The preset values are used for fast and easy access to standard timer settings.
The preset values are: 3, 5, 10, 15 and 45 minutes.
The user defined time can be set to any value (max. 99hr
Press and hold MODE to set the user defined time.
The hours will blink on the display
MODE to confirm your setting.
Set the minutes and seconds in the same manner
Press and hold MODE to complete the setting.
Press LAP/RESET to select one of the preset values or the user defined value.
Press ST
In the last 10 minutes of the set time a beep will sound every minute.
In the last minute a beep will sound every 10 seconds.
In the last 5 seconds a beep will sound every second.
Upon completion of the countdown a 30 second alarm will sound.
Second time zone
Enter second time zone display (T2) by pressing MODE.
Press and hold MODE for 3 seconds.
The minutes will blink on the display
set the minutes.
Press MODE to confirm your setting and activate hour setting. Press
ST
pressing MODE.
Press and hold MODE to complete the setting.
G
-5-
Function modes of the ski computer
Enter ski computer mode from normal time mode by pressing SENSOR.
Y
follows:
> ski mode S > altimeter mode a > barometer mode b > compass c > ski
mode s >
Ski mode S
Enter ski mode S by pressing mode.
Ski mode can be activated by pressing and holding MODE.
ON will appear in the display
Press and hold ST
display
The ski mode is now activated and S appears blinking on the
display
The ski mode will stay activated even if you enter another mode
and ski data will continue to be recorded.
Y
hold ST
If ski mode is not manually stopped it will automatically deactivate after 12 hours.
T
Y
Middle row of the display
If the ski mode is activated you may select the following display modes by pressing LAP/RESET
> current descent speed (SPEED) > total elapsed time (PERIOD) > accumulated descent
(ACC.DS) > accumulated ascent (ACC.AS) > current descent speed (SPEED) >
Lower row of the display
If the ski mode is activated you can show either the time or the current number of ski-runs that you
have skied (RUN).
G
-6-
Change measurement units of ski mode
Press and hold ST
Measurement unit for distance: M (metre) or F (feet)
Measurement unit for temperature: °C (Celsius) or °F (Fahrenheit)
Measurement unit for speed: km/h (kilometres per hour) or m/h (miles per hour)
Ski log book
Upon activating the ski function the ski computer will create a data record in the log book.
Data will be added to the data record manually or automatically for each ski-run.
In automatic mode a ski-run is initiated automatically by a significant loss in altitude.
also be initiated manually
A
After the ski-run has been stopped the ski run the recorded data will be saved and the ski-run time
will be stopped.
After deactivation of the ski function the ski data with all ski-runs will be saved.
Manually starting or stopping ski-runs
Press MODE in the activated ski mode to enable the manual mode. MANUAL will appear on the
display
Press ST
ski-run.
ST
G
-8-
Ski log book memory
Enter memory mode (MEM) by pressing MODE. MEM will appear in the upper
row of the display and an R will appear next to the number of the ski data
record.
The middle row of the display shows the start time and the lower row shows
the start date.
Select a data record by pressing LAP/RESET
Press ST
data record.
>choice of data record > total time (PERIOD) > descent time (DS.TIME) > accumulated
descent (ACC.DS) > accumulated ascent (ACC.AS) > maximum speed (MAX.DS) > maximum
altitude (HI.AL> minimum altitude (LO.AL> slope angle (SLOPE) > choice of data record
>
A
The slope angle can be changed after the data record was saved. Press and hold MODE in the
display for slope angle. Set the angle by pressing ST
MODE to save your setting. Y
Selecting a ski run
Press and hold MODE in any sub display of the data record (except slope angle (SLOPE) or the
display for choice of data record) to enter ski run selection mode. Choose a ski run by pressing
LAP/RESET
After choosing the ski run the different types of information for the ski run can be selected by pressing
ST
>start time (ST> descent time (DS.TIME) > maximum speed (MAX.DS) > average speed
(A> maximum altitude (HI.AL> minimum altitude (LO.AL> altitude change ( dAL
> altitude graph (ALtI) > start time (ST>
When the start time (ST
press MODE to return to the normal data record display
G
G G G G
G G G G