RESETTING TEMPERA
Select the TEMPERA
Press and hold the MEM button for 3 seconds to clear all max/min memories.
COMFORT LEVEL
The main unit is capable of detecting and displaying the current indoor comfort levels of
the room climate. The comfort level is based on the combination of the current indoor
temperature and humidity reading. The following comfort levels may be displayed:
COMFORT (comfortable); WET (wet) and DR (dry)
Indicator
displayed
COM
WET
DRY
T
Range
Humidity
Range
Shows current
condition
20°C to 25°C
(68°F to 77°F)
40%RH-
70%RH
Ideal relative humidity
and temperature
-5°C to 50°C
(23°F to122°F)
OVER
70%RH
Contains excess
moisture
5°C to 50°C
(23°F to122°F)
BELOW
40%RH
Contains inadequate
moisture
Note: If there is no comfort indication, this means that it is not wet and not dry
the temperature is higher
4.3 CLOCK WINDOW
For all operations described in Chapter 4.5, press UP▲) or DOWN (▼ ) until the
TIME icon, in the left corner of the time window
4.3.1 TIME FUNCTION
The radio controlled time signal (DCF 77) is transmitted from the central atomic clock in
Frankfurt/Main. It has a reception range of approx. 1500 km. If the tower icon is not fully
lit, or if the time and date are not set automatically
During night-time hours, atmospheric disturbances are typically less severe and radio
signal reception may improve.
clock accuracy within 1 second.
Make sure the unit is positioned at least 2 meters (8 feet) distance from any interference
source such as a TV
W
signal may be weakened. In such a case, place the main unit near the window for better
reception. Sometimes it also helps to turn the unit by 90°
NOTE: In any of below described settings, the unit will automatically exit any
programming mode if it does not detect a button press for about 2 minutes.
made before this will not be taken over by the unit. Therefore, as long you are in a setting
and you have made changes, close the setting mode as described in below chapters.
HOW T
1.
(DCF77 from Germany). It takes about 3-10 minutes to finish this process.
2. If you wish to disable the auto-reception feature, hold UP▲) for 3 seconds to disable
it. Having done that, the tower icon will disappear
3. TUP▲) for 3 seconds again to start the
reception and the regular synchronization (daily at 0:00, 3:00, 6:00 and 12:00).
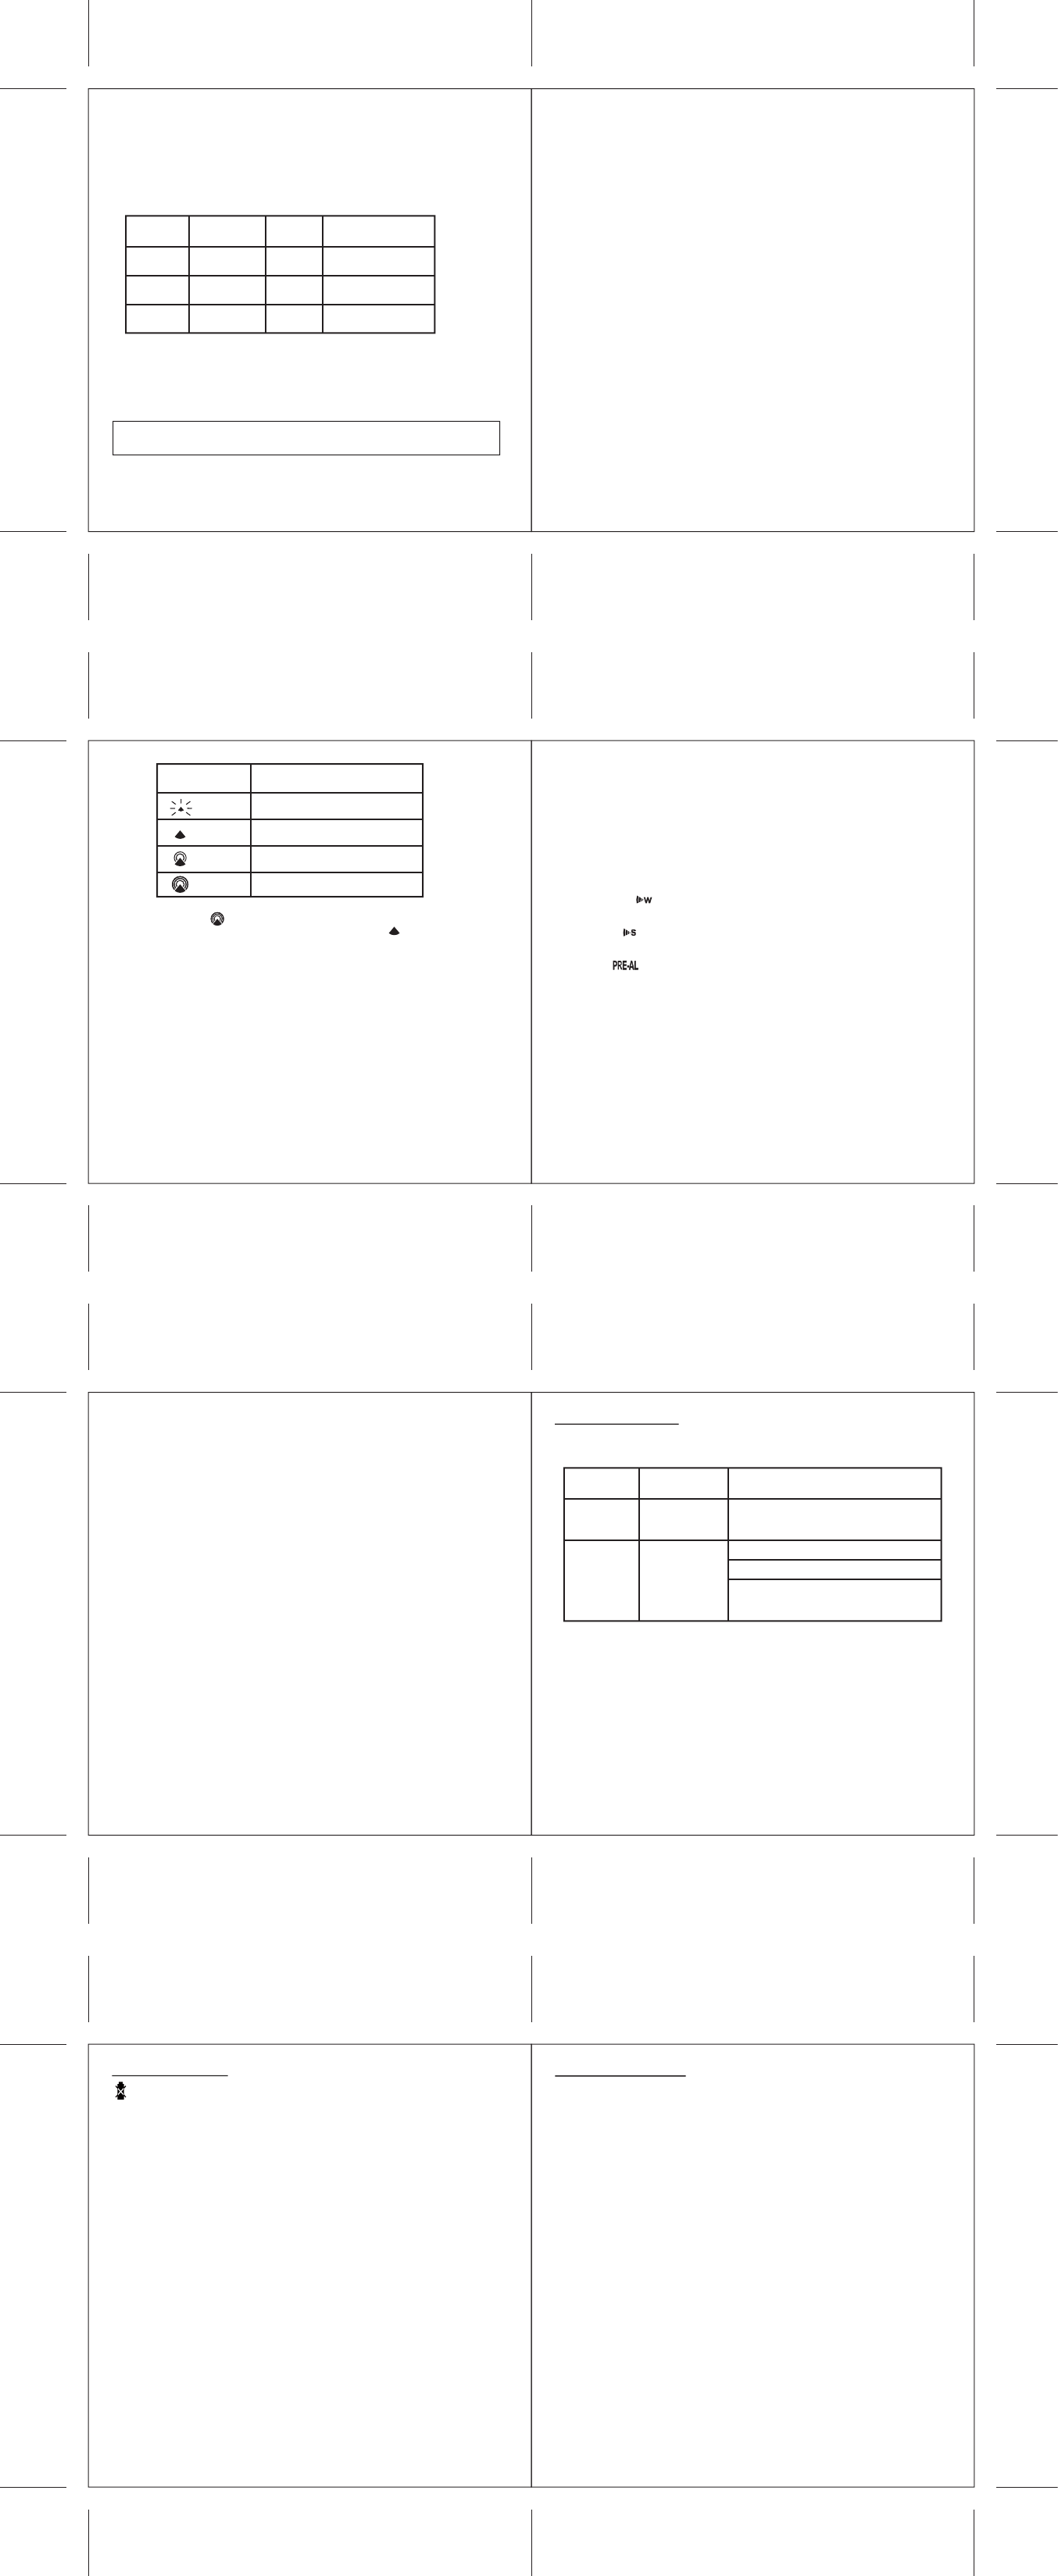
ICON Time Signal Reception Str
Undefined data(Flashing)
No Reception for the past 24 hours
W
Strong signal
4. If the radio signal is received, the date & time will be set automatically and the radio
control signal icon [ ] turns on.
5. If the clock fails to receive the time signal, it will show the [ ] icon. If the time is not
correct, you may set the time manually
HOW T
Tnot the ZONE) and then
press and hold MODE.
Now it will show the language.
French (Fr), Italian (IT), Spanish (SP), Dutch (Du) and Swedish (SW). Press UP▲) or
DOWN (▼ ) to change it.
Press MODE to confirm. Repeat the same procedure to set the year
day-month format, 12/24 hour format, hour and minute. During the setting, press and hold
will change the value rapidly
If there is an item you do not wish to change, simply press MODE to bypass the item.
After the last setting, pressing MODE will exit the setting mode and return to the clock
mode.
HOW T
TZONE icon. Then
press and hold MODE .
Press UP▲) or DOWN ( ▼) to adjust value in steps of 30 min. Press and hold either
button for fast advance. Press MODE to confirm your selection.
SELECT THE CLOCK/CALENDAR DISPLA
Each time you press MODE , you may rotate from one of the following dispalys to the
next:
- Hour: Minute: Second
- Hour: Minute: W
- Hour: Minute: W
- Hour: Minute: Second of the T
- Day: Month
4.3.2 W
There are three time alarms available on the main unit:
* W
The alarm sound will be activated and the icon will flash on weekdays (Mo-Fr) when it
is armed and the alarm time is reached.
* Single
The alarm sound will be activated and the icon will flash when it is armed and the alarm
time is reached. Once it finished, it will be disabled automatically
* Pre-Alarm
The pre-alarm will be activated and the icon will flash if the temperature of channel 1 is
falling to +0 ºC or below
It is programmable 15, 30, 45, 60 or 90 minutes earlier than the weekday alarm or single
alarm time.
ACTIV
1. Press ALARM to rotate between:
- W
- Single
- Pre-Alarm T
2. When the above alarms are displayed, pressing UP▲) will activate, pressing
DOWN (▼ ) will deactivate the corresponding alarm.
Note: Press MODE anytime during above alarm selection mode to return to normal clock
display
SETTING THE TIME
1. Press ALARM to select the alarm which you wish to configure.
2. Press and hold ALARM/ until hour starts flashing in the display
3. Set
Press UP▲) or DOWN ( ▼) to adjust. Press and hold either button for fast changes.
Press ALARM to confirm your selection.
4. Set
Press UP▲) or DOWN ( ▼) to adjust. Press and hold either button for fast changes.
Press ALARM to confirm your selection
5. Upon completion the display will be returned to the alarm selection screen.
Note: Pre-alarm cannot be activated if weekday alarm or single alarm is not enabled.
STOP
The alarm will sound for 2 minutes with increasing intensity
TALARM during the
Note: For weekday alarm, pressing ALARM will only disable the alarm for the current
day
If the
minutes for 3 times.
Issue
Main unit
Radio Controlled
Time signal is not
received
Cannot locate
remote sensor
Place unit by the window and keep it there
overnight
Check batteries
Check location
Press and hold DOWN ( ▼ ) button on the
main unit to search for the signal form the
remote sensor
Remote sensor
Symptom Solution
6. BA
: BA
The batteries last for around 8-12 months. Depending on the usage of the unit and the
batteries used, this time can be slightly shorter or longer
and unpleasant interruption to operations, a battery symbol may appear
- in the temperature window with the corresponding channel.
This means that batteries of the displayed sensor are becoming weak and need to be
replaced.
- in the time window
This means that batteries of the main unit are becoming weak and need to be replaced.
T
Important:
- Insert batteries in the correct polarity
- Use only new batteries and never mix old and new batteries.
Please also remember that used batteries should not be thrown in the household rubbish
bin but handed in at the designated collection points. The environment will thank you for
it!
7. CARE INSTRUCTIONS
- Do not expose the device to extreme temperatures or direct sunlight over longer periods.
-
- For cleaning use a dry soft cloth that you have moistened with water and a mild cleaning
agent. Never use volatile substances such as benzene, thinner
cans etc.
- When the device is not being used store it in a dry area and out of the reach of small
children.
- If the device is activated under extreme coldness it may occur that the display becomes
illegible.
normally
- Please keep the user
carefully so that you can reference them at a later point if necessary
- Please use only new batteries and never mix old and new batteries.
- Please also remember that old batteries should not be disposed of with household waste
but should be handed in at the designated collection centres.
- Important: W
recycling fee) and in the EU (WEEE) have been paid.
5. TROUBLESHOOTING
In case of a malfunction, always check the batteries and replace them in the main unit
and in the sensor(s) with new ones.
Please also check below issues before contacting customer service.
47
49
51
53