578942
2
Zoom out
Zoom in
Vorherige Seite
1/5
Nächste Seite
LOW BATTERY WARNING
When it is time to replace batteries for the remote
sensor, the respective low-battery indicator [ ]
will show up on the indoor or outdoor temperature &
hygrometer display.
h) Weather forecast
The unit is capable of detecting atmospheric pressure
changes. Based on collected data, it can predict the
weather for the forthcoming 12 to 24 hours.
NOTE:
1. The accuracy of a general pressure-based weather
forecast is about 70%.
2. The weather forecast may not reflect the current
situation necessarily.
3. The “Sunny” icon implies clear weather at night.
˚C
The unit is in searching mode.
No signals.
Temperature readings are
securely registered.
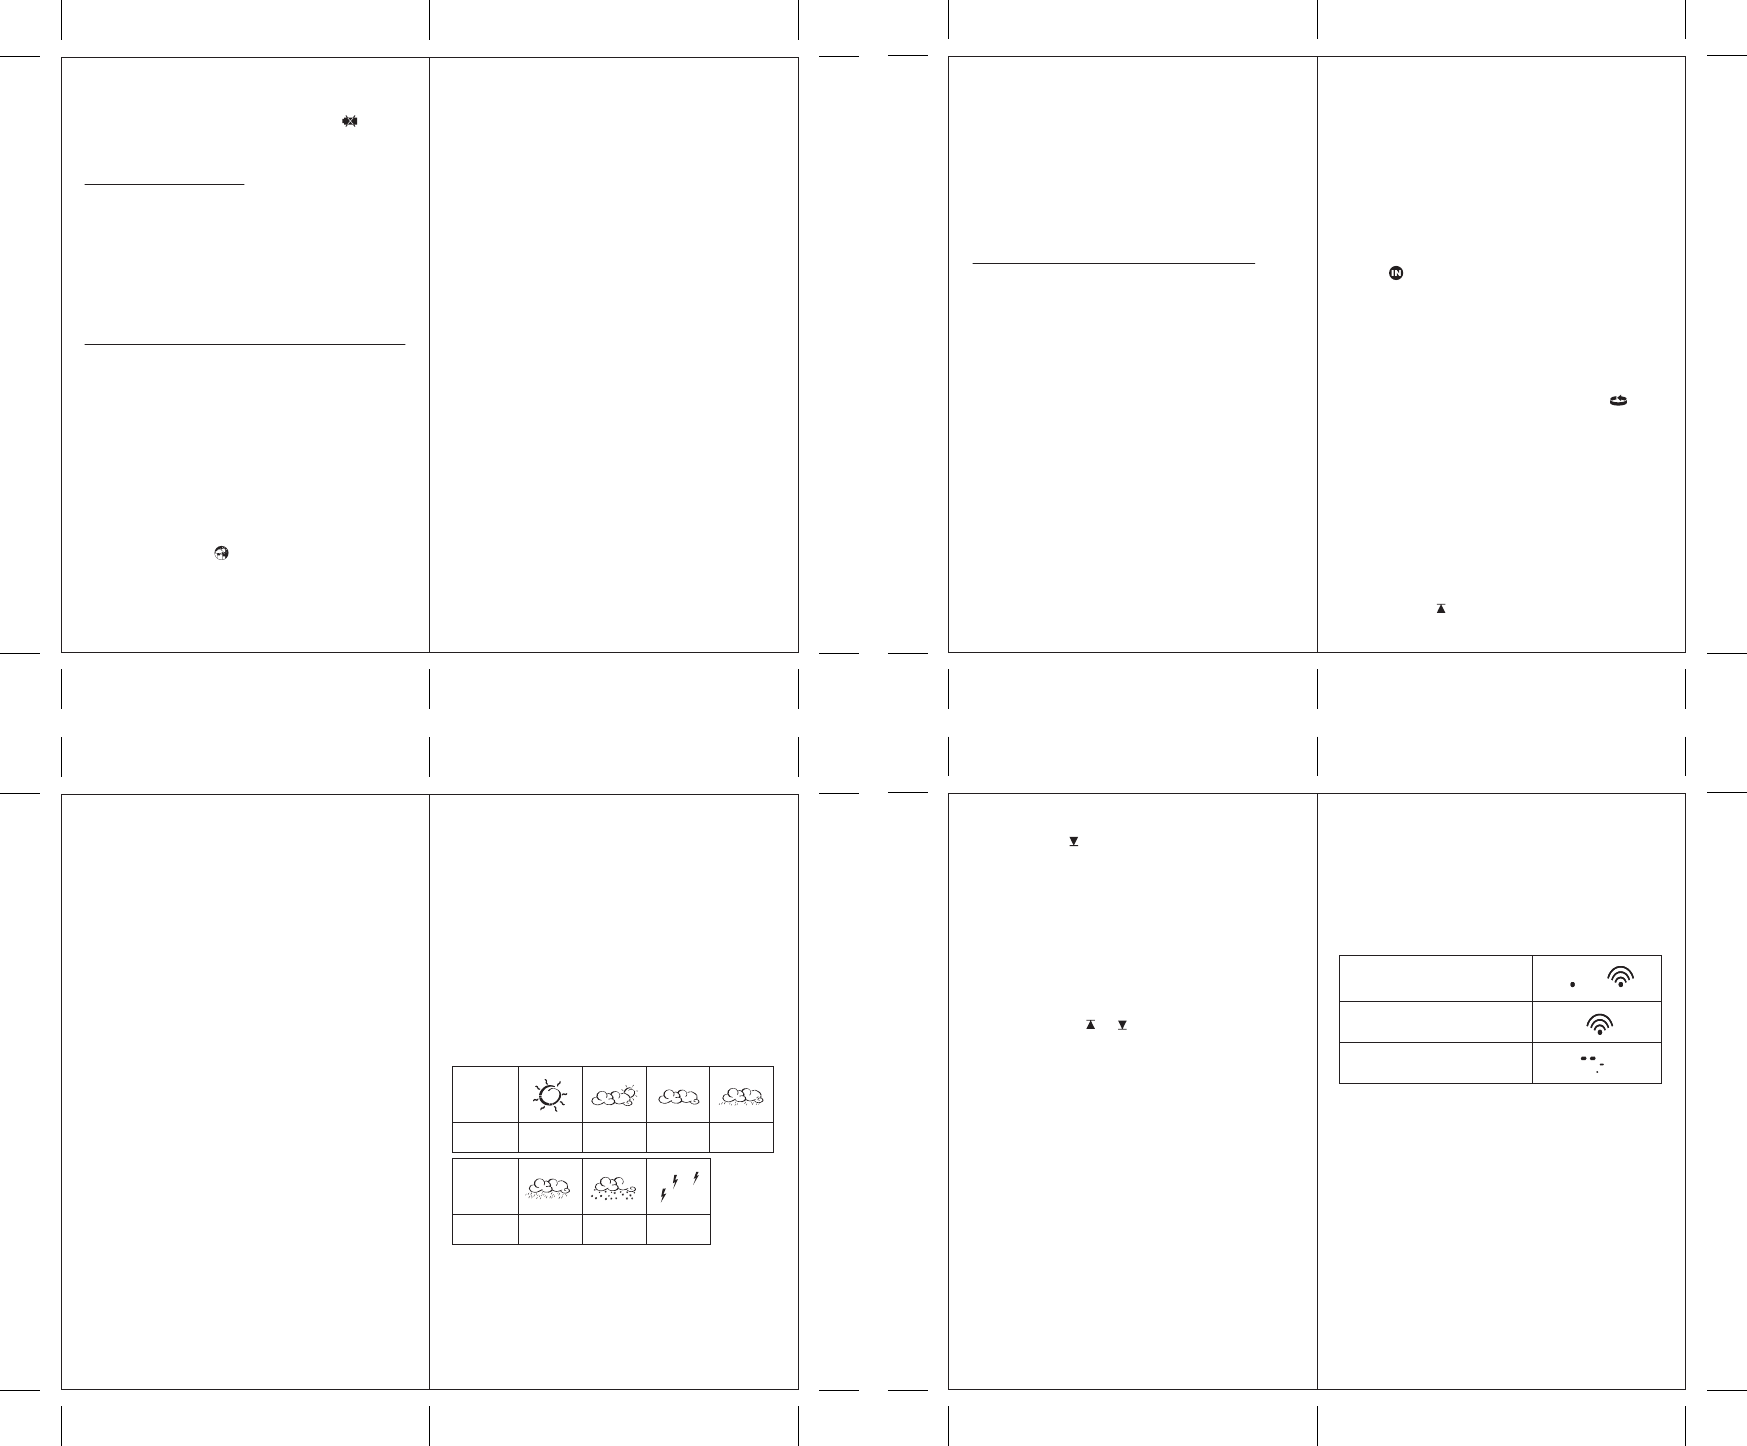
Storm
Forecast
Sunny
Heavy
Rainy
Slightly
Cloudy
Cloudy
Little
Rainy
Symbol
of Display
Symbol
of Display
Forecast
Heavy
Snowy
3. USING YOUR HBR657
(NAVIGATING BETWEEN DIFFERENT MODES)
There are 6 sections available on the main console unit,
and each one displays a different information.
When the display is in one of the 4 modes which can be
operated, its corresponding icon will start flashing. To
navigate between these 4 modes, press “+” or “-” to
cycle through them.
The Heat index section is a fixed mode. It cannot be
navigated into this section.
4. PRESSURE AND WEATHER FORECAST MODE
Important: All operations described in here are to be
made in the Weather mode
This part of the display indicates the current pressure,
sea level pressure, weather forecast and pressure trend.
A number of historical statistics can also be viewed,
such as the sea-level pressure values for the last 24
hours, as well as a pressure/ temperature/ humidity
history bar-chart.
Pressure values may be displayed inHg, hPa/mBar or
mmHg, and altitude values may be displayed in meters
or feet.
a) Accessing Pressure and Weather Forecast Mode
From the main console unit: Press “+” or “-” until the
weather forecast icon on the upper left of the
display starts flashing.
b) Setting Pressure Parameters during Initial Start-Up
During the initial start-up of the main console unit, all
functions in Pressure and Weather Forecast mode will
be locked until the pressure settings are configured.
1. Choose Pressure Units:
The icon “hPa/mBar” starts flashing. Press “+” or “-”
to select pressure unit as inHg, hPa/mBar or mmHg
Press SET to confirm your selection.
2. Choose Altitude Units:
Press “+” or “-” to select altitude unit as feet or meters.
Press SET to confirm your selection.
3. Set Altitude:
Press “+” or “-” to adjust value. Press and hold
either button for fast advance. Press SET to confirm
your selection.
4. Upon completion the display will be returned to
Pressure and Weather Forecast Mode.
e) Setting the Pressure and Altitude Units
1. In Pressure and Weather Forecast Mode, press SET
until local pressure is displayed.
2. Press and hold MEM. The pressure unit starts
flashing.
3. Set Local Pressure Units: Press “+” or “-” to adjust.
Press MEM to confirm your selection.
4. In Pressure and Weather Forecast Mode, press SET
until Sea-Level Pressure is displayed.
5. Press and hold MEM. The pressure unit starts
flashing.
6. Set Sea-Level Pressure Units: Press “+” or “-” to
adjust. Press MEM to confirm your selection.
7. In Pressure and Weather Forecast Mode, press SET
until the set altitude is displayed.
8. Press and hold MEM. The altitude unit starts
flashing.
9. Set Altitude Units: Press “+” or “-” to adjust (feet
or meter). Press MEM to confirm your selection.
"Storm" is meaning a dramatic pressure drop with the
potential of a storm. An acoustic warning for this
situation can be activated or deactivated in the
following way:
Press ALARM/CHART in Pressure and Weather
Forecast Mode. Then press ALARM/CHART to turn
ON or OFF the storm alert function. It will return to
pressure display automatically after 5s.
Weather Alarm
The weather alarm sound will be activated when it is
change to heavy rainy, heavy snow and storm.
- Lower Temperature Alert (displays OFF if
deactivated): icon displayed
When the above alerts are displayed, pressing “+” or
“-” will activate/deactivate the corresponding alert.
Temperature Alarm
The temperature alarm will sound when the temperature
is out of the pre-set range.
h) Resetting the Max/Min Channel Temperature
and Humidity Memory
In Temperature and Humidity Mode, press and hold
MEM 3-4 seconds to clear memory for all channels
(there will be no key sound to confirm)
i) Main Unit and Remote Sensor Status
The kinetic wave display shows the signal receiving
status of the main unit. There are three possible forms:
j) Activating Main Console Unit to Search for
All Remote Sensor Signals
The main console unit may be manually activated to
search for signals from all remote sensors.
Press and hold “-” to start a search.
k) Disconnected Signals
If without obvious reasons the display of the outdoor
temperature goes blank. Hold “-” for 2 seconds to start
an immediate search. If that fails, check:
1. The remote unit is still in place.
2. The batteries of both the remote unit and main unit.
Replace as necessary.
Note: When the temperature falls below freezing point,
the batteries of outdoor units will get cold too and
subsequently lowering their voltage supply and the
effective transmission range.
e) Setting up the Temperature Alerts
1. In Temperature and Humidity Mode, press
ALARM/CHART to select the alarm which you
wish to configure.
2. Press and hold ALARM/CHART until channel
temperature and or icon starts flashing in
the display.
3. Set Value for Temperature Alert:
Press “+”or “-” to adjust value. Press and hold either
button for fast advance.
Press ALARM/CHART to confirm your selection.
4. Upon completion the display will be returned to
the temperature alert selection screen.
f) Interrupt a triggered alarm
To Disable Temperature Alarm(s):
Press ALARM/CHART to disable the alarm (s).
g) Viewing the Max/Min Channel Temperature and
Humidity
In Temperature and Humidity Mode, each press of
MEM rotates the selected temperature and humidity
(IN, CH1-5) between:
- Current temperature and humidity
- Minimum temperature and humidity
- Maximum temperature and humidity
A temperature alert function is available for each
channel. It can be programmed to sound if the channel
temperature exceeds or falls below the pre-configured
upper and lower limits.
Note: The temperature alerts have a 0.5 ºC hysteresis to
prevent the alerts from sounding constantly due to small
fluctuations near the alert value. This means that after
the temperature reaches the alert value, it will have to
fall below the alert value plus the hysteresis to
deactivate the active alert.
a) Accessing Temperature and Humidity Mode
From the main console unit: Press “+” or “-” until the
IN icon starts flashing.
b) Viewing Temperature and Humidity Display for
each Channel
For Static Display:
In Temperature and Humidity Mode, each press of
CHANNEL rotates display between different channels.
For Cycling Display:
To enable automatic rotating between different channel
displays, press and hold CHANNEL, until the icon
is displayed. Each valid channel will now be displayed
for 5s.
c) Setting Units for Temperature Display (ºC or ºF)
In Temperature and Humidity Mode, press and hold
SET to convert units between degrees Celsius ºC and
degrees Fahrenheit ºF.
d) Activating/Deactivating the Temperature Alertsl
1. In Temperature and Humidity Mode, each press of
ALARM/CHART rotates channel temperature
display between:
- Current Temperature for corresponding channel
- Upper Temperature Alert (displays OFF if
deactivated): icon displayed
5. TEMPERATURE AND HUMIDITY MODE
Important: All operations described in here are to be
made in the Temperature/Humidity mode.
The weather station supports up to 3 remote
thermo-hygro sensors, each sensor corresponding to a
separate channel for the temperature and relative
humidity display. The temperature may be shown in
degrees Celsius ºC or degrees Fahrenheit ºF. The trend
(rising, steady or falling) of the values is also indicated
on the display.
The main console unit uses the indoor temperature and
humidity data to compute a comfort level rating of Wet,
Comfort or Dry.
f) Viewing the Sea Level Pressure History
1. Pressing HISTORY will activate the sea level
pressure display.
2. When sea level pressure is displayed, press
HISTORY repeatedly to view sea level pressure
data for each of the last 24 hours.
3. If no buttons are pressed for 5s, the display
automatically returns to Pressure and Weather
Forecast Mode.
g) Viewing the Pressure/ Temperature/ Humidity
Bar-Charts
The bar-chart on the display can be configured to
display the history data for sea-level pressure,
temperature or humidity for channel 1.
In Pressure and Weather Forecast Mode, press and hold
ALARM/CHART, to toggle the bar-chart between:
- Sea-level pressure (“PRESSURE” will be displayed)
- Temperature (Thermometer icon and “CH1” will
be displayed)
- Humidity (RH icon and “CH1” will be displayed)
c) Viewing Pressure and Altitude Data
In Pressure and Weather Forecast Mode, each press of
SET rotates display between:
- Sea level pressure
- Local pressure
- Local altitude
d) Setting the Sea Level Pressure or the local altitude
1. In Pressure and Weather Forecast Mode, press SET
until the sea level pressure is displayed.
2. Press and hold SET. The Sea Level Pressure display
starts flashing.
3. Set Sea Level Pressure:
Press “+” or “-” to adjust. Press and hold either
button for fast advance.
Press SET to confirm your selection.
4. Upon completion the display will be returned to
Pressure and Weather Forecast Mode.
The same procedure can be done to set the altitude.
Instead of selecting the sea level, select the altitude display.
Please note: Any setting made in either mode will adjust
automatically the other one!
109
1211
1413
1615
2

Brauchen Sie Hilfe? Stellen Sie Ihre Frage.

Forenregeln

Missbrauch melden von Frage und/oder Antwort

Libble nimmt den Missbrauch seiner Dienste sehr ernst. Wir setzen uns dafür ein, derartige Missbrauchsfälle gemäß den Gesetzen Ihres Heimatlandes zu behandeln. Wenn Sie eine Meldung übermitteln, überprüfen wir Ihre Informationen und ergreifen entsprechende Maßnahmen. Wir melden uns nur dann wieder bei Ihnen, wenn wir weitere Einzelheiten wissen müssen oder weitere Informationen für Sie haben.

Art des Missbrauchs:

Zum Beispiel antisemitische Inhalte, rassistische Inhalte oder Material, das zu einer Gewalttat führen könnte.

Beispielsweise eine Kreditkartennummer, persönliche Identifikationsnummer oder unveröffentlichte Privatadresse. Beachten Sie, dass E-Mail-Adressen und der vollständige Name nicht als private Informationen angesehen werden.

Forenregeln

Um zu sinnvolle Fragen zu kommen halten Sie sich bitte an folgende Spielregeln:

Neu registrieren

Registrieren auf E - Mails für Irox HBR653 wenn:


Sie erhalten eine E-Mail, um sich für eine oder beide Optionen anzumelden.


Andere Handbücher von Irox HBR653

Irox HBR653 Bedienungsanleitung - Deutsch - 3 seiten


Das Handbuch wird per E-Mail gesendet. Überprüfen Sie ihre E-Mail.

Wenn Sie innerhalb von 15 Minuten keine E-Mail mit dem Handbuch erhalten haben, kann es sein, dass Sie eine falsche E-Mail-Adresse eingegeben haben oder dass Ihr ISP eine maximale Größe eingestellt hat, um E-Mails zu erhalten, die kleiner als die Größe des Handbuchs sind.

Ihre Frage wurde zu diesem Forum hinzugefügt

Möchten Sie eine E-Mail erhalten, wenn neue Antworten und Fragen veröffentlicht werden? Geben Sie bitte Ihre Email-Adresse ein.


Info